Build a Webhook Notification System in PHP with Lumen and Twilio SMS
Time to read:
October 08, 2019
Written by

Webhooks are generally automated calls made from one application to another, triggered whenever a specific event occurs. Each webhook transfers a payload to the receiving application. For example, Twilio uses webhooks to let you know whenever certain events occur such as an incoming SMS message or a phone call.
A really good use case is when you'd like to be alerted via SMS when different events occur on any third party services integrated with your application. As long as they provide webhooks, we can build a notification system around that.
In this tutorial, we’ll be using Lumen, a fast micro-framework by Laravel and Twilio to create a reusable notification system for any kind of webhook.
Technical Requirements
To follow along, you’ll need the following:
- PHP version 7.1 or Higher
- Lumen 6.0
- Composer
- Twilio Account
- Ngrok
- Postman
Setting up Lumen
There are different ways to set up a new Lumen project. You can do so via the Lumen installer or by using Composer. For the sake of this tutorial, we’ll be using Composer.
Run the following command on your terminal:
This will set up a new Lumen project for you in the twilio-webhook directory.
Creating the Model and Migration
Our application is going to have just a single Model called Webhook. Before we create the Model, let’s create the migration to generate the relative database tables.
This will create a new migration file for us in the database/migrations directory at [TODAYSDATE]_create_webhooks_table.php. Next, edit the file with the following code:
The webhooks table will have the following attributes:
- identifier - A unique random string that will be automatically generated once a webhook has been created.
- title - The title of the webook.
- notification_message - The content of the notification we want sent out whenever a request is made to our unique URL.
Head over to the app directory, create a Webhook.php file and edit the file with the following code:
In our Webhook model, we’ve set our guarded property to be an empty array which means all the model attributes are mass assignable. In the boot() method, we plugged into the creating lifecycle hook of the model to automatically set the identifier attribute to a random string. This comes in handy for us as we don’t always have to define the value of the identifier when creating a Webhook.
Next, update your .env file with your database credentials and then execute the following command to run our migration:
Setting up Twilio
Let’s set up Twilio in our project. From your terminal, run the following command to install the Twilio PHP SDK library.
Head over to your Twilio Dashboard and take note of your Account SID, Auth Token and Virtual Number from which the SMS will be sent from. Next, edit the .env file with the credentials we just noted:
Head over to the app directory and create a Twilio.php file. This class will simply serve as a wrapper for us around the Twilio library we just installed. Add the following code to the file:
In the constructor, we initialized the Twilio credentials we added to our .env file earlier. We also created a new Twilio Rest Client and assigned it to the $client property of our class.
The notify() method will handle sending outbound SMS notifications using the Twilio API. It accepts two $arguments, the phone number that we’ll be sending the notification to and the notification itself.
Creating an API Endpoint Route
Our application will have two routes; one for creating the notification message, and the other for receiving incoming webhooks which will in turn trigger the SMS notification message itself. Add the following code to the routes/web.php file:
Creating the Controller
In the app/Http/Controllers folder, create a WebhookController.php file and edit the file with the following code:
Let’s go over what’s happening here. The store() method is responsible for creating a new webhook notification. We validate the incoming request to ensure the title and notification_message fields are present. Next, we create the webhook and then return a json response containing the unique URL where requests will be made to so we can receive notifications.
The dispatchNotification() method handles sending the SMS notification. Using Eloquent’s firstOrFail() method, we’ll retrieve the webhook associated with that identifier. If no webhook is found, a 404 error will be thrown. The notify() method is called on the Twilio class we created earlier by passing in the phone number that should receive the SMS, and notification messages associated with the retrieved webhook model.
Note: Make sure that you uncomment $app->withEloquent() in bootstrap/app.php in order to use the Eloquent ORM.
Setting up Ngrok
To be able to test our endpoints works as expected, we’ll need to set up ngrok so that our application can be publicly accessible over the web. You can learn how to set up ngrok here.
Once you’re done setting up ngrok, run the following command:
You might need to run a different command depending on how your current development environment is set up. You should see a screen similar to the one below.
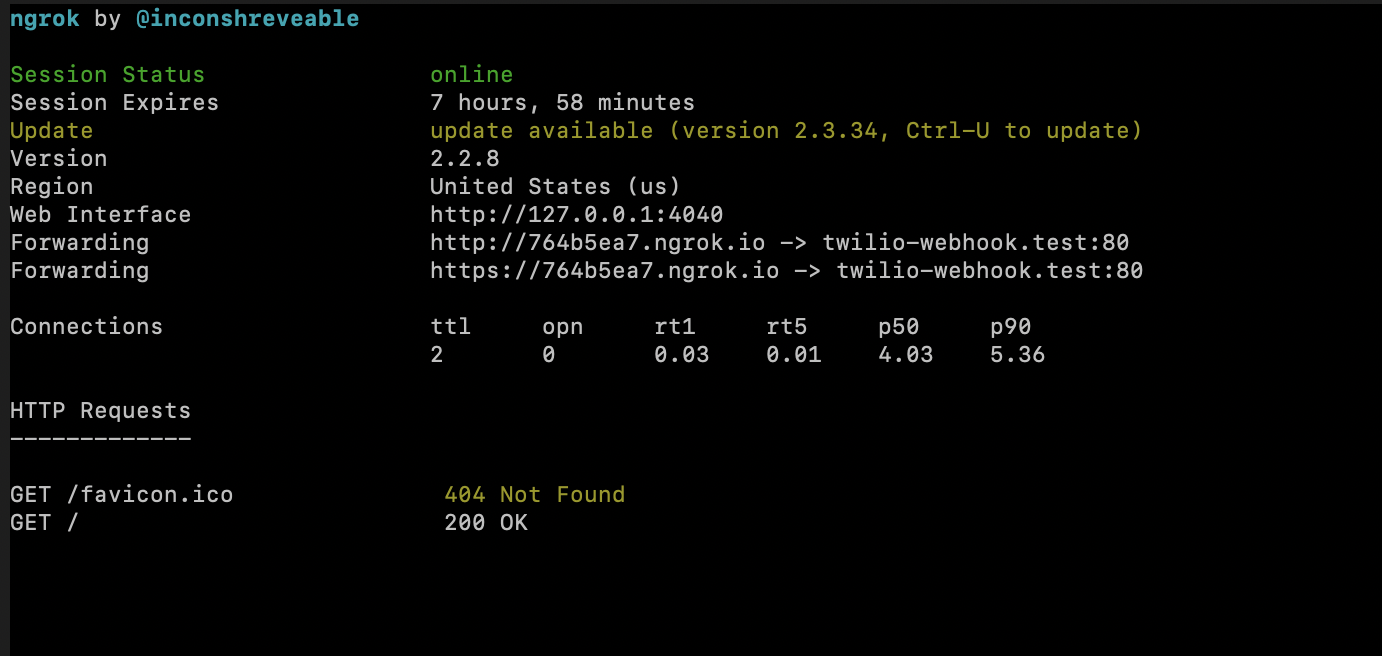
We’ll need to edit the .env file so that our application can now reference the new public-facing URL. Replace the APP_URL option in the .env file with the Forwarding URL provided by Ngrok.
Creating a Webhook Notification
For me, I make use of Flutterwave to receive payments on my website. Every time a payment has been made I want to receive an SMS notification. We’ll be making use of Postman to test our API endpoints and create a webhook notification. You can read about getting started with Postman here.
Head over to Postman and make a post request to the /webhook/store endpoint passing in the title and notification_message as part of the request body.
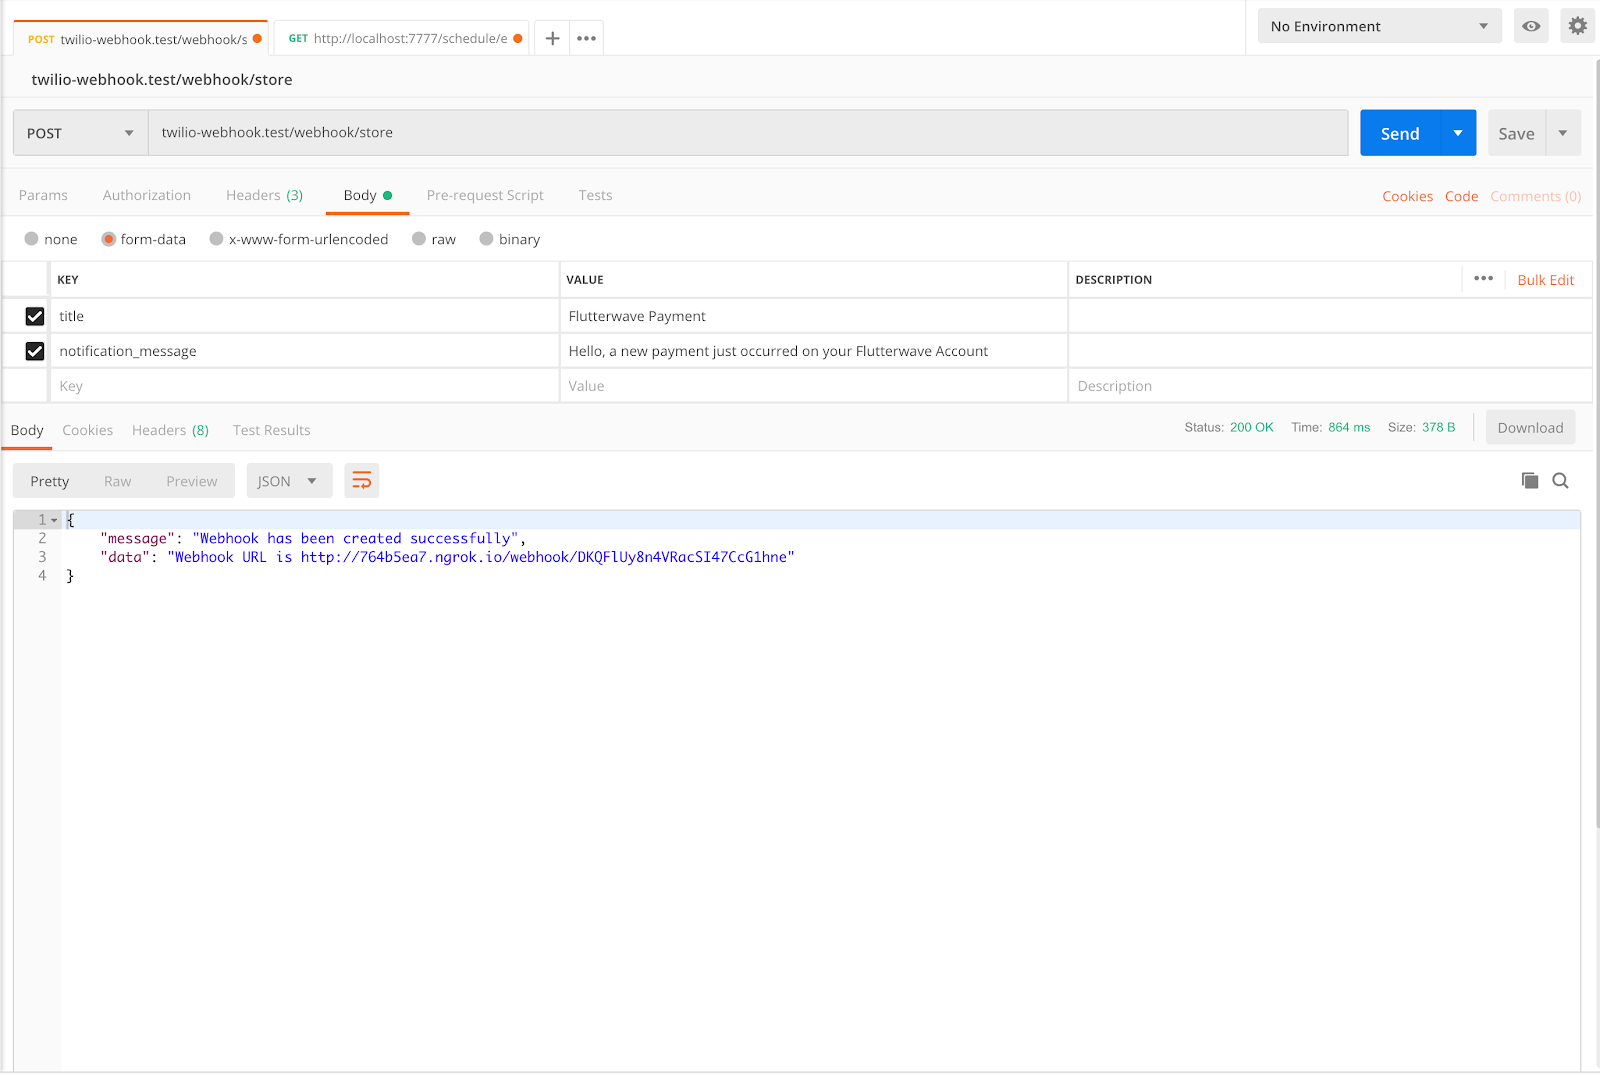
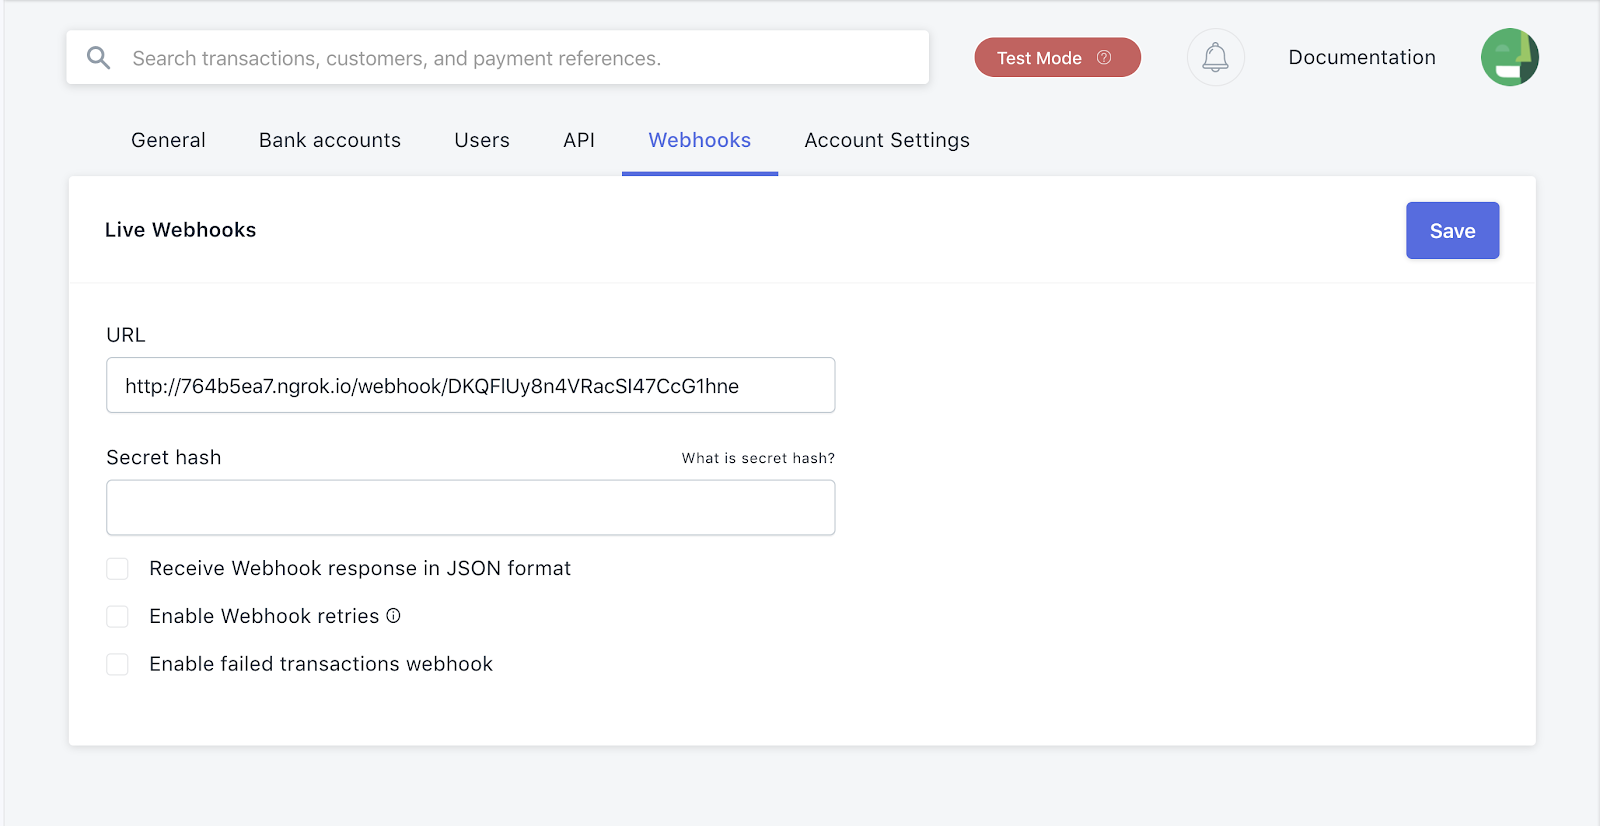
Once the request has been completed, copy the URL returned in the data key. Next, under the webhooks section in my Flutterwave account, I pasted the URL I just copied.
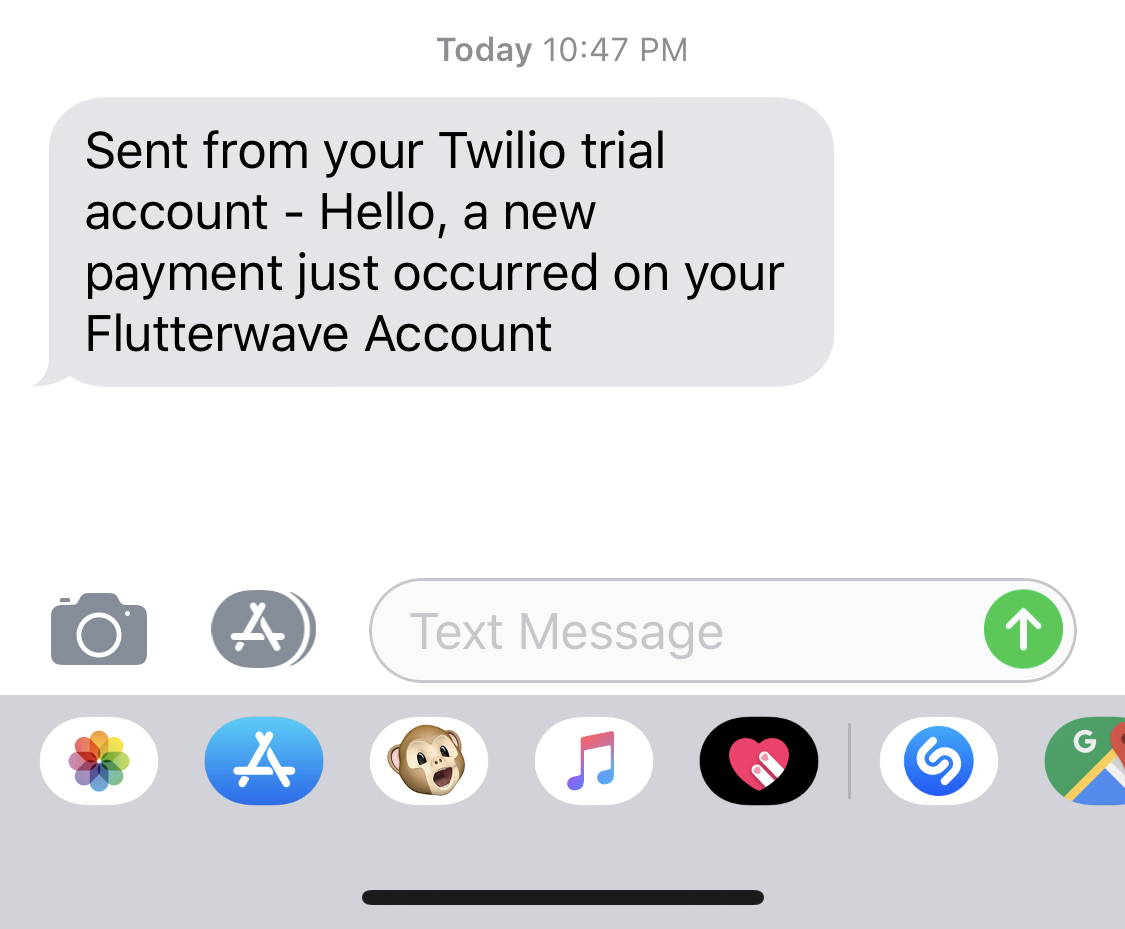
Now, every time a payment is made I receive an SMS notification.
Conclusion
In this tutorial, we’ve seen how we can build a webhook notification system using Lumen and Twilio. You can find the GitHub repo here.

Related Resources
Twilio Docs
From APIs to SDKs to sample apps
API reference documentation, SDKs, helper libraries, quickstarts, and tutorials for your language and platform.
Resource Center
The latest ebooks, industry reports, and webinars
Learn from customer engagement experts to improve your own communication.
Ahoy
Twilio's developer community hub
Best practices, code samples, and inspiration to build communications and digital engagement experiences.