Create a WhatsApp and Email Reminder System using Laravel and Inertia
Time to read:
March 04, 2024
Written by
Reviewed by
Create a WhatsApp and Email Reminder System using Laravel and Inertia
In today's fast-paced corporate environment, a robust reminder system plays a pivotal role in helping individuals manage their busy schedules. With people relying heavily on mobile applications such as WhatsApp and email services, there's a growing need for a comprehensive reminder solution that seamlessly integrates with these platforms.
This tutorial walks you through the process of building a straightforward yet powerful reminder system. This system empowers users to create appointments and set specific notification times, ensuring they stay on top of their commitments. Notifications are delivered through multiple channels, including SMS, WhatsApp, and email, catering to diverse user preferences and ensuring timely reminders.
To implement this, we'll leverage the combined strength of Laravel, Inertia.js, and Vue.js. By integrating these technologies, we'll create a smart and efficient reminder solution that enhances the user experience and addresses the demands of modern schedules. Follow the steps outlined in this guide to set up your reminder system and easily streamline your notification process.
Prerequisites
The following technologies are required to follow along effectively with this tutorial:
- PHP 8.3 or later
- Node.js and npm
- Composer installed globally
- A Twilio account. Create a free account if you don't already have one.
- A Mailtrap account
- Access to a MySQL database, whether locally, such as via Laravel Sail or through a hosted service
- Prior experience with Laravel would be ideal but is not essential
Project setup
To kickstart the development of our reminder system, the initial step involves setting up our Laravel application, and changing into the new project directory afterward. You can effortlessly initialize a new Laravel project using Composer. Begin by navigating to your desired projects folder and then run the following command.
Once the project has been generated, the next step is to establish a connection between the application and our database. In your .env file, configure the connection by setting the variables below as specified.
Next, we need to serve the project using the following command:
If you now navigate to http://127.0.0.1:8080 in your browser of choice, it should look like the screenshot below.

What is Inertia.js?
Inertia.js is a contemporary JavaScript framework designed to facilitate the creation of Single-Page Applications (SPAs) within the context of server-side frameworks, notably Laravel, while preserving the advantages associated with traditional, server-rendered methodologies.
It's particularly well-suited for projects employing Laravel on the backend and Vue.js on the frontend. Inertia.js isn't its framework, and it doesn't want to take the place of the frameworks you're already using for the server or client side. Instead, it's here to work alongside them!
In the Laravel and Vue.js ecosystem, Inertia.js has gained widespread popularity and has been embraced by numerous development teams. This adoption is driven by a range of compelling reasons, including but not limited to:
Server-Driven Pages (SPA)
Inertia.js adopts the Server-Driven Pages paradigm, wherein the server takes responsibility for rendering the initial HTML content. This departure from conventional SPA approaches, where the frontend manages routing and rendering entirely, and enables the amalgamation of server-rendered and client-rendered attributes.
Reusable Laravel controllers
In the Inertia.js framework, the same Laravel controllers and views can be employed for both server-side and client-side rendering. This encourages code cleanliness and maintainability by obviating the necessity for distinct controllers for API and web routes.
No API endpoints
In contrast to traditional SPA methodologies, Inertia.js does not mandate the creation of separate API endpoints for frontend and backend functionalities. Data retrieval and manipulation are conducted through the same routes employed for server-side rendering.
Simplified routing
Inertia.js streamlines the routing process by utilizing identical Laravel routes for both server-side and client-side rendering. This simplification minimizes the need for additional configuration and enhances the comprehensibility of the application's routes.
Shared data
Facilitating the seamless data exchange between the backend and frontend, Inertia.js enables the direct transfer of data from Laravel controllers to Vue components. This eliminates the requirement for supplementary API calls.
Install Inertia in Laravel
Installing Inertia.js involves two setup steps, one on the server side and the other on the client side. Let's commence with the server-side setup, by installing the Inertia server-side adapter using the following command:
Root template
After installing the Inertia server-side adapter, the next step is to configure our root template. This template will include links to your CSS and import Inertia.js into your application. In the resources/views folder, create a new file named app.blade.php and set its contents as follows:
Add the Inertia middleware
To set up the Inertia middleware, publish the HandleInertiaRequests middleware in your application by using the provided Artisan command below.
After publishing the middleware, add the HandleInertiaRequests middleware to your app\Http\Kernel.php. Place it as the last item in your web middleware group.
Install Inertia.js on the client-side
To install Inertia.js on the client side of a Laravel project with Vue 3, first, navigate to your Laravel project directory. Then, execute the command below to install the required packages.
After the installation, you need to configure Inertia.js by updating your resource/js/app.js file. Modify its content to match the following.
Next, update your vite.config.js file as follows.
Save the changes, and then you can start using Inertia.js with Vue 3 in your Laravel project.
Update the Laravel backend
Now that the Inertia.js configuration is complete, let's move on to building the Laravel backend of the application. Begin by creating a model, controller, and migration for the reminder system using the command below.
The command above generates a corresponding controller and migration for our model in the standard directories. Now, let's create a route for our controller and modify the content of the controller. In the routes/web.php file, add the following line of code.
Update the migrations
To create our database table, open the migration file ending with create_reminders_table.php in database/migrations and insert the following code into the file's content:
Update the controller
We're making progress. In app/Http/Controllers/ReminderController.php, our next step is to validate the form input and save it to our database. Let's add the code for that:
Update the models
To enable mass-assignment of values, add the following code to the app/Models/Reminder.php model file:
We also cast our timezoneoffset value to datetime:Y-m-d, so we can save Carbon values.
Add task scheduling
To handle frequent notifications, our application must actively monitor the database for changes and send notifications to users at scheduled intervals. Laravel provides various methods for achieving this.
For this tutorial, we'll create an Artisan command. In this command, we'll monitor the database every second for new notifications that are due and notify users through SMS, WhatsApp, and Email. Let's initiate the creation of our Artisan command with the following command.
This creates app/Console/Commands/SendReminder.php, where we will write the logic for our Artisan command.
Install the Twilio PHP Helper Library
Before we proceed, Let's install the Twilio PHP Helper Library , by running the following command:
Then, following best practices and for easy access, we should add our Twilio credentials to our .env file. Include the following lines to the end of your .env file:
Now, we need our Twilio credentials to configure the Twilio helper library in our application. Log into your Twilio dashboard to retrieve your Twilio credentials. You can find your account credentials (Account SID, Auth Token, and Twilio phone number) in the account info section on your Twilio dashboard as shown in the image below. Paste them in .env in place of <<TWILIO_SID>>, <<TWILIO_TOKEN>>, and <<TWILIO_PHONE_NUMBER>>, respectively.

Then, open the WhatsApp Sandbox. Follow the instructions to activate it. Then, copy your WhatsApp number from the From field. Paste it in place of <<TWILIO_WHATSAPP_SANDBOX_NUMBER>>.

Then, return to app/Console/Commands/SendReminder.php and update the contents of the file with the following code.
To ensure our application continuously monitors the database for changes at intervals as short as one second, we cannot rely on a cron job, due to its minimum watch time limitation of one minute. Instead, we have implemented an infinite loop that runs every second, incorporating the logic of our reminder system.
The following command is used to run the Artisan command.
When the command runs, the infinite while loop runs every second. In the loop, we query the database for reminders where status is set to false (reminders that have not been attended to). If any, we check if the time set for the reminder is due, if yes, an SMS, Email, and WhatsApp message are sent to the user's phone number.
For this tutorial, we utilized Mailtrap for email testing. To receive emails, add the following Mailtrap email configuration details to your .env file.
After sending all the notifications, we update the database's status column to true, indicating that it has been attended to. The sleep command introduces a one-second delay in the execution of the command. With these steps, our backend is now ready. Let's proceed to build the front end using Vue.js.
Create the VueJS frontend
First, create a new directory named Pages in resources/js. Then, in the resources/js/Pages directory, create a file named Main.vue and update its contents as follows.
In the code, there's a form triggering the submit() method upon submission. This method sends the form's values to the Laravel backend route /reminder and clears the form content upon success. Inertia.js forms seamlessly integrate with Laravel backend form validation. Validation errors are displayed in the div below the form.
Additionally, a success flash message is displayed for successful post requests using Inertia.js, which requires one more tiny step to finish configuring the display of our flash message.
In app/Http/Middleware/HandleInertiaRequests.php file, update the share() method to match the following.
Start and test the application
Earlier in the application, we started our Laravel development server. However, we still need to run our migration and start our notification service.
Run your migration using the Artisan command below:
To start our notification service using our custom Artisan command, run:
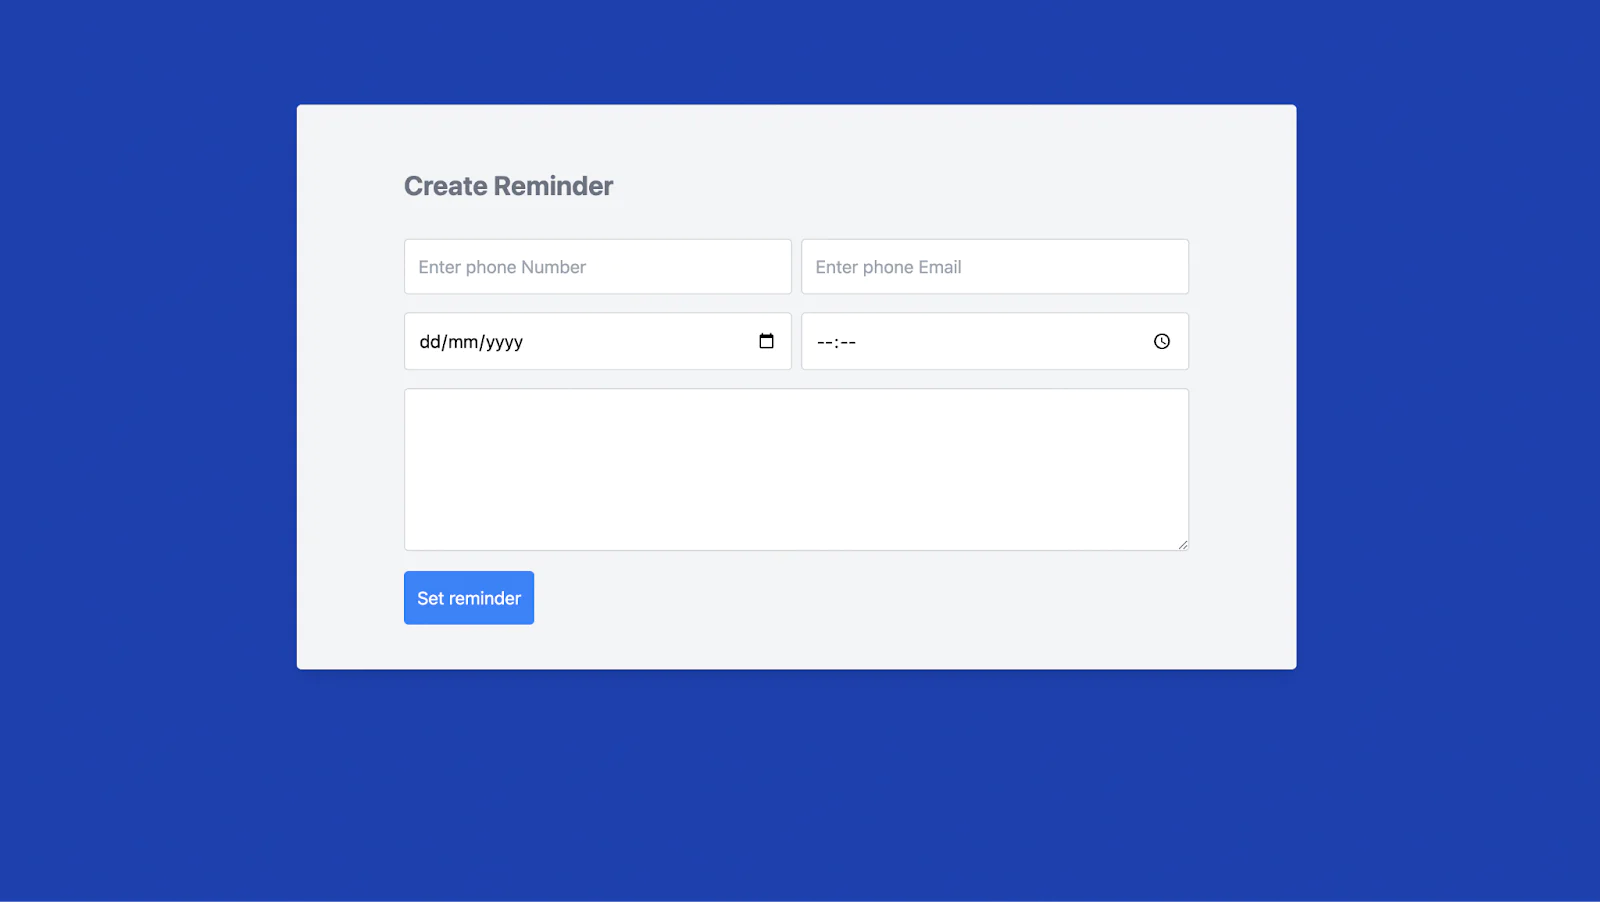
These commands will migrate the newly created tables, set up the Laravel development server, and initiate the custom Artisan command for sending reminders. Putting all the pieces together, our front end should look like the screenshot below when you open http://127.0.0.1:8000 in your browser of choice.
That's how to create a WhatsApp and email reminder system using Laravel and Inertia
This tutorial has equipped you with the essential knowledge to effectively implement a simple reminder system using Laravel, Inertial, and VueJs.
We walked through the process by
- Configured our frontend to work with Inertial.Js and Vue.Js
- We styled the application using Tailwind CSS CDN
- Creating a database for storing our reminders
- Watching the database for reminders that are due every second using an infinite loop
- Send our reminders Via SMS, Email, and WhatsApp message
We've highlighted the importance of incorporating customizable reminders into your workflow. As you embark on further exploration, we encourage you to tailor the system to your specific needs, enhancing its utility and relevance.
Moses Anumadu is a software developer and online educator who loves to write clean, maintainable code. I create technical content for technical audiences. You can find me at https://laraveldev.pro/.

Related Resources
Twilio Docs
From APIs to SDKs to sample apps
API reference documentation, SDKs, helper libraries, quickstarts, and tutorials for your language and platform.
Resource Center
The latest ebooks, industry reports, and webinars
Learn from customer engagement experts to improve your own communication.
Ahoy
Twilio's developer community hub
Best practices, code samples, and inspiration to build communications and digital engagement experiences.