Send And Receive SMS Messages via Email with Twilio and SendGrid
Time to read: 9 minutes
May 28, 2014
Written by

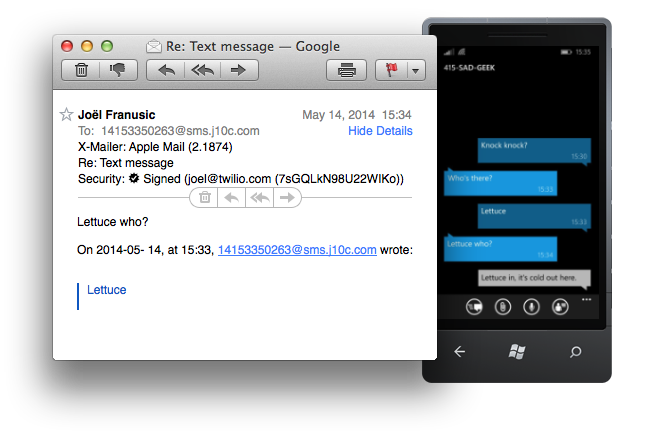
Most of us spend all day reading and writing email. What if you could also send and receive SMS messages using email? How would you do that? That’s actually a question that we get fairly frequently, so I built an example application that does just that.
In this this blog post, I will be showing you how to send and receive SMS messages via email using Python, Flask, SendGrid, and Heroku.
I will cover how to configure and connect all of those services to set up your own “SMS via email” service. If you haven’t used Twilio, SendGrid, or Heroku before, this will be a great time to learn more about how they work.
The example code in this post turns SMS messages into email messages, the first line of your replies to those email messages will be sent back the the sender via SMS. This example code also allows you to send SMS messages by sending email to a special email address.
Below is a list of what you will need to get everything working:
- A domain name configured to work with SendGrid (see the “Configure DNS for your domain” section below).
- An account with Twilio.
- An account with SendGrid.
- An account with Heroku.
- The Heroku Toolbelt installed on your system.
Here is the agenda for the rest of this blog post:
- Configuring DNS for your domain.
- A Quick Setup guide.
- How it works.
- Closing thoughts.
Configuring DNS for your domain
Before you get started, I highly suggest that you do the first part of setting up an Inbound Parse Webhook on SendGrid. Setting up the Inbound Parse Webhook involves making changes to DNS which can take a while to propagate through DNS. If you do this step first, then the changes you make will have time to go into effect while you read the rest of this post.
Here’s what you need to do:
- Pick a domain that you want your “SMS via email” messages to be sent to and from.
If you don’t have a spare domain name to use, I suggest buying one from Namecheap. (The first 20 people to use the promo code “TWILIO” will get a discount on Namecheap) - Configure DNS for that domain to have a sub-domain called “sms”. For example, if your domain is “example.com”, then configure DNS for “sms.example.com”.
If you’re using Namecheap, DNS settings can be found by clicking “All Host Records” in the “Host Management” section of your domain. - Add a MX record to the “sms” subdomain that points to: “mx.sendgrid.net”
Here is what that looks like on Namecheap:

Once you’ve set up the subdomain to point to SendGrid, then (if you’re using a mostly POSIX compliant OS like Mac OS X or Linux) you can make sure it works by opening up a terminal and typing dig MX sms.example.com (replace example.com with your domain name).
Here is what the output of that command should look like:
If you find yourself having trouble sending or receiving email via your domain, try using a tool which can check for DNS propagation, for example: cachecheck.opendns.com or whatsmydns.net
Quick Setup
If you’re already sold on the idea of sending and receiving SMS messages via email and you just want to get it working, here are the steps for you to follow to do just that:
These instructions assume that you’re using a mostly POSIX compliant operating system like Linux or Mac OS X
- Configure your domain to have a subdomain called “sms” that points to “mx.sendgrid.net”. This should already be done if you followed the “Before You Get Started” instructions above.
- Clone the sms-via-email GitHub repository to your local machine:
git clone https://github.com/jpf/sms-via-email.git - Switch to the sms-via-email directory you just cloned:
cd sms-via-email - If you haven’t already, log in to Heroku from your command line:
heroku login
(If you’re prompted for a username and password, enter in the username and password that you use for Heroku.) - Tell Heroku to create a new application for you:
heroku create - Configure your new Heroku application with your Twilio and SendGrid credentials:
Make sure you fill out your credentials after the “=” signs below!
heroku config:set SENDGRID_USERNAME=
heroku config:set SENDGRID_PASSWORD=
heroku config:set TWILIO_ACCOUNT_SID=
heroku config:set TWILIO_AUTH_TOKEN= - Configure your Heroku application with the email domain you configured above.
heroku config:set EMAIL_DOMAIN=
If the email domain you configured is “sms.example.com” then put that after the “=” sign in the command above - Deploy the code you just checked out from GitHub to Heroku:
git push heroku master - Check to see if everything is configured correctly:
heroku open - If a web browser opens and you see the text: “Congratulations, this software appears to be configured correctly.” then you’re almost done!
- Take note of the “SendGrid Inbound Parse Webhook URL” and the “Twilio Messaging Request URL” from the web browser window that just opened. You’ll be using those URLs in the next sections.
Configuring SendGrid
In order to handle incoming email, we’ll need to set up a webhook on SendGrid to “Parse Incoming Email”.
- Log in to your SendGrid account.
- Visit the “Parsing Incoming Email” page in the “Developers” section of your account. Here is what you’ll see on the “Parsing Incoming Email” page:
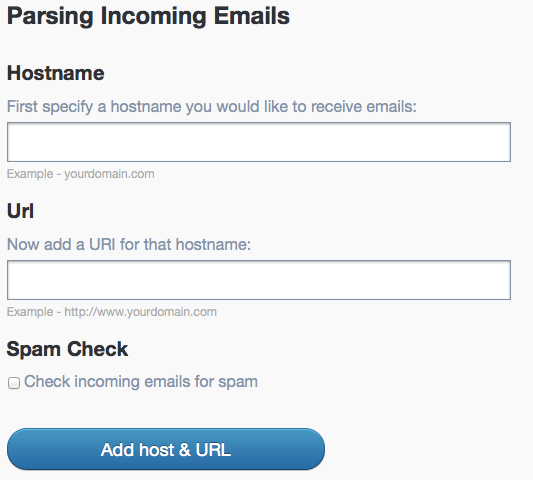
- In the “Hostname” input box, enter in the domain you set up at the beginning of these instructions. It should look something like “sms.example.com”.
- In the “Url” input box, enter in the “SendGrid Inbound Parse Webhook URL” from the web page you saw after typing heroku open on the command line.
- Click the “Add host & URL” button.
Configuring Twilio
In order to send and receive text messages we need to purchase and configure a phone number with Twilio. This is the number that you will use to send and receive SMS messages through your email account.
- Log in to your Twilio account.
- Visit the “Numbers” section of your account.
- Click on the “Buy a number” button in the “Numbers” section.
- Find a number that you like, then click the “Buy” button next to that number. Confirm your purchase by clicking “Buy this number.
- You will see a page that says “Congratulations!” “You’ve purchased …”, click the “Setup number” button on that page.
- In the “Messaging” section, enter the “Twilio Messaging Request URL” into the “Request URL” input box. You’ll find your Twilio Messaging Request URL on the web page you saw after typing heroku open on the command line.
Finally, you will need to configure the example code to send and receive email using the number you just purchased:
- Using your favorite text editor, open the “address-book.cfg” file in the sms-via-email directory. For example:
nano address-book.cfg - Change the “+14155551212” number to the number you just purchased, it needs to be in the same format of “+1xxxyyyzzzz”.
- Change the “user@example.com” email address in the file to your email address.
- Save your changes.
- Update the file in git and push your changes to Heroku:
git add address-book.cfg
git commit -m "Update address book"
git push heroku master
Try it out!
Send a message to the phone number you just purchased with Twilio. I suggest sending the word “testing” as your first message, just in case you accidentally type the wrong number into your phone! Wait a few seconds, you should receive an email in your inbox that says “testing”. When you get the email that says “testing”, reply to that email. The first line of your reply will be sent back to the SMS sender as a reply!
How it works
Thanks in large part to the power of webhooks, this example is actually fairly simple. At the core of this program are two functions: One to handle webhooks from SendGrid and another to handle webhooks from Twilio. This code is written in Python and uses the Flask microframework.
Let’s take a look at each of those two main functions. First we will look at “handle_email()”, the code that handles the webhook requests from SendGrid. I’m putting the whole function below and will then cover each part of the function individually.
Here is what each section of the code above is doing. This first line is a Python decorator which we use to tell Flask that this code is used to handle POST requests to the “/handle-email/” URL.
Next we use a “try” block to parse the email data that SendGrid has sent to us in a POST request. We’re using a “try” block so we can catch any errors that we might get while parsing the data or converting email addresses to phone numbers.
Now we create a dictionary called “sms”. The keys are specifically named so that we can just pass the sms dictionary to the TwilioRestClient “message.create()” method. We use the “email_to_phone()” and “lookup.phone_for_email()” methods to convert the email addresses in the email to their corresponding phone numbers. Note that only the first line of the email is used as the body of the SMS message.
If there was an error parsing the phone number out of the “To” email address, or if there was an error determining what phone number the SMS should be from, then we return an error message saying so. Since these types of errors will be due to misconfiguration, we use the default HTTP status code of 200 here, otherwise SendGrid will keep attempting to deliver the email.
Lastly, assuming if we didn’t get any errors parsing the email from SendGrid, we will attempt to send a SMS message using Twilio. If we get an error from Twilio, we return a message that says “Error sending message to Twilio”. Note that in this case we use an HTTP status code of 400, so that SendGrid will attempt to send the message again later as this error is likely to be transient.
The second function that we will cover in detail is “handle_sms()”, the function which handles webhook requests from Twilio. As before, I’m starting with the whole function and will then cover each section individually.
Now let’s look at each section individually. Like in the code for handling SendGrid Webhooks, the first line of this function is a Python decorator to tell Flask that this code handles HTTP POST requests made to the “/handle-sms” URL.
In the “try” block below, we take the various parameters of the SMS message we received and convert them into their appropriate email fields. The “Body” of the SMS becomes the “text” of the email we will send. Similarly, we use the “phone_to_email()” and “lookup.email_for_phone()” functions that are defined elsewhere to convert the “From” and “To” phone numbers into email addresses for the “from_email” and “to” email fields.
If there are any errors converting the phone numbers into email addresses, we return a message saying so with an HTTP status code of 400. These error messages will show up in the “Dev Tools” section of your Twilio account.
Finally, we will attempt to send the contents of the SMS message via SendGrid. If there is an error sending that email, we will return an error message with an HTTP status code of 400. Otherwise we return ‘’, which tells Twilio that the message was received and that we don’t have any further instructions for it to act on.
As you can see, the handle_email() and handle_sms() functions form the core of what makes this example work. If you want to fully understand what this script is doing, then I suggest reading through the rest of the code yourself, it’s just under 200 lines of Python and should be a quick read.
Pay special attention to the “Lookup” class, as well as the “phone_to_email” and “email_to_phone” functions. These are the functions I used above use to convert email addresses to phone numbers and vice versa.
The rest of the code in the script is for handling errors (I define several exceptions for this purpose) as well as code to check for configuration errors.
Closing
We covered a lot of ground in this blog post: Setting up a domain name to work with SendGrid’s Inbound Parse Webhook, purchasing and configuring a telephone number with Twilio, building a simple web application using Python and Flask, and then deploying that code using Heroku.
We also just covered the two functions that integrate Twilio and SendGrid, providing the core functionality of this example code.
The example code that I wrote is about 200 lines of Python and just under half of those lines of those lines are for error messages or to check that the script is configured correctly. Leaving the rest of the code to integrate SendGrid and Twilio. How are we able to do so much with so little code? Webhooks! Webhooks have been around for a while now, so you’ve mostly likely learned about them already. If you haven’t, now is a great time to read up on them. The Webhook page on Wikipedia and Jeff Lindsay’s “Web Hooks and the Programmable World of Tomorrow” presentation, are great places to learn more about webhooks.
As a reminder, all of the code for this example are on GitHub: https://github.com/jpf/sms-via-email
Speak up in the comment section if you have any questions or problems setting this up. If you were able to get everything working, then enjoy sending and receiving SMS messages via email.


Related Resources
Twilio Docs
From APIs to SDKs to sample apps
API reference documentation, SDKs, helper libraries, quickstarts, and tutorials for your language and platform.
Resource Center
The latest ebooks, industry reports, and webinars
Learn from customer engagement experts to improve your own communication.
Ahoy
Twilio's developer community hub
Best practices, code samples, and inspiration to build communications and digital engagement experiences.