Reply to SMS Messages with an ESP8266 with Amazon AWS IoT, Lambda, and API Gateway
Time to read: 10 minutes
February 23, 2017
Written by
Reviewed by

Ever wish you could send a text to your toaster? After today you'll be well on your way - we're going to show how to receive and reply to SMS or MMS messages with an Espressif ESP8266, Amazon AWS IoT, Lambda, and API Gateway. We'll also look at TwiML, Twilio's markup language, and how Webhooks work with Twilio.
Let's carry on and look at a serverless solution to receiving SMS and MMS messages on a $2 piece of silicon. (The toast part? You'll have to figure that out.)
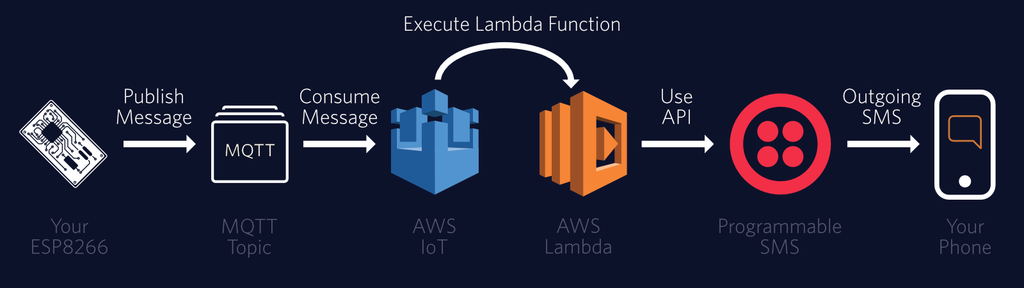
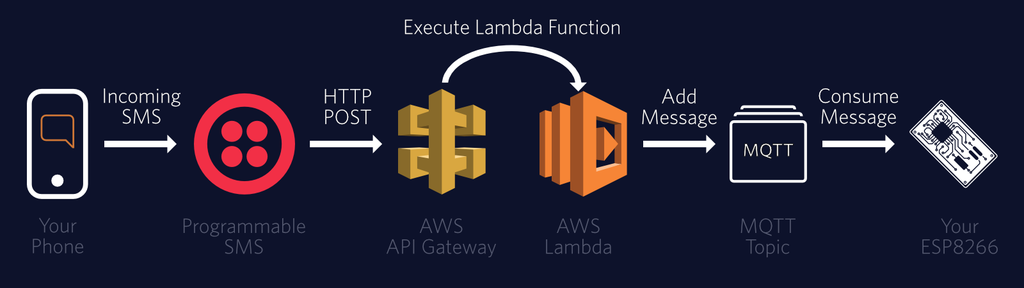
Going Serverless With Amazon AWS
This is our fourth guide exploring working with Twilio and Amazon's AWS services. On some of the integration steps, we'll point you to a previous post where we detail the setup. If you just want to skip ahead, you can clone the code behind this article from GitHub.
Here's a preview of this guide's architecture:
- An ESP8266 communicating with Amazon's AWS IoT
- Amazon's API Gateway to handle incoming Twilio Webhook requests, passing them to Lambda
- Lambda will forward legal messages to the ESP8266 on the MQTT topic 'twilio'
- Responses from the ESP8266 will use the passthrough setup we detailed in our guide on sending MMS and SMS messages from an ESP8266 via AWS IoT and Amazon Lambda
Sending Messages:
Receiving Messages:
Activating Amazon AWS IoT
In our article on sending messages with the ESP8266 and Lambda, we covered the AWS IoT setup in greater detail. If you haven't yet gone through that article, we'd highly suggest you do so first - but we'll give a summary of the steps you'll need to complete.
- Add a new ESP8266 'Thing' and 'Type' in AWS IoT
- Create a new policy allowing access to the 'twilio' topic in MQTT (we used "iot:*").
- Create a new IAM user with permission to do everything on IoT. Store the credentials to use on the ESP8266.
- From the 'Interact' tab of your created thing, retrieve the "Update to this thing shadow" MQTT topic and HTTPS Endpoint to use on the ESP8266.
Also highly suggested: keep a tab open with the Test MQTT Client subscribed to both the shadow update topic and the 'twilio' channel.
Setting Up a Mock API with Amazon API Gateway
We're going to use API Gateway to expose a route for Twilio to access. We first went over this process in our receiving and replying to SMS and MMS messages using Amazon Lambda guide.
From the API Gateway console, create a new API with the 'Create API' button. Give it a friendly name and description, then create the API. Follow that up with a new resource 'message' (at '/message'), and create a 'POST' method on message.
For now, select 'Mock' as an 'Integration type' - we'll eventually add a Lambda function, but for now this'll suffice. Leave the API as is (don't deploy it yet) and let's start carving out our Lambda functions.
Exercising the Espressif ESP8266
While you'll be able to follow our MQTT posts without hardware, to complete this guide you'll need an ESP8266. To maximize accessibility, we've targeted the Arduino IDE with this tutorial. While we can't support other setups, we'd love to hear about your successes outside.
ESP8266 Board Selection
No board yet? The Arduino on ESP8266 repository's tested board list is the best place to get started. A tested development board variant is the quickest way to get up and running on the hardware. You can always switch later when you have the MVP working.
We were using the ESP8266 Thing from Sparkfun while crafting this guide. The Sparkfun Thing overloads the DTR pin and may cause trouble with your serial monitor. We've added an option for SoftwareSerial debugging on top of HardwareSerial (or none). Set your preference at the top of the .ino file.
Setting Up the ESP8266 For Your Accounts
You'll need to edit a number of variables at the top of the .ino file before getting started. We covered exactly where to find each of the variables in our article on sending SMS or MMS messages from an ESP8266 with Lambda, but we'll briefly summarize now.
- Gather credentials for your WiFi ssid and password.
- Get an AWS key (for an IAM user with IoT permissions), AWS secret (for the same user), AWS IoT region, and the HTTPS endpoint from the 'Interact' section of the ESP8266 Thing's entry in AWS IoT.
- Change the
your_device_numberandnumber_to_textvariables to an owned Twilio number and a phone that can receive texts, respectively. Optionally changeyour_sms_messageandoptional_image_pathto change the message you'll receive at power-on.
Adding Libraries to Arduino
We're relying on a few libraries for the guide today:
- aws-mqtt-websockets from GitHub user odelot
- Arduino WebSockets from Markus Sattler
- ArduinoJSON from Benoit Blanchon.
- AWS-SDK-Arduino from Sander van de Graaf forked from AWS Labs
- Eclipse Paho Embedded Client (for MQTT)
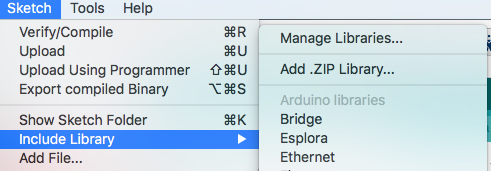
Using Arduino's Library Manager is possible for two of the libraries, but the others must be added manually. For a complete overview of library management on Arduino, see the official documentation.
Add Through Library Manager (Search)
- ArduinoJSON
- WebSockets
Add Manually to Arduino
The easiest way to get these libraries into Arduino is to install directly from the zip file once you download.
This can be done directly from the ZIP Library Installer in the Arduino IDE:
'Sketch' Menu -> 'Add .ZIP Library' -> select downloaded .zip file
Download links:
Building the Client Code and Programming the Board
If you've followed all the steps, programming the board should be as easy as setting the board and serial port of your ESP8266 in the Arduino IDE and clicking 'Upload'. If you have the Test MQTT Client open, watch for a message on the 'twilio' topic to come from your ESP8266 as soon as you turn it on.
Receiving Incoming Messages on the ESP8266
The way the code handles incoming messages is to take a pointer to a function that you define that can handle a MQTT::MessageData reference. MQTT::MessageData is a structure which contains a few things you'll need, including a reference to another struct 'Message'.
struct Message
{
    enum QoS qos;
    bool retained;
    bool dup;
    unsigned short id;
    void *payload;
    size_t payloadlen;
};


struct MessageData
{
    MessageData(MQTTString &aTopicName, struct Message &aMessage)  : message(aMessage), topicName(aTopicName)
    { }

    struct Message &message;
    MQTTString &topicName;
};
We've split our listeners into two functions for the example application, one on the Device Shadow update channel, and the other on the twilio topic. In the twilio callback function, you can see how we shuttle the message body into a C-Style string, and use ArduinoJSON to parse some needed fields. Finally, we reverse the string and send it back out to the twilio MQTT topic, where it'll eventually make its way to your phone.
Simple, right? That's really all it takes to handle incoming messages on the ESP8266.
Letting Lambda Handle Lots of Little Things
We're going to have two Lambda functions in the backend of our application: one for sending messages and one for receiving messages.
Sending Messages With Amazon Lambda
The first function we've already described in detail in the sending guide. If you haven't yet done that exercise, we'd suggest visiting now before continuing this guide. It details how to set up AWS IoT to talk to the ESP8266 and how to forward messages from the 'twilio' MQTT topic to Lambda. We'll be using the exact same function to reply to messages, so that will need to be added to Lambda.
Briefly, here's what you need to do:
- Load the code from the 'Lambda Function Send SMS' directory in the GitHub repo into a new Lambda function
- Change the 'Handler' in the Configuration tab in Lambda to point to 'twilio_functions.iot_handler'
- Set up a trigger with the SQL Statement of
SELECT * FROM 'twilio' WHERE Type='Outgoing', and in AWS IoT change the SQL version to '2015-10-08' - Enter the environment variables
AUTH_TOKENandACCOUNT_SID
Now, JSON messages published to the 'twilio' MQTT topic in AWS IoT will be forwarded to Lambda. In Lambda we do a tiny bit of processing and then use the Twilio Python Helper Library to send SMS and MMS messages.
Receiving Messages with Lambda and Returning a Blank Reply
The second aspect is new for this article - we need a Lambda function to receive incoming requests from Twilio.
On your computer, start a new directory and include the content from the GitHub repository's 'Lambda Function Receive Message' directory inside. Install the Twilio Python Helper Library inside the directory (personally, we used pip install with a target), and zip up the contents of the directory (but not the directory itself!).
Create a new Lambda function in the same region as the 'Mock' API and choose that API as the trigger to the new function. Under role, select 'Create a New Role From Template', selecting 'AWS IoT Button permissions'. Give that role a descriptive name - we'll need to visit it again after - and create your function.
Now in Lambda, change to the 'Code' tab, and select 'Upload a .ZIP File' from the 'Code entry type' menu. Upload the zip file you created on your computer, and make sure you are using the Python 2.7 runtime.
Now in the 'Configuration' tab, change the handler to 'twilio_functions.twilio_webhook_handler'. This is pointing to the twilio_functions.py file you just opened, and telling AWS to call the twilio_webhook_handler() function when triggered.
Next, set four environment variables asked for in the code (also in the 'Code' tab of Lambda):
AUTH_TOKENAWS_TOPIC('twilio', with no quotes)REQUEST_URL(For now, '' or blank - we'll come back to this)AWS_IOT_REGION
Examining the Lambda Receive-and-Forward Python Code
You'll notice a few interesting details in this Lambda function.
First, we validate messages from Twilio in the same manner as described in our validating incoming Twilio Webhooks with Python in Lambda article.
Next, we check the message body is under 160 characters before we burden the ESP8266 with a new message. (There are a few orders of magnitude more RAM on Lambda than on the ESP8266).
Finally, we use the in-built boto3 library to post to the 'twilio' MQTT topic in your AWS region.
Allowing Lambda to Post to MQTT Topics
Remember that role you created in Lambda? If you deployed the API and let Twilio use it as of now, you'd find that Twilio can access your route just fine... but publishing to the 'twilio' MQTT topic is unauthorized. Let's rectify that by applying the proper permissions to your Lambda function's role.
Go to IAM by using the 'My Security Credentials' in your name pulldown:
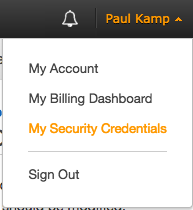
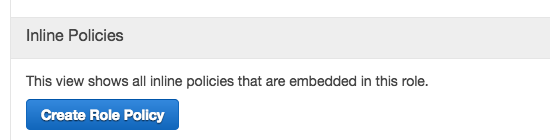
In there, click on the 'Roles' link in the left sidebar. Find the role you assigned to this Lambda function and click on it. Next, click on the 'Create Role Policy' button under 'Inline Policies':
Now, you need to add an inline policy which allows Lambda to post to all topics:
{
    "Version": "2012-10-17",
    "Statement": [
        {
            "Effect": "Allow",
            "Action": [
                "iot:Publish"
            ],
            "Resource": [
                "*"
            ]
        }
    ]
}
With that policy, your Lambda function is authorized to publish to MQTT topics. Unless you turn off the validation steps you won't be able to test it yet - you'll have to wait until our final step, hooking up Twilio, for that.
Triggering Lambda with API Gateway
You will want to modify the 'Mock' API we built out earlier. When you linked to it from the Lambda trigger, it should have already added the function as the integration to your API. If it instead created a new resource and method, delete it - under the /message POST resource and method you can add the function directly from inside API Gateway.
Now we'll need to configure API Gateway now exactly as we did in our receiving and replying to SMS and MMS messages from Lambda article. The full steps are detailed in that post, but here's the summary of what you'll need to do:
- In 'Method Request', add the
X-Twilio-SignatureHTTP Request Header to pass through to Lambda. - In 'Integration Request', remove all Body Mapping Templates and add a new one for
application/x-www-form-urlencodedwith a template of:
#set($httpPost = $input.path('$').split("&")) { "twilioSignature": "$input.params('X-Twilio-Signature')", #foreach( $kvPair in $httpPost ) #set($kvTokenised = $kvPair.split("=")) #if( $kvTokenised.size() > 1 ) "$kvTokenised[0]" : "$kvTokenised[1]"#if( $foreach.hasNext ),#end #else "$kvTokenised[0]" : ""#if( $foreach.hasNext ),#end #end #end } - In 'Integration Response', remove existing Body Mapping Templates and add one in HTTP status code
200forapplication/xml. Use this two line template:
#set($inputRoot = $input.path('$')) $inputRoot - In 'Method Response', for HTTP Status 200 remove any existing response bodies and add one for
application/xml.
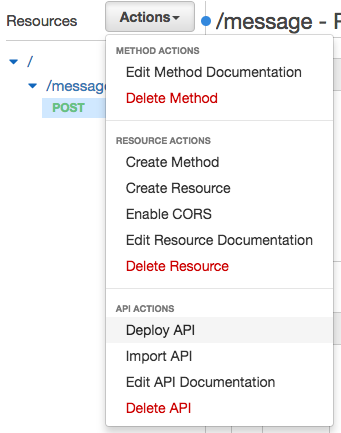
If you did all that, you're ready to deploy! From the 'Action' pulldown menu, 'Deploy API':
You will be asked to choose an existing (or create a new) stage. We called our stage 'prod'... feel free to name it whatever you'd like - just remember what it's called.
After deploying, you'll get a URL to your new /message route. Copy that exact URL, '/message' and all, into the REQUEST_URL environment variable of your Lambda function. This is also the time to make sure the trigger is enabled on the Lambda side - make sure that the 'prod' stage of the API will trigger your function.
Keep that URL on your clipboard - you're going to use it one more time.
Configure Your Twilio Webhook URL
It's now time to plug Twilio into your Amazon-and-Thing setup. Log into your Twilio Account and go to the console. Click the 'pound sign'/'hashtag' ('#') in the sidebar and navigate to 'Active Numbers'.
Existing numbers you have will show an icon if SMS and MMS are enabled. You'll need one with both capabilities for the initial ESP8266 application's startup (it sends an MMS). If you'd only likle to exercise SMS sending capabilities, set optional_image_path to an empty string before uploading to your board.
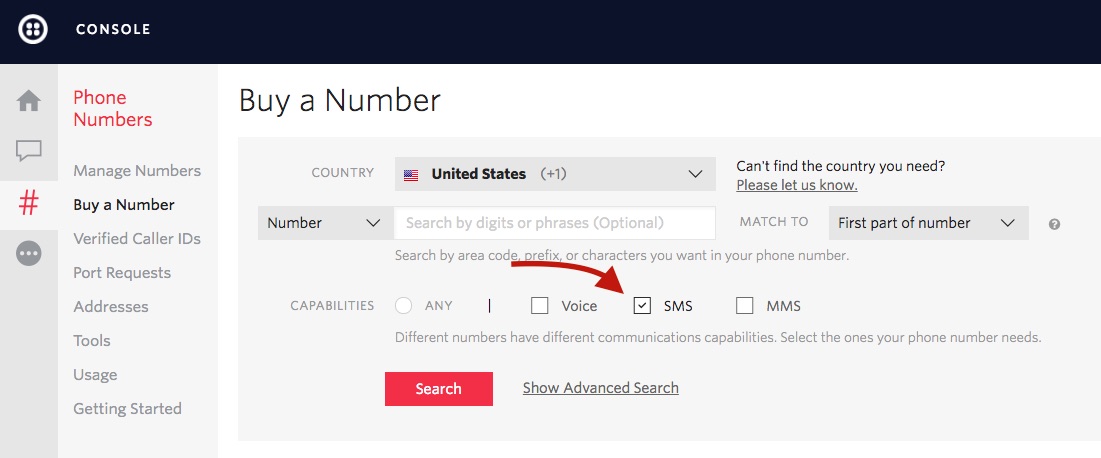
If you don't yet have a number, Twilio makes your search easy. Select SMS and MMS before you start your search and we'll only return numbers available to purchase that feature both capabilities:
Whether you bought your number new or you're recycling, click on the number to use. (Note: this can be different than the number programmed into the ESP8266, you can use any Twilio number you own.)
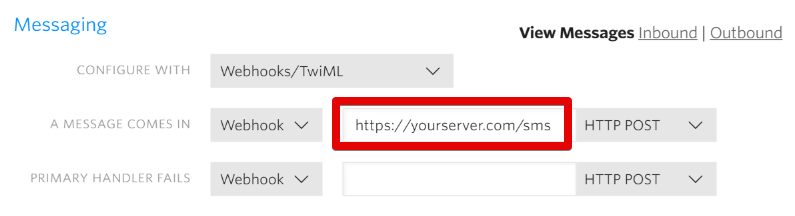
In the screen that appears, under 'Messaging' and in 'A Message Comes In', select 'Webhook' and paste the URL from your new API in API Gateway into the text box (highlighted below). Ensure 'HTTP POST' is selected.
Backup Webhook URLs
You'll also notice the 'Primary Handler Fails' box. When you go to production, you'll want to add a failover webhook here to catch any issues with your primary webhook Twilio will automatically use the secondary handler if there is a problem with your webhook or we can't reach the primary handler in 15 seconds. See our Availability and Reliability guide for details.
SMS Your Twilio Number Under 160 Characters!
It's time to test the whole setup - send a SMS to the Twilio number assigned to the ESP8266. If all goes well, you should see your message sent back to you from the ESP... esrever ni!
Try texting it "Oozy rat in a sanitary zoo.". Or really, any line from this Weird Al song.
Make the Thing Your Own
With that under your belt, you've now got an end to end solution for receiving and replying to SMS and MMS messages with some Amazon serverless AWS solutions. If you combine the sending SMS and MMS messages from the ESP8266 and Lambda post, you'll also have a handle on outgoing messages. Call it "Incoming and outgoing text messages in 64 Kb of RAM". (640Kb really was enough for anyone).
If you're ready to press on, Add-Ons will often simplify the next steps on your journey to production. Quickly add our partners' convenient powerful services and tools to your application- try it, you'll love the ease of use.
Please keep us posted on your production journey. We'd love to hear from you on Twitter - let us know what you're building, or what you've built!

Related Resources
Twilio Docs
From APIs to SDKs to sample apps
API reference documentation, SDKs, helper libraries, quickstarts, and tutorials for your language and platform.
Resource Center
The latest ebooks, industry reports, and webinars
Learn from customer engagement experts to improve your own communication.
Ahoy
Twilio's developer community hub
Best practices, code samples, and inspiration to build communications and digital engagement experiences.