A Practical Guide to Creating Microservices With Go-Micro
Time to read:
December 06, 2023
Written by
Reviewed by
Microservices are becoming increasingly popular in the software industry. They help developers build applications that are easy to manage, can handle a lot of users, and are quick to update. At first sight, the concept of microservices may appear intimidating. However, in truth, understanding and even implementing microservices can be relatively straightforward — especially with the correct tools and direction.
In this tutorial, we’ll demystify the microservice architecture, delve into what it means, explore its advantages, and compare it with the traditional monolithic approach to software development. Additionally, we’ll dive into the practical aspects of building a microservice using the Go programming language and the Go-micro framework.
Prerequisites
To follow along with this tutorial, the following prerequisites are required:
- Go installed on your system
- A basic understanding of Go programming
- Familiarity with REST API development concepts such as HTTP methods, endpoints, and status codes
- Familiarity with JWTs would be helpful, though not essential
What are microservices?
Microservices are an architectural approach to developing an application as a collection of small, self-contained services that each fulfill a specific business purpose. Developers can build these services in several programming languages, deploy, scale, and maintain them independently, and enable communication between them via well-defined APIs. The following image demonstrates how microservices work in practice.
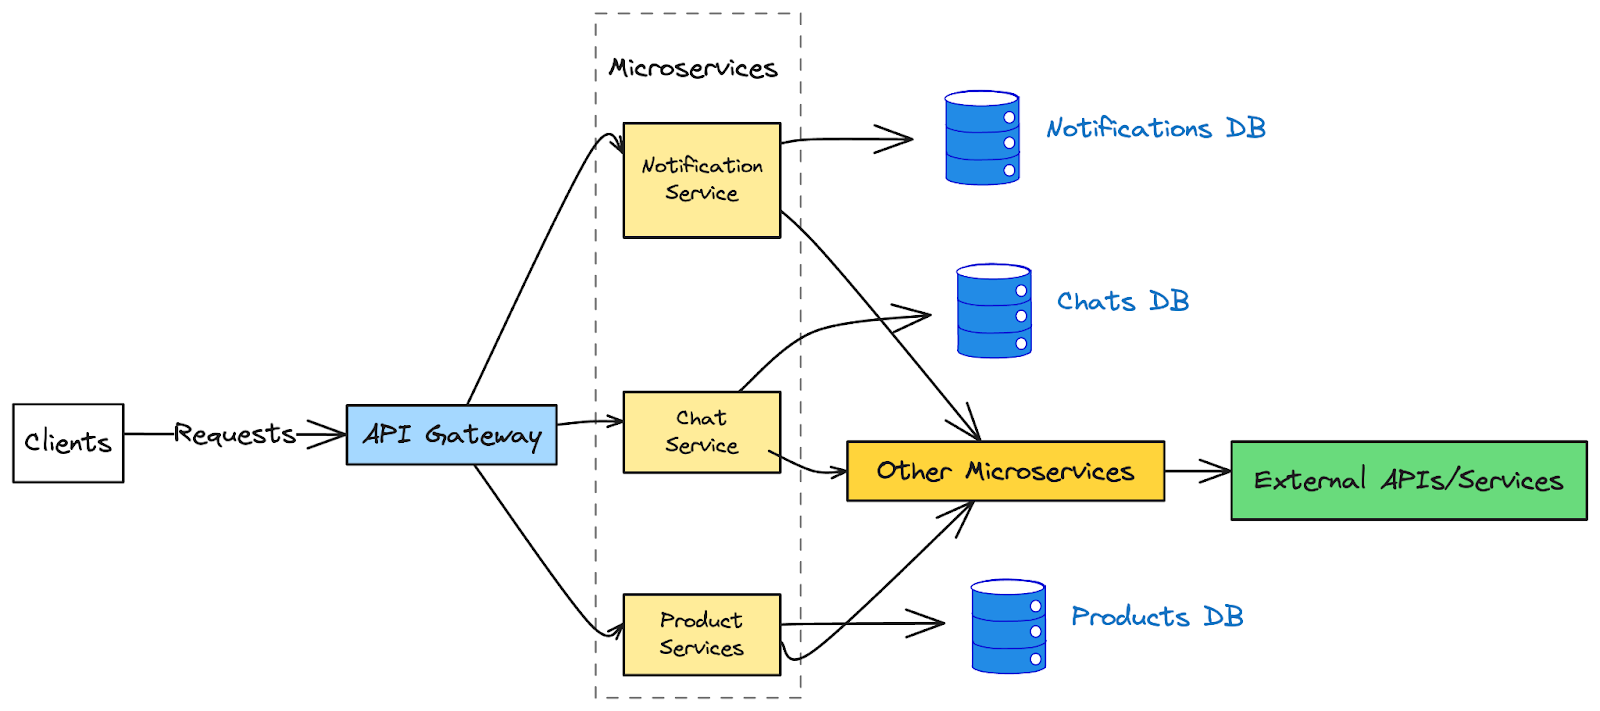
As shown in the image above, clients (mobile, web, or desktop applications) send requests to an API gateway, which serves as the entry point, routing each request to the appropriate microservice. Furthermore, each service operates independently, interacting with its own database and, if necessary, with other microservices or an external API or service to fulfill requests.
Microservices vs monoliths
To further understand microservices, it's helpful to contrast them with the traditional pattern of developing applications — the monolithic architecture. Applications in a monolithic architecture are often constructed in layers, e.g., a presentation layer to handle user interaction, a business logic layer to process data according to business rules, and a data access layer to communicate with the database.
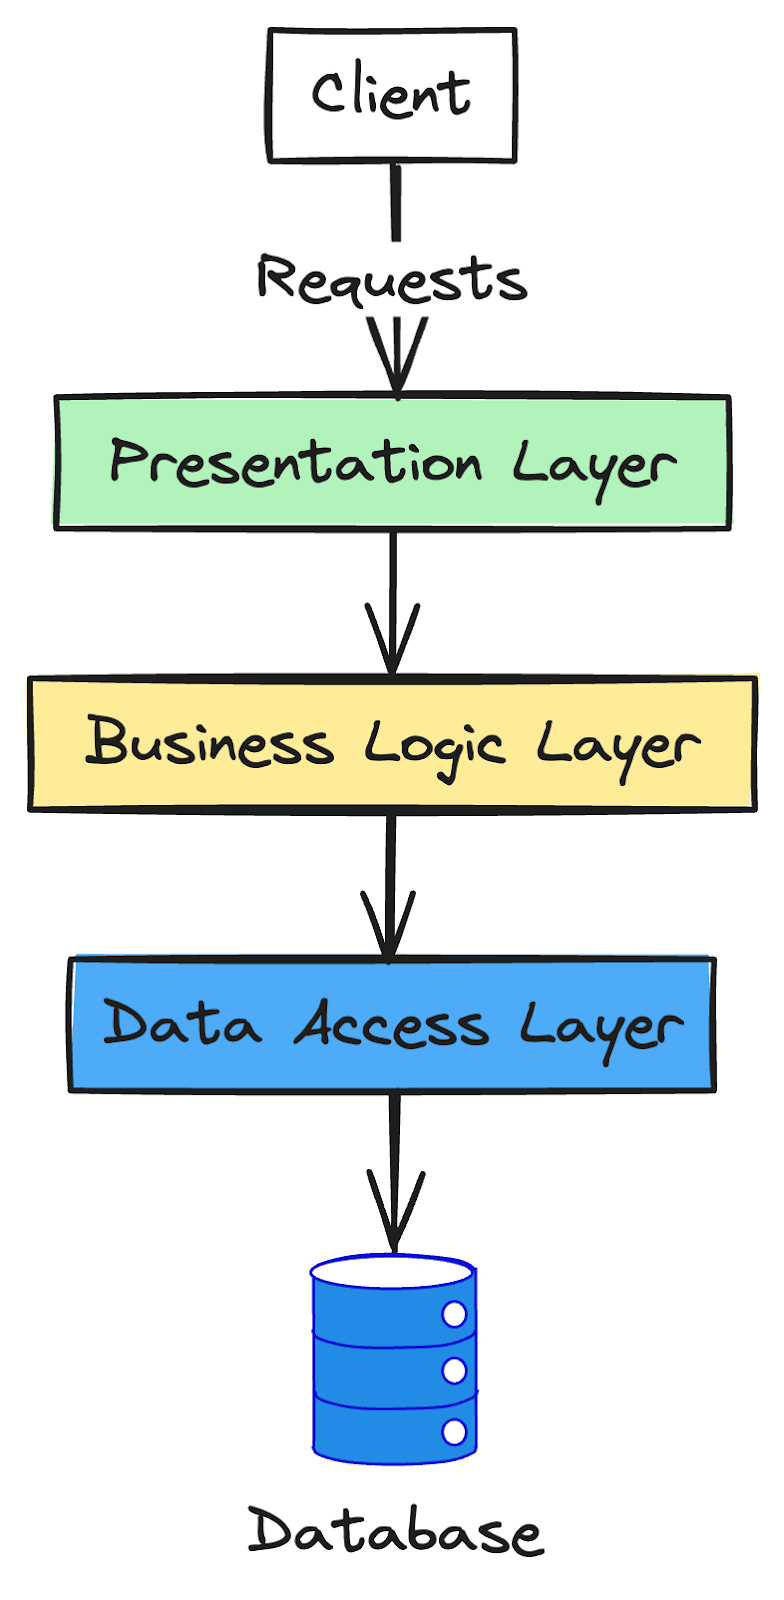
This centralized approach tightly integrates all application components within a single codebase and deploys them together. In contrast, a microservices architecture divides the application into independent services, each with its own presentation logic, business logic, and data access layers. These services then connect over a network, allowing for more flexible development, deployment, and scaling of each service independently.
What is Go-micro?
Go-micro is an open-source framework for building microservices in Go. It provides a set of tools and modules that abstract the challenges of distributed systems, as well as capabilities such as automated service discovery and client-side load balancing that improve network communication and efficiency.
Go-micro simplifies the development process by:
- facilitating communication between services
- supporting both synchronous and asynchronous communication patterns
- enabling client-side load balancing for efficient distribution of requests between service instances
- providing event streaming for developing responsive, real-time applications
Additionally, Go-micro enhances security by ensuring that only authorized entities can access services through integrated authentication mechanisms. These capabilities, collectively, make Go-micro a comprehensive and versatile toolkit for developing robust microservices in Go.
Create a microservice with Go and Go-micro
To get started, let’s create a new directory for our project and initialize it as a Go module, using the following commands:
The third command generates a new go.mod file, which contains metadata about our projects and the packages which we'll install later in the tutorial.
The next step is to install Go-micro, using go get, as shown below:
This command downloads the Go-micro package and its dependencies and makes them available for use in our project.
Create a "Hello World" microservice
Let's proceed by creating a foundational "Hello World" microservice to help you understand the core structure of services in Go-micro. In your project directory, create a new main.go file and paste the following code into the file:
In the code above, we're constructing a basic microservice. We created a new service using the micro.NewService() method, which also allows us to pass the name of our microservice via micro.Name(), as well as a preferred port via micro.Address(). In addition, the service.Init() method initializes the service with our specified settings, and finally service.Run() launches the service.
To start your microservice, run the main.go file using the following command:
Running this command activates the microservice, and you should see an output indicating that the service is running, waiting for further instructions or interactions, as shown in the image below.

These log messages confirm that your microservice has successfully started, is configured to receive incoming requests, communicates with a broker for message forwarding, and has been registered in the service discovery system.
However, because we haven't included any code or logic to handle incoming requests at a given URL, visiting the URLs in the log would not yield any useful results — yet.
Add an HTTP handler
Now, let's enhance our microservice by adding an HTTP handler to it. This handler will allow the microservice to respond to HTTP requests, a common requirement in many applications. To proceed, modify your main.go file to match the following code:
This updated code transforms our basic service into a web service using Go-Micro's web package. We define a route (/hello) and associate it with a handler function which sends "Hello, World!" as a response to any HTTP request it receives. Then, we used the service.Handle() method to link the HTTP handler to our microservice, and service.Run() to start the service, making it ready to listen for and respond to HTTP requests.
Run the updated microservice with the following command:
After executing this command, our microservice will actively listen for HTTP requests on the /hello route and promptly respond with "Hello, World!" when visited, such as by running the command below, will showcase the utilization of Go-micro for handling HTTP requests within a microservice architecture.
Exploring Go-micro's features
Go-micro comes with a few capabilities that are quite useful in the building of microservice architectures. Let's have a look at some of them.
Service discovery
Service discovery is a fundamental concept in microservices architecture, allowing services in a distributed system to discover and communicate with one another on the fly, regardless of where they are operating.
To demonstrate service discovery using Go-micro, we will create a simple server service and another client service that locates and connects with the server. To proceed, create a new directory called service-desc and a new main.go file within that directory Then, paste the following code inside the new file:
The code above defines a struct named Greeter with a Hello() method and creates a new service with the name serviceA. Upon initiation, the service registers itself with Go-micro's default registry, enabling its discoverability by other services or clients.
Next, let’s create the client that makes a call to our service. Create a new folder named client, inside the existing service-desc directory and also create a new main.go file in this new directory. Then, paste the following code into the new main.go file:
In the code, we're initializing a new service with the name serviceB and making a call to our previous service A's Greeter.Hello() method. We’d also used an empty Map for both the request and the response, which is sufficient for this demonstration. If the call is successful, a success message is printed to the console.
To test the service discovery, first, start the server service by running the following command:
Then, in a separate terminal window, run the client:
When both the service and the client are running, the server terminal prints "Service A was called," and the client terminal displays "Successfully called service A", indicating successful service discovery and communication. This example demonstrates how Go-micro seamlessly manages service registration and discovery, providing a robust foundation for microservices communication.
Synchronous and asynchronous communication
In a microservices architecture, communication between services can be either synchronous or asynchronous, each serving different use cases and requirements.
Synchronous communication involves direct, real-time communication where the client sends a request and waits for a response from the server. This communication pattern is straightforward and is often used for immediate data retrieval, or operations where the client needs an instant response.
To demonstrate synchronous communication in Go-micro, we can refer back to our service discovery example. In this case, the client sends a request to the server service and waits synchronously for a response:
Here, service.Client().Call() is a synchronous operation in which the client waits for serviceA to process the request and return a response.
Asynchronous communication, on the other hand, does not require the client to wait for a response. Instead, the client can continue with other tasks while the response can be handled later, if necessary. This pattern is useful for long-running operations, sending notifications, or when immediate response processing is not necessary.
To implement asynchronous communication in Go-micro, you typically use a message broker for publishing and subscribing to messages. Luckily, Go-micro includes a built-in broker plugin to help with this.
Publish-subscribe messaging
Publish-subscribe (Pub/Sub) is a messaging pattern in which publishers transmit messages without knowing who the subscribers are. The subscribers can then listen to and receive messages about certain topics of interest without knowing who the publishers are. Now, let's look at how to set up a pub/sub service with Go-micro to learn more about asynchronous communication.
Set up a publisher
First, let's create the publisher. In your project's root folder, create a new directory named publisher and in that directory, a file named main.go. Then, paste the following code into the new main.go file:
In the code above, first we define a new example.publisher service. We then utilize the broker.Connect() method to connect to the message broker, which is required for message publishing. Following that, we used go func() to start a goroutine for concurrent execution, so that a ticker triggers message publishing every five seconds, and the broker.Publish() function delivers messages to the given topic (example.topic); with each message containing a basic text payload and a header.
With this setup, the publishing operation is asynchronous; the publisher does not wait for any acknowledgment from subscribers and continuously publishes messages at set intervals.
Set up a subscriber
Next, let’s set up the subscriber. Create a new directory named subscriber. Then, in that directory, create a file named main.go. Then, paste the following code into it:
Here, we created a new service and called it example.subscriber. Then, we are using the broker.Subscribe() function to listen for messages on example.topic (recall that our publisher is publishing to example.topic). From here, we can also see that the broker.Subscribe() function accepts two required parameters: the topic to subscribe to and a callback function.
In our case, we’d passed an anonymous function as the second parameter, and this function is called asynchronously each time a message is received on example.topic. Furthermore, per our definition, upon receiving a message, the subscriber prints its content.
Now, let’s start the publisher and subscriber services to see things in action. First, run the subscriber with the following command:
In a separate terminal, run the publisher:
The subscriber should receive messages published by the publisher every five seconds, demonstrating the asynchronous communication pattern where the publisher does not wait for any acknowledgment or response from the subscriber.
You may have noticed that we ran the subscriber first in this example. This is because, if the publisher runs before any subscribers are present, it will try to send messages to a topic that no one has subscribed to yet. This results in a "service not found" error, as some brokers require at least one active subscription to a topic before accepting messages. However, if the subscriber is started first, the broker detects an active listener and the message flow commences without any error.
Add authentication
Another key aspect of microservice design is authentication, which ensures that only authorized entities can access specified features and endpoints. It usually consists of two components:
- Authenticating communication between microservices
- Safeguarding HTTP endpoints exposed by services
It typically involves two aspects:
- Authenticating communication between microservices
- Securing HTTP endpoints exposed by services
Authentication between microservices
Authentication between microservices is essential to ensure that only authorized services can communicate with each other. Services often use token-based authentication, such as JSON Web Tokens (JWT), to implement this feature. In this approach, a service includes a token with its request, and the receiving service verifies the token before processing the request.
Let’s do a practical example to try things out. Create a new auth directory. In that directory, create three new files: main.go, authMiddleware.go, and client/main.go. The files and directory structure, of the new auth directory, should look like the structure below.
Next, let's create a middleware that verifies incoming request metadata for the presence of a valid JWT token. In this example, we'll use a placeholder function to simulate token validation.
Add the following code inside the auth/authMiddleware.go file:
In the AuthMiddleware() function defined above, we're checking for a token in the request's metadata. If the token is not present or is invalid (i.e., its value is not "valid token" in our case), an error is returned. Otherwise, the request is routed to the appropriate handler.
Now, let's create a new microservice that will use this middleware. Paste the following code inside the auth/main.go file:
In the code above, we use micro.WrapHandler(AuthMiddleware()) to add our authentication middleware to the service so that when the service receives a request, the middleware will be invoked to validate the token before any of the service methods can be called.
At this point, you can already start the server service, along with the middleware, with the command below, and you should receive a response that it is running.
To simulate a client request with a token, let’s create a client that sends the token in the request's metadata. Inside the client/main.go file, paste the following code:
In the code above, we’re attempting to recreate synchronous communication between two services like in our previous example, except now we are using metadata.NewContext() to add a token to the context's metadata of the client service. This token will be checked by the AuthMiddleware in the server service.
Let’s run the client with the following command to see things in action:
You should get the response “Successfully called hello service,” indicating that our client service is able to access the server service function successfully. However, if you alter “valid-token” in the client service, you get a message that you've passed an invalid or missing authentication token.
Secure the HTTP endpoints
Securing HTTP endpoints is similar to our last example in that we'd need to write middleware that intercepts incoming HTTP requests and checks for valid credentials.
To try things out, create a new directory for this example, named auth-http. In that directory, create two new files: authMiddleware.go and main.go. Paste the following code inside the authMiddleware.go file:
The middleware code above checks if an authorization header is present in HTTP requests, and if it is, validates the token part of the header. Furthermore, for simplicity, we're comparing against a hard-coded string, "valid-token". However, in a real-world scenario, this is where you'd integrate with your authentication system (like JWT verification).
Now, let’s create a new service to implement this middleware. Open the new auth-http/main.go file you recently created and paste the following code into it:
Here, we created a new web service, named http.service, and set its port to 8080. Then, we defined a protectedHandler() function to handle requests to our protected resource and applied the AuthMiddleware to this function. We also used service.HandleFunc() to register the /protected endpoint and its associated middleware-wrapped handler with the Go-micro web service. This way, only requests to /protected will require authentication.
Next, let’s run our service. Make sure you’re in the auth-http directory and run the following command to start the service.
Then, access the /protected endpoint without a token or with an invalid token:
Because we're not sending any tokens, using the curl command above to access the /protected endpoint should result in an "Invalid or missing auth token" response. However, if the request header has a valid token, as shown below,
You should now have access to the endpoint and receive the response "Access to protected resource granted." With this example, we've seen how Go-micro successfully streamlines the authentication process, demonstrating its ability to secure microservices with robust access control.
In addition to the features covered so far, Go-micro expands its capabilities with a variety of features that improve microservice development. Notably, it includes packages such as go-micro/dashboard for visualizing and monitoring services in real-time, as well as a CLI package for creating microservices straight from the command line. Furthermore, Go-micro's example repository is a wonderful resource, providing a range of service implementation examples for further exploration and learning.
That’s how to create microservices with go-micro
In this tutorial, we've covered the fundamentals of microservices, their differences from monolithic architecture, and how to get started using Go-micro.
Go and Go-micro are a good combination for microservice development, because they both combine the simplicity and concurrency of Go with the extensive features of Go-micro. This results in an optimal balance of performance, efficiency, and scalability in service development and a high-class development experience.
For more hands-on experience, you can find the complete code used in this article on GitHub.
Elijah Asaolu is a technical writer and software engineer. He frequently enjoys writing technical articles to share his skills and experience with other developers.
Related Posts
-
Build an Omni-Channel AI Agent with Twilio Agent Connect and Amazon Bedrock AgentCoreAkshay Dhawale Rachel Baskin
-
 Build a WhatsApp Fact-Checking Bot with Twilio, OpenAI, and Node.jsCharles Oduk
 -
 Crafting a Unified Voice: Creating the next step in virtual agent evolution using AILillian Lopez Ben Johnstone
Related Resources
Twilio Docs
From APIs to SDKs to sample apps
API reference documentation, SDKs, helper libraries, quickstarts, and tutorials for your language and platform.
Resource Center
The latest ebooks, industry reports, and webinars
Learn from customer engagement experts to improve your own communication.
Ahoy
Twilio's developer community hub
Best practices, code samples, and inspiration to build communications and digital engagement experiences.