Gmail API and Rails – Authorize with OAuth via Omniauth
Time to read:
September 25, 2014
Written by
This post is part of Twilio’s archive and may contain outdated information. We’re always building something new, so be sure to check out our latest posts for the most up-to-date insights.

I turned off Gmail alerts on my phone a while ago. It just doesn’t make sense for my phone to beep every time someone comments on someone else’s status. That said, not all emails are created equal. There are some messages for which I would like to know right now when they show up in my inbox. SMS alerts are great for customized, urgent notifications like this.
This is a two part tutorial on how to build SMS email alerts in Ruby on Rails using the GMail API and Twilio. Part One is on how to authenticate your Rails app with a Google API using OAuth — and though our app uses Gmail, the OAuth process is the same for all Google APIs, so all this will work for the Calendar API, the Drive API, etc. with only minor adjustments. Part Two will teach you how to retrieve emails from the Gmail API in Rails and how to send SMS alerts using Twilio.
Google APIs and OAuth
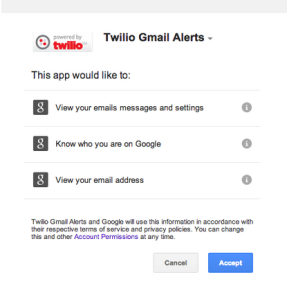
The goal of this series is to write a script that checks our e-mail. To do that, we’ll first need to authenticate with Google via OAuth to access our account data. Even if you’ve never written an OAuth authorization before, you’ve undoubtedly used it. OAuth is what’s happening in the background when you encounter this screen:
From the developer’s perspective, the OAuth process looks like this:
- You set up an app within Google’s developer portal and tell it what APIs you’d like to use and Google gives you a Client ID and Client Secret (basically, a username and password).
- When a user signs into your app, your app redirects them to Google and passes along the client id/secret.
- Google asks the user permission to access their GMail data
- Google calls back to your app and sends a code which you can use, along with your credentials, to retrieve an access token with which you can make authenticated API calls.
Now you could write this OAuth process flow by hand, but why reinvent that rather complicated wheel? Omniauth is the de facto standard way to perform OAuth authentication in the Ruby world. Fortunately, there’s an add-on gem (“swappable strategy” in Omniauth speak) written specifically for the the Google API. In the rest of this post, we’ll talk about how to:
- Create a Rails app with the the gems needed to connect to a Google API
- Configure Omniauth to perform the Oauth dance with Google
- Set up your app on the Google developer portal
- Save and refresh your Google API access token
Sound good? Then let’s get started…
Create a Rails project for Omniauth and the Gmail API
Open a terminal, navigate into your code directory and type:
You won’t be needing most of the stock Rails gems, so replace your Gemfile with:
I’m using the most recent version of Rails at the time of writing, but all this should work with Rails 3 as well. Aside from Rails, the only gems here are Omniauth, the Google API add-on for Omniauth, JSON to parse the data that Google sends back to your app and sqlite to save your access tokens.
To install your gems, run:
Now you’re ready to write some real code.
Google APIs and Omniauth
To set up Omniauth, create a new file at config/initializers/omniauth.rb:
PSA: any time you modify a file in the config/initializers directory, you must restart your Rails server for the changes to take effect. Also, when I originally published this post I was requesting a gmail.readonly token. If you get an insufficient permissions error along the way, that may be why.
Here’s what we’re doing there:
provider…
tells Omniauth to initialize the google_oauth2 strategy with a Client ID and Client Secret that you will get from the Google Developer Console shortly.
scope…
tells Google which APIs you want to access — in our case, the Gmail API. If you omit the email scope you will receive an insufficientPermission error when you try to authenticate. It throws a similar error even if you’re trying to connect to, e.g., the Google Calendar API, so leave that email bit in there in addition to whatever Google API you’re connecting to.
access_type: ‘offline’
tells Google that you want to access the Gmail account even if the account holder is away from the browser.
Omniauth is going to automatically create a route at localhost:3000/auth/google_oauth2 — no need to define it yourself in the routes file. When a user visits that URL, Omniauth redirects them to Google to authorize their account. After they grant permission, Google redirects them back to your app’s callback URL, and sends along an access token in the HTTP request parameters.
You do need to set up the callback url. Replace all of the default code in config/routes.rb with:
Those first two routes set up a convenient but unnecessary way for us to kick off the authorization process. The third is the important one — it routes to the create action of the Sessions controller when Google makes an HTTP GET request to localhost:3000/auth/google_oauth2/callback.
Create the SessionsController at app/controllers/sessions_controller.rb:
This is just a temporary controller to make sure that the authentication flow is working so far — we’ll update it in a moment. Create a simple view to kick things off at app/views/sessions/new.html.erb:
And, for the sake of instant gratification, create a view at app/views/sessions/create.html.erb to display the token information passed back to Omniauth from Google:
Make your callback URL publicly accessible
We’ve been talking about localhost:3000, but that URL doesn’t do Google any good — Google needs a URL on the public Internet that it can access after the authentication step. Now, you could just deploy your app to, say, Heroku, but that means redeploying every time you make a change which is so incredibly suboptimal and unfun that it’s not worth considering. One solution is to use tunneling software such as ngrok — here’s a quick post by Kevin Whinnery on how to set it up (it will take you about four minutes). Make sure you register for a free account so that you can use the incredibly helpful subdomain flag.
Once set up, start ngrok in a new terminal window on port 3000:
You should see something like:
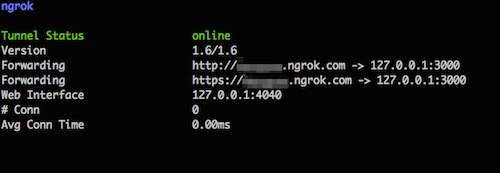
So long as ngrok stays running, Google can access your localhost:3000 via your ngrok subdomain. I’m going to use example.ngrok.com from here on out — replace that with whatever URL ngrok gives you.
Create a new app in your Google API console
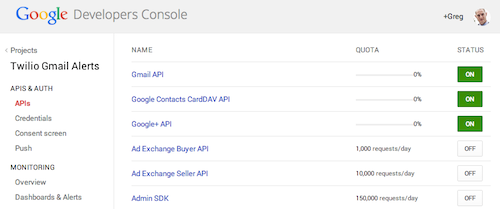
Your Rails app is all set to receive an access token, now you need to set up your app in the Google Developer’s Console. Click Create Project and name your app Gmail Alerts. Google’s going to think for a few minutes. When it’s done, click into your project, click Enable an API and flip the toggles next to Gmail API, Google Contacts CardDAV API, and Google+ API. If you’re the tidy type, you can turn off the rest of the APIs. Or not. It’s cool either way.
Now go to the Consent Screen section, under Credentials, and add you email address and a Product Name (perhaps ‘Gmail Alerts’). If you don’t, you’ll get a 401 invalid client error.
After that, create your Google OAuth 2.0 credentials:
- Click Credentials under APIs & auth on the left navbar
- Click Create new Client ID.
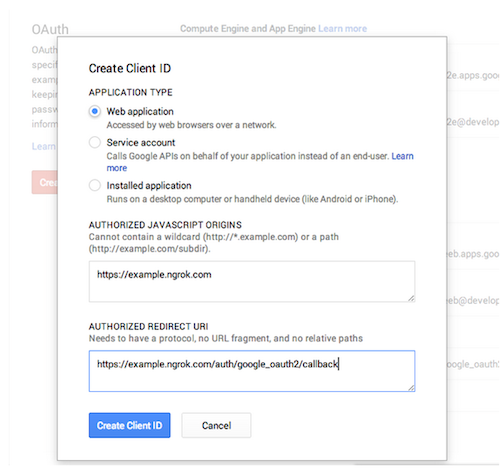
- In the popup window, select Web Application
- Enter http://example.ngrok.com under authorized javascript origins
- Enter http://example.ngrok.com/auth/google_oauth2/callback under Authorized Redirect URI
- Click the blue Create Client ID button
A Client ID and Client Secret appear on your dashboard:
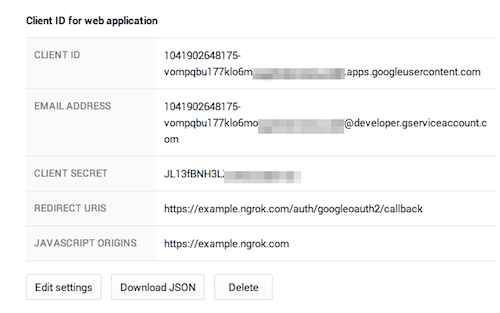
Open a new terminal (don’t touch the one running ngrok!) and export these values as sessions variables:
Alternatively, to avoid retyping that everytime you start a new terminal session you can:
- add those same two lines to your ~/.terminalofchoicerc and restart your terminal
- drop those values into Rails 4.1’s settings.yml and use Rails.application.secrets.client_id instead of ENV[‘CLIENT_ID’] in your omniauth.rb.
What you shouldn’t do is hardcode these values and/or commit them to a Github repository… that’s bad form.
Alright, let’s try it out:
- Start your Rails server from the same terminal window in which you set your environment variables
- Visit http://example.ngrok.com in a broswer
- Click the authorization link
- Say ‘yes’ to The Google
Google will redirect back to your callback URL. If you see something like this:
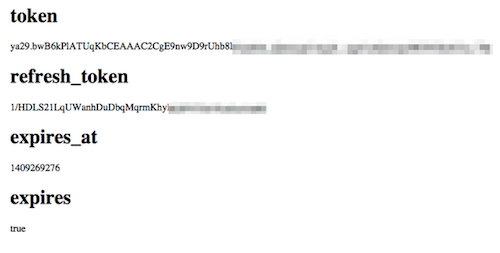
… then you have successfully performed an OAuth authorization with Gmail. Now, if you want to do anything with that accomplishment, you’re gonna have to save some of that data Google just sent you. (And if everything seems to work but you don’t see a refresh_token, read the part in the next section about revoking app access.)
Save the OAuth tokens
The three most important bits of information that Google sent back to your app are found in:
That access token is what you’ll use to make requests against the Gmail API later on, however, it’s only good for 60 minutes. Once it expires, you’ll request a new one by sending Google the refresh_token along with your client_id and client_secret. Unfortunately, Google only sends the refresh token once so you have to save it the first time you authorize your app… and we just blew that opportunity. Head over to your Google Account Permissions and revoke access to your Gmail Alerts app. We’ll be ready next time.
Let’s first save those tokens and the expiration time. Initialize your database and create a Token ActiveRecord model. From the terminal:
Update SessionsController to save the tokens that Google sends to the callback url:
Revisit example.ngrok.com and reauthorize your account. Check your database and ensure that a new record was created in your tokens table with access_token, refresh_token, and expires_at all populated. An easy way to do this is via the Rails console:
Refresh your Google API Access Token
Now you’ve got an access token, but it’s only good for 60 minutes (probably 57 minutes by this point). Unfortunately, neither the Google API gem nor Omniauth have a built in method to refresh access tokens so you’re going to have to write (copy) that yourself. Replace your token model at app/models/token.rb with the code below, then we’ll talk about what it all does:
That a lot to take in all at once, but each method is pretty straightforward:
to_params
Converts the token’s attributes into a hash with the key names that the Google API expects for a token refresh. For more information on why these are the way they are, check out the docs for how to refresh a Google API token.
request_token_from_google
Makes a http POST request to the Google API OAuth 2.0 authorization endpoint using parameters from above. Google returns JSON data that includes an access token good for another 60 minutes. Again, the the Google API docs have more information on how this works.
refresh!
Requests the token from Google, parses its JSON response and updates your database with the new access token and expiration date.
expired?
Returns true if your access token smells like spoiled milk.
fresh_token
A convenience method to return a valid access token, refreshing if necessary.
One last note about the tokens table: for simplicity’s sake I wrote this tutorial to only work with a single email address but it won’t be difficult to add support for multiple accounts if you build a service for multiple users. Google sends the users’s email address to the callback url. Add an email column to the tokens table, and save the email address in sessions#create, then retrieve the corresponding token when needed.
However, for the purpose of this tutorial, your token will always be found at Token.last. To make sure this all works, open a Rails console and type:
You should see two different values. Then type:
And you should see the same value as t.access_token. Now whenever you’re trying to pull data from a Google API, you don’t have to worry if the token is expired or not — token.last.fresh_token takes care of that automagically.
Onward!
You can now authorize Rails your app with any Google API — pull appointments from Google Calendar, edit documents on Google Drive, retrieve pictures from Google+. Opportunities abound!
In Part 2, we’ll learn how to get emails from the Gmail API and send SMS alerts using Twilio. If you’ve got any ideas for integrating Google and Twilio, or have any questions, hit me up at gb@twilio.com or on Twitter at @greggyb.


Related Resources
Twilio Docs
From APIs to SDKs to sample apps
API reference documentation, SDKs, helper libraries, quickstarts, and tutorials for your language and platform.
Resource Center
The latest ebooks, industry reports, and webinars
Learn from customer engagement experts to improve your own communication.
Ahoy
Twilio's developer community hub
Best practices, code samples, and inspiration to build communications and digital engagement experiences.