Build your own Pokemon Go SMS Service with Node.js, Express and Twilio
Time to read:
July 29, 2016
Written by
This post is part of Twilio’s archive and may contain outdated information. We’re always building something new, so be sure to check out our latest posts for the most up-to-date insights.

Pokemon GO is everywhere right now and if you are like Ash Ketchum or me you want to catch ’em all. This journey can be difficult but tools such as PokeVision can help us on our quest. The problem with these tools is that they require you to actively check them. Let’s build a service using Twilio SMS that notifies you via SMS when certain Pokemon are found around your location.
DISCLAIMER: Pokemon Go doesn’t have an official API and the mechanisms the community uses for tools around the game are shifting constantly. This might totally break.
Now let’s learn how to build this ourselves!
Choose your Starter

To get started we need to make a couple of choices. Unlike the choices that Professor Oak gives you, for this project, you can choose from a variety of programming languages and web frameworks, as long as they can make and receive HTTP requests.
For this tutorial we’ll use a basic Express server and Node.js. The things you need for this journey are:
- Node.js version 6.0 or higher. Check your version with
node -v. - A Twilio Account to send and receive SMS – Sign up for free!
- ngrok – You can read more about ngrok here.
To get a basic Express server, start by cloning the following template branch of this project and install the dependencies:
With the code in place, spin up the app by running:
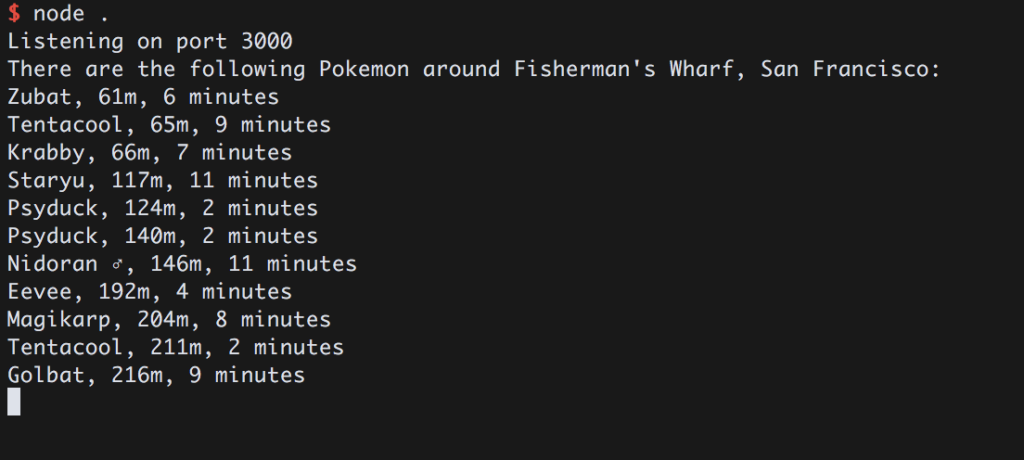
Navigate to http://localhost:3000/Kanto. You should see a message saying Ahoy! Kanto. Feel free to change Kanto in the URL with other things. It should change the message.


You can’t be the very best on this journey without having the necessary data. Or in other words you need your Pokedex. In our case we will use a Node module called pokespotter. It’s a basic wrapper around the Niantic API that will return you the list of Pokemon around a certain location.
Start by installing pokespotter:
Require the pokespotter module at the top of the index.js file.
You need at least one Pokemon GO account for pokespotter to work. This can be either a Google account or a Pokemon Trainer Club account Save your account credentials along with the account provider you have chosen (‘google’ if you are using a Google account or ‘ptc’ for Pokemon Trainer Club accounts) as the environment variables PGO_USERNAME, PGO_PASSWORD and PGO_PROVIDER. You can also pass these values directly as arguments to the Pokespotter() call.
Add the following two lines to your index.js file:
Now add a function that will call spotter.getNearby and executes a function that simply returns the list of Pokemon for now:
The getNearby method gets two properties. An address or set of coordinates as well as an options object where we specify a steps value. For now we chose 2 which gives you roughly a radius of 200m. The current time for a scan for this radius is roughly 30 seconds. You can reduce this time by passing into the Pokespotter() constructor an array of users. At the current radius 7 spots are visited so the optimal number of accounts will be 7. You can also increase the radius but it also increases the response time significantly.
Now that we have this function we need to consume it. Modify the handler for /:address:
Open again http://localhost:3000/Central Park, New York and you should get a first glimpse of the Pokemon around Central Park. Feel free to replace everything after the 3000/ with your own address to check the Pokemon near you.
Identify your Pokemon

For our text messages we are interested in 3 pieces of information for every Pokemon:
- Name of the Pokemon
- Distance from location
- Time till disappearance
The first two are already provided by pokespotter. For the third one we have a timestamp when the Pokemon is going to disappear. We can use that and the moment module to provide the information. Additionally we will sort the result by distance.
Require the two modules at the top of the file:
Add a new function that uses moment.duration().humanize() to add a readable version of the duration to every Pokemon and a function that compares the distance of two Pokemon. Alter the getPokemonByAddress function to use the two new functions:
Restart the server and refresh the browser. You should see more useful information now.
Enhancing your Pokedex with Twilio

Alright we got the basic information going. But we didn’t want to create a web service for our Pokedex but an SMS service. This is where Twilio SMS comes into play.
In order to receive SMS we need to create a new POST endpoint for our web server that will handle all incoming SMS. Twilio will then pass the content of our SMS and all related information to that endpoint.
First add a function that makes our information look more readable and limits it to only 6 Pokemon to keep the SMS short:
Now add a new POST endpoint for /incoming that uses the Body that Twilio sends as an address and logs the lookup result to the console. Feel free to adjust the other endpoint to use the format function, too:
Make sure to restart the server. In order to receive SMS we first need to expose our local server to the web for Twilio to access it. Run in a separate console window:
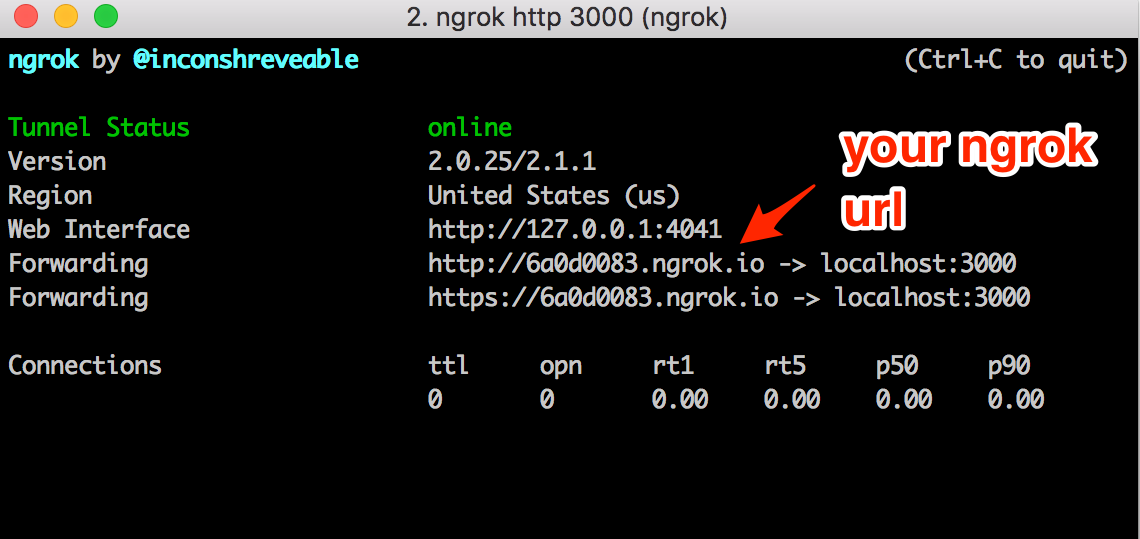
Get a Twilio phone number and configure the webhook URL for incoming messages to be http://.ngrok.io/incoming. Afterwards send an SMS to your Twilio phone number with an address and you should see the result show up in your terminal window.
Now the last step is to actually reply with an SMS. If we would know the response immediately we could directly reply to the request that Twilio does to our server using TwiML. However, because it takes a fairly long time to request the data we need to use the Twilio REST API or in our case the Twilio helper library to reply to the message at a later point.
Install it via:
Make sure your Twilio Account SID (TWILIO_ACCOUNT_SID) and Twilio Auth Token (TWILIO_AUTH_TOKEN) are set as the respective environment variables. Require the helper library at the top of your file:
Modify the POST request handler to send a message with the result:
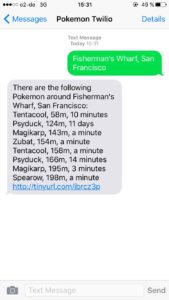
Restart your server and send another SMS to your Twilio phone number. You will now get a reply SMS with the 6 closest Pokemon to that location.

A Wild SMS Appeared!
Lastly we have one more problem. How do we get informed if that one Pokemon that we are looking for shows up at a certain location? Let’s add an SMS notification whenever this happens and an easy way to subscribe to it.
First create a new map instance at the top of your file that will hold all the necessary subscriber information:
Next we need to add subscribers to this map. We will add them based on the format of SMS they send. If you send something such as: Subscribe: Pikachu; Alexanderplatz, Berlin it will notify you when there is a Pikachu around Alexanderplatz in Berlin.
For this modify our SMS request handler:
Now that we know which Pokemon we should be looking for and where, all we need to do is to look for them on a regular basis. We will be doing this every 60 seconds. Once we found the respective Pokemon for someone, we will also stop looking for it. You can re-subscribe by sending the same message again.
In order to send a message without previously receiving one we again need to use the the Twilio helper library.
Create a new function watchForPokemon and run setInterval when the server starts. Make sure to replace {{YOUR TWILIO NUMBER}} with your own Twilio phone number:
That’s it! Restart your server and you can start sending Subscribe messages. To test it, I recommend to search for a Pokemon that is very common to the area that you want to watch for. This way you should get instantly an SMS.

Go and Explore
We made it! Hopefully now we will be able to catch ’em all. You don’t have to stop here though. How about filtering out common Pokemon or providing a way to sort them by rarity?
I can’t wait to see what you build with this! Feel free to contact me to tell me what you build or if you have any questions:
- Email: dkundel@twilio.com
- Twitter: @dkundel
- GitHub: dkundel
- Twitch (streaming live code): dkundel
Please remember that this system is based on an unofficial API that isn’t guaranteed to always work and they might block you. So you might have to sometimes fallback to travel across the land to search for Pokemon.


Related Resources
Twilio Docs
From APIs to SDKs to sample apps
API reference documentation, SDKs, helper libraries, quickstarts, and tutorials for your language and platform.
Resource Center
The latest ebooks, industry reports, and webinars
Learn from customer engagement experts to improve your own communication.
Ahoy
Twilio's developer community hub
Best practices, code samples, and inspiration to build communications and digital engagement experiences.