Creating a Symfony 3 Project with Basic User Handling
Time to read:
August 15, 2017
Written by
This post is part of Twilio’s archive and may contain outdated information. We’re always building something new, so be sure to check out our latest posts for the most up-to-date insights.

User handling is a fundamental part of a ton of web projects. This post will walk through how to get setup using the Symfony 3 framework and the Friends of Symfony bundle so that your project can allow users to register, login and out, and view and edit their User profile. The steps here will serve as a great starting point for your next web project.
Assumptions
This post will assume you have already set up a couple of things:
- make sure you have a working database user and password – you will need to input these during the install process
Install Symfony Standard Edition
The install command will create a new folder and build the project within it. Inside the directory where you would like to place your project folder run the following command:
composer create-project symfony/framework-standard-edition UserLove
Interactive Install Things
The installation will prompt you to give values for various parameters. The database_user, and database_password will need to match what you have set up.
Give the mailer_user parameter an email address value, as we’ll need it later. This does not need to be a valid email address for the purposes of this walkthrough.
If you’ve setup your database to use a different port, be sure to override that default.
You’ll also want to override the default secret with a random string before putting any Symfony project into production.
The defaults for the other parameters should be fine.
A Bit About Parameters
Don’t worry if you make a typo or accept a default you didn’t mean to. You can overwrite any of these values in the project’s app/config/parameters.yml file later.
The parameters.yml file is created by the install process based on parameters.yml.dist which acts as a blueprint.
As a best practice, the generated file parameters.yml is excluded from repositories as it may contain private and server specific information.
Database Creation
If you already had an empty database matching the name in your parameters.yml that’s fine. Otherwise, once the install process is complete, you can use a command in Symfony’s built in ORM package, Doctrine, to create it. In your terminal, move into your new project directory, UserLove, and run the create command:
cd UserLove
php bin/console doctrine:database:create
Check It Out
You can verify a successful install by visiting the default landing page. If you have a web server configured visit http://localhost:8000 or the assigned virtual host url.
If you do not have a web server setup you can run symfony’s server:run command which leverages PHP’s built in development web server. If you run into errors you might not have your default timezone set in your php.ini. From the root of your new “UserLove” directory run:
php bin/console server:run
The default landing page should look something like:

Symfony assumes you are in development and includes a web debug toolbar at the bottom of your project pages automatically when using the built in server.

If you are using virtual hosts you may want to comment out the highlighted lines below in the project’s
web/app_dev.php and add /app_dev.php to the url or update your virtual host server config to use app_dev.php in the location so you can access the web debug toolbar.
Install FriendsOfSymfony/FOSUserBundle
Now you have a Symfony 3 project, but it doesn’t do anything just yet. You can add a lot of basic functionality for users by installing and setting up the popular Friends of Symfony User bundle. Once the install and setup are complete, your project will be able to have users register, login, and view or edit their profiles.
Pre Install Setup
The FOS user bundle is setup to use Symfony’s translator service, but it’s not enabled by default. To enable Symfony’s translator, open app/config/config.yml, find the ‘translator’ config option and remove the # which comments out the line by default:
The bundle also requires its own config to know what database driver to use, which firewall to use, the location of the User class, and information for emailing. Add the fos_user config at the end of config.yml:
The mailer_user parameter already exists, but we’ll need to create the mailer_name parameter and add it to the existing parameter list in app/config/parameters.yml.dist. You will be prompted to give a value for mailer_name when you install the user bundle.
Enable the bundle so the installer will know what to do with the fos_user portion of the config by adding it to the existing $bundles array in the registerBundles() method in app/AppKernel.php:
The fos_user config specifies a file location for a User class, but it doesn’t exist yet. Create a new directory src/AppBundle/Entity and add a new file User.php with the default class setup:
The ORM annotations will tell Symfony’s default ORM – Doctrine, how to update the schema the database is built from.
Just before the class declaration there are ORM annotations which declare this class an Entity and associate it with a table named fos_user.
Above where the protected $id variable is declared there are additional ORM annotations declaring it an Id, making it a column of type “integer” and making it an auto generated value in the fos_user table.
Bundle Installation
Still in your project root run the following command:
composer require friendsofsymfony/user-bundle "~2.0"
Enter a value for the new mailer_name parameter when prompted.
Once the composer install process is complete, replace the content in app/config/security.yml with the following:
The FOS User bundle includes routes for actions like login, logout, and register, but they need to be imported into the project’s routing.yml.
Open app/config/routing.yml. By default this will contain one definition “app” which points to our AppBundle. Under this definition, add one which imports the FOS User bundle’s routes:
Update the Schema
The fos bundle User we extended and the additional attribute we’ve added will need to have a corresponding structure in our database. To have Doctrine generate table structures based on ORM annotations, run the following command from your project root:
php bin/console doctrine:schema:update —force
Doctrine provides another useful command which will both check your mapping for errors and also check your current database structure to see if it matches.
php bin/console doctrine:schema:validate
If you run the validate command after the update command, your console output should look something like this:
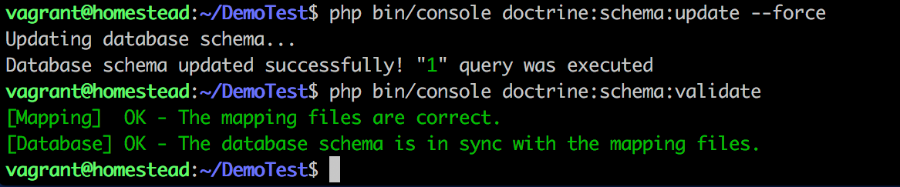
Success!
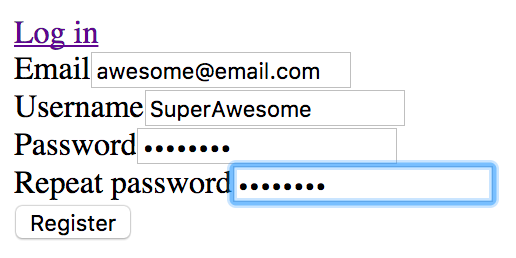
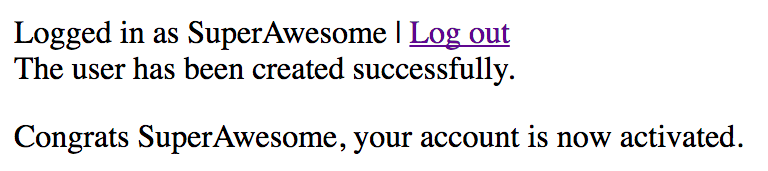
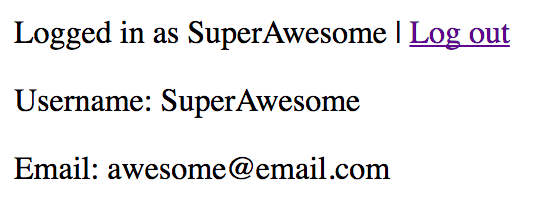
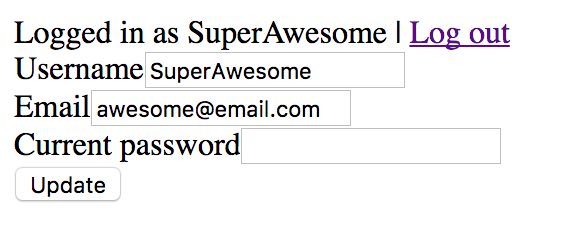
Congratulations, you now have a functional, if content-free, Symfony 3 application! Check out the registration process, login, logout, and edit profile:

You have successfully installed and configured Symfony and added the Friends of Symfony User bundle for user registration, login, and edit capabilities.
You’ve made amazing progress on your next web project for users.
Moving forward you might incorporate the FOS User bundle forms into your project’s style, expand the User attributes, install additional Symfony bundles, and of course writing tests is always a good idea.
Are you building something awesome for users with Symfony? Have suggestions for Symfony howtos you’d like to see? I want to hear about it!
- Email: mstaples@twilio.com
- Twitter: @dead_lugosi
- Github: mstaples


Related Resources
Twilio Docs
From APIs to SDKs to sample apps
API reference documentation, SDKs, helper libraries, quickstarts, and tutorials for your language and platform.
Resource Center
The latest ebooks, industry reports, and webinars
Learn from customer engagement experts to improve your own communication.
Ahoy
Twilio's developer community hub
Best practices, code samples, and inspiration to build communications and digital engagement experiences.