HTTP headers for the responsible developer
Time to read: 14 minutes
April 23, 2019
Written by

This article is a written version of the talk “HTTP headers for the responsible developer”. You can check the slides or the recording.
Being online is the default state for many people these days. We all spend our time shopping, chatting, reading articles, and looking for information like directions. The web connects us with the whole world, but most certainly the web connects people. I myself have been using the web now for 20 years, and my relationship to it changed eight years ago when I became a web developer.
Developers connect people.
Developers help people.
Developers enable people.
Developers have the power to build the web for everyone, but that power needs to be used responsibly. What matters, in the end, is building things that help and enable people.
In this article, I want to share how HTTP headers can help you build better products for a better web for everyone.
HTTP – HyperText Transfer Protocol
Let’s talk about HTTP first. HTTP is the protocol used by computers to request and send data over the web.
When a browser requests a resource from a server it uses HTTP. This request includes a set of key-value pairs giving information like the version of the browser or what file formats it understands. These key-value pairs are called request headers.
The server answers with the requested resource but also sends response headers giving information on the resource or the server itself.
HTTP is the foundation of the web today and it offers many ways to improve user experience. Let's dive into how you can use HTTP headers to build a web that is safe, affordable and respectful.
The web has to be safe
I never used to feel unsafe while browsing the internet. The more I learned about the web, the more concerned I became though. You can read about hackers potentially changing global CDN-hosted libraries, random websites mining cryptocurrency in the browser of their visitors and people social engineering their way into successful open source projects regularly. That’s not good, but why should you care?
If you’re building for the web today, it is not only you writing the code. Web development these days includes lots of people working on the same site. You are probably shipping lots of open source code, too. Additionally, you may include several third-party scripts for marketing purposes. Hundreds of people provide the code running on your site. Developers have to deal with this reality.
Should you trust all these people and all their source code?
I don’t think you can trust any third party code out there. Luckily, there are ways to secure your site and make it safer. Additionally, tools like helmet can be helpful to secure e.g. your express application.
If you want to analyze how much 3rd party code runs on your website, you can have a look at the network panel of your developer tools of choice or can give Request Map Generator a try.
HTTPS and HSTS – make sure your connection is safe
A secure connection is the foundation of a safe internet. Without encrypted requests running over HTTPS, you cannot be sure that there is no one in between your site and your visitors. A person can quickly spin up a public wifi network and perform a man in the middle attack against anyone who connects. How often do you use public wifi? And moreover, how often do you check if it’s trustworthy?
Luckily, TLS certificates are free today; HTTPS has become a standard and browser vendors allow cutting-edge features only over secure connections and even mark non-HTTPS websites as unsafe, which drives HTTPS adoption. Unfortunately, we’re not browsing safe all the time. When someone wants to open a website they are not entering the protocol into the address bar (and why should they?). This action leads to an unencrypted HTTP request. Securely running sites then redirect to HTTPS. But what if someone intercepts the first unsecured request?
You can use HSTS response headers (HTTP Strict Transport Security) to tell browsers that your site only works via HTTPS.
This header tells the browser that you don’t want to use HTTP requests, and it will automatically make the following requests to the same origin with a secured connection. When you try to access the same URL via HTTP again browsers will use HTTPS and redirect internally.
You can configure how long this setting should be active (max-age in seconds) for the case that you might want to use HTTP again. If you want to include subdomains you can configure that using includeSubDomains too.
If you want to go the extra mile and want to ensure a browser will never request your site over HTTP, you can also set the preload directive and submit your site to a global list. If your site’s HSTS configuration fulfills the requirements of a minimum max-age of one year and is active for subdomains it can be included in an internal browser record of sites that only work over HTTPS.
Did you ever wonder why you can’t use local environments like my-site.dev via HTTP with your browser anymore? This internal record is the reason – .dev domains are automatically included in this list since it became a real top-level domain in February 2019.
The HSTS header not only makes your site a little bit safer but also speeds it up. Imagine someone visiting your site on a slow mobile connection. If the first request is made via HTTP only to receive a redirect the user can spend several seconds without seeing anything. Using HSTS, you can save these seconds, and the browser uses HTTPS automatically.
CSP – be clear about what is allowed on your site
Now that your site runs over a secure connection you might run into the problem that browsers start blocking requests that go out to an insecure address due to mixed-content policies. The Content Security Policy (CSP) header offers an excellent way to handle these cases. You can define your CSP ruleset via meta elements in your served HTML or via HTTP headers.
The upgrade-insecure-requests directive tells the browser to upgrade all HTTP requests to HTTPS magically.
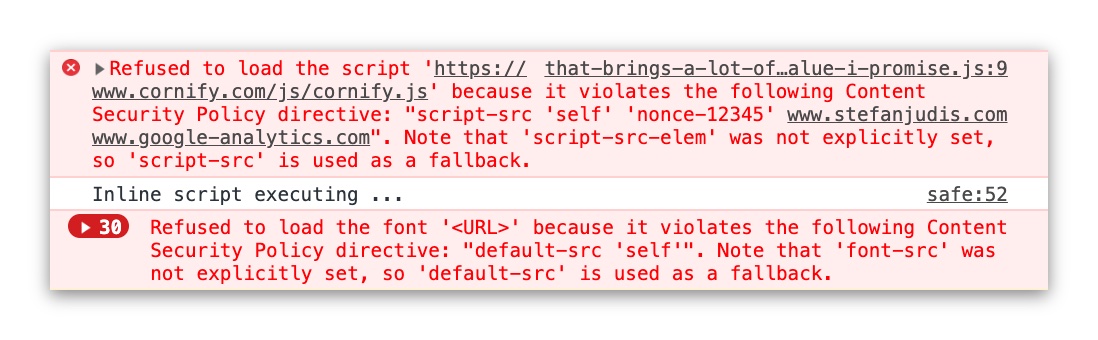
CSP is not only about the used protocol though. It offers granular ways to define what resources and actions are allowed on your site. You can define for example which scripts should be executed or where images should be loaded from. If something is not allowed the browser blocks it and prevents your site from potential attacks.
At the time of writing, there are 24 different configuration options for CSP. These options range from scripts over stylesheets to even service worker origins.
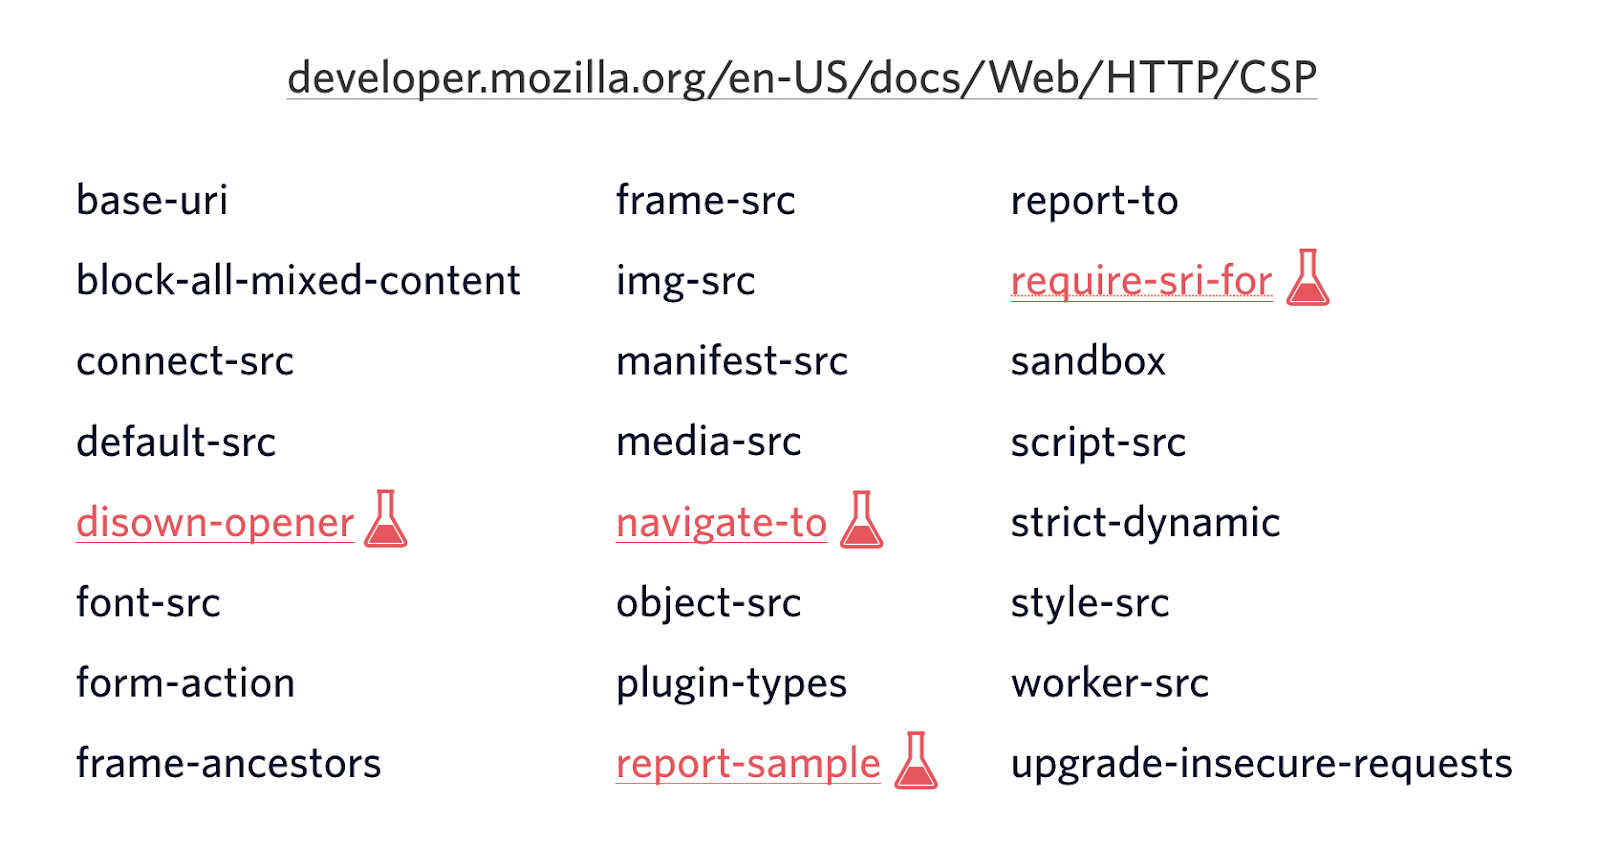
You can find a complete overview on MDN.
Using CSP, you can nail down what your site should include and what not.
The ruleset above is the one I ship for my personal site and if you think that this CSP example definition is very tough to come up with – you’re entirely right. Implementing the CSP ruleset on my personal site took me three attempts to get right. I deployed it and rolled back because it broke my site several times. There is a better way to do this.
To avoid breaking your site, CSP also provides a report-only option.
Using the Content-Security-Policy-Report-Only mode browsers only log resources that would be blocked to the console instead of blocking them. This reporting mechanism gives you a way to check and adjust your ruleset.
Both headers, Content-Security-Policy and Content-Security-Policy-Report-Only, also offer a way to define an endpoint to send the violation and log information to (report-uri). You can set up a logging server and use the sent log information to tweak your CSP rules until it’s ready to ship.
The recommended process is: deploy CSP in report mode only first, analyze the incoming violations with real traffic, and only when there are no violations of your controlled resources showing up anymore turn it on.
If you’re looking for a service that can help you deal with these logs, I’m using Report URI, and it’s a great help.
Overall CSP adoption
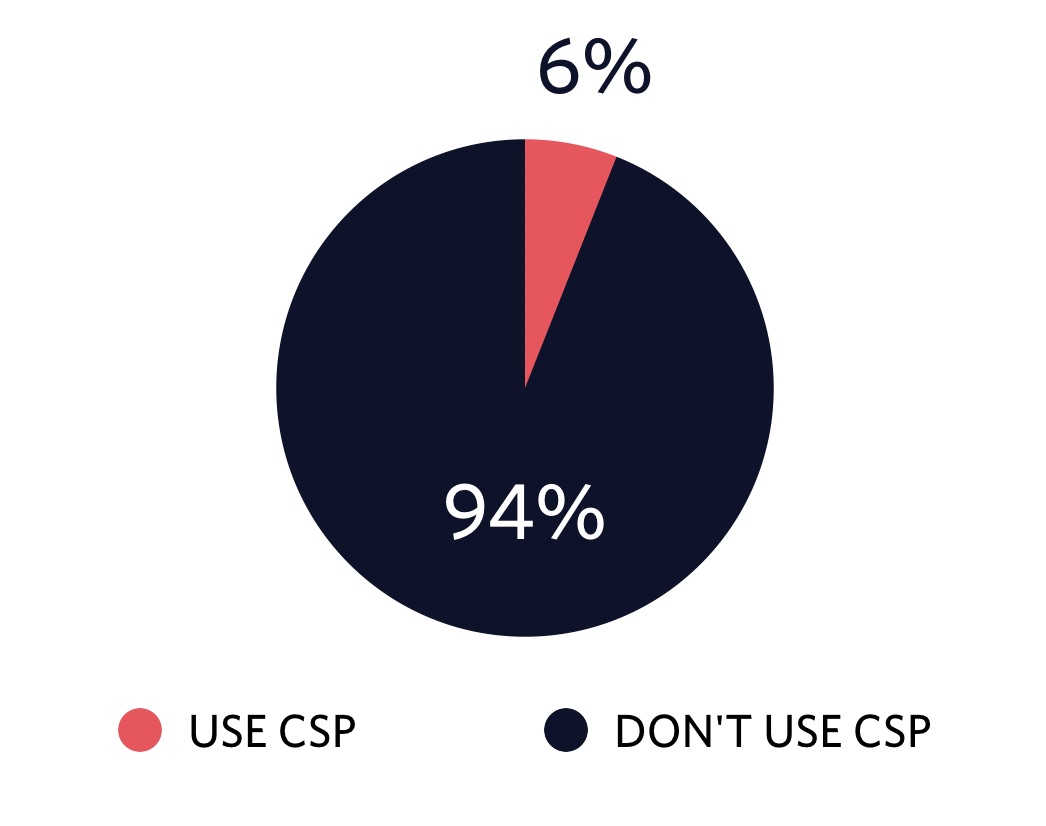
Browser support for CSP is good these days, but unfortunately, not many sites are using it. To see how many sites serve content with CSP I ran a query on HTTP Archive and found out that only 6% of the crawled sites use CSP. I think we can do better to make the web a safer place and to avoid our users mining cryptocurrency without knowing it.
The web has to be affordable
While I write this article, I sit in front of a relatively new MacBook using my fast Wi-Fi connection at home. Developers often forget that a setup like this is not the default for most of our users. People visiting our sites use old phones and are on crappy connections. Heavy and bloated sites with hundreds of requests give them a bad experience.
It’s not only about the experience though. People pay different amounts for data depending on where they live. Imagine, you’re building a hospital site. The information on this particular site might be crucial and life-saving for people.
If a page on a hospital site is 5MB it is not only slow but also could be too expensive for people needing it the most. The price of 5MB in Europe or the United States is nothing compared to the price of 5MB of data in Africa. Developers are responsible for keeping the web affordable for everybody. This responsibility includes serving the right resources, evaluation of the right tools to use (do you really need a JS framework for a landing page?), and avoiding requests.
Cache-Control – avoid requests for the unchanged resources
A website today easily contains hundreds of resources ranging from stylesheets to script files to images. Using the Cache-Control header developers can define how long a resource should be considered “fresh” and can be served from the browser cache.
By setting proper Cache-Control data transfer is saved, and files can be used from the browser cache for a certain amount of seconds (max-age). Browsers should revalidate cached resources after the time span is over.
However, when visitors refresh a page, browsers still revalidate the page including referenced resources to ensure the cached data is still valid. Servers respond with a 304 header signaling that the cached data is still good or 200 serving the updated data. This can save transferred data but not necessarily made requests.
This is where the immutable feature comes into play.
immutable – never request a resource twice
In modern Frontend applications, stylesheet and script files usually have a unique file name like styles.123abc.css. This file name depends on the contents of the particular file. When the content of these files changes, it results in a different file name.
These unique files could potentially be cached forever including the situation when a user refreshes a page. The immutable feature can tell the browser not to revalidate a resource in a certain timeframe. This makes much sense for finger-printed assets and helps to avoid revalidation requests.
Optimal caching is very hard and in particular browser caching is not very intuitive because it provides multiple configurations. I recommend having a look at the following resources:
- Harry Roberts wrote an excellent guide about cache-control and its settings
- Jake Archibald gave advice on caching best practices in visual detail
- Ilya Grigorik provided a nice how to flow diagram on caching headers
Accept-Encoding – compress to the maximum (uhm… minimum)
Using Cache-control, we can save requests and reduce the amount of data that repeatedly goes over the wire. We can not only save requests but also shrink what is transferred.
When serving resources, developers should make sure to send as little data as possible. For text-based resources like HTML, CSS and JavaScript compression plays a significant role in saving transferred data.
The most commonly used compression these days is GZIP. Servers are fast enough to compress text files on the fly and serve compressed data when requested. GZIP is not the best option anymore though.
If you inspect the requests your browser makes for text-based files like HTML, CSS, and JavaScript and have a look at the request headers you’ll find the accept-encoding header.
This header tells the server what compression algorithms it understands. The not so well known br stands for Brotli compression and is the compression used by high-traffic sites like Google and Facebook. To use Brotli your site has to run on HTTPS.
This compression algorithm was created with small file sizes in mind. When you give it a try on your local machine and compress a file by hand, you’ll find out that Brotli indeed compresses better than GZIP.
You may have heard that Brotli compression performs slower, too. The reason for that is that Brotli has 11 compression modes and the default mode was chosen to guarantee small file sizes resulting in long encoding times. GZIP, on the other hand, has 9 modes and the default mode was chosen taking both, speed and file size, into consideration.
This decision makes Brotli’s default mode unsuitable for on-the-fly compression, but if you change the compression mode you can achieve smaller file sizes with comparable speed to GZIP. You can even use it to compress on-the-fly and treat it as a potential GZIP replacement for supporting browsers.
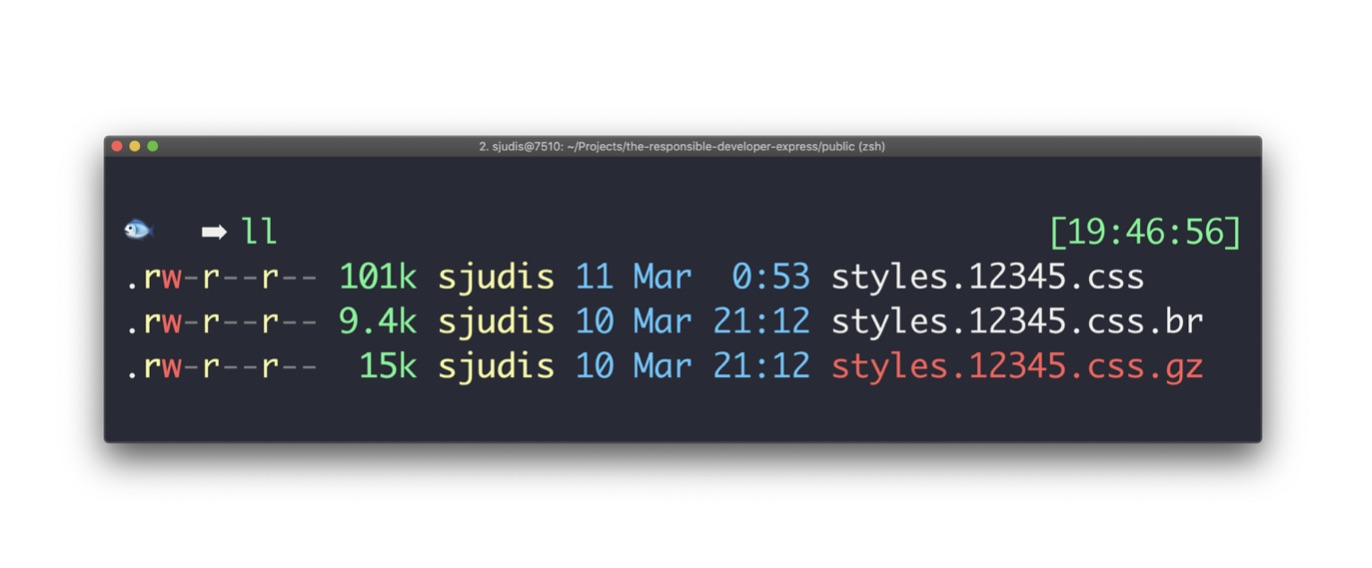
In addition to that, if you want to gain maximal file savings you could forget the idea of dynamically compressing your files and pre-generate optimized GZIP files using zopfli and Brotli files in your build process to statically serve them.
If you want to read more about Brotli compression and how it compares to GZIP, the folks at Akamai did extensive research around this topic.
Accept and Accept-CH – serve tailored resources to the user
Optimizing text assets is great to save kilobytes but what about the heavier resources like images to save even more data.
Accept – serve the right image format
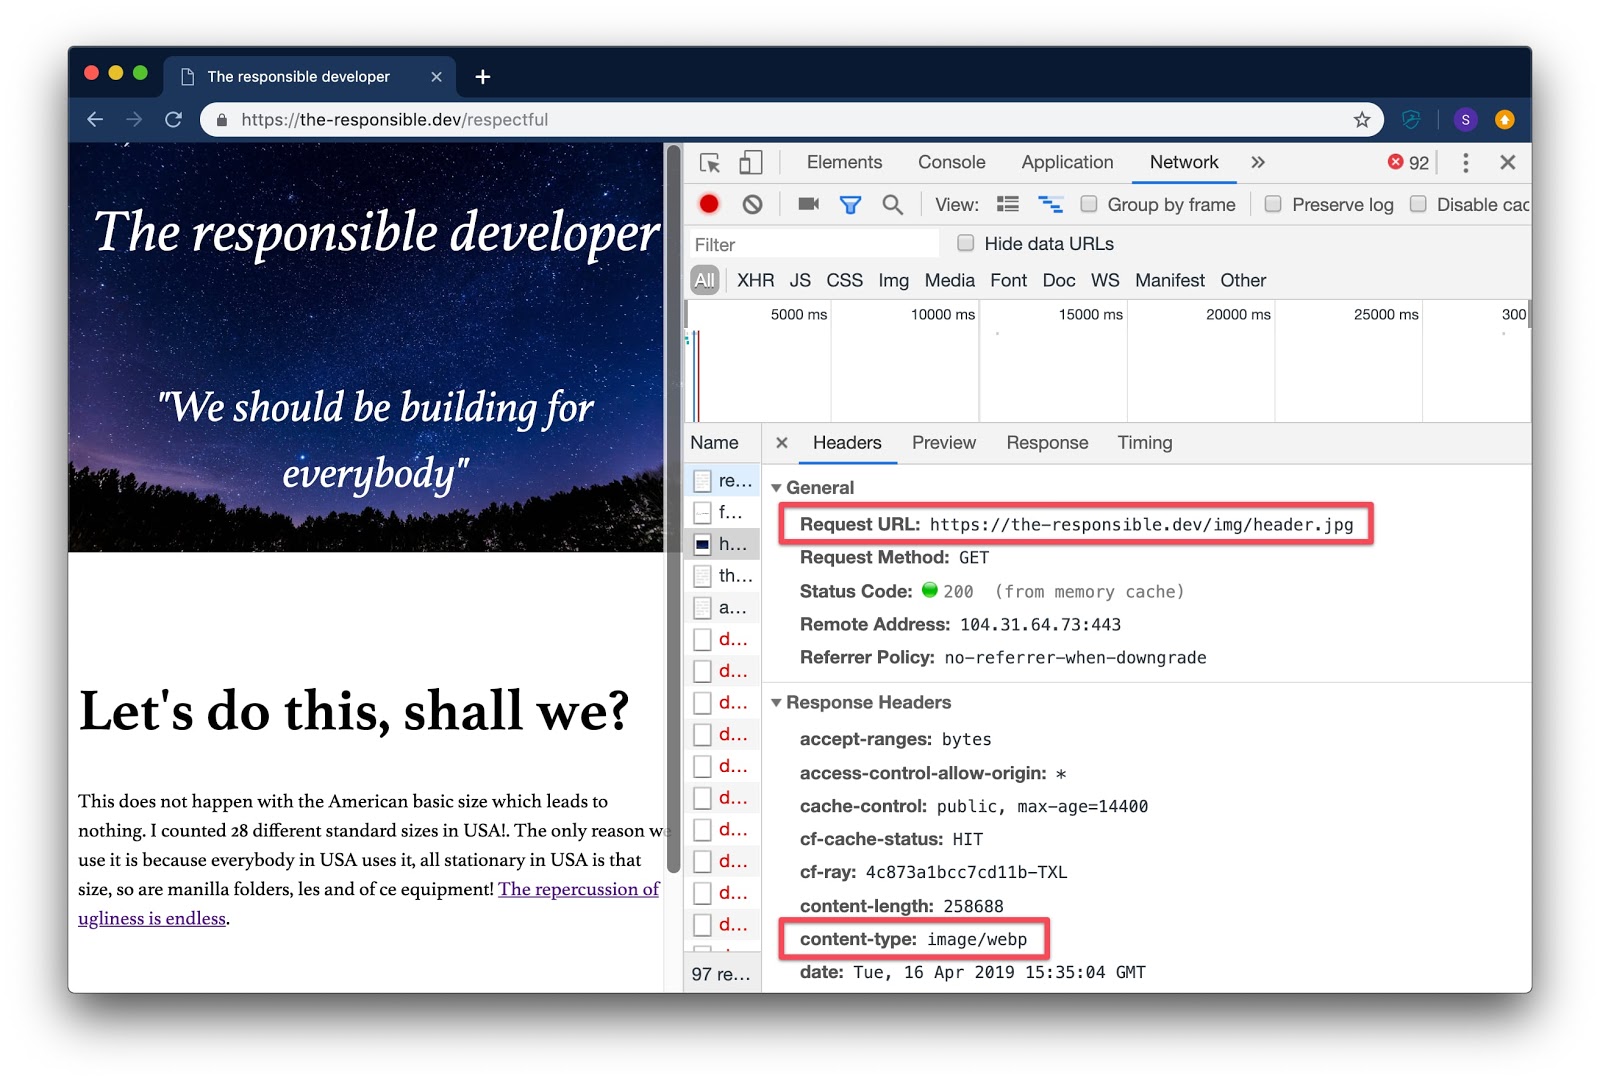
Browsers not only tell us about what compression algorithms they understand. When your browser requests an image, it also gives information about what file formats it understands.
The competition around a new image format was on for a few years, but now it looks like webp won. Webp is an image format invented by Google, and the support for webp images is pretty good these days.
Using this request header, developers can serve a webp image even when the browser requested image.jpg which results in smaller file size. Dean Hume wrote a nice guide on how to do this in a service worker. That’s pretty cool!
Accept-CH - serve a properly sized image
You can also enable client hints for supporting browsers. Client hints are a way to tell browsers to send additional headers giving information on viewport width, image width and even network conditions like RTT (round trip time) and connection type like 2g.
You can enable them by including a meta element:
Or setting headers on the initial HTML request:
Supporting browsers will start sending additional information for the defined timespan (Accept-CH-Lifetime in seconds) in the following requests that can help developers to tailor for examples images to user conditions without changing any HTML.
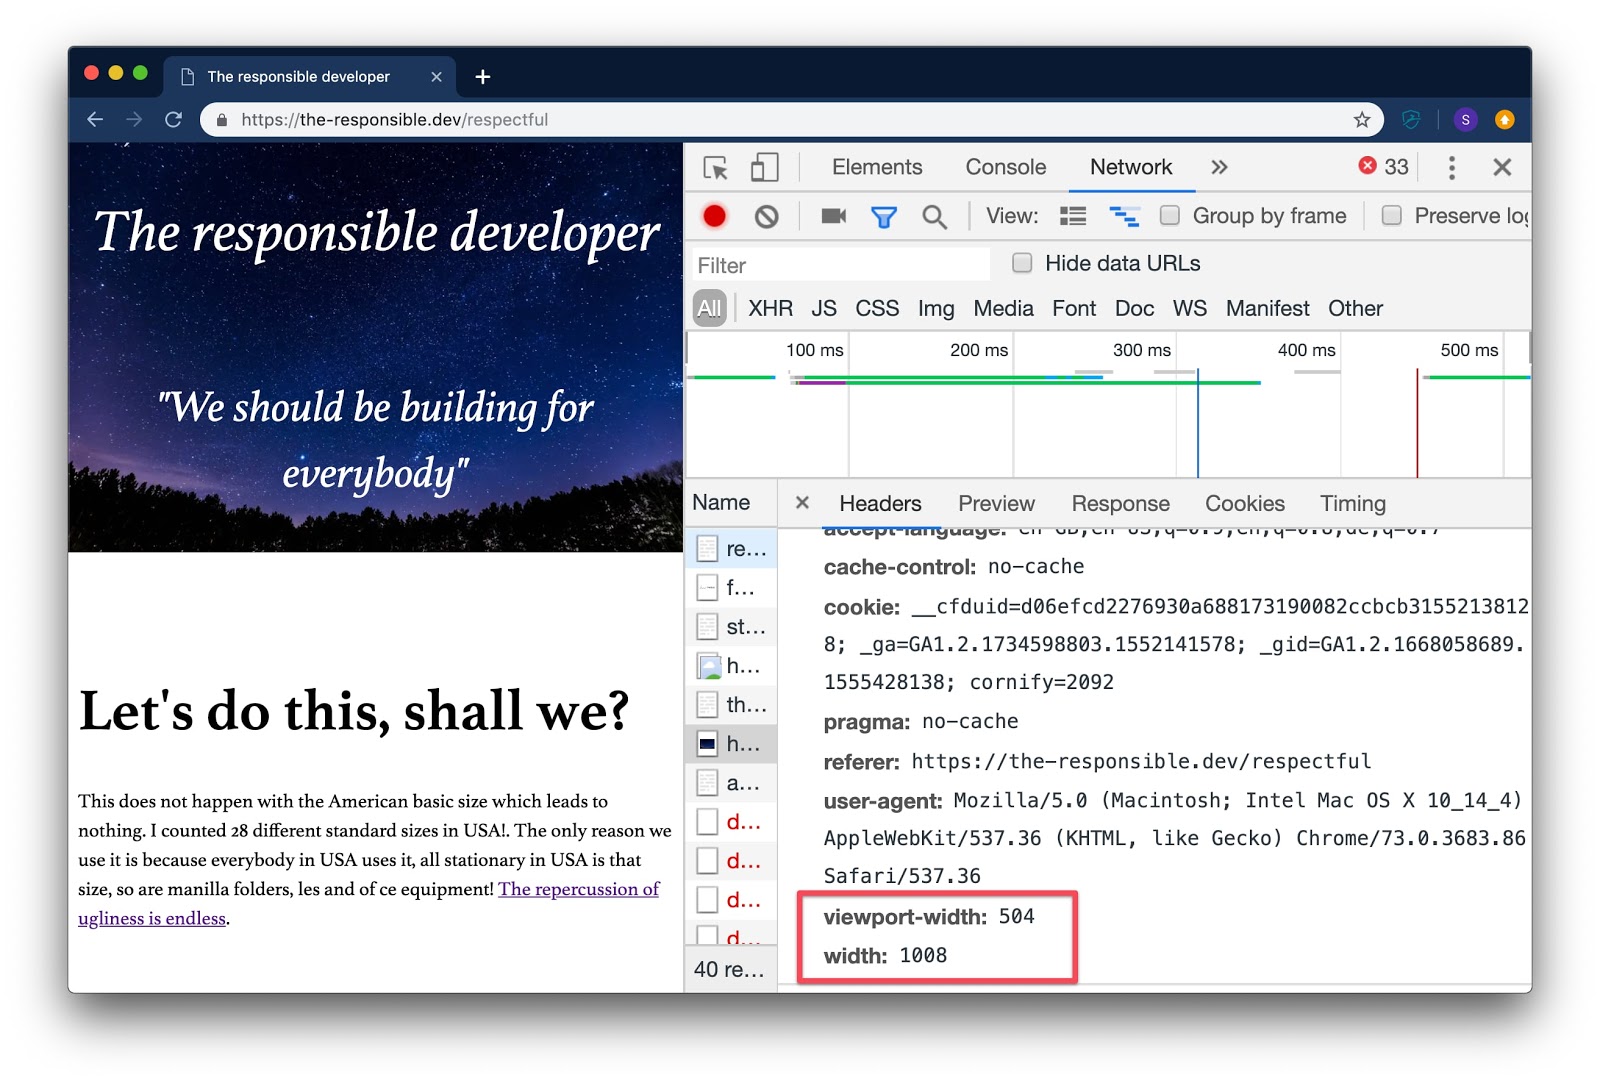
To receive for example additional information like image width on the server side you can equip your images with a sizes attribute to give the browser additional information on how this image will be laid out.
With the initially received Accept-CH response header and images equipped with the sizes attribute supporting browsers will include viewport-width and width headers in the image requests telling you what image would be the best fit.
Having the supported image format and image dimensions at hand you can send tailored media without the need to write error-prone picture elements taking care of file formats and sizes like the following repeatedly.
With the possibility to access viewport width and image sizes you can potentially move asset resize logic in a central place on your servers.
You have to consider though, that just because you have the exact image width at hand you don’t want to create images for every width. Sending images for certain dimension ranges (image-200, image-300, ...) helps to leverage CDN caches and saves computation time.
Additionally, with current technologies like service workers, you could even intercept and change request right in the client to serve the best image files. With enabled client hints service workers have access to layout information and in combination with an images API like for example Cloudinary you could adjust the image url right in the browser to receive properly sized images.
If you’re looking for more information on client hints, you can check Jeremy Wagner’s article or Ilya Grigorik’s article on the topic.
The web has to be respectful
With all of us being online many hours a day there is the last aspect that I consider to be very important – the web has to be respectful.
preload – reduce the waiting time
As developers, we want to make sure to value the time of our users. Nobody wants to waste time. As discussed in the previous sections serving the right data plays a big role in saving time and data. It’s not only about what requests are made but also about the timing and order of these.
Let’s think of an example: if you include a stylesheet in your site browsers will show nothing until it is loaded. While nothing is displayed the browser still continues to parse the HTML looking for other resources to fetch. When the stylesheet is loaded and parsed it might include references to other critical resources like fonts which have to be requested. This sequential process can increase the loading time for your visitors.
Using the rel=preload you can give the browser information on what resources will be requested in the near future.
You can preload resources via HTML elements:
Or headers:
This way the browser receives the header or discovers the link element and immediately requests the resources so that these sit already in the browser cache when they are needed. This process values your visitor’s time.
To preload your resources in the best way and understand all the configurations I recommend having a look at the following resources:
- Yoav Weiss is an expert on preload and published great resources around it
- Addy Osmani went into great detail on preload and other mechanisms like
prefetchandpreconnect
Feature-Policy – don’t be the annoying person
If there is one last thing that I don’t want to see any longer, it is websites asking me for permissions for no reason. I can only quote my colleague Phil Nash on that topic.
Do not demand notification permission on page load.
Developers should be respectful and not build sites that annoy their visitors. People just click away all the permission dialogs. Websites and developers lose much trust, and all the new shiny web features will lose their power if we as developers are not using them carefully.
However, what if it is mandatory for your site to include lots of third-party code and all these scripts trigger one permission dialog after another? How can you make sure that all of the included scripts behave?
This is where the Feature-Policy header comes into play. Using this header you can define what features are allowed and limit the popping up permission dialogs that may be triggered by someone else running code in your site.
You can define it for your site using headers but also define it for embedded content like iframes which can be mandatory for third-party integrations.
At the time of writing Feature-Policy is highly experimental but if you have a look at upcoming options, it’s very exciting. In the not too distant future developers cannot only limit themselves and prevent the shipping of annoying dialogs but also potentially block non-optimized media. These features will make a big difference in user experience.
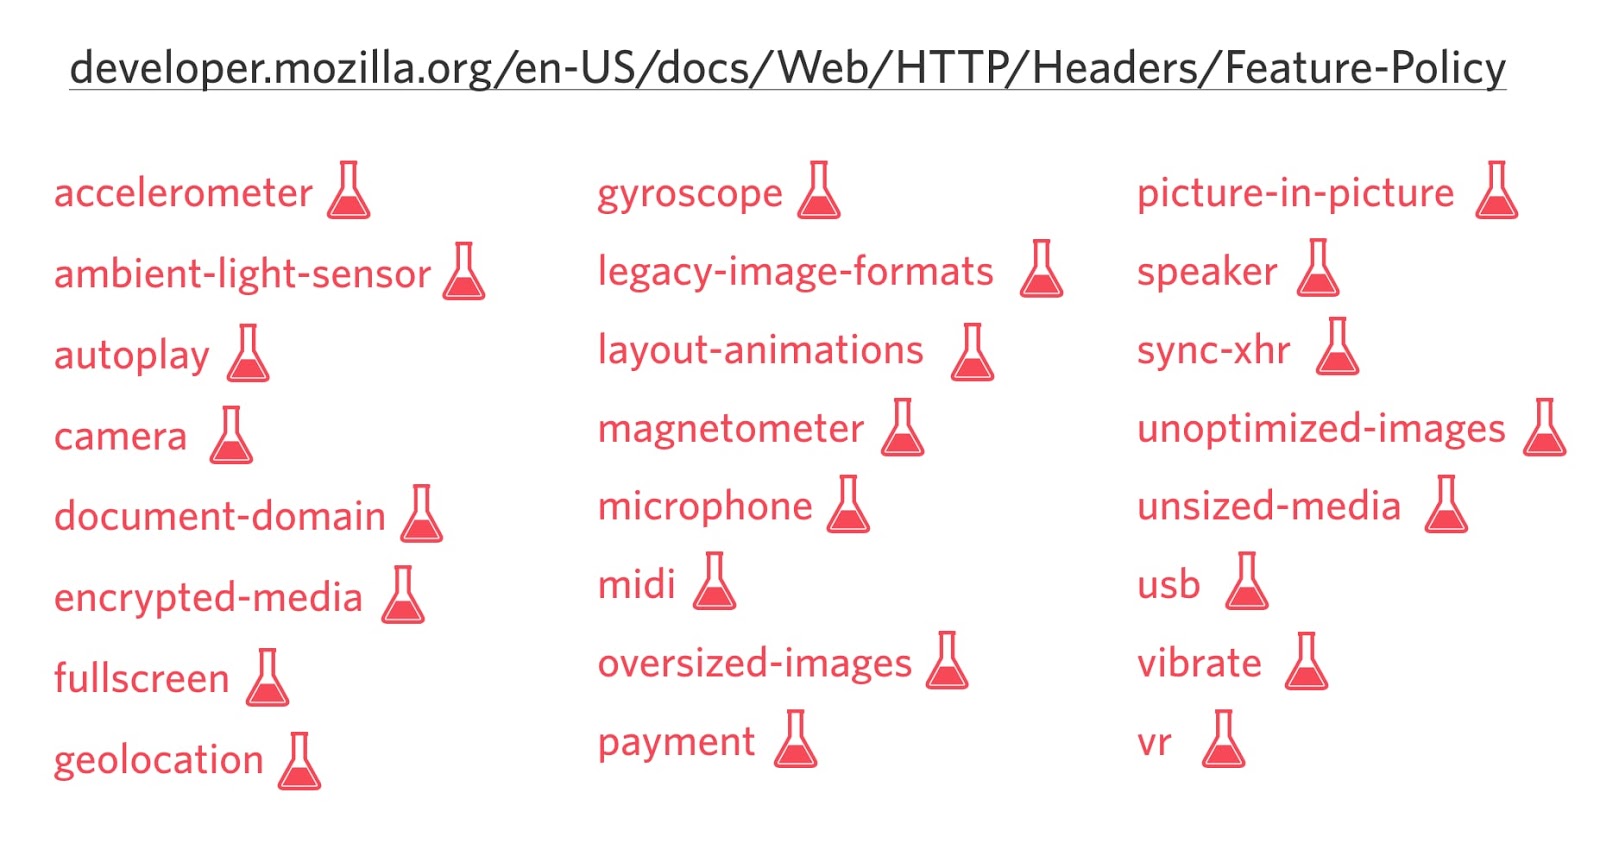
You can find a complete overview on MDN.
Looking at the feature policy list above you might wonder what happened to the most annoying one – push notifications. It turned out that the implementation of Feature-Policy for push notifications is harder than expected. You can follow the filed GitHub issue if you want to learn more.
Using feature policy, you can make sure that you and your third parties won’t turn your site into a permission dismissal race which unfortunately is already the default state for many sites today.
The web has to be for everybody
In this article, I only covered a few headers that could help improve the user experience. If you want to see an almost complete overview of headers and their possibilities I can recommend having a look at Christian Schaefer’s slide deck “HTTP headers – the hidden champions”.
I know that building a great website today is very challenging. Developers have to consider designs, devices, frameworks, and yes… headers play a role, too. Hopefully, this article gave you some ideas and you’ll consider safety, affordability, and respect in your next web projects because these are the factors that make the web truly great for everybody.
If you want to say “Hi” you can reach me under the following channels:
- Email: sjudis@twilio.com
- Github: stefanjudis
- Twitter: @stefanjudis

Related Resources
Twilio Docs
From APIs to SDKs to sample apps
API reference documentation, SDKs, helper libraries, quickstarts, and tutorials for your language and platform.
Resource Center
The latest ebooks, industry reports, and webinars
Learn from customer engagement experts to improve your own communication.
Ahoy
Twilio's developer community hub
Best practices, code samples, and inspiration to build communications and digital engagement experiences.