Build a Photobooth with an Arduino Yun, a Webcam and Dropbox
Time to read:
February 12, 2015
Written by

The Arduino Yun is an Arduino with built-in WiFi and Linux. With the Yun, not only can you do all the hardware hacking that you’d expect from an Arduino, but you can also connect it to the Internet and run programs in your favorite scripting language.
In this tutorial, we’ll build a proof-of-concept for an Arduino powered photo booth to serve as the foundation for teaching my dog to send me selfies using Twilio MMS. The goal is to:
- take a picture with a webcam plugged into the Arduino Yun
- upload the image to dropbox using Python
- trigger these actions via the press of a button
The end result is going to look something like this:
Getting Started
This tutorial builds on our Getting Started with the Arduino Yun tutorial, which covers:
- How to format your SD card for use in the Yun
- How to upgrade to the latest version of OpenWRT-Yun
- How to install the Arduino IDE
- How to run your first sketch on the Yun
Assuming you’ve completed those steps, this photo booth tutorial will take you about 30 minutes. The ingredients you’ll need are:
- Arduino Yun (~$75 at Spark Fun or Ada Fruit)
- microUSB cable (~$5)
- microSD card (~$5)
- webcam that runs the UVC protocol (see below)
- breadboard (~$5)
- 3 jumper wires
- 10K Ohm resistor
- A momentary tactile push button
- A free dropbox account
Webcam and the Arduino Yun
It’s surprisingly easy to use a webcam with an Arduino Yun. Any webcam that uses the UVC protocol (most of them do) will work. If you don’t have a webcam lying around, check out the Logitech C270 ($23 on Amazon).
To start:
- plug the webcam into your Arduino Yun’s USB slot
- insert your microSD card into the Yun
- SSH into your Arduino Yun
If you can’t SSH into your Yun or haven’t formatted the microSD card to work in your Yun, check out our getting started with the Yun guide.
Once connected to your Yun, you’ll need to
- upgrade the OpenWRT package manager
- install drivers for the webcam
- install fswebcam, “a neat and simple webcam app.”
From the command line:
Then cd into the root of your SD card:
We’ll run the fswebcam utility with two parameters:
- where to save the file
- the resolution at which to shoot
You’ll see a bunch of text, some of which looks like an error message. Disregard it. So long as you see Writing JPEG image to ‘pic.jpg’ , you’re fine.
If you want to verify that that file really is a picture, you can pop the SD card out of your Yun, plug it into your computer and view it there.
Dropbox and Arduinos
You might be saying, “But Greg, what good is a picture on the Yun if I have to pop out the SD card just to look at it?” I hear ya. Let’s get those pictures off the Yun and into the cloud.
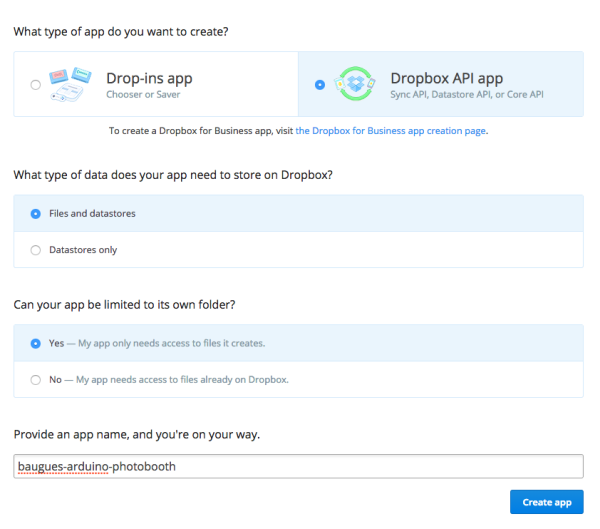
To interact with the Dropbox API, we need to create a new Dropbox app. Sign up for a Dropbox account if you haven’t already, then visit the create apps page on the developer console. Then:
- Select Dropbox API app
- Select “Files and datastores only”
- Select “Yes – My app only needs access to files it creates.”
- Give your app a name (it has to be unique to the Dropbox world)
- Click Create
Once you create your app, you’ll need to generate an access token
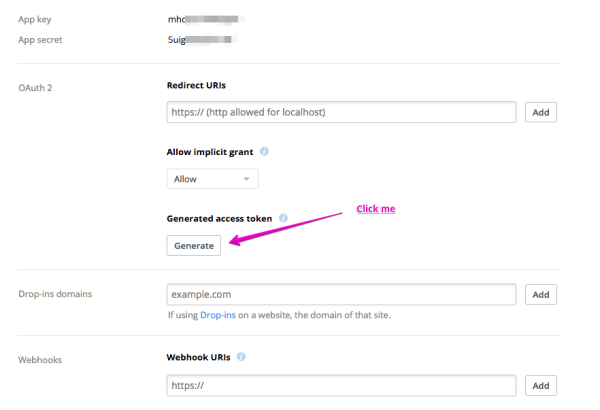
Keep that tab open. We’re going to need that access token in a few minutes.
Install pip on the Arduino Yun
Let’s write some code to interact with the Dropbox API. This is when the power of the Yun shines. Instead of working with APIs in the Arduino programming language, you can write programs in a scripting language with which you’re more familiar. Here we’ll do it in Python since that’s what comes preinstalled on the Yun, but you could install Ruby or Node if that’s your jam.
Dropbox has an easy to use Python SDK. Before we install that though, we’ll need to install pip, a Python package manager.
From the command line:
And that’s it.
By default, pip would install Python packages to the Yun’s onboard memory. However, the Arduino Yun docs carry an ominous warning that says, “You’re discouraged from using the Yún’s built-in non-volatile memory, because it has a limited number of writes.” Let’s install the Dropbox SDK to the SD card instead.
That requires three steps:
- Create a new directory on the SD card for our Python packages
- Tell Python to look for packages there
- Force pip to install the Dropbox SDK there
Plug your SD card back into your Yun if you haven’t already. Then create a directory:
Now let’s edit our /etc/profile and set a PYTHONPATH environment variable so that Python knows to look here.
You’ll see several lines that start with export. Move the cursor down below those lines, then press i to enter insert mode. Then paste this:
Press esc to go back to command mode. Type :wq to save the file and quit vim. Then, from the command line, reload your environment by typing:
source /etc/profile
Finally, install the Dropbox SDK with a flag to install to our newly created directory:
Upload a file to Dropbox from the Arduino Yun in Python
Your Arduino Yun expects code to live in a directory on the SD card called arduino. Let’s create that directory and navigate there:
Now let’s create a new file and edit it in vim:
Then press i to enter insert mode.
The code we’re about to copy and paste will:
- import the dropbox and datetime libraries
- use datetime to create a unique filename for each picture
- initialize a Dropbox client with our access token
- open the picture taken by our webcam
- save the file to Dropbox with our unique filename
- print the response from the dropbox API
Make sure you replace YOURACCESSTOKENGOESHERE with the access token you generated on the Dropbox dashboard. Then hit esc and type :wq to save the file and quit.
(If you’d like more detail on what’s happening in those last four lines, check out Dropbox’s excellent documentation on using Dropbox Core API in Python.)
Let’s see if it works. Open your apps folder in Dropbox and click into the folder for your newly created app. It should be empty. Now run your Python script from the terminal:
Now check that Dropbox folder again.
Upload a file with an Arduino Sketch
If all you wanted to do was take a picture with a webcam and upload it to Dropbox, you wouldn’t need an Arduino. The reason we’re doing this on the Yun is so that we can do some hardware hacking along with our software writing.
To interact with the pins on the board, we are going to have to write some code in the Arduino programming language (oddly, it has no official name other than that). So let’s first write a sketch that will trigger the shell command to take a picture and the Python script to upload a picture, then we’ll deal with the button.
Open the Arduino IDE and create a new sketch. At the top of the sketch, include the bridge and process libraries:
The Arduino Yun has two processors: the “Arduino chip” which controls the pins and interfaces with the hardware and runs, and the “Linux and WiFi Chip.” These two chips communicate with one another via the Bridge library. The Process library is how we execute Linux commands from Arduino code.
Your sketch comes pre-populated with setup() and loop() functions. We’ll come back to those in a minute.
First, let’s write the function to take a picture:
Then a function to upload the file from the Arduino to Dropbox:
Pretty simple, huh?
Now back to our setup() and loop() . The setup() runs one time after you upload the sketch to your Arduino.
Our setup() will simply initialize the bridge:
Once setup() is finished, loop() runs continuously. Ours will take a picture, upload a picture, then do it again. The loop() can run thousands of times per second, but our synchronous Linux processes will slow it down considerably (if you ever need to slow it down more, you can introduce a delay()).
That’s it. Click the upload button in the top left of the Arduino IDE to push your sketch to the Arduino. Then open your Dropbox folder, smile for the camera, and you should see something like this:
Photos at the push of a button
Now that our functions work, lets trigger them with a button instead of running an infinite loop. For our circuit we’re going to need:
- Breadboard
- Three jumper cables
- 10K Ohm resistor
- Momentary tactile pushbutton switch
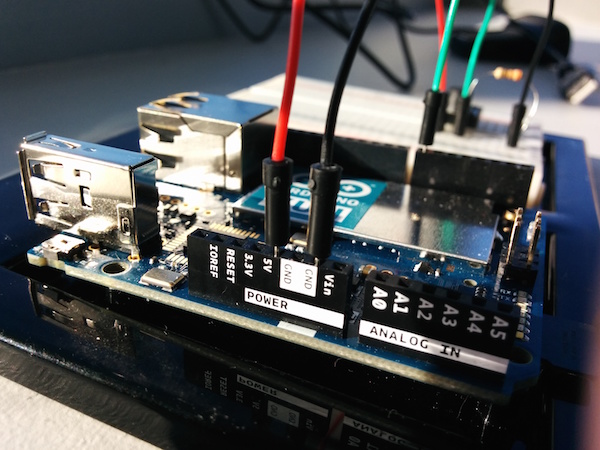
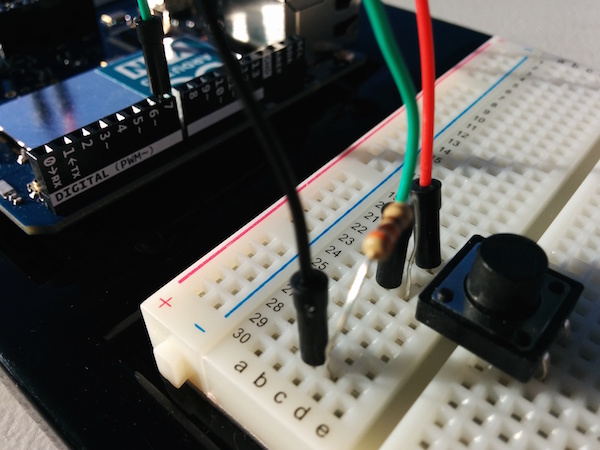
The general idea is that we have a circuit running from the 5V pin, through a button, and back into GND. When the circuit is completed — i.e. the button is pressed — we send a signal to PIN 7.
This circuit is based on an example from Massimo Banzi’s excellent introductory book called Getting Started with Arduino. Here’s what it looks like:

Once you’ve built your circuit, we’ll update the sketch with an additional flourish — instead of having the button press take a picture immediately, we’ll have it flash the onboard LED three times to tell us to get ready, then take a picture.
The first two lines of your sketch currently are includes . Below those, add two constants to identify the LED and the pin telling us if the button has been pressed:
In the setup() , add these two lines to prepare those pins for output and input, respectively:
Then create a new function at the end of your sketch to blink the LED — turn it on for half a second, then off for a tenth of a second — and do this three times:
Finally, replace your loop() with code that will read from the pin we’ve identified as BUTTON . If it’s HIGH (i.e., current is running through it) then:
- blink the LED
- take a picture
- upload that picture to Dropbox.
Upload this new sketch to your Arduino, press your button and watch that Dropbox fill up.
Next Steps
Full disclosure — I started working on this series of Arduino Yun tutorials because I wanted to teach my dog to send selfies. So far we’ve managed to set up an Arduino Yun, take pictures at the push of a button, and ship those pictures to the cloud. In our next tutorial, we’ll learn how to send SMS and MMS from the Arduino Yun.
What about you? Maybe you could:
- Stream video from the webcam
- Trigger the camera with a motion sensor instead of a button
- Store data from other input devices, such as environmental sensors or a keypad
- Build a real-deal photo booth
When Arduinos first came out, the possibilities seemed pretty wide open. Now that you can run scripts from your favorite programming language and connect to the Internet, the possibilities seem limitless. I’d love to hear what you’ve built with your Yun and I’d be happy to help if you run into any problems. You can leave a comment below or drop me an email at gb@twilio.com. And if you’ve enjoyed this post, you may want to follow me on Twitter.
Happy hacking.
Resources
These resources were incredibly helpful as I wrote this tutorial:
- Marc-Oliver Schwartz’ Wireless Security Camera with the Arduino Yun
- The fwebcam docs
- Wikipedia page for USB Video Class (UVC) protocol
- Dropbox Core API docs
- Full Stack Python’s Application Dependencies
- Cody Boney and Sam Brenner’s posts on installing pip on the Yun.
- Massimo Banzi’s Getting Started with Arduino
Related Posts
-
 How To Containerize A Twilio App With DockerDylan Frankcom
 -
 How to run Automated AMD Tests and Fine-Tune Twilio AMD for Accurate Voice AutomationRosina Garcia Bru Fernando Vieira Machado
 -
 How to Build an AI Chatbot with Facebook Messenger, OpenAI, and Twilio Programmable Messaging using PythonDylan Frankcom
Related Resources
Twilio Docs
From APIs to SDKs to sample apps
API reference documentation, SDKs, helper libraries, quickstarts, and tutorials for your language and platform.
Resource Center
The latest ebooks, industry reports, and webinars
Learn from customer engagement experts to improve your own communication.
Ahoy
Twilio's developer community hub
Best practices, code samples, and inspiration to build communications and digital engagement experiences.