Asynchronous JavaScript: Introduction to JavaScript Promises
Time to read: 15 minutes
August 31, 2019
Written by

Asynchronous processing is one of the most important capabilities JavaScript acquired as the language matured. JavaScript’s async capabilities enable more sophisticated and responsive user interfaces. They also make it possible to implement a distributed web application architecture built on standards like SOAP and REST.
JavaScript Promises are currently the most powerful and flexible asynchronous technology built into the language itself. This post will explain how they work and get you writing your own promises with some practical examples.
Promises offer a number of advantages:
- a promise can be called multiple times
- promises can be chained together
- promises can include error rejection events
- errors in a chain of promises need only be handled once (error propagation)
- promises can be used to wrap old-style callback functionality
- promises always execute after the current execution stack is empty
If you’re just starting out with asynchronous functionality in JavaScript the preceding points might not mean much to you. Fortunately, the two previous posts in this series introduce the basics and give you a solid foundation for understanding how promises work:
Asynchronous JavaScript: Understanding Callbacks
Asynchronous Javascript: Organize Callbacks for Readability and Reusability
Those posts provide an explanation of the JavaScript event loop, callback queue, and execution stack. They also show you how to create practical callbacks and organize them into readable code.
If you already have a solid understanding of these topics and want to learn about JavaScript Promises you can dig right in.
Prerequisites
To accomplish the tasks in this post you will need the following:
- Node.js and npm (The Node.js installation will also install npm.)
You should also have a working knowledge of the core elements of JavaScript, including object constructors and anonymous functions. Read the first post in this series if you are not familiar with the JavaScript event model.
There is a companion repository for this post, available on GitHub.
Setting up the project
If you have completed the project from the Asynchronous Javascript: Organize Callbacks for Readability and Reusability post you can continue with the code you wrote for that post. If you are familiar with the Event Loop mechanism or want to start fresh, you can get the code from GitHub.
Clone the project by executing the following command-line instructions in the directory where you would like to create the project root directory:
Understanding JavaScript Promises
The JavaScript Promise object was introduced in 2015 with the 6th edition of JavaScript, initially called ECMAScript® 6 (ES6) and later renamed to ECMAScript® 2015 (ES2015). You’ll see both names used interchangeably.
The Promise object is a proxy that represents the eventual completion or failure of a deferred operation, which is almost always (but not required to be) asynchronous. Typical asynchronous operation of this kind would be a REST call to a remote API or reading a file from the local file system.
The promise can do work on the result of an asynchronous activity and decide whether to resolve or reject the promise. The state of the returned promise object is then set accordingly.
Promise terminology
Promises are fulfilled, rejected, or pending. The state of a promise is set to fulfilled to indicate successful execution. The state of a promise is set to rejected to indicate failure of an activity. Otherwise the promise is pending: waiting for the result of an activity.
A promise is settled if it is either fulfilled or rejected.
A promise is resolved if it is settled or locked in to match the state of another promise. Because a promise may be locked in to the state of another promise which may itself be pending, a resolved promise may be pending, fulfilled, or rejected.
A promise is unresolved if it is not resolved.
Promise constructor syntax
The generic syntax for creating a Promise object is: new Promise(executor)
executor is a function that takes two arguments, resolve and reject; both are optional. They are functions called to fulfill or reject the promise. The executor function normally initiates some asynchronous work and calls the resolve or reject functions depending on the results of the asynchronous activity.
Including the structure of the executor function, the constructor for a Promise consists of:
const keyword, name, new keyword and Promise type;
executor anonymous function with two optional function parameters, resolve and reject;
statements comprising the body of the executor function, which includes two methods:
resolve(value)
reject(reason)
It looks like this in a simple example:
Testing the return value of a function with if … else is just one of many ways of determining whether a promise is fulfilled or rejected.
It’s possible to have a promise that just resolves, in which case the declaration can be shortened like this:
The mySimplePromise is fulfilled with the value returned by someFunction() —providing someFunction() returns a value instead of blowing up or running on until the heat death of the universe (or until someone kills the process).
Invoking Promise objects
To implement promises in your code you need to know how to use them as well as declare them. Promises are used by invoking the then method of the Promise prototype.
Rejected promises can be handled in two ways: with a parameter of the then method or with the catch method.
Additional prototype methods enable more advanced use of promises, such as evaluating a collection of promises. These capabilities will be covered in the next post in this series.
The .then method takes two parameters, both optional. The first specifies a function to call when the promise is fulfilled and the second specifies what to do when the promise is rejected:
In practice, a simple example would look like this:
In most cases, you will see implementations which omit the second parameter and put rejection handling in the .catch method, as shown below. (More on this later.)
In code that implements promises it’s also common to see asynchronous functions return a promise, and a number of library functions do this. Here’s a simple async function that returns a promise and the code that uses the fulfilled promise:
Note that the return value of the reject method is usually a “reason”, which can be a string or more complex type.
Understanding asynchronous behavior in Promises
When a promise is fulfilled or rejected one of the handler functions is placed in the event loop for the current thread to execute asynchronously. This is similar to the asynchronous callbacks described in the second part of this series, Asynchronous JavaScript: Understanding Callbacks.
The Promise object returned by the .then method is either fulfilled or rejected depending on the return value of the onFulfilled or onRejected handler method. There is a specific set of rules for the return value, which could be:
- resolved with the value of the
onFulfilledhandler function - rejected with the error thrown by the
onRejectedhandler function or error - fulfilled with the value of a fulfilled linked promise
- rejected with the reason associated with a linked promise that was rejected
- a pending promise object that will be settled with the value of a linked promise
- undefined
To get a better understanding of how promises implement asynchronous processing it’s helpful to see it happening in code.
Understanding when Promise state is determined
The promise’s state is determined by the results of the executor function. It starts out as pending and becomes resolved or rejected as the executor function progresses. When a promise state is resolved the promise will also have a value, the return value of the resolve method.
Since Promise state is determined by the results of the executor function it will remain pending until any asynchronous code is executed. Depending on how long the code in the current call stack takes to execute before processing moves to the resolve or reject method code in the callback queue, or depending on how long it takes asynchronous functions to return results, the promise’s state may take some time to determine. Promises can depend on other promises, which can also introduce delay.
You can use a Promise’s state in your code. These techniques will be covered in the next post in this series, which will explain how to use promise methods like .all and .race to evaluate a collection of promises.
In this post, it’s important to know that you can see the current state of a promise with the following code, where promise is a generic placeholder for the name of a specific promise:
The examples below will show you how the timing of the state of a promise differs between promises in which the executor function includes synchronous code exclusively and those in which the executor function calls asynchronous code.
Using Promises with synchronous functions
In the promises directory of the asynchronous-javascript project create a new directory called promises and create a new file called blocking.js in the promises directory.
Insert the following code in blocking.js:
Run this code by executing the following command line instruction:
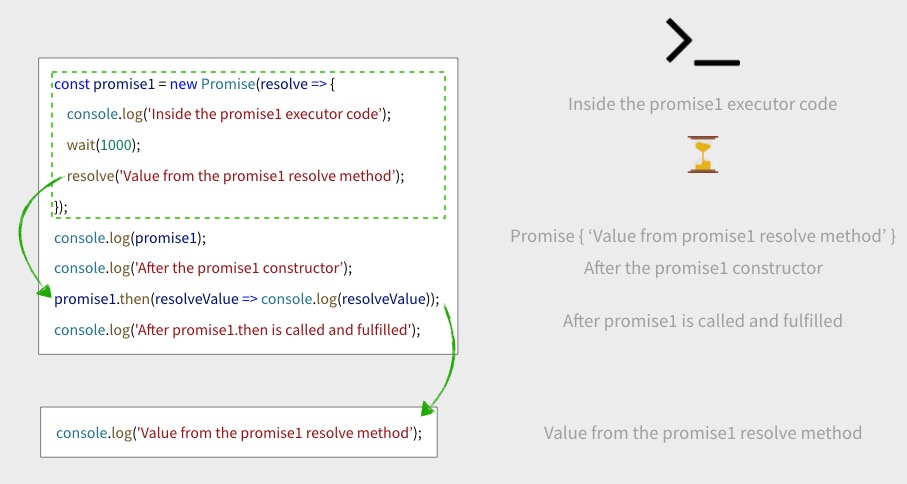
You should see the following output:
If you watch carefully, you’ll see that only the first line of the text is displayed immediately and the remainder of the console output is displayed after a two second delay. This includes the message that is displayed “After the promise1 constructor”. You’ll also see that the message from the resolve method appears after the message indicating that the promise has been “called and fulfilled”, reversed from their order in the code.
Why?
There are three things going on here:
- Promise executor functions are synchronous like other JavaScript code.
- The promise constructor is executed immediately, before the promise state (resolved, rejected) is set.
- The promise methods aren’t executed until the current call stack is empty.
Here’s the sequence of events:
- The
promise1executor is placed on the stack and begins executing. - The
console.logfunction with the parameter “Inside the promise1 constructor” is placed on the stack and executed; the message is displayed. - The synchronous
waitcall causes thewaitfunction to be loaded onto the stack and executed, introducing a perceptible delay in processing. - The promise1
resolvemethod is executed. - The promise1 constructor executor function is finished executing and is removed from the stack. At this point
promise1state isresolvedand thepromise1value is the return value from theresolvemethod. - The
console.logfunction with the parameter “After the promise1 constructor” is placed on the stack and executed; the message is displayed. - The
console.logfunction with the parameter “After promise1 is called and fulfilled” message is placed on the stack and executed; the message is displayed. - At this point the current execution stack is empty, so processing moves to the event queue.
- The value of the
resolvemethod, the string “Value from the promise1 resolve method” is returned. - The
.thenmethod uses thepromise1status value to determine whether to execute theonResolvedfunction. (Since noonRejectedparameter function has been supplied, the only option is to call theonResolvedfunction if the promise is resolved.) - The
.thenmethod executes theonResolveparameter function using the return value from theresolvemethod. In this caseonResolveis an anonymous function that displays the return value of thepromise1constructor’sresolvemethod, the string “Value from the promise1 resolve method”. - The stack and the callback queue are empty and processing is complete.
When used with a synchronous function a promise can block execution until the function has finished executing, but the promise itself will still be fulfilled asynchronously.
See the sequence of events illustrated in the following diagram:
Using Promises with asynchronous functions
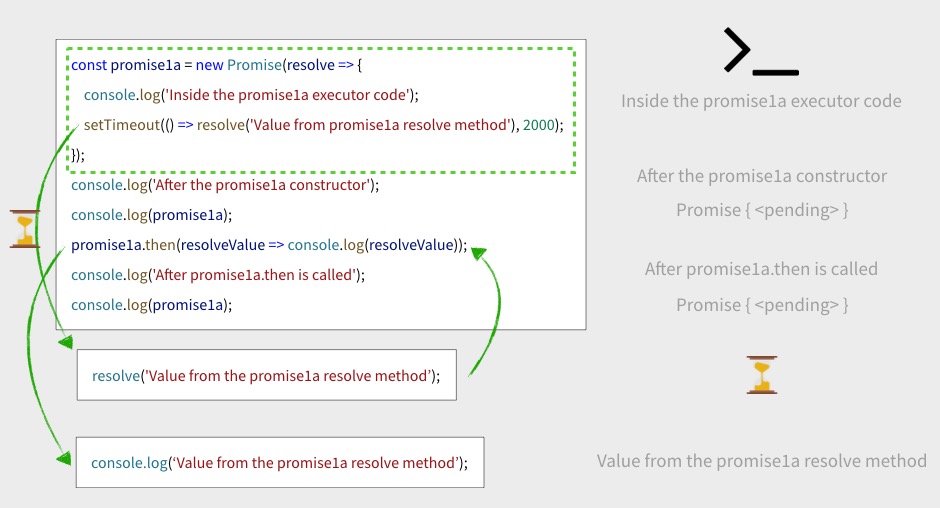
What about an asynchronous operation wrapped with a promise? Try a similar construction, but instead of a synchronous wait function call, use the asynchronous setTimeout function.
Insert the following code in the non-blocking.js file:
Run the program with the following command-line instruction:
You should see similar output, but only the last line is delayed. You will also see two lines that indicate the current state of promise1a is pending.
What accounts for the difference?
You’ll recall that setTimeout() is an asynchronous function. (See part one of this series for more on that.)
As the promise1a executor function is being processed on the stack, the asynchronous setTimeout() function call is put in the callback queue along with the resolve function call for execution when the stack is empty.
Since the setTimeout() function is responsible for the delay in processing, the delay isn’t invoked until the remainder of instructions available to be executed on the stack have been executed. The other statements in the program can be executed without delay.
Because the resolve method of promise1a is the first parameter of the setTimeout() function it isn’t executed until the stack is empty and processing moves to the callback queue.
Because of the 2-second interval specified as the second parameter of setTimeout() the value of the resolve method isn’t returned to the .then method until the interval has elapsed.
When processing moves to the callback queue and the 2-second interval has elapsed, the resolve method can return its value; the status of promise1a becomes fulfilled and the .then method can evaluate if the onResolved method should be called. At that point the return value of the resolve method can be displayed.
You can also see how the promise state is changing from <pending> to the resolved state when the return value for promise1a changes to Value from promise1a resolve method. Feel free to experiment with this code to learn more about the timing of promise execution.
This behavior is illustrated by the following diagram:
If you haven't been coding along and you want to catch up to this step using the companion repository on GitHub, execute the following commands in the directory where you’d like to create the project directory:
Getting started with JavaScript Promises
All of the preceding information about how Promises are created and consumed might seem intimidating for the first-time user. But, as with a lot of programming language features, you can start with the basics, put them to good use, and get into more advanced scenarios as your experience grows and your code becomes more sophisticated.
You can start with implementing a basic Promise with resolve and reject methods and using it in code.
Resolving and rejecting Promises
In most practical applications you are going to use Promises that call some asynchronous code and resolve or reject depending on the results of the function call. You’ll want to use the results of the promise in some way, depending on whether the promise was resolved or rejected.
In the following example, you’ll create a function that asynchronously produces a result. Then you’ll create another function that uses the fulfilled (resolved or rejected) to take some action that depends on the status of the promise.
Create new file practical.js in the promises directory of the project and insert the following JavaScript code:
Run the code with the following command line instruction:
The output you should see will be similar to the following, depending on the results from the random number generator:
In practical.js you can see a number of techniques useful in real world code. The asynchronous fillGlass function returns a promise. (It’s asynchronous because it incorporates the setTimeout function, which is asynchronous.) As you can see, it’s no problem passing parameters into functions that return promises.
It’s also no problem to pass arguments into the onResolved and onRejected methods of the .then method. You can also iterate calls to functions that return promises and use the promise state (resolved or rejected) to perform further operations on the objects associated with a promise.
Catching Promise rejections and exceptions
In pratical.js rejected promises are handled with the onRejected parameter of the .then method of the promise object: fillGlass(pourtime).then calls returnGlass when the promise is rejected. That’s fine when you’re only working with one promise, but what about occasions where you want to deal with a collection of promises?
That’s when the Promise .catch method useful. Like .then, it returns a promise. A group of resolved promises produced by .then methods and promises produced by .catch methods can be evaluated together in program logic.
The next post in this series will deal with techniques for handling promises returned by .catch along with the methods for dealing with collections of promises. The following examples will show you how to use .catch instead of the onRejection parameter of .then They’ll also demonstrate some aspects of .catch that require extra care.
Because the .catch method is more flexible and usually results in more readable code, it has become a convention to use it in preference to the onRejected method of the .then method. It’s important to note, however, that they are not equivalent and will produce different results in some situations.
Create a new file, catch.js, in the promises directory by making a copy of practical.js:
Modify the pour function so it looks like the following:
Run the modified program with the following command line instruction:
You should see output similar to the following after you’ve run the code a few times to account for variations in the random number sequence:
All the successful pour operations appear before the failures. What’s up with that?
In the original code using the onRejected event handler function of the .then method, the error in the returned promise is handled by the same method. In the new code a new promise is returned with a status of rejected that promise is handled by the function argument of the .catch method. The rejected operations require an extra step, so they’re requeued in the callback queue and processed after the successful operations. If you want your results to appear in the called order without having to collect and sort them, this is something to keep in mind.
It’s also considered good practice to throw an error when rejecting a promise. You can easily modify the fillGlass function so the promises it return pass errors when they’re rejected.
Replace the fillGlass function in catch.js with the following code:
Run catch.js again. Now you should see the explanation for the failed pour operations: “Missed the glass!”
Note: If your promise constructor includes a reject method you must use a onRejected function parameter of the .then method or use a .catch method. Failure to handle your promise rejection will result in errors like this:
You can see how the `reject` method in the promise constructor and the `onRejected` parameter of the `.then` method and the `.catch` method work together by modifying practical.js and catch.js. As you start removing required error handling these programs will start producing errors.
If you haven't been coding along and you want to catch up to this step using the companion repository on GitHub, execute the following commands in the directory where you’d like to create the project directory:
Wrapping up Promise operations with the .finally method
The .then and .catch methods enable you to handle promises that are fulfilled either by resolution or rejection. That’s fine as long as all the operations you want to perform fit in one category or the other, but what do you do when you have code that should be executed regardless of whether promise is resolved or rejected?
ECMAScript® 2018 added the .finally method to the Promise prototype, enabling you to perform operations on a promise once it has been settled, regardless of whether it is resolved or rejected. Prior to that, you’d have to include the same code in both .then and .catch.
The .finally method doesn’t accept any parameters because it’s impossible for it to know whether the promise was fulfilled or rejected. Accordingly, everything you do in a .finally method must apply regardless of the promise’s state once is is settled.
A common use case is displaying a spinner graphic on a web page while data is being retrieved from a remote API. You can also implement a spinner on the console command line with the ora library to show activity while a remote operation is being performed in the Node.js environment.
You can try it out using code similar to the code you’ve just seen.
Begin by installing the ora package by executing the following command-line instruction in the promises directory:
Create a new file, finally.js in the promises directory of the project and insert the following code:
Run the program with the following command-line instruction:
You should see the ora spinner and “Loading promise” for the length of time specified in setTimeout function of the promise2 constructor.
When the timeout has elapsed you should see the following line of output:
It should be followed by one of the next two lines of output:
Repeated execution of the code should produce each result 50% of the time (after a sufficient number of repetitions) and you should see the spinner during each repetition.
If you want to catch up your code to this step using the companion repository on GitHub, execute the following commands in the directory where you’d like to create the project directory:
Summary
This post provides an introduction to JavaScript Promises, building on the explanation of callbacks and the JavaScript event loop found in the first two installments of this series on Asynchronous JavaScript. It explains fundamental JavaScript concepts and terminology, shows how to write Promise constructors, and explains the basics of using Promises in code. This post includes sample code for using the .then, .catch and .finally methods and is accompanied by a companion library on GitHub.
The next installment in the Asynchronous JavaScript series will delve into more advanced ways to use Promises and explain the .all and .race methods.
Additional Resources
Promise – Mozilla Developer Network (MDN) documentation of the Promise object constructor
Using Promises – Mozilla Developer Network (MDN) documentation for using Promises in code, including the prototype methods .then, ,catch and .finally.
Promises, async/await – javascript.info provides a nice section on asynchronous techniques in JavaScript, including callbacks, Promises, and async/await. It’s attractively put together and includes well-executed diagrams.
There are many other blog posts and articles on the web about JavaScript Promises and a lot of them are inaccurate, incomplete, or confusing. Callback functions are always a tough topic to write about and the timing considerations in Promises make them even more difficult. If you have an issue with any part of this introduction to Promises, please bring it to the attention of the author so we can fix it.
Maciej Treder is a Senior Software Development Engineer at Akamai Technologies. He is also an international conference speaker and the author of @ng-toolkit, an open-source toolkit for building Angular progressive web apps (PWAs), serverless apps, and Angular Universal apps. Check out the repo to learn more about the toolkit, contribute, and support the project. You can learn more about the author at https://www.maciejtreder.com. You can also contact him at: contact@maciejtreder.com or @maciejtreder on GitHub, Twitter, StackOverflow, and LinkedIn.


Related Resources
Twilio Docs
From APIs to SDKs to sample apps
API reference documentation, SDKs, helper libraries, quickstarts, and tutorials for your language and platform.
Resource Center
The latest ebooks, industry reports, and webinars
Learn from customer engagement experts to improve your own communication.
Ahoy
Twilio's developer community hub
Best practices, code samples, and inspiration to build communications and digital engagement experiences.