Automatically Send Birthday Wishes with Python Flask and WhatsApp
Time to read: 9 minutes
September 10, 2021
Written by
Reviewed by

Do you forget to send birthday wishes to your friends and loved ones? I do, and it usually results in being scolded by my fiancée! I’ve often wished for a software program that could send birthday wishes on my behalf.
In this tutorial, we will create this exact end-to-end system. We will use Twilio's What’sApp API for sending the messages, the Flask web framework for the web server, and we will run messaging jobs periodically using APScheduler. We’ll also deploy the Flask application to AWS so it can be deployed resiliently and at scale.
The complete code for this tutorial is available in this Github repository.
Prerequisites
- A Twilio account. (Sign up with this link and receive an additional $10 credit.)
- The WhatsApp application installed on your mobile phone
- An activated WhatsApp Sandbox (be sure to follow the setup instructions).
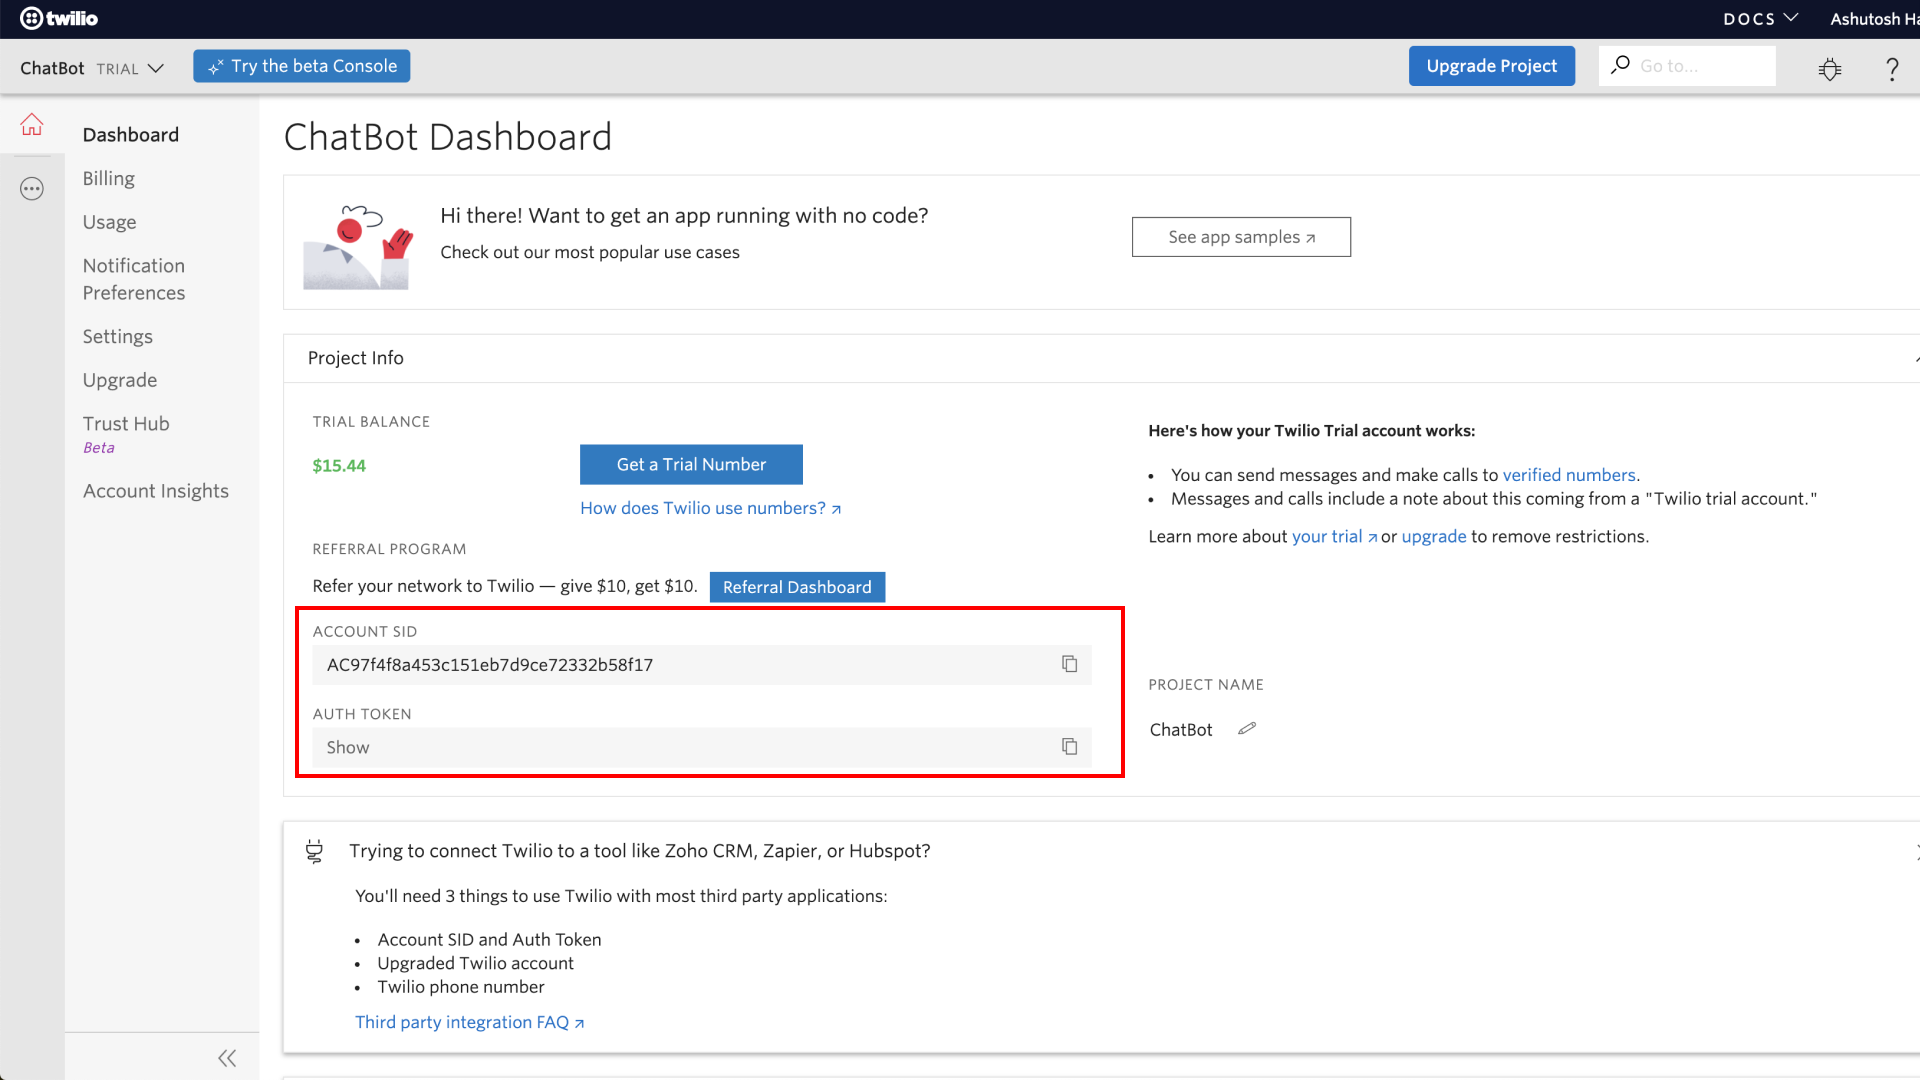
- Your Account SID and Auth Token, found in your Twilio account dashboard as shown below:
The following services downloaded to your computer:
Special notes about using WhatsApp
WhatsApp has to formally approve your account before you can send messages with WhatsApp in a production capacity, even for personal projects. That doesn't mean you have to wait to start building, though! Twilio Sandbox for WhatsApp lets you test your app in a developer environment. You’ll be able to complete this tutorial using the Sandbox, but you’ll need to have your WhatsApp account approved in order for the birthday wisher to run 24/7. This is because WhatsApp Sandbox sessions expire after 3 days and must be re-enabled.
Read our Help Center article called How Can I Get my Own WhatsApp Twilio Number for Use in Production? for more information.
Additionally, there are some limitations to the amount and types of messages that can be sent using WhatsApp. Please read our Help Center article called Rules and Best Practices for WhatsApp Messaging on Twilio for details.
Create the Python virtual environment
Create a new directory for this project in your command prompt called whatsapp-birthday-wisher, then navigate to this new directory:
We will create a new virtual environment for this project so that the dependencies we need to install don’t interfere with the global setup on your computer. To create a new environment called “env”, run the following commands:
After you source the virtual environment, you'll see that your command prompt's input line begins with the name of the environment ("env"). Python has created a new folder called env/ in the whatsapp-birthday-wisher directory, which you can see by running the ls command in your command prompt. If you are using git as your version control system, you should add this new env/ directory to a .gitignore file so that git knows not to track it. To create the .gitignore file in the whatsapp-birthday-wisher directory, run this command:
Open the .gitignore file in the text editor of your choice, then add the env/ folder to the contents of the .gitignore file:
Store environment variables securely
You’ll need to use the Account SID and Auth Token you located at the beginning of this tutorial in order to interact with the Twilio API. These two environment variables should be kept private, which means we should not put their values in the code. Instead, we can store them in a .env file and list the .env file in our .gitignore file so git doesn’t track it. A .env file is used whenever there are environment variables you need to make available to your operating system.
First, create the .env file:
Then, add the .env file as a line item in the .gitignore file:
Next, open the .env file in your favorite text editor and add the following lines, replacing the random string placeholder values with your own values:
Source the .env file so it becomes available to your operating system, then print the environment variable values to your console to confirm they were sourced successfully:
Install the Python dependencies
The Python packages required for the project are:
- twilio - provides access to the What’sApp API
- pandas - makes the birthday dates easier to work with
- apscheduler - runs our function at a specific time
- flask - provides the web server for our project
Dependencies needed for Python projects are typically listed in a file called requirements.txt. Create a requirements.txt file in the whatsapp-birthday-wisher directory:
Copy and paste this list of Python packages into your requirements.txt file using your preferred text editor:
Install all of the dependencies with the command given below, making sure you still have your virtual environment (“env”) sourced:
Send a WhatsApp message using Python
Sending messages with a Python script is straightforward when using the Twilio API. First, create an app.py file in the whatsapp-birthday-wisher directory:
Copy and paste the starter code below into the app.py file:
On lines 1 and 3, we import Python’s built-in os library and the Client object from the twilio Python package which facilitates communication with the Twilio API. On lines 5 and 6, insert the Account SID and Auth token you found in the Prerequisites section of this tutorial in between the single quotes. On line 7, the Client object is instantiated with the Account SID and the Auth token.
Now we can use the client object to access Twilio’s APIs. Only one object method is needed to send a WhatsApp message after a few initial lines of code. In the example below, the from WhatsApp number is provided in your Twilio WhatsApp Sandbox. Replace the to WhatsApp number with your own number for now, including the country code. You can also customize the message associated with the body variable if you want.
Copy and paste this code into the app.py file, below the other code:
In your command prompt, run the following command from the whatsapp-birthday-wisher directory (where the app.py file is located) to run the code snippet:
You’ll see a new message from the Twilio Sandbox appear in your WhatsApp chats. This is a great example of the power and scalability that Twilio APIs provide!
Send a birthday wish via WhatsApp
Let’s build on the code provided in the previous section by creating a function that can send birthday wishes to your loved ones. First, delete the client.messages.create() function call from the previous section. Then, copy and paste the following example code into your app.py file below the code you already have there. Keep reading for an explanation of what the code does.
In the new function, we first define the birthday_wish variable as a multiline string. Feel free to customize this! Then, we define the message variable using the same syntax we used before to interact with Twilio’s Client object. For testing purposes, use the Twilio Sandbox WhatsApp number as the from_ number.
In the last line of the example code, the function is called and you’ll pass in your own WhatsApp number as the to number and your own name for testing purposes.
Notice that the code that’s responsible for sending the messages is wrapped in a try/except block. This ensures that you’ll get helpful output in your console if something goes wrong and the message isn’t sent.
To test the functionality, run the app.py file again:
You should receive the WhatsApp message on your phone. Great job so far!
Store birth dates in a CSV file
We are now able to send the birthday message but we are not storing our loved ones’ birth dates anywhere. To keep things simple, we can do this by storing the birth date information in a Comma Separated Value (CSV) file like the one shown below:
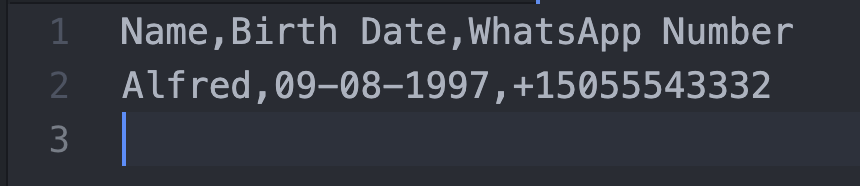
The CSV file will contain 3 columns corresponding to the recipient’s name, their date of birth and their WhatsApp number. Each row represents one person, and you can add as many rows as you want. If you make new friends in the future (or if new family members are born!) you can simply update the CSV file.
Create a new CSV file in the whatsapp-birthday-wisher directory with this command:
Open the file in your preferred text editor. Copy and paste the two example rows shown below. Change the day and month to today’s date and use your own WhatsApp number so you can test the functionality. Note that there are no spaces in between the data points, just commas. Add as many more rows as you like.
Convert the CSV file to a pandas dataframe
We can now import the CSV file into the app.py file using the pandas library we installed earlier. The pandas library will help us convert the information in the CSV file to something called a dataframe. You can learn more about the pandas library and dataframes if you’re interested, but no knowledge of them is required for this tutorial.
First, import the datetime and pandas libraries. Note that it’s common to separate imports of built-in Python libraries from imports of 3rd-party packages with a blank line. (And if you were importing modules from your own project, those would go underneath the 3rd-party packages and be separated from them with another blank line.)
Next, we’ll create a new function called create_birthdays_dataframe(). This function will load the birth_dates.csv file and return a pandas dataframe that represents the birthday info. Add the following sample code underneath the code already present in app.py, and delete the send_birthday_wish() function call that was formerly on the last line of the file.
In the newly-introduced code above, the dateparse object is a Python lambda function which parses the dates. The birthdays_df object is a pandas dataframe that represents the information in our birth_dates.csv file. The code related to parsing the dates in the CSV file is wrapped in a try/except block which will print a message to the console if something goes wrong.
You can test the code to ensure that a dataframe is returned by this function. Simply add a function call at the end of app.py:
Then re-run the file. A dataframe will print to your console.
Determine if it’s someone’s birthday today
The code we added to app.py in the previous section imports the data from the CSV file into our script, but we haven’t yet written the code to use that data.
Now that we’ve created a function to send messages and we’ve imported the CSV within our app.py file, we can schedule a daily time for the script to run. Anyone represented in the CSV file with a birth date that matches the date of the computer that’s running our program will automatically get a WhatsApp birthday message. Pay special attention to time zones if you have loved ones on the other side of the world!
We’ll create a function that checks today’s date and compares it to the birth dates in our CSV file. If the dates match, the person whose birthday it is will get a WhatsApp message. Add the code shown below to the bottom of the app.py file:
This new function compares the day and month of each row in our CSV file to today’s day and month. If both the days and the months match, the check_for_matching_dates() function sends a birthday wish to the person whose birthday it is by calling the send_birthday_wish() function we defined earlier. If two or more people share a birthday, they will each receive a WhatsApp message.
Schedule the birthday checker using APScheduler
Let’s schedule the check_for_matching_dates() function to run at 12:01am every day using APScheduler. Remember that the run time will be 12:01am according to the computer that is hosting your code, so you may need to adjust its time zone to better reflect where most of your loved ones live.
Import the BackgroundScheduler object from the APScheduler package in app.py:
Delete the existing function call to check_for_matching_dates() at the bottom of app.py. Then add the code shown below at the very bottom of app.py:
The new code creates an instance of BackgroundScheduler called scheduler. We call the scheduler object’s add_job() method which defines when and how to run the check_for_matching_dates() function. To learn more about defining scheduled jobs, check out the APScheduler documentation.
If we run the app.py file from our command line now, as we’ve been doing, it will execute the job once and then the program will terminate. We need a way to keep the file running indefinitely so that the script will run every day at 12:01am. To do this, we’ll set up a lightweight web server called Flask.
Create a web server using Flask
To set up a web server using Flask, we first need to import it:
Then, we can instantiate a Flask application with just 3 lines of code!
Put this line right under the imports, towards the top of app.py:
Paste the other 2 lines of Flask code at the very bottom of the app.py file, underneath the scheduler-related code we added in the previous section.
You can start the Flask server with either of these commands:
or
And that’s all the code we need! The complete code for this tutorial is available in this Github repository.
Run the Flask web server in the cloud
Running the Flask application on your local machine is fine for development purposes, but it means that your computer has to stay on 24/7 so your server doesn’t crash. And since we don’t want to miss anyone’s birthday, we need a much more resilient way to host the server. Follow the steps in Twilio’s tutorial, Deploy a Flask App on AWS EC2 Instance - No Stress Involved!.
If you prefer not to use AWS, there are other popular cloud providers you can use. Most cloud providers have a free tier or offer several months’ worth of free credits.
Conclusion
Congratulations! You created an automated birthday wisher and you never need to stress about forgetting someone’s birthday ever again.
In this tutorial you learned how to:
- Write a function to send a WhatsApp message
- Run functions periodically using APScheduler
- Create a web server using Flask
- Deploy your Flask app to the cloud provider of your choice
If you would like to extend this tutorial, you could modify the send_birthday_wish() function so you get a reminder message in WhatsApp and you can then call the person yourself.
I can’t wait to see what you build!
Ashutosh Hathidara is an artificial intelligence engineer with experience in full stack development and design. He can be reached via:
- Email: ashutoshhathidara98@gmail.com
- Twitter: @ashutosh_1919
- Github: https://github.com/ashutosh1919

Related Resources
Twilio Docs
From APIs to SDKs to sample apps
API reference documentation, SDKs, helper libraries, quickstarts, and tutorials for your language and platform.
Resource Center
The latest ebooks, industry reports, and webinars
Learn from customer engagement experts to improve your own communication.
Ahoy
Twilio's developer community hub
Best practices, code samples, and inspiration to build communications and digital engagement experiences.