Bridging Twilio Programmable Chat and SMS with ASP.NET

February 16, 2016
Written by

Helographic-twilio

Back in December 2015 Star Wars: The Force Awakens started airing on cinemas. I have been a good fan of Star Wars for years now, but do you know what else I’m good at? Not buying cinema tickets when they start selling months in advance.

giphy.gif

My friend James had been telling me for months about how his brother, on the spur of the moment bought a dozen tickets and gave them to all of his friends. As you can probably guess, I never got to meet his brother.

December 18th, the day SW:TFA was released I got a message from James. At this point I already knew I was only going to see the film on the 21st.

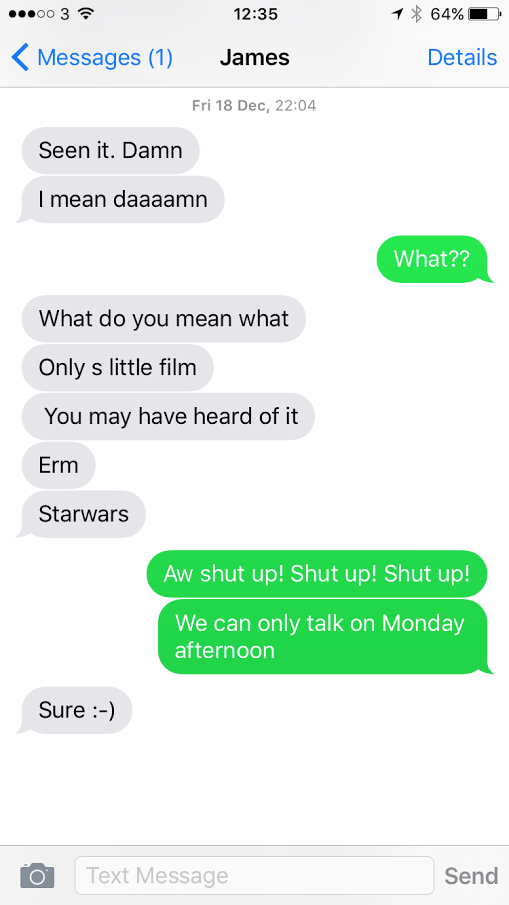
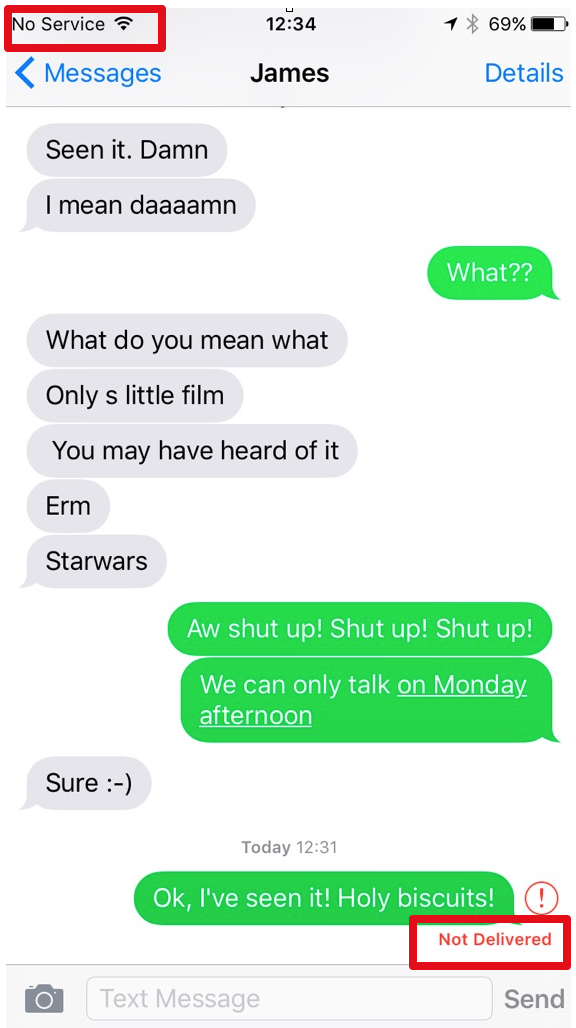
James was pretty stoked about the movie and wanted to talk about it. Fast track to December 21st when I actually got to see the movie and tried to reply to his SMS message as soon as I got into the London Underground on my way back.

Let me tell you something about James. As much as he claims he likes technology, he’s not present in any form of social networking services, and most of our communication happens via phone (voice or SMS) or whenever we meet. Facebook Messenger or Whatsapp was not an option here.

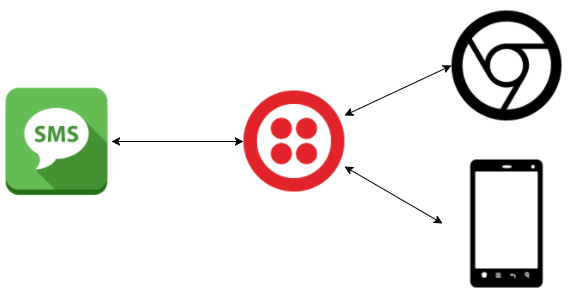
That’s why today I will show you how to build an application that breaks the barriers between IP communications and PSTN – the protocol used for SMS messages – and helps us bridging Twilio Programmable Chat and SMS with ASP.NET

Bridging Twilio IP Messaging and SMS with ASP NET

If you don’t feel like following through and want to skip straight to the final application, I’ve got you covered with my Github Repository.

Our weaponry

Attack of the Clones

We will clone a starter repository in just a bit, but first let’s make sure we have all the necessary credentials and a phone number so we can use it with our application.

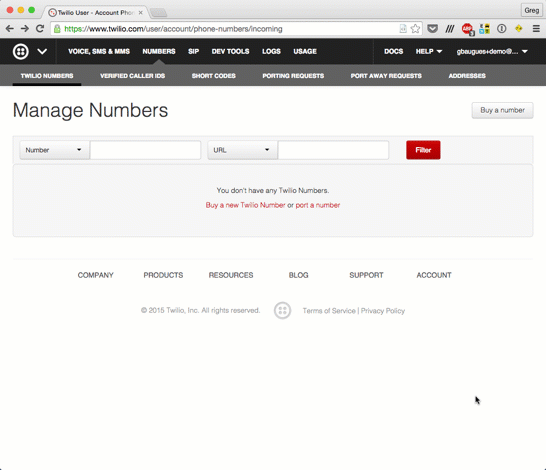
On the Twilio dashboard get yourself a telephone number with SMS capability if you don’t already have one.

MJDVoSr-OYIAMgwRW9OqSmHl1VUumhP7OdXmPqQEUVdvAf3N_3Ke1K7lreUflwxMlUx9u6rBCfoQiWHI5KP7HDYMmv-VqfC20rgY1v46u1NgNPIjlfXK9VrpA4GohF_F8ZZv66E.png

Now head to your favourite command line application and clone the C# Twilio Programmable Chat Quickstart Project for Mac. Make sure you follow the readme file to get all the authentication keys.

git clone git@github.com:mplacona/ipm-quickstart-csharp-mac.git; cd ipm-quickstart-csharp-mac; dnu restore

You will now be able to open this application in VSCode and If you’ve set your environment variables correctly or updated the values in TokenController.cs, you should be all set to run the application. Hop back on your favourite terminal application type the following.

dnx web

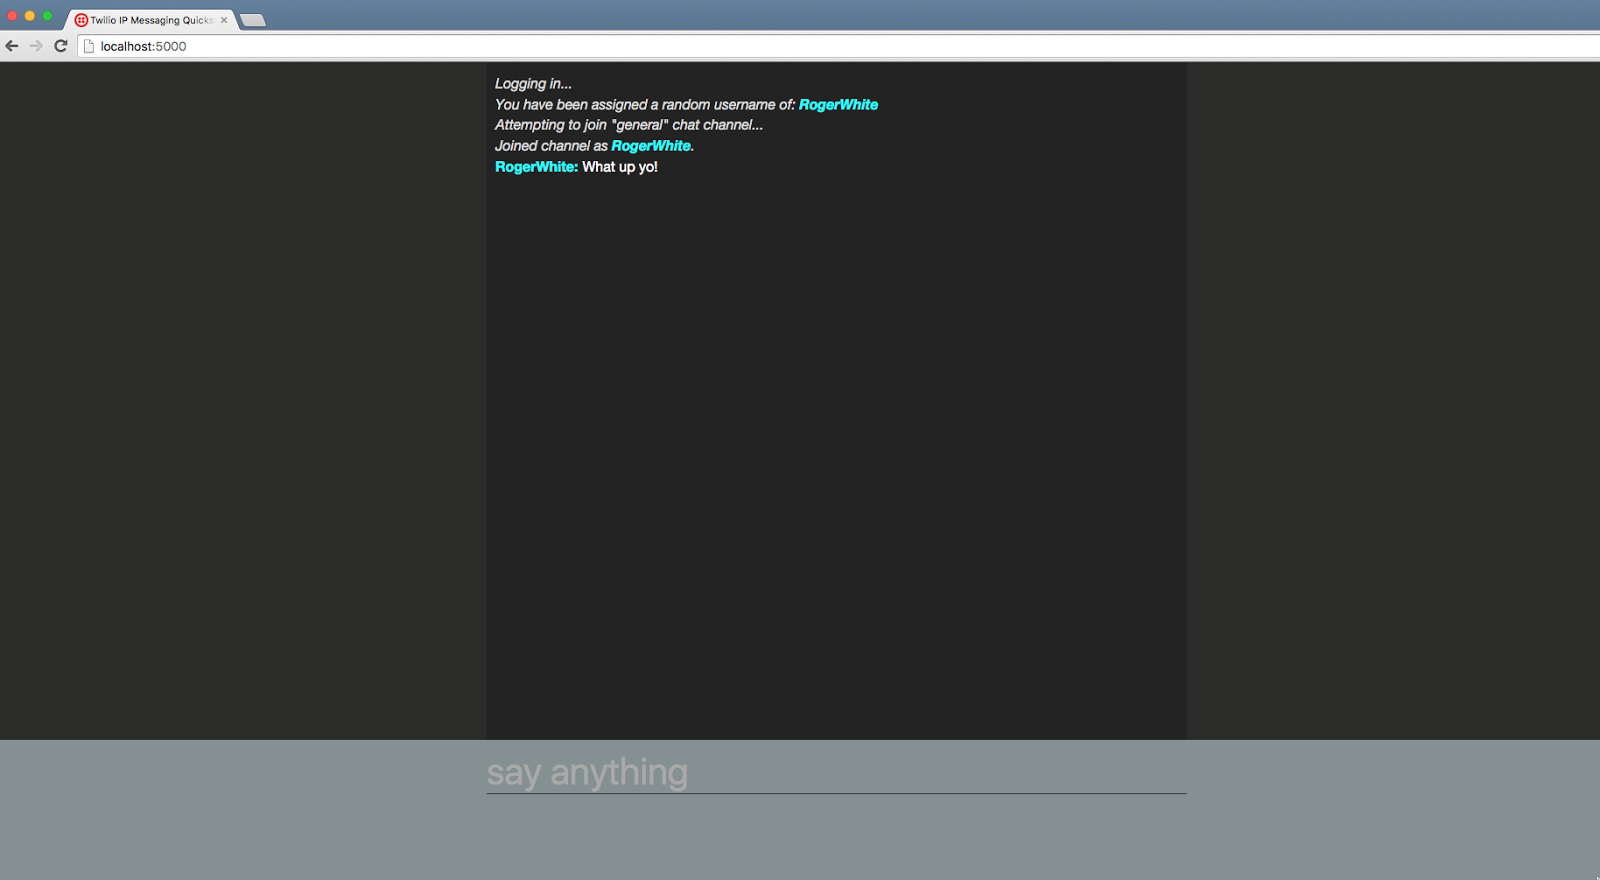
Open up the browser, point it to http://localhost:5000 and you should be able to start chatting.

But we need to make a few necessary changes on this application so it works the way we would like it to.

Han Shot First

We’ll create a new class to store some of our strings and extension methods. Create a directory called Extensions on the root of the project and add a new class called StringExtensions.cs.


using System.Text;

namespace ipm_quickstart_csharp_mac.Controllers
{
  public static class StringExtensions
  {
    public readonly static string MyNumber = "[YOUR_TWILIO_NUMBER]";
    public readonly static string MyName = "YourName";

    public static string RemoveSpecialCharacters(this string str) {
      var sb = new StringBuilder();
      foreach (char c in str) {
        if ((c >= '0' && c <= '9') || (c >= 'A' && c <= 'Z') || (c >= 'a' && c <= 'z') || c == '.' || c == '_') {
          sb.Append(c);
        }
      }
      return sb.ToString();
    }
  }
}

Make sure you replace the contents of MyNumber with your Twilio telephone number, and MyName with your name. We’ve also added a string extension method which we will use later that will rid usernames of special characters.

Next, let’s make some edits to site.js which lives under wwwroot/js/. At present whenever you load the application, the following things happen:

  • You can’t see the time when a message was sent.
  • Previous message history is not loaded
  • You always see the general channel and can’t change the chat room.
  • You’re automatically assigned a username

A long time ago in a galaxy far away…

Head over to Views/Shared/_Layout.cshtml and add the following script include above site.js.

<script src="//cdnjs.cloudflare.com/ajax/libs/moment.js/2.11.1/moment.min.js"></script>

Go back to wwwroot/js/site.js and change the code on the printMesage function to the following:


function printMessage(fromUser, date, message) {
    var $user = $('<span class="username">').text(fromUser   ':');
    if (fromUser === username) {
        $user.addClass('me');
    }
    var $date = $('<span class="date">').text(moment(date).format("MMM Do YY @ HH:mm:ss"));
    var $message = $('<span class="message">').text(message);
    var $container = $('<div class="message-container">');
    $container.append($date).append('<br/>');
    $container.append($user).append($message);
    $chatWindow.append($container);
    $chatWindow.scrollTop($chatWindow[0].scrollHeight);
}

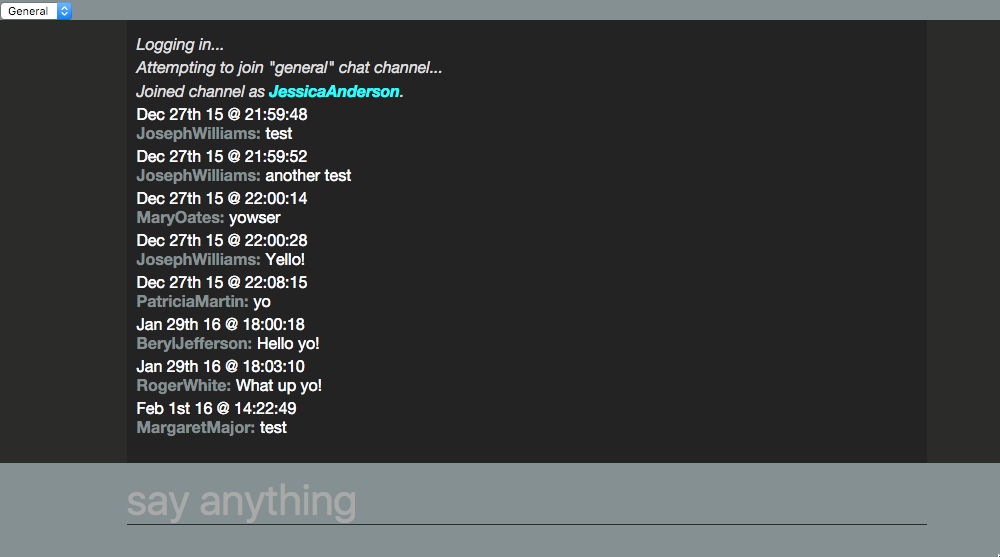
You will notice we’ve introduced the concept of time in our messages, and to avoid having to format them manually, we just used moment.js which is an awesome date manipulation library.

History, we shall have
Let’s make sure we load up all the previous history for a channel. After all, we now have timestamps for each message. Begin by changing the setupChannel function back in site.js.


function setupChannel() {
    // Join the general channel
    generalChannel.join().then(function (channel) {
        print('Joined channel as '
              '<span class="me">'   username   '</span>.', true);
            
        var promise = generalChannel.getMessages();
        promise.then(function (messages){
            for (var i=0; i < messages.length; i  ){
                printMessage(messages[i].author, messages[i].timestamp, messages[i].body);
            }
        }).catch(function(e){
            console.log(e)
        });

        // Listen for new messages sent to the channel
        generalChannel.on('messageAdded', function (message) {
            printMessage(message.author, message.timestamp, message.body);
        });
    });
}

getMessages returns a promise which when completed adds all the historical messages into the board. Notice we’ve already updated the call to printMessage to add the message’s timestamp.

It’s a trap!
The quickstart has been built for simplicity so you always use the same channel – general. We want to have one channel per friend so we can read historical data and switch channels between friends.

Delete all the code after the last line of the printMessage function and the beginning of the setupChannel function. This consists of a call to the print method and the getJson block. Replace that with the following:

setTimeout(function(){ window.joinChannel('general'); }, 1000);

We will now bring the getJson block back, but turn it into a function  that also handles our channel choice. Under the above code add the function.

    window.joinChannel = function(chosenChannel){
        // clear div
        $chatWindow.html("");
        
        print('Logging in...');
        
        $.getJSON('/token', {
            identity: username,
            device: 'browser'
        }, function (data) {
            // Alert the user they have been assigned a random username
            username = data.identity;

            // Initialize the Programmable Chat client
            accessManager = new Twilio.AccessManager(data.token);
            messagingClient = new Twilio.IPMessaging.Client(accessManager);

            // Get the general chat channel, which is where all the messages are
            // sent in this simple application
            print('Attempting to join "'   chosenChannel   '" chat channel...');
            var promise = messagingClient.getChannelByUniqueName(chosenChannel);
            promise.then(function (channel) {
                generalChannel = channel;
                if (!generalChannel) {
                    // If it doesn't exist, let's create it
                    messagingClient.createChannel({
                        uniqueName: chosenChannel,
                        friendlyName: chosenChannel   ' Chat Channel'
                    }).then(function (channel) {
                        console.log('Created '  chosenChannel   ' channel:');
                        console.log(channel);
                        generalChannel = channel;
                        setupChannel();
                    });
                } else {
                    console.log('Found'   chosenChannel   ' channel:');
                    console.log('Found'   generalChannel.Sid   ' channel:');
                    console.log(generalChannel);
                    setupChannel();
                }
            });
        });
    }

This is pretty much the same as the code block we’ve just deleted but is now a function and can be called from our view. This will let us switch to different channels dynamically.

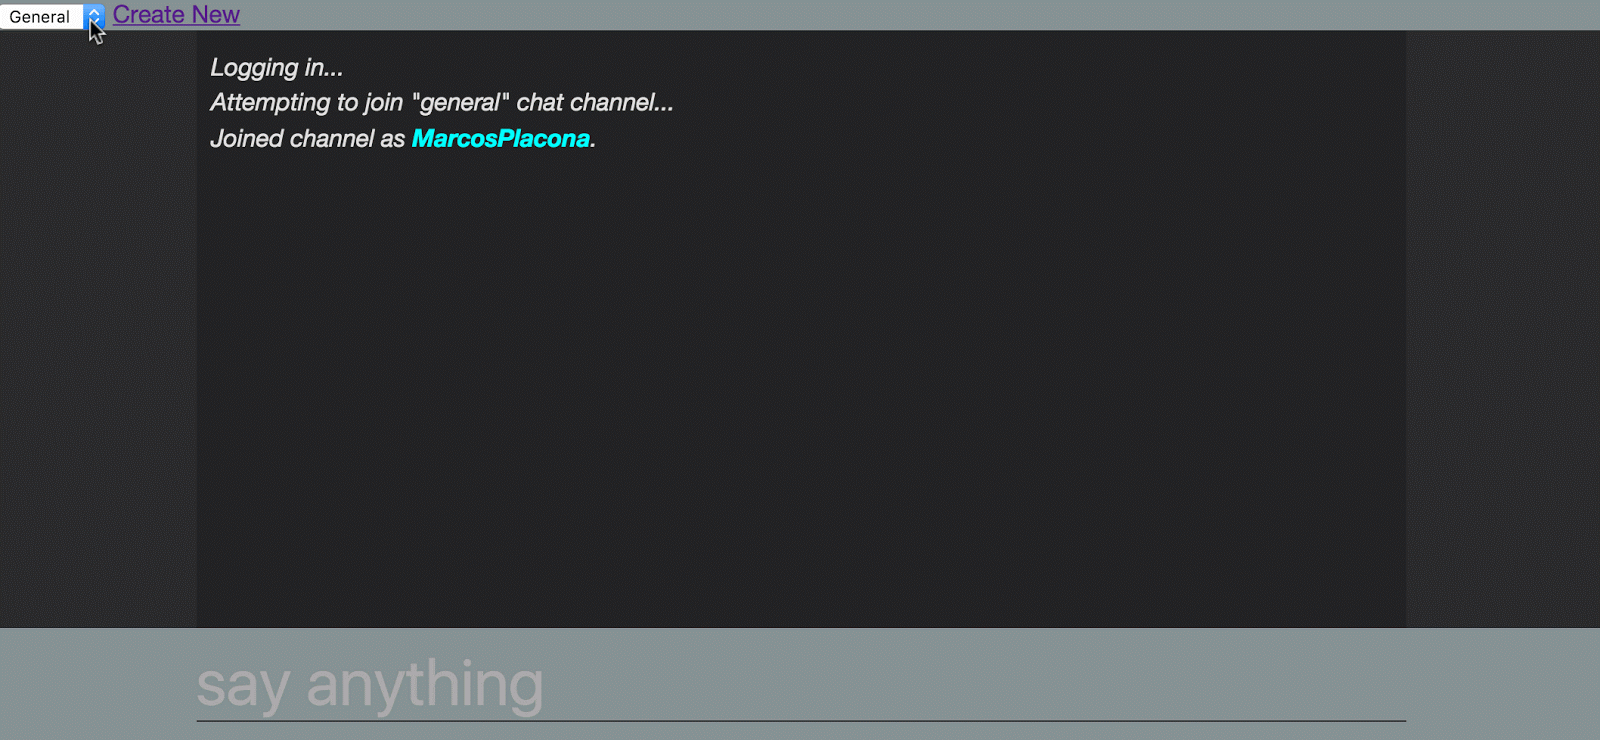
Open up Views/Home/Index.cshtml and add a selector so you can choose which friend you want to talk to.


<header>
    <a href="https://www.twilio.com/docs/api/ip-messaging/guides/quickstart-js"
       target="_blank">
        Read the getting started guide
        <i class="fa fa-fw fa-external-link"></i>
    </a>
</header>
<div id="selector">
    <select name="friend" onchange="joinChannel(this.options[this.selectedIndex].value)">
        <option value="general">General</option>
    </select> 
</div>
<section>
    <div id="messages"></div>
    <input id="chat-input" type="text" placeholder="say anything" autofocus />
</section>

We haven’t created any channels yet and will be changing this view later to make sure all our friends that have been added to the database show up in the selector.

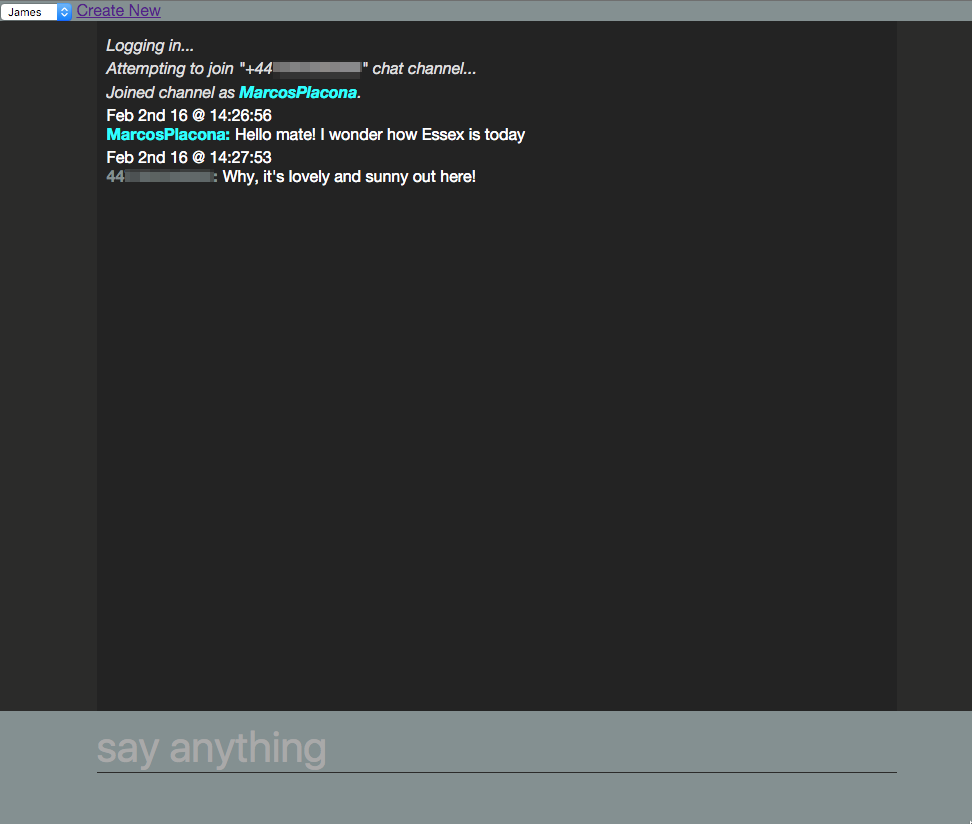
Right now the application should be functional again and you should feel free to restart the project and give it a go. You will notice that if you’ve posted messages before those will now be loaded and have timestamps along with them.

But wouldn’t it be great if instead of logging in as Jessica Anderson or Joseph Williams, we actually got to login with our own names?

Lando’s not a system, he’s a man!
We’ve already defined our name in Extensions/StringExtensions.cs so now we have to change Controllers/TokenController.cs to use that instead of an auto-generated name. Change the contents of the Identity variable with StringExtensions.MyName.


using ipm_quickstart_csharp_mac.Controllers;
...
// Load Twilio configuration from Web.config
var AccountSid = Environment.GetEnvironmentVariable("TWILIO_ACCOUNT_SID");
var ApiKey = Environment.GetEnvironmentVariable("TWILIO_IPM_KEY");
var ApiSecret = Environment.GetEnvironmentVariable("TWILIO_IPM_SECRET");
var IpmServiceSid = Environment.GetEnvironmentVariable("TWILIO_IPM_SERVICE_SID");
var Identity = StringExtensions.MyName.RemoveSpecialCharacters();

Restart the server and give it another spin. You should see your name appear on the board instead of a random one.

R2-D2, it is you! It is you!

Now that we’ve sorted the front-end for our chat, let’s add the ability to create new friends.

Open project.json and add the highlighted dependencies and commands to it.


  "dependencies": {
    "Microsoft.AspNet.Diagnostics": "1.0.0-rc1-final",
    "Microsoft.AspNet.IISPlatformHandler": "1.0.0-rc1-final",
    "Microsoft.AspNet.Mvc": "6.0.0-rc1-final",
    "Microsoft.AspNet.Mvc.TagHelpers": "6.0.0-rc1-final",
    "Microsoft.AspNet.Server.Kestrel": "1.0.0-rc1-final",
    "Microsoft.AspNet.StaticFiles": "1.0.0-rc1-final",
    "Microsoft.AspNet.Tooling.Razor": "1.0.0-rc1-final",
    "Microsoft.Extensions.Configuration.FileProviderExtensions" : "1.0.0-rc1-final",
    "Microsoft.Extensions.Configuration.Json": "1.0.0-rc1-final",
    "Microsoft.Extensions.Logging": "1.0.0-rc1-final",
    "Microsoft.Extensions.Logging.Console": "1.0.0-rc1-final",
    "Microsoft.Extensions.Logging.Debug": "1.0.0-rc1-final",
    "Twilio": "4.4.1",
    "Twilio.Auth": "1.1.0",
    "JWT": "1.3.4",
    "Faker": "1.2",
    "Twilio.TwiML": "3.4.0",
    "Twilio.IpMessaging": "1.1.1",
    "EntityFramework.Sqlite": "7.0.0-rc1-final",
    "EntityFramework.Sqlite.Design": "7.0.0-rc1-final",
    "EntityFramework.Commands": "7.0.0-rc1-final"
  },

  "commands": {
    "web": "Microsoft.AspNet.Server.Kestrel",
    "ef": "EntityFramework.Commands"
  }

Make sure you run dnu restore on your terminal after you add that so it downloads the libraries.

Create a new directory called Models on the root of the project and add a new class to it called Friend.cs.

Inside that file create the following entity class:

using System.ComponentModel.DataAnnotations;
using Microsoft.Data.Entity;
 
namespace ipm_quickstart_csharp_mac.Models
{
    public class FriendsContext : DbContext
    {
        public DbSet<Friend> Friends { get; set; }
        protected override void OnConfiguring(DbContextOptionsBuilder optionsBuilder)
        {
            // Declare that we want to use SQLite and name the database
                        optionsBuilder.UseSqlite("Data Source=./friends.db");
        }
    }
    public class Friend
    {
        [Key]
        public int FriendId { get; set; }
        [Display(Name = "Friend Name")]
        public string Name { get; set; }
        [Display(Name = "Phone Number")]
        public string PhoneNumber { get; set; }
        [ScaffoldColumn(false)] 
        public string ChannelSid { get; set; }
        [ScaffoldColumn(false)] 
        public string UserSid { get; set; }
    }
}

I’ve written a detailed blog post in the past explaining each one of the attributes used in an entity class but we’re basically modelling our database here using code-first.

Back on your terminal add the migration and execute so the database is generated.

dnx ef migrations add InitialMigration
dnx ef database update

Still in the terminal create a controller called FriendsController inside the Controllers folder.

yo aspnet:MvcController FriendController

Open that file and change it so it has CRUD routes defined.


public class FriendController : Controller
    {
        private FriendsContext _db;
        private IpMessagingClient _client;

        public FriendController()
        {
            _db = new FriendsContext();
            _client = new IpMessagingClient(Environment.GetEnvironmentVariable("TWILIO_ACCOUNT_SID"), Environment.GetEnvironmentVariable("TWILIO_AUTH_TOKEN"));
        }

        public IActionResult Index()
        {
            return View(_db.Friends);
        }

        [HttpGet]
        public IActionResult Create()
        {
            return View();
        }
        
        //POST: /Friend/Create/
        [HttpPost]
        [ValidateAntiForgeryToken]
        public IActionResult Create(Friend friend)
        {
            ModelState.Clear();
            TryValidateModel(friend);
            if (ModelState.IsValid)
            {
                using (var db = new FriendsContext())
                {
                    // Create a channel                    
                    var channel = _client.CreateChannel(Environment.GetEnvironmentVariable("TWILIO_IPM_SERVICE_SID"), "public", friend.PhoneNumber, friend.PhoneNumber, string.Empty);
                    
                    // join this channel
                    if (channel.RestException!=null)
                    {
                        //an exception occurred making the REST call
                        return Content(channel.RestException.Message);
                    }
                    else{
                        // Create a user
                        var user = _client.CreateUser(Environment.GetEnvironmentVariable("TWILIO_IPM_SERVICE_SID"), friend.PhoneNumber.RemoveSpecialCharacters());
                        if (user.RestException!=null){
                            return Content(user.RestException.Message);
                        }
                        else{
                            // Create membership
                            var member = _client.CreateMember(Environment.GetEnvironmentVariable("TWILIO_IPM_SERVICE_SID"), channel.Sid, user.Identity, string.Empty);
                            if (member.RestException!=null){
                                return Content(member.RestException.Message);
                            }
                            else{
                                // Add complete user to the DB
                                friend.ChannelSid = channel.Sid;
                                friend.UserSid = user.Sid;
                                db.Friends.Add(friend);
                                db.SaveChanges();
                            }
                        }
                    }
                    return RedirectToAction("Index");
                }
            }
            return View(friend);
        }
        
        [HttpGet]
        public IActionResult Edit(int id)
        {
            var friend = _db.Friends.FirstOrDefault(s => s.FriendId == id);
            if (friend == null)
            {
                return HttpNotFound();
            }
            return View(friend);
        }
        
        [HttpPost]
        [ValidateAntiForgeryToken]
        public IActionResult Edit(Friend friend)
        {
            ModelState.Clear();
            TryValidateModel(friend);
            if (ModelState.IsValid)
            {
                using (var db = new FriendsContext())
                {
                    db.Friends.Update(friend);
                    var count = db.SaveChanges();
                    return RedirectToAction("Index");
                }
            }
            return View(friend);
        }
        
        public IActionResult Delete(int id)
        {
            var friend = _db.Friends.FirstOrDefault(s => s.FriendId == id);
            if (friend == null)
            {
                return HttpNotFound();
            }
            else
            {
                // Delete channel                
                _client.DeleteChannel(Environment.GetEnvironmentVariable("TWILIO_IPM_SERVICE_SID"), friend.ChannelSid);
                _client.DeleteUser(Environment.GetEnvironmentVariable("TWILIO_IPM_SERVICE_SID"), friend.UserSid);
                
                // Remove user from from the database
                _db.Friends.Remove(friend);
                _db.SaveChanges();
                return RedirectToAction("Index");
            }
        }

        protected override void Dispose(bool disposing)
        {
            if (disposing)
            {
                _db.Dispose();
            }
            base.Dispose(disposing);
        }
    }


The contents of this class are very straight forward as we’re only adding routes and logic to create new friends in the database. The highlighted parts are the interactions with the Twilio Programmable Chat REST API.

We start off by creating a channel and then check that it’s successfully created. We then proceed on joining the channel but first we need to create a user and once that user is created we create the membership for it.

We finally add all the information to the database. When we want to delete that friend we also need to make sure we delete the channel related to it, so on the delete route besides just removing the friend from the database we also delete the channel and the user.

We will now create three views to create, edit and view our friends. In the Views directory create a new directory called Friend and add three new views to it.

yo aspnet:MvcView Create
yo aspnet:MvcView Edit 
yo aspnet:MvcView Index

The contents of these views are super straight forward, so I will just link to them here and you can replace the contents of the generated views with these.

Open up the application again by browsing to http://127.0.0.1:5000/Friend and you will see a page ready to display a list of friends you’re about to create. Go ahead and create a new friend.

At last we will reveal ourselves to the Jedi
We’re practically done now but if you go back to the chat screen you will notice that the friend we’ve just created is not listed on the selector. That is because our view still has no concept of what’s in the database. We’ll change that now.

Open up Views/Home/Index.cshtml and make the following changes to it.


@model IEnumerable<ipm_quickstart_csharp_mac.Models.Friend>

<header>
    <a href="https://www.twilio.com/docs/api/ip-messaging/guides/quickstart-js"
       target="_blank">
        Read the getting started guide
        <i class="fa fa-fw fa-external-link"></i>
    </a>
</header>
<div id="selector">
    <select name="friend" onchange="joinChannel(this.options[this.selectedIndex].value)">
        <option value="general">General</option>
        @foreach (var item in Model) {
            <option value="@item.PhoneNumber">@item.Name</option>
        }
    </select> 
    @Html.ActionLink("Create New", "Create", new { controller = "Friend" })
</div>
<section>
    <div id="messages"></div>
    <input id="chat-input" type="text" placeholder="say anything" autofocus />
</section>

This page is now ready to display a list of friends, but we need to modify our controller so it returns the friends we have added to the database. Change Controllers/HomeController.cs to the following:


using System;
using System.Linq;
using Microsoft.AspNet.Mvc;
using ipm_quickstart_csharp_mac.Models;
using Twilio;
using Twilio.IpMessaging;

namespace ipm_quickstart_csharp_mac.Controllers
{
    public class HomeController : Controller
    {
        private FriendsContext _db;
        public HomeController()
        {
            _db = new FriendsContext();
        }

        public IActionResult Index()
        {
            return View(_db.Friends);
        }
    }
}

Restart the app again and reload the page. You should see that not only are your friends being listed, but you can also join their channels.

james-channel.gif

There is one last thing we need to do though, which is create a new message on the correct channel when James sends me an SMS, and create an SMS when I post a message on James’ channel. Wanna take a guess where we’re going to do that?

Why does everyone want to go back to Jakku?

Let’s  create two new endpoints in our controller and get webhooks to do the rest of the job so when a new SMS or IP Message comes in, our code is ready to handle it. Still in Controllers/HomeController.cs add the following new endpoints:

        public IActionResult MessageAdded(string To, string From, string Body)
        {
            var client = new TwilioRestClient(Environment.GetEnvironmentVariable("TWILIO_ACCOUNT_SID"), Environment.GetEnvironmentVariable("TWILIO_AUTH_TOKEN"));
            
            using (var _db = new FriendsContext())
            {
                // Match the channel Sid passed by the webhook with one we have on the DB
                var channelSid = _db.Friends.FirstOrDefault(s => s.ChannelSid == To).PhoneNumber;
                
                Message message = client.SendMessage(
                    StringExtensions.MyNumber,
                    channelSid,
                    Body
                );
                
                if (message.RestException!=null)
                {
                    //an exception occurred making the REST call
                    string result = message.RestException.Message;
                    return Content(result);
                }
            }
            return Content(string.Empty);
        }

        public IActionResult SMSAdded(string To, string From, string Body)
        {
            var client = new IpMessagingClient(Environment.GetEnvironmentVariable("TWILIO_ACCOUNT_SID"), Environment.GetEnvironmentVariable("TWILIO_AUTH_TOKEN"));
            using (var _db = new FriendsContext()){
                var channelSid = _db.Friends.FirstOrDefault(s => s.PhoneNumber == From).ChannelSid;
            
                var message = client.CreateMessage(
                    Environment.GetEnvironmentVariable("TWILIO_IPM_SERVICE_SID"),
                    channelSid,
                    From.RemoveSpecialCharacters(),
                    Body
                );
                    
                if (message.RestException!=null) {
                    string result = message.RestException.Message;
                    return Content(result);
                }
            }
            
            return Content(string.Empty);
        }

The first method will be fired when a new message is added to a channel. It will then find the telephone number that is related to that channel on the database and create a new SMS message to that number.

The second will do the inverse since it will be triggered when a new SMS message is sent to our number and will then create a new message on the correct channel. All we have to do now is quickly set up our webhooks on Twilio and we’re done.

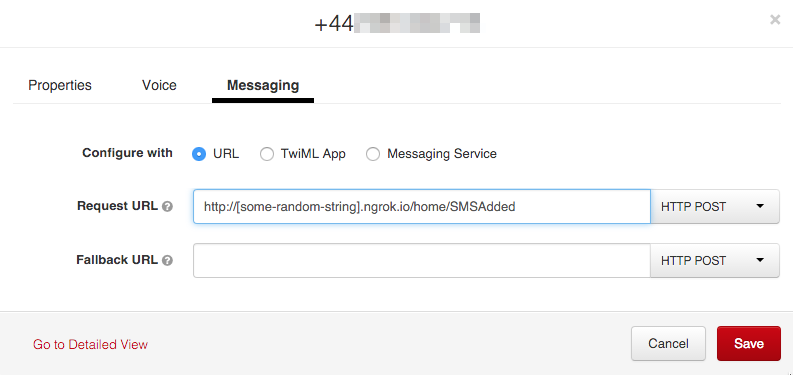
But before we can do that let’s make sure Twilio can see this application from outside our environment. That’s when ngrok comes in. In your terminal start ngrok and copy the generated URL.

ngrok http 5000

The forwarding URL should be something like http://[some-random-string].ngrok.io, and you can now go to the Programmable Chat Services page and click on the service you created earlier.

Scroll down to the webhooks section and enter the URL you’ve been assigned along with the new endpoint and save.

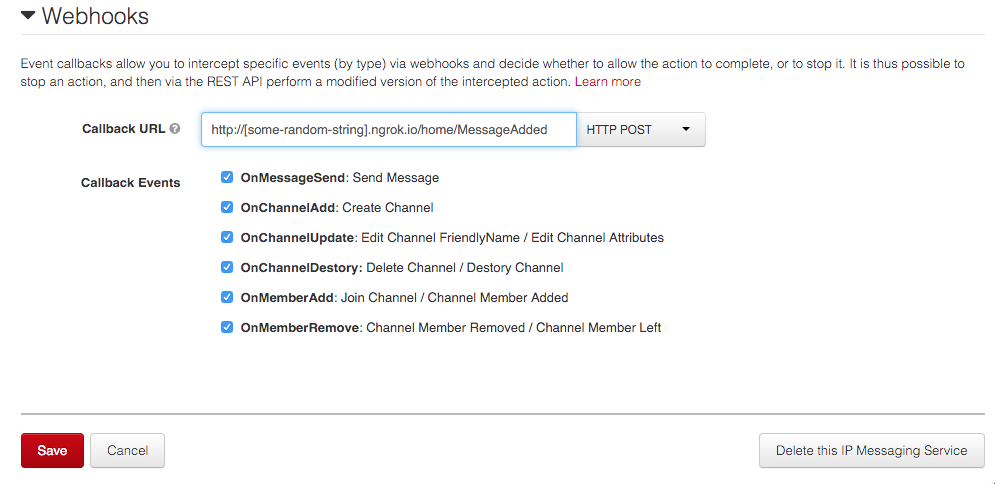
Go to Messaging Phone Numbers and click on the phone number you picked earlier. Use the other endpoint to configure what happens when a new SMS message comes in.

Reload your app and get chatting.

May the force be with you

Talking to friends is great and being able to communicate in whatever medium wherever you are regardless of how strong your signal or Internet is makes it even better.

How about being able to talk to your friends when you’re on a flight and only have wifi. Ever been to a hackathon and all you had was phone signal but no internet?

I would love to see how you can make this application better. Hit me up on Twitter @marcos_placona or by email on marcos@twilio.com to tell me more about it.