Review and catalog text messages with Cohere Classify and .NET
Time to read:
June 13, 2023
Written by
Reviewed by
Review and catalog text messages with Cohere Classify and .NET
Classifying information or messages that you receive in your business/project is essential to know how to prioritize or direct such data to another process, so certain actions can be taken based on it. Several companies have a system that classifies the message (like SMS, WhatsApp, or Email) based on the sender, recipient, or subject. Now, thanks to Artificial Intelligence (AI), it can be done based on its content.
In this post, you are going to create a web app that, using the Cohere Classify service, will be able to classify any received text message using Twilio for WhatsApp.
Prerequisites
You will need the following for your development environment:
- a .NET IDE (Visual Studio, VS Code with C# plugin, JetBrains Rider, or any editor of your choice)
- .NET 6 SDK (earlier and newer versions should work too)
- Cohere Account
- A Twilio account (try out Twilio for free)
- ngrok CLI
What is Cohere and Cohere Classify?
Cohere is a platform that offers different Artificial Intelligence services using natural language and LLM (Large Language Model), similar to other platforms such as OpenAI, among others.
Within Cohere's services, there is Classify, which, as its name indicates, from a few examples, you can classify new texts, specifying the text and the label (classification). For example, you can classify messages received from customer service through WhatsApp, SMS, or Email.
Get a Cohere API Key
In order to use Cohere Classify, you will need a Cohere AI account.
After registration, you will see your dashboard, where among various options and examples, you can generate your API key:
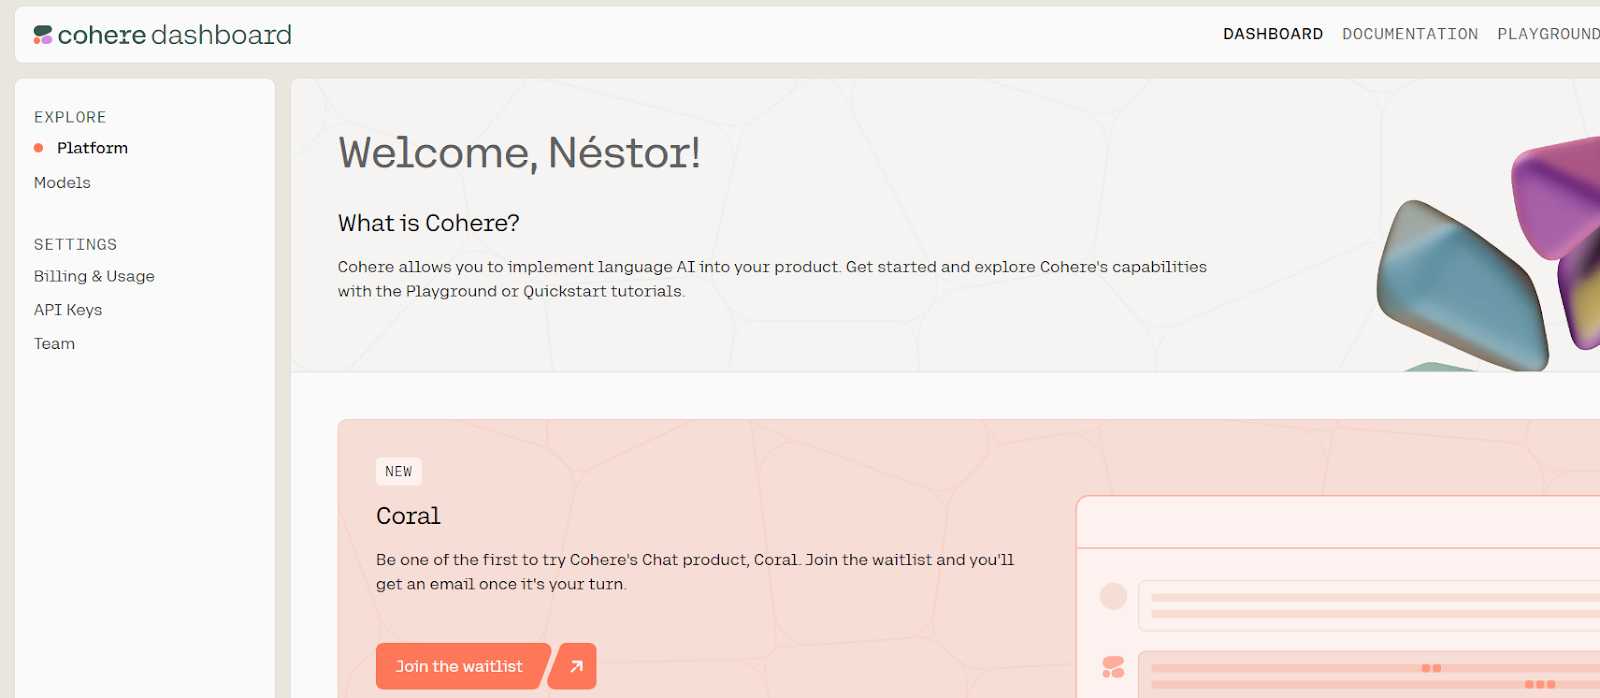
Click on "API keys", where you will see the option to create productive API keys (paid with better performance) and trial keys (free). Next, generate a new trial key by clicking on the “New trial key” button, giving a name, and saving it as you will use it later.

Create your web app
Initialize your project
You will need to create a console project using the .NET CLI. Open a terminal and run the following commands to create a folder that will contain your project:
Next, create the project with the command below:
Install the Twilio SDK and the Twilio helper library for ASP.NET Core which will help you send and receive WhatsApp messages:
Connect your app to Cohere using the API
To add the Cohere API key to your project, you will use user secrets since it is a good option for local development that is easy to manage, more secure, and for good development practices.
To set user secrets for your project, run the following commands at the command line inside your project's root folder:
Replace <Cohere API Key> with the API Key obtained in the creation of your Cohere account.
Add the objects to send requests and receive responses from the API
With Cohere Classify, the training and inference (classification process with new data) happen in the same call, so you will have to specify some examples to classify along with the new text to classify. In this case, you are going to classify messages that could be sent to different areas of your company (human resources, finance, marketing, etc.).
First, create two files, one that you will use for the API request and one for the response. You will call the first ClassificationRequest.cs, and the second ClassificationResponse.cs, and add the following C# code:
Configure the API call to classify text
Now create the following class in a new ClassifierService.cs file, and add the namespaces and structure of the class:
Next, add a constructor to this class, which will receive the configuration as a parameter, in order to use the previously configured secrets:
You will need to create some examples with already classified texts that will be used to train your model. To do this, create a method with the following code:
Finally, configure the method to prepare and send the request, receiving a text from the user from the console, and using the Cohere API, you will receive the corresponding classification and the confidence level for that classification:
Configure your web app to receive text messages
Now, in Program.cs, add the following code to configure your web app:
Next, create the MessageController.cs file, where you will configure the webhook to receive and reply to WhatsApp messages, with the following code:
In this new controller, add the constructor to receive the app's configuration (the one that contains the Cohere API Key) and instantiate the ClassifierService:
It is time to add an action that receives the WhatsApp message, processes it through the Cohere service, and returns the prediction via message to the user. To do this, add this action to the controller:
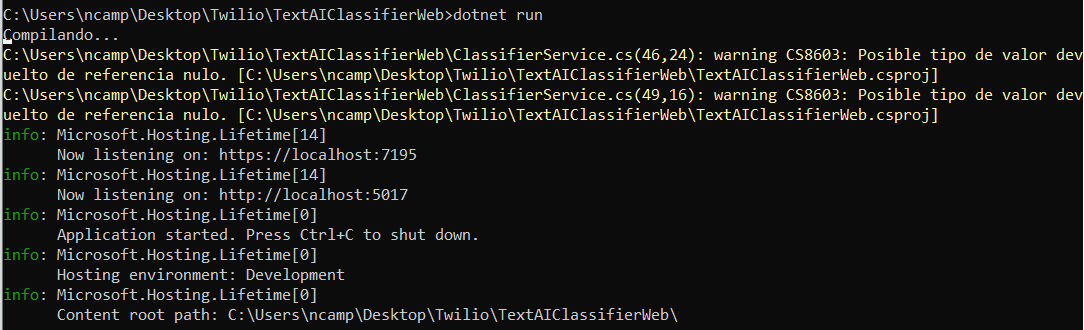
And finally, run the web app to get the URL that you will use later. Must be in the format "http://localhost:<port>".
Set up the Twilio Sandbox for WhatsApp
To send WhatsApp messages through your Twilio account, you need to create a WhatsApp Sender, but for testing and developing locally, you can, and in this tutorial, you will use the Twilio Sandbox for WhatsApp.
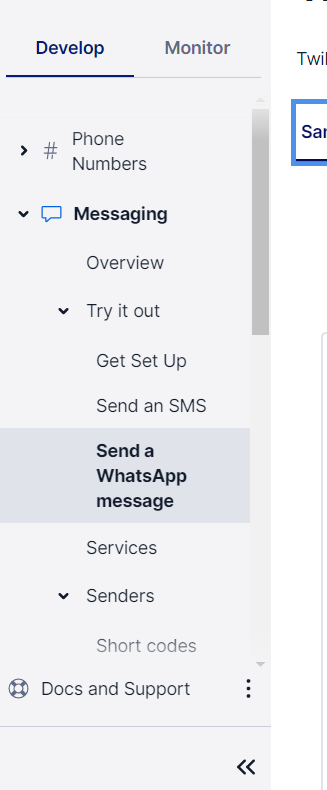
In order to get to the WhatsApp sandbox, in the left-side menu of the Twilio console click on "Messaging" (if you don't see it, click on "Explore Products", which will display the list with the available products, and there you will see "Messaging"). After that, in the available options open the "Try it out" submenu, and finally, click "Send a WhatsApp message".
Next, you have to follow the instruction on the screen, in which you must send a pre-defined message to the indicated number through WhatsApp. This will enable that WhatsApp number to use to send messages to your own WhatsApp number. If you want to send messages to other numbers, the people who own those numbers will have to do this same step.

After that, you will receive a message in response confirming the Sandbox is configured.

Now you are able to send messages to the Sandbox number and receive messages from the Sandbox number.
Make your webhook public with ngrok for testing
Your web app needs to be publicly accessible for Twilio to send the message webhook requests to your application. That's why you'll use ngrok to create a secure tunnel between your locally running API and ngrok's public forwarding URL.
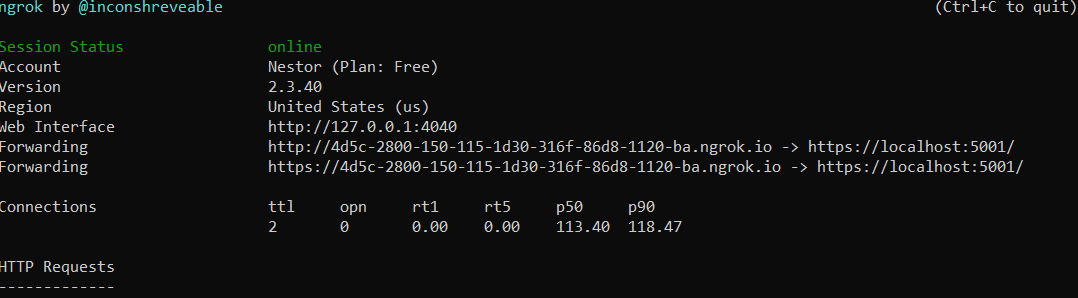
Leave your .NET application running and open a separate shell. In the new shell, run ngrok with the following command, specifying the HTTP URL that your application is listening to:
Copy the Forwarding HTTPS address that ngrok created for you, as you will use it in the Twilio Sandbox for the WhatsApp console.
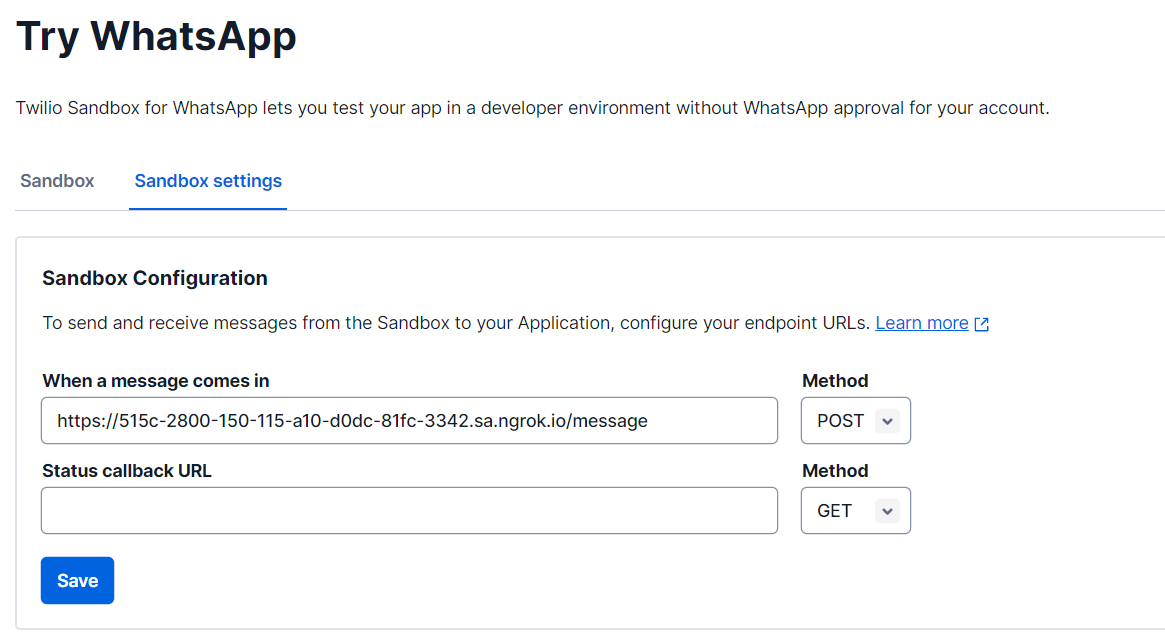
In the Twilio portal, go to the Twilio WhatsApp page, in the “Sandbox settings” section, and change the “When a message comes in” endpoint with the generated URL by ngrok, including the /Message path.
Test the project
To test, in the conversations with the Sandbox number, send a text message using WhatsApp.

In a few seconds, you will see the message with the prediction and confidence percentage.

What's next
This is a great start, and to continue, you can:
- Send more than 1 message in the same API call (already supported by the class you have built), which will save you time and costs in calls.
- Optimize the examples, storing them in a database and adding more for each class, which will make the predictions with a higher level of confidence. Note that the minimum number of examples is 2 and the maximum is 2,500, with a maximum of 512 tokens per example.
Additional resources
Cohere Docs - Review all documentation of what you can do with Cohere services.
Twilio WhatsApp – This page contains all the information about the requirements and benefits of using messaging over WhatsApp with Twilio.
Twilio SDK for C# and .NET – You can explain all the options provided by the Twilio C# SDK.
Source Code to this tutorial on GitHub - You can find the source code for this project at this GitHub repository. Use it to compare solutions if you run into any issues.
Néstor Campos is a software engineer, tech founder, and Microsoft Most Value Professional (MVP), working on different types of projects, especially with Web applications.

Related Resources
Twilio Docs
From APIs to SDKs to sample apps
API reference documentation, SDKs, helper libraries, quickstarts, and tutorials for your language and platform.
Resource Center
The latest ebooks, industry reports, and webinars
Learn from customer engagement experts to improve your own communication.
Ahoy
Twilio's developer community hub
Best practices, code samples, and inspiration to build communications and digital engagement experiences.