Migrate your database using Entity Framework Core Migration Bundles
Time to read:
June 12, 2023
Written by
Reviewed by

In this article, you will look at what Entity Framework (EF) Migration Bundles are and their advantages. Then you will see, through a practical example, how to create and run migration bundles in your projects.
Prerequisites
Before we dive into Migration Bundles, make sure you have the following installed on your system:
- An OS that supports .NET (Windows/macOS/Linux)
- .NET 7.0 SDK (newer and older versions may work too)
- A code editor or IDE (Recommended: Visual Studio Code with the C# plugin, Visual Studio, or JetBrains Rider)
- EF Core Tools version 6 or above
- Git CLI
Database updates, historically
Prior to the introduction of migration bundles, developers had various methods to handle database updates, such as SQL scripts or the Command-Line Interface (CLI), to name a few. Both approaches have their drawbacks:
SQL Scripts
This approach consists of generating SQL scripts from the migrations. As the scripts are pure SQL, you can review them before deployment migrations, With this approach, there is no way to check if you have applied all the previous changes. If not, the scripts can fail or lead to unexpected effects. Nevertheless, the idempotent script approach can help to apply only the necessary migrations by maintaining a migration history table.
Command-Line Interface
This approach deploys the updates using the command line tools. It includes some tool dependencies, as you will need to compile your model via your source code. As a matter of fact, you will also need the .NET SDK.
What is an EF Core migration bundle?
A migration bundle is a file produced by EF Core that can be used to apply migrations to a database. It was introduced in EF Core version 6 as a solution to address dependencies and provide a safer way to update databases with EF Core. Migration bundles offer several advantages, including:
- Standalone executables: Migration bundles are standalone executables and can be executed independently of your source code.
- Minimal dependencies: Migration bundles don’t necessitate the presence of an Entity Framework tool or the .NET SDK to execute a bundle. Only the .NET runtime is required, and you can even create self-contained bundles that include the .NET runtime, offering flexibility in application deployment. You can then decouple your database deployment pipeline from the rest of your application.
Now that you know what migration bundles are, let’s see how to create and manipulate them.
EF core migration bundle in action
1. Set up the sample project
As this article is about EF Core migration bundles, you will not spend time creating an ASP.NET Core MVC app from scratch. I’ve already set up an application for the purpose. It is a basic To-Do app written in .NET 7. I set the project up to use a SQLite database.
The source code is available on GitHub. All you need to do is to clone it. In the terminal, navigate to the folder in which your project will reside and run the following command:
If you'd like to use a different database, you can update the connection string within the TodoApp/appsettings.json file. Find the `ConnectionStrings:DbConnection" property and change its value to your connection string.
You are all set. Next, let’s look at the sample project in more details.
2. Exploring the sample project
The sample application comprises the following projects:
TodoApp, which is the MVC project, with the controllers, views, etc.TodoApp.Core, which contains the business servicesTodoApp.Data, which includes the database context and the repositories responsible for interacting with the database.TodoApp.Domain, in which resides the entities.
Let’s look more closely at the TodoApp.Data project. The TodoAppDbContext.cs file defines the DbContext as follows:
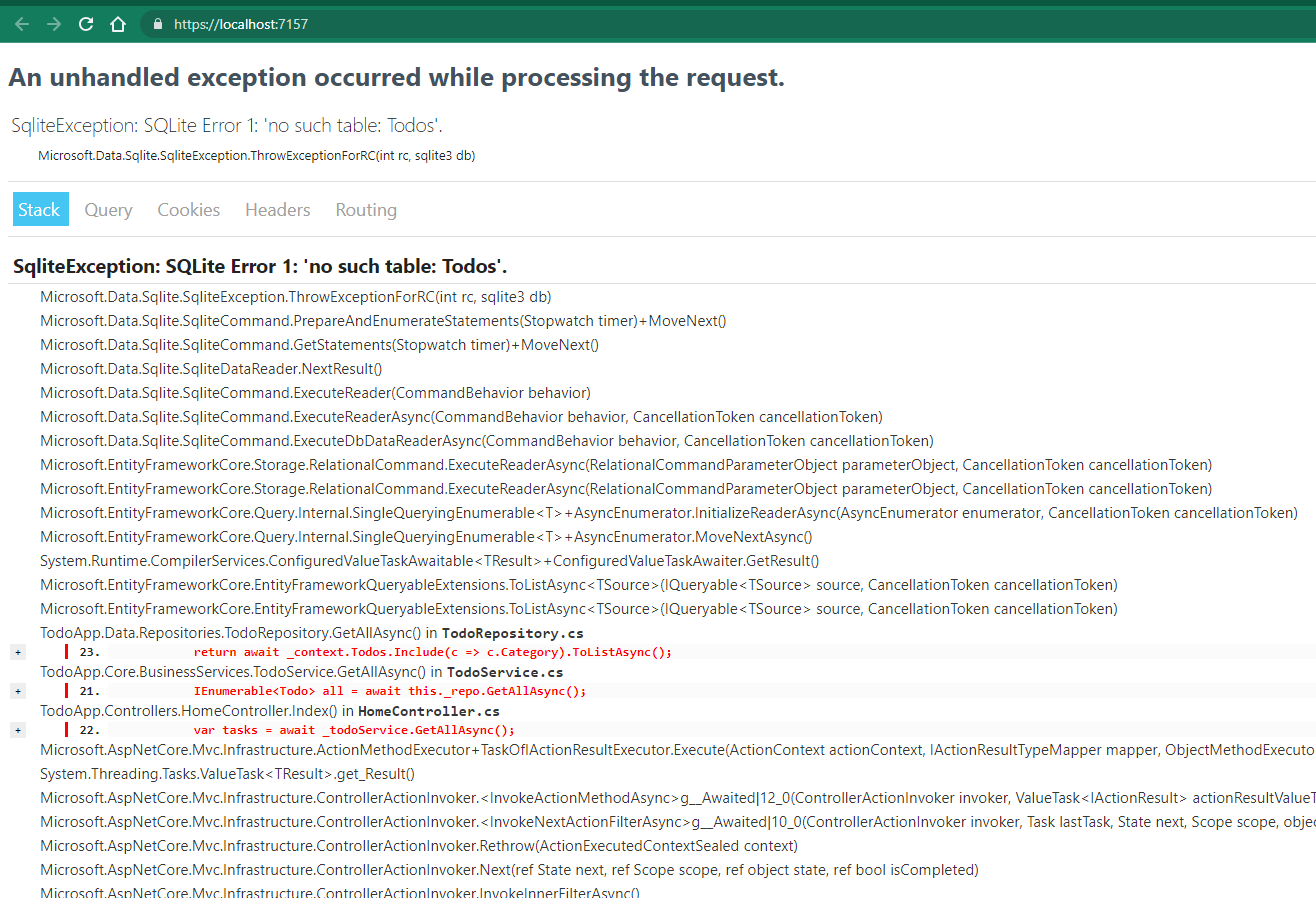
With this code, EF Core (in conjunction with a migration file) will create two tables to store to-do items and categories. At this point, when you run the TodoApp project, you should get an error, because the database hasn't been created yet:
3. Create a migration bundle
To begin, you need to generate a migration. Open your terminal and navigate to the solution folder. Run the command below:
With this command, EF Core will create a Migrations folder within the TodoApp.Data project. Inside this folder, you will find an xxx_InitialMigration.cs file, which contains all your database schema updates. xxx is a unique number generated by EF Core for this particular migration file.
Next, you will create a migration bundle to include the previously generated migration file. In the terminal, enter the following command:
These commands will first build your code and then generate an exe file named efbundle.exe in the specified output folder. This file contains your database migrations. The prompt should show the location of your bundle file:
Now, execute the bundle with the following command:
This command will trigger all the migrations in your bundle, applying the necessary changes to your database schema. The prompt shows the SQL scripts which are executed during the migration.
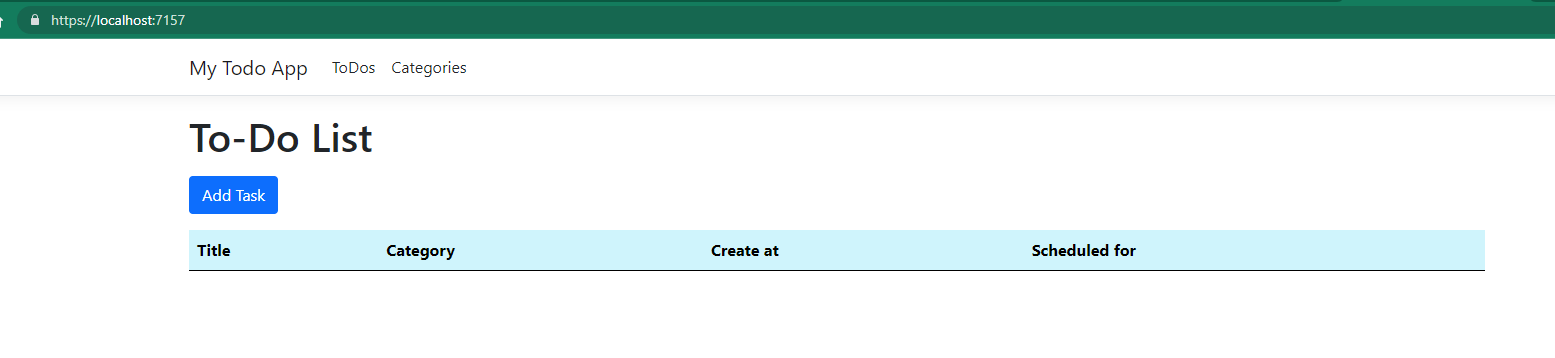
After that, relaunch your application. You should not have any errors anymore. That means the bundle has successfully created your database. Your fully functional to-do app is now up and running, as shown below:
Now, you will update your entities. In the TodoApp.Domain project, update the Todo class in Todo.cs, by adding a new property, as shown below:
The highlighted code represents the addition of a new property to the Todo class. This will result in an update of the database, specifically the addition of a new tinyint column, named IsDone within the Todo table. To take this change into account, you need to create a migration. You’ll call it AddColumnIsDoneInTodo Run this command to create the AddColumnIsDoneInTodo migration:
You can see that EF Core creates another migration file inside the Migrations folder, with name similar to xxx_AddColumnIsDoneInTodo.cs.
Now, you need to generate a new migration bundle which will embark the new migration. Open the terminal and run these commands:
Now, you can run your new bundle:
The new bundle runs and creates the new column. In the terminal, you can observe that EF Core only executes the new update, recall adding the column IsDone in the Todo table. The rest of the operations are about the update of the migrations history.
You will find that the new column is correctly added when you check your database. Congratulations!
Conclusion
In this article, we explored the concept of Entity Framework Core Migration Bundles, their advantages, and how to work with them in practical scenarios. Migration bundles offer a convenient and decoupled approach for applying database updates, providing flexibility in deployment and minimizing dependencies. By understanding the usage of migration bundles, you can streamline the database migration process in your .NET applications and ensure smooth transitions in database schema evolution.
A topic worth exploring might be how you can integrate your database deployment as part of your CI/CD pipeline, based on EF Core Migration Bundles. This can bring a lot of flexibility to your app delivery. Happy coding!
Daniel Lawson is an Independent Software Developer and Cloud Enthusiast. He is passionate about C# and AWS. He can be reached on Twitter or LinkedIn. He also has a personal blog.


Related Resources
Twilio Docs
From APIs to SDKs to sample apps
API reference documentation, SDKs, helper libraries, quickstarts, and tutorials for your language and platform.
Resource Center
The latest ebooks, industry reports, and webinars
Learn from customer engagement experts to improve your own communication.
Ahoy
Twilio's developer community hub
Best practices, code samples, and inspiration to build communications and digital engagement experiences.