Build an Automated SMS Survey with Laravel, PHP, and Twilio Programmable SMS
Time to read: 5 minutes
October 27, 2020
Written by
Reviewed by

In recent years, SMS has been widely used as one of the cost-effective and seamless means of disseminating information in the form of a survey. This allows survey creators to reach a larger audience and facilitate gathering data more efficiently.
In this tutorial, we will build an automated customer survey application to receive customer feedback for a fictional company through SMS. In leveraging Twilio Programmable SMS, we will connect a Twilio phone number to a Laravel application to build the business logic that will determine when to begin the survey, the questions to ask, and a persistent layer to save the users’ responses. Each participant will send an SMS response to the Twilio number until the survey is completed.
Let's begin building an automated survey that can be answered via SMS!
Prerequisites
You will need the following to complete this project:
- Knowledge of building applications withLaravel
- A Twilio Account
- A valid Twilio Number
- Composer globally installed to manage dependencies
- Ngrok installed on your computer. Follow the instructions here to set it up.
Scaffold a New Laravel Project
Create a new Laravel application using Composer by issuing the following command from the terminal:
You now have a new application within a folder named survey. Move into the folder for the newly created project and run the following command to install Twilio SDK:
The installed SDK from above will make it easy for our Laravel application to communicate with the Twilio API.
Models and Migrations File
To ensure a successful outcome of a survey, you need to ask appropriate questions so that your users can respond as best as they can. In this section, we will focus on creating eloquent models and generating database migration files for Question and QuestionResponse respectively.
Create Question Model and Migration
Begin by issuing the following command to simultaneously create a Question model and generate a migration file for it:
The previous command will create a new file in the app/Models folder, and another in database/migrations. Modify the newly generated migration file in database/migrations by replacing its content with the following:
This file will be used to create the Questions table and a body field. Next, open the Question model file located at app/Models/Question.php and add the body field as a $fillable property:
Create QuestionResponse Model and Migration
Similar to the steps in the previous section, run the following command in the terminal to create a QuestionResponse model and its corresponding migration file:
The migration file generated from the preceding command will be used to create a question_responses table and its fields. To achieve that, replace the default content of the migration file with the following:
To ensure that the fields created for the question_responses table are mass assignable, open the app/Models/QuestionResponse.php file and replace its content with:
Create a Seeder File for the Questions Table
This survey will contain a couple of open-ended questions that participants need to respond to. For the sake of convenience and to easily populate our database table with some questions, we will use a Seeder class in Laravel.
Run the command below to generate a seeder file, mainly for the Questions table:
You can find the newly created file inside the database/seeders folder as QuestionSeeder.php. Open it and use the following content for it:
We kept things simple by creating an instance of the Question model and inserting an array of data, with a total of four questions for the survey.
Next, include the newly created QuestionSeeder class within the default DatabaseSeeder class by opening the database/seeders/DatabaseSeeder.php file and update the contents with:
Create the Database and Update the Environment File
In this section, we will create a database table, set up connections with the database, and insert the questions into the table. Proceed to create a database locally on your computer and update the .env file within the root of your application with its credentials. Check the content shown below:
NOTE: Don’t forget to swap the placeholder values for YOUR_DB_NAME, YOUR_DB_USERNAME, and YOUR_DB_PASSWORD with the appropriate credentials of your database.
Once you are done, issue the following command to create the database schema and run the database seeder as well:
You now have a database and default questions in the questions table ready for the survey.
Create the Survey Controller
Here, we will create the controller that will handle all the necessary business logic to send questions to users, receive feedback, and save the responses into the database. Use the following command to create a SurveyController:
The command above will create a SurveyController.php file in the app/Http/Controllers folder. Open this newly created folder and replace its contents with the following code:
This might look a bit daunting, but let us try to break it down to properly understand the logic defined here.
First, we defined a function named responses as the entry point and main method that will be called once a user indicates interest in participating in the survey, by sending a message to our valid Twilio phone number. This function will handle each response from the participant in the survey and either return an open-ended question or end the survey if the participant has answered the questions.
Next, we check if a cookie with the question_id existed within the request. This will help us track and determine the next question to retrieve from the database and send it to the survey participant as an SMS.
Depending on the value of the retrieved question_id from the cookie, we will be able to ascertain if the user is sending a message for the first time or providing an answer to a question. We will either send the first question using the firstQuestion() method, or the next question in line using the nextQuestion() method.
Lastly, the destroy() method will terminate the survey as soon as all expected answers have been provided. The method will also remove the question_id from the cookie.
Set Up the Route
Whenever a survey participant sends a message to our Twilio phone number, Twilio will send a webhook - a user-defined HTTP callback - to our application. To define a route in which the Twilio’s request will be mapped, open the routes/api.php file and update its contents by adding the following line of code:
Run the Survey App and Generate a Public URL
Use the following command to start the application on port 8000 of your local web server, the default port for Laravel applications.
To make the application accessible from the internet, we will use ngrok to generate an instant and secured public URL. The instructions here will guide you on how to install ngrok, if you haven’t done so already.
Next, open a new terminal and run the following command for ngrok:
Change the port from the command above, if your Laravel application is running on a different port other than the default 8000.
Update your Twilio Board with the Public URL
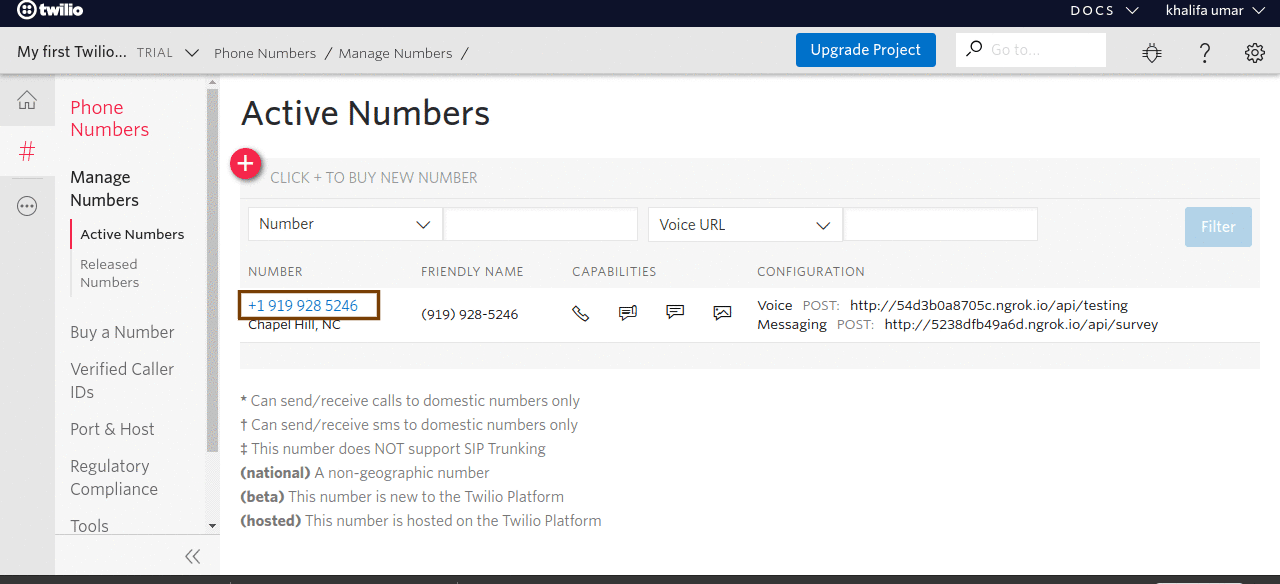
Go back to your Twilio dashboard and select the Phone Numbers link from the sidebar menu. This will show the list of active numbers for your account:
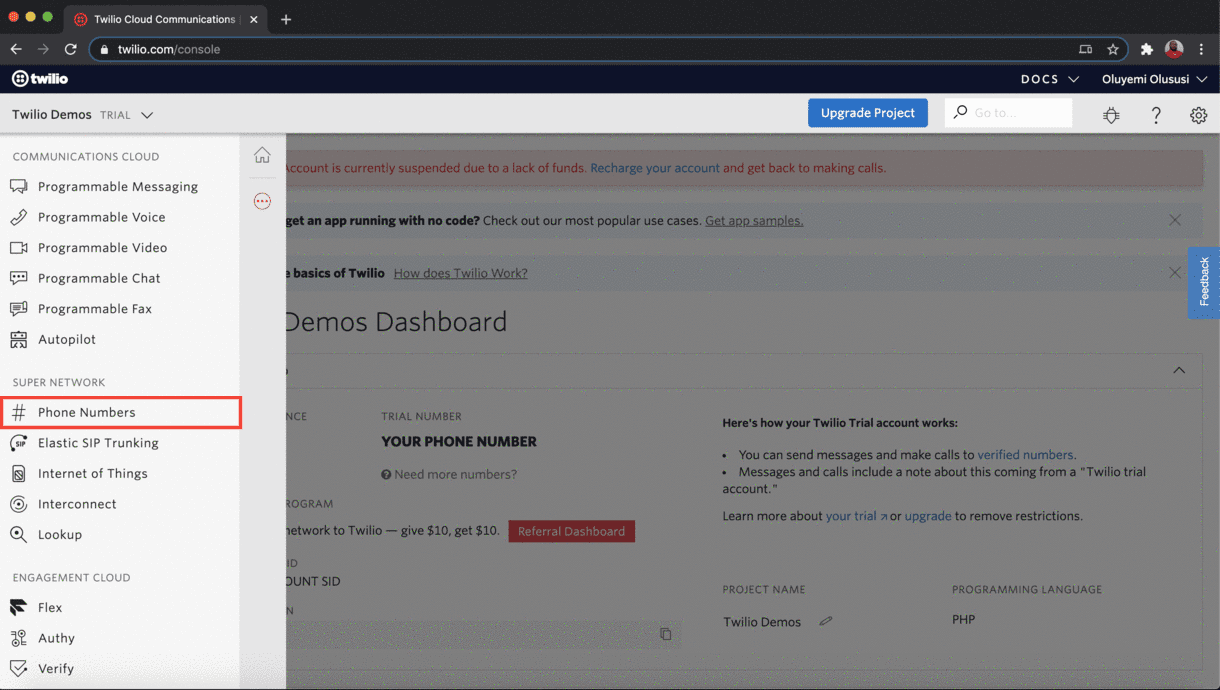
Click on the specific number of interest to manage its configuration:
Scroll down to the Messaging section and paste the public URL generated by ngrok into the input field for the Webhook under A MESSAGE COMES IN. The URL will also include the endpoints from the Laravel application in this format <Ngrok URL>/api/survey
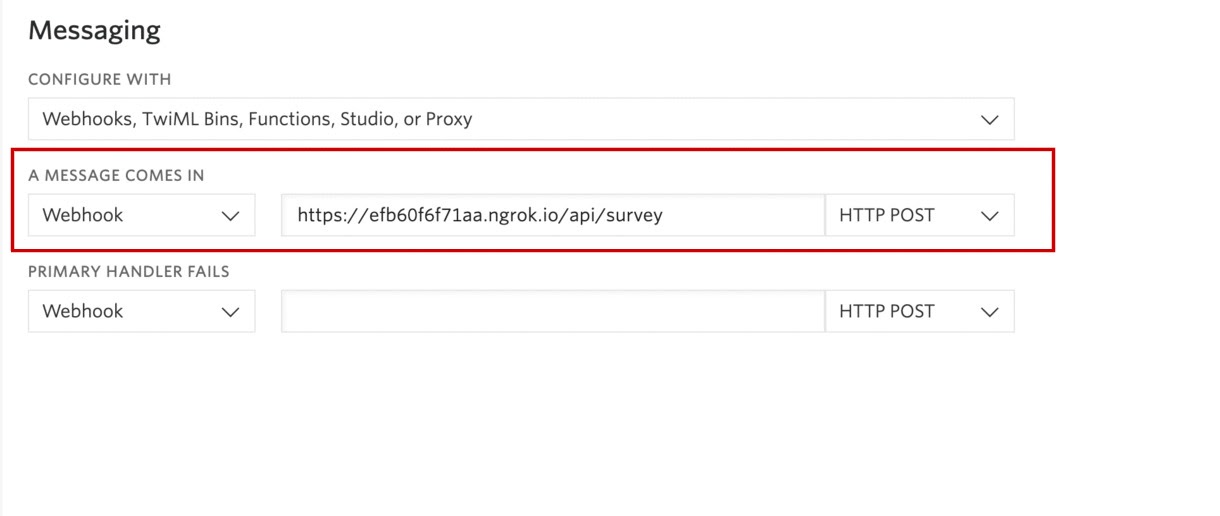
Click on the Save button once you are done.
Test the Application
To test this application, inform your users to send any message ( such as “Join”) to the Twilio phone number configured for this survey. The image below depicts the flow of survey questions and responses from a particular participant:
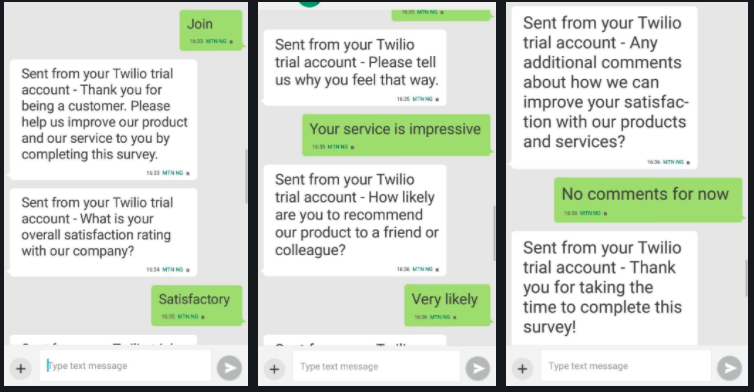
That’s it. You should be able to take a survey if you have configured one of your Twilio numbers for this tutorial.
Conclusion
As shown here, we were able to build a complete automated SMS survey application that can interact seamlessly with survey participants. We leveraged Twilio’s infrastructure using Programmable SMS to power the entire survey flow without hassle.
I hope you found this tutorial helpful! Don’t forget to check the official documentation of Twilio to explore further. Find the complete source code of this tutorial here on GitHub.
Olususi Oluyemi is a tech enthusiast, programming freak, and web development junkie who loves to embrace new technology.
- Twitter: https://twitter.com/yemiwebby
- GitHub: https://github.com/yemiwebby
- Website: https://yemiwebby.com.ng/
Related Resources
Twilio Docs
From APIs to SDKs to sample apps
API reference documentation, SDKs, helper libraries, quickstarts, and tutorials for your language and platform.
Resource Center
The latest ebooks, industry reports, and webinars
Learn from customer engagement experts to improve your own communication.
Ahoy
Twilio's developer community hub
Best practices, code samples, and inspiration to build communications and digital engagement experiences.