Build a Digital Jukebox for WhatsApp using Spotify, Python and Twilio

September 04, 2020
Written by
Miguel Ángel Ramírez
Contributor
Opinions expressed by Twilio contributors are their own

Build a Digital Jukebox for WhatsApp using Spotify, Python and Twilio

Remember those old jukeboxes where people used to insert a coin for it to take a record out and play the selected song? In this tutorial, we will implement our own digital jukebox that will allow you or your friends to search and add music to a playlist using the Twilio API for WhatsApp, Spotipy (a lightweight Python library for the Spotify Web API) and the Flask framework for Python.

The jukebox chatbot

Tutorial Requirements

For this tutorial, we will need the following:

  • Python 3.6 or newer. You can download it from this link
  • ngrok. We will use this handy utility to connect the Flask application running on your system to a public URL that Twilio can connect to. This is necessary for the development version of the application because your computer is likely behind a router or firewall, so it isn’t directly reachable on the Internet. If you don’t have ngrok installed, you can download a copy for Windows, MacOS or Linux
  • A smartphone with an active phone number and WhatsApp installed
  • A Twilio account. If you are new to Twilio create a free account now. You can review the features and limitations of a free Twilio account

Create a Python Virtual Environment

Following Python best practices, we are going to make a separate directory for our chatbot project, and inside it we are going to create a virtual environment. We then are going to install the Python packages that we need for our chatbot on it.

If you are using a Unix or Mac OS system, open a terminal and enter the following commands to do the tasks described above:

$ mkdir spotwilio-bot
$ cd spotwilio-bot
$ python3 -m venv spotwilio-bot
$ source spotwilio-bot-venv/bin/activate
(spotwilio-bot-venv) $ pip install twilio flask spotipy python-dotenv

For those of you following the tutorial on Windows, enter the following commands in a command prompt window:

$ md spotwilio-bot
$ cd spotwilio-bot
$ python -m venv spotwilio-bot-venv
$ spotwilio-bot-venvScripts\activate
(spotwilio-bot-venv) $ pip install twilio flask spotipy python-dotenv

The last command uses pip, the Python package installer, to install the five packages that we are going to use in this project, which are:

  • The Flask framework, to create the web application that responds to incoming WhatsApp messages with it
  • The Twilio Python Helper library, to work with the Twilio APIs
  • The Spotipy library for the Spotify Web API that provides for us the basic functionality that we will be needing for this tutorial
  • The Dotenv package, to load environment variables from a .env file

For your reference, at the time this tutorial was released these were the versions of the above packages and their dependencies tested:

certifi==2020.6.20
chardet==3.0.4
click==7.1.2
python-dotenv==0.14.0
flask==1.1.2
idna==2.10
itsdangerous==1.1.0
jinja2==2.11.2
markupsafe==1.1.1
pyjwt==1.7.1
pytz==2020.1
requests==2.24.0
six==1.15.0
spotipy==2.13.0
twilio==6.44.1
urllib3==1.25.9
werkzeug==1.0.1

Configure the Twilio WhatsApp Sandbox

Twilio provides a WhatsApp sandbox where you can easily develop and test your application. Once your application is complete you can request production access for your Twilio phone number, which requires approval by WhatsApp.

Let’s connect your smartphone to the sandbox. From your Twilio Console, select Programmable Messaging, then click on “Try it Out”, and finally click on “Try WhatsApp”. The WhatsApp sandbox page will show you the sandbox number assigned to your account, and a join code.

Whatsapp sandbox

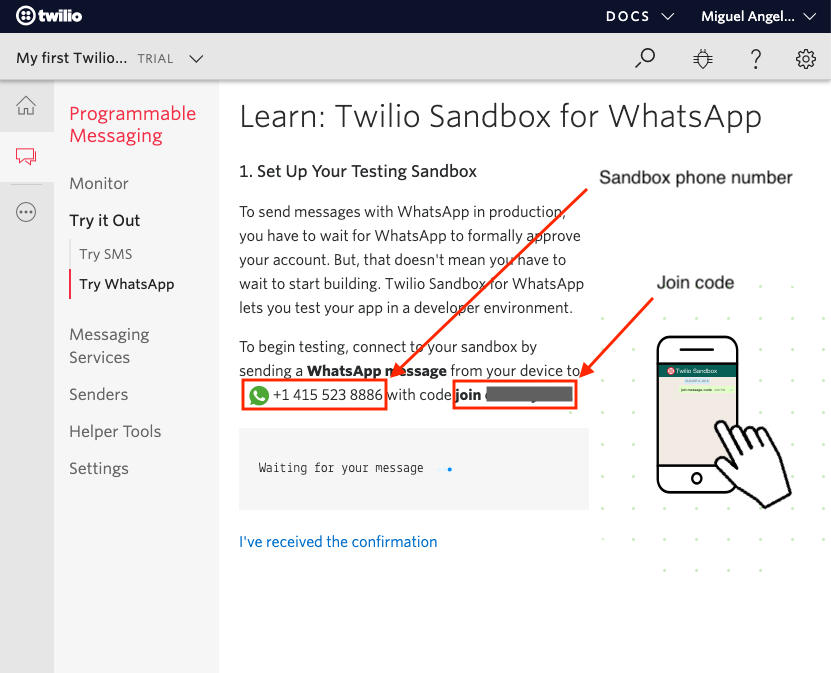
To enable the WhatsApp sandbox for your smartphone, send a WhatsApp message with the given code to the number assigned to your account. The code is going to begin with the word join, followed by a randomly generated two-word phrase. Shortly after you send the message you should receive a reply from Twilio indicating that your mobile number is connected to the sandbox and can start sending and receiving messages.

Note that this step needs to be repeated for any additional phones you’d like to have connected to your sandbox.

Getting Spotify ready for our application

Now we are going to be doing a series of tasks that need to be done before we start working with the Spotify API, like creating our playlist, authorizing our app and testing both the Spotify Web API directly and through the spotipy library.

Create your playlist

For this tutorial we will be creating a private, non-collaborative playlist as the modifications to it will only be done with our own user. You can adapt this later on to your own requirements.

In case you are not familiar with this procedure, here is a very brief and clear video from Spotify that will get you there.

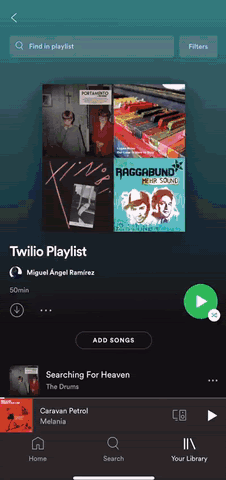
Once you have added your first song by creating the playlist, it should look something like this:

Spotify playlist

Authorize your application on the Spotify Web API

For this, you will have to go to the Spotify Web API site (where there is a lot of information if you’re interested), click on “Dashboard” on the upper navigation bar and login with your Spotify account.

Spotify developer dashboard option

Spotify developer dashboard

Once you’re in the Dashboard, click on “Create an app” to begin.

Create a Spotify app

We will then provide the required information.

Spotify app creation

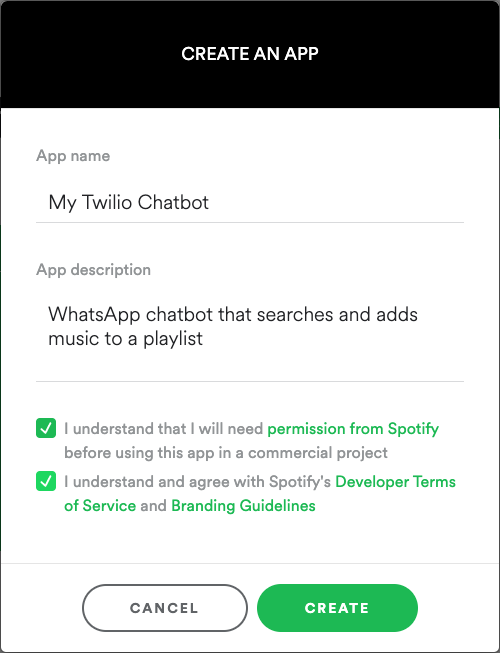
Click on “Edit Settings” and add your “Redirect URI” as http://127.0.0.1:5000/callback. This is the URL where we will be redirected to once the authentication is successful (or if it fails too) and it can be any URL as long as it is specified in this section of our app.

Spotify app

Test the Spotify API

Now we are going to be doing a quick test on the Spotify API so you get familiar with how Spotify exposes its information.

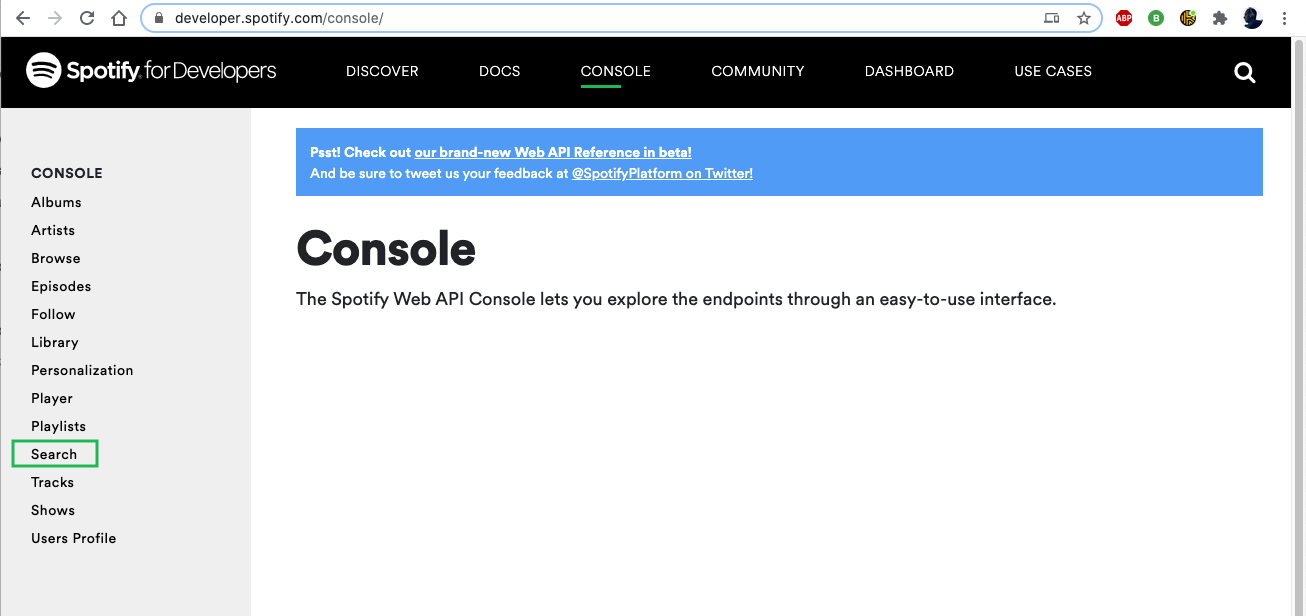
Let’s navigate to the “Console” menu and click on “Search” in the submenu, and then select the only method available.

Spotify console

Spotify search

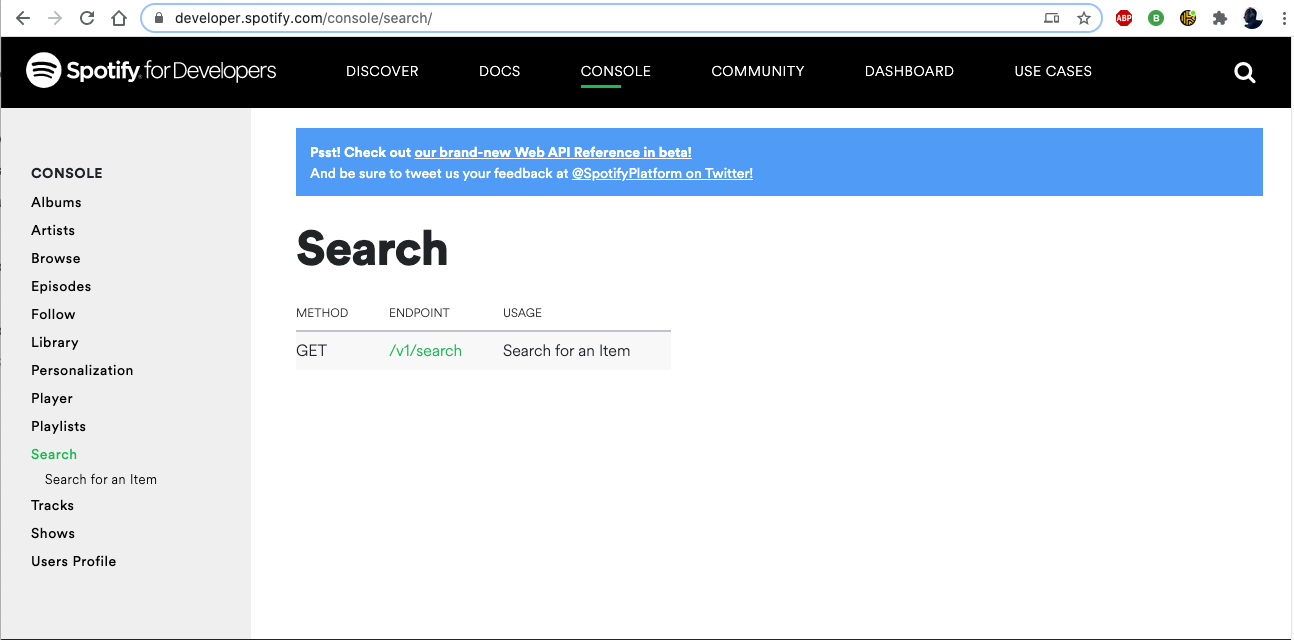
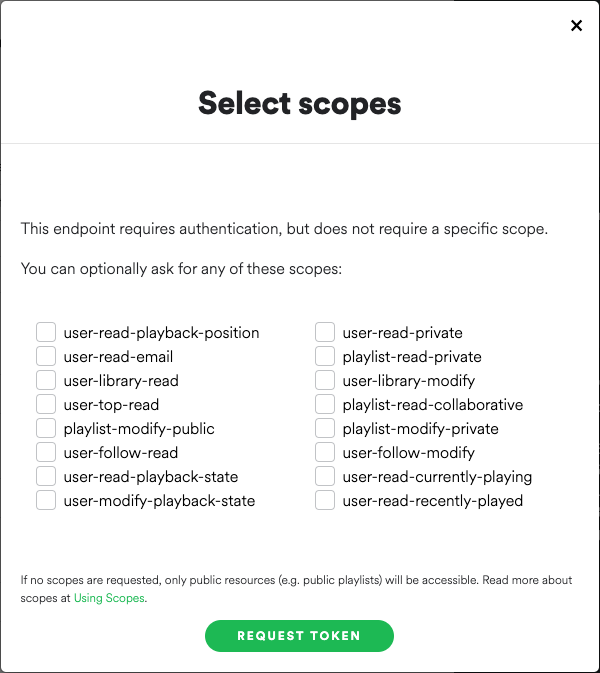
Now fill in the “q” and “type” fields (for example: q: Muse, type: artist). Click on “Get token”. Note that a “Select scopes” window shows up, but don’t worry, we won’t select any as we are only doing a simple search here, so just continue with “Request token”.

Scope selection

To execute the request click “Try it”. Once executed, if you scroll down, you will see the response message on the right black frame.

Execute search query

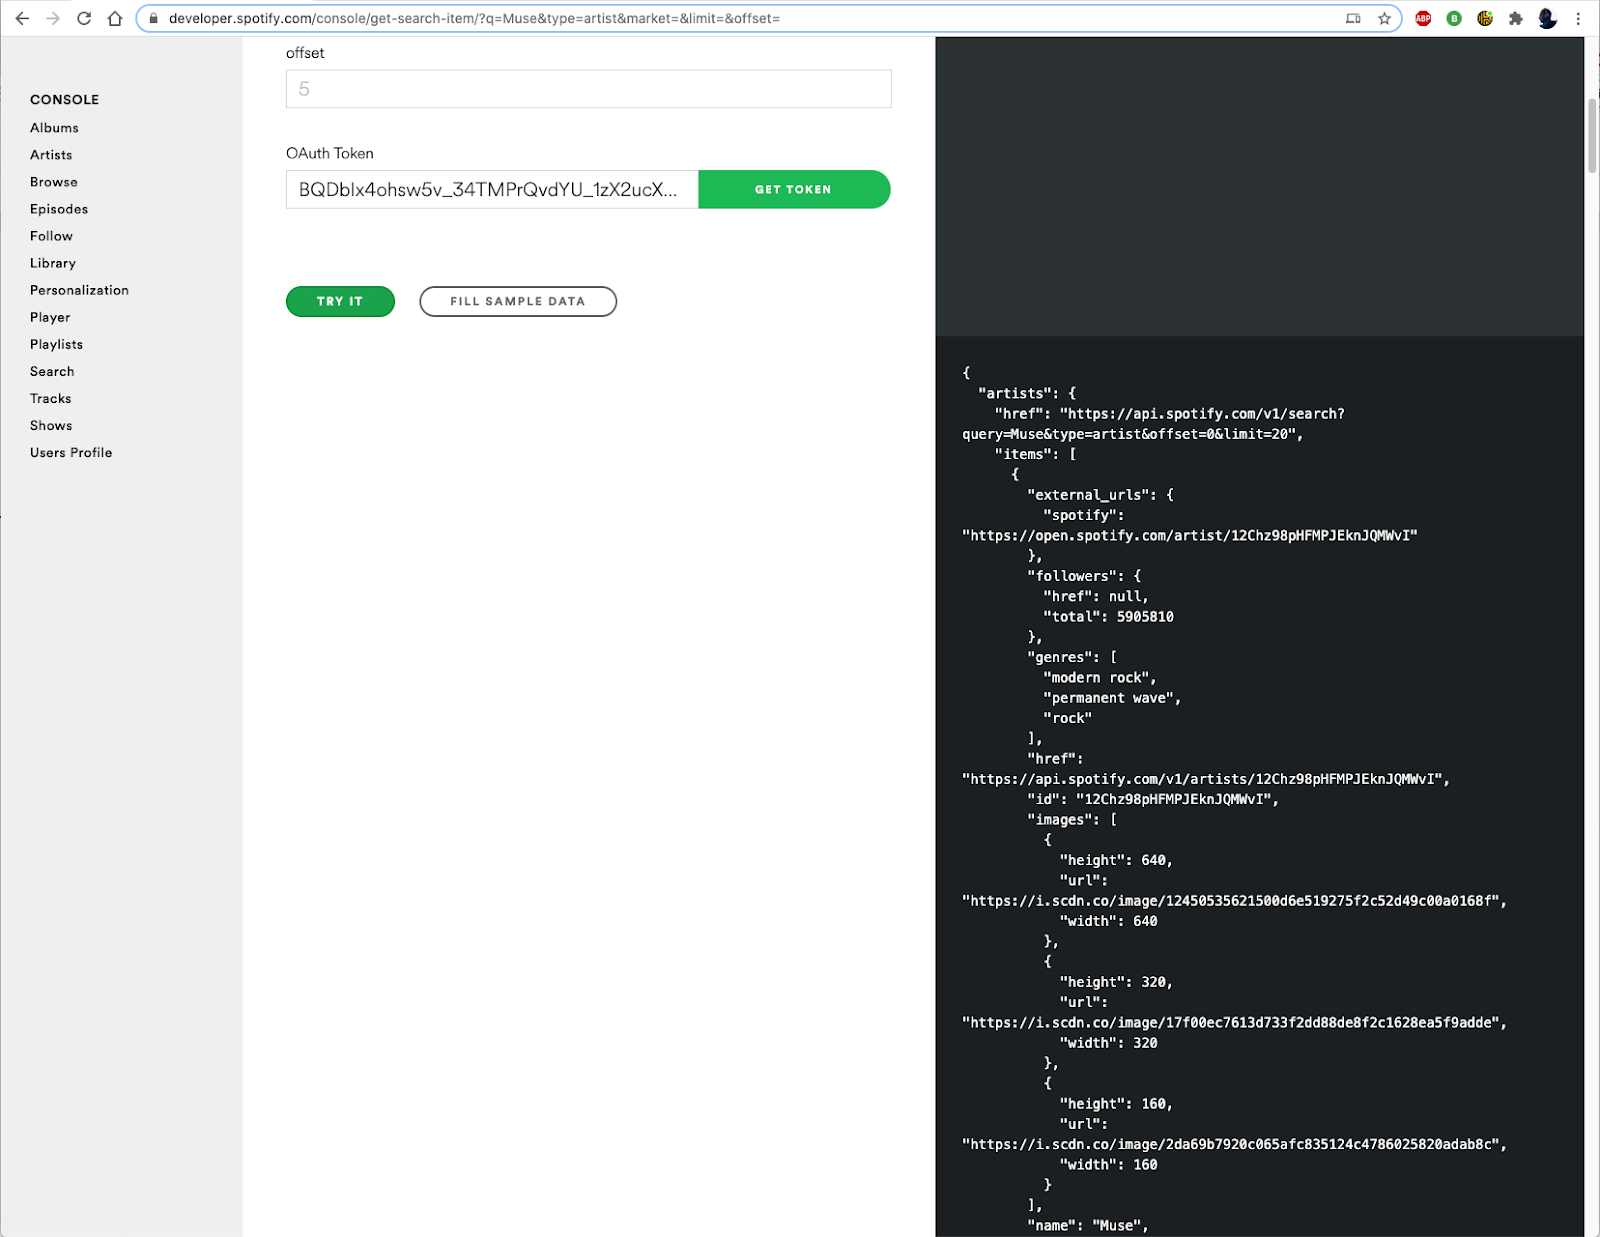
Now take a minute to examine the response and understand how the information is structured. Try making a few more tests with different search queries and types, or even try different endpoints.

Test the Spotify API through spotipy

Now, let’s go back to your terminal. We are going to try doing the exact same search procedure, but through the spotipy library with Python.

We will now create the following environment variables as the spotipy library uses these as a more secure option instead of having to type this sensitive information on your code and looks it up automatically. We just need to create the .env file in the project directory that will look like this:

SPOTIPY_CLIENT_USERNAME="<your_spotify_username>"
SPOTIPY_CLIENT_ID="<your_client_id>"
SPOTIPY_CLIENT_SECRET="<your_client_secret>"
SPOTIPY_REDIRECT_URI="http://127.0.0.1:5000/callback"
SPOTIFY_PLAYLIST_URI="<your_playlist_uri>"
SPOTIFY_MARKET="<your_country_code>"

This is where we can get the values for each variable:

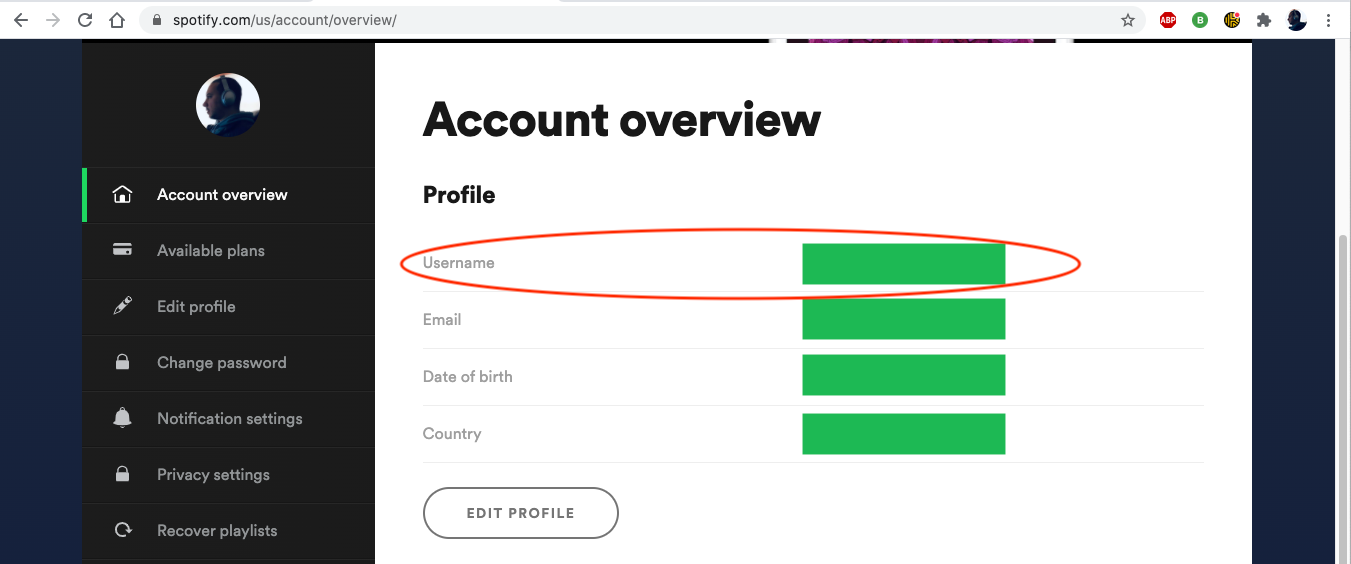
  • Username. Go to spotify.com. On the upper right corner, click on “Profile” next to your avatar, and then “Account”


Spotify account

There you will find your basic user information. We’re looking for the one next to “username”.


Spotify username
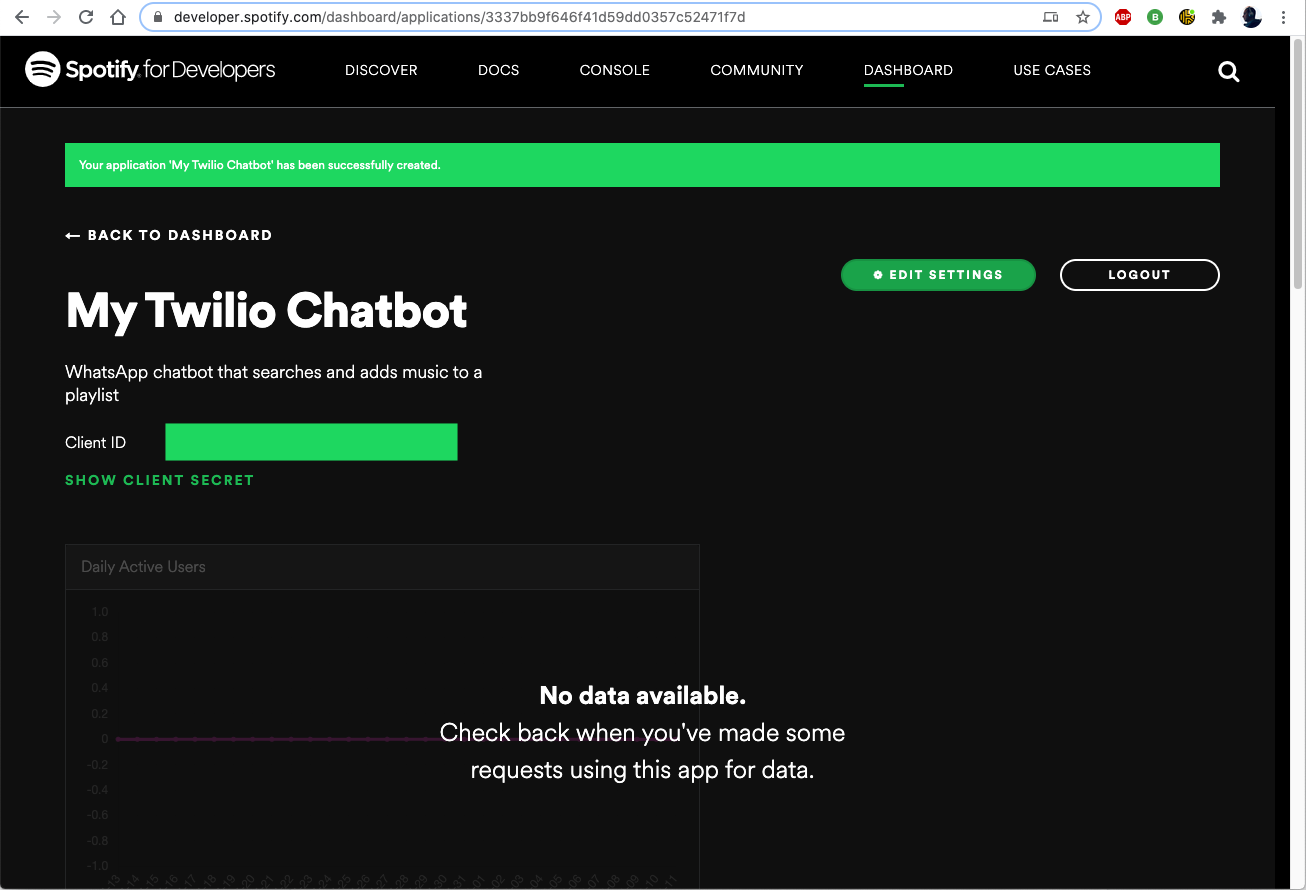
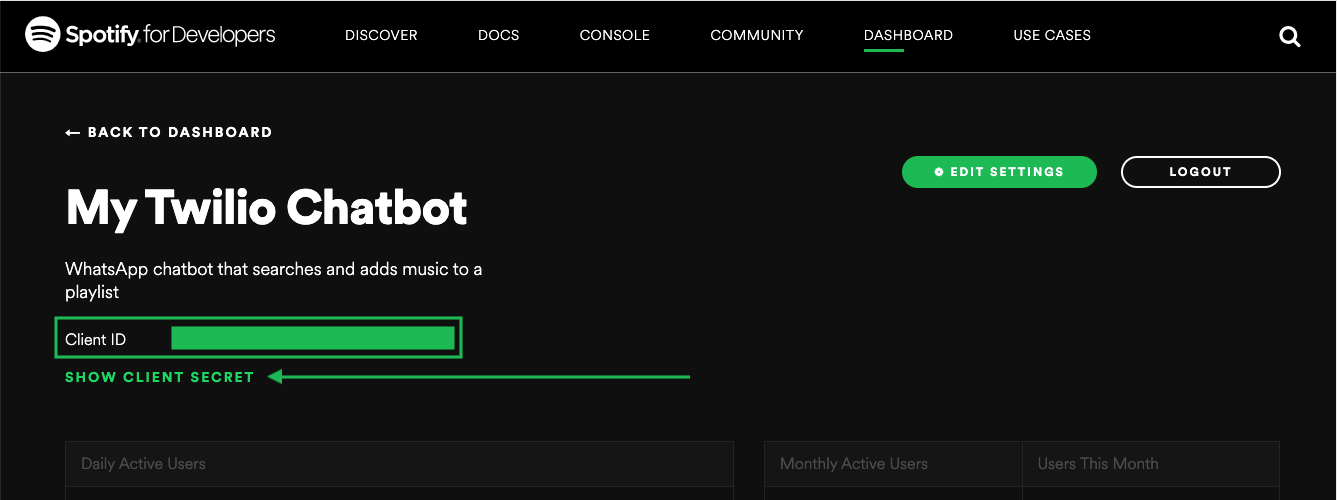
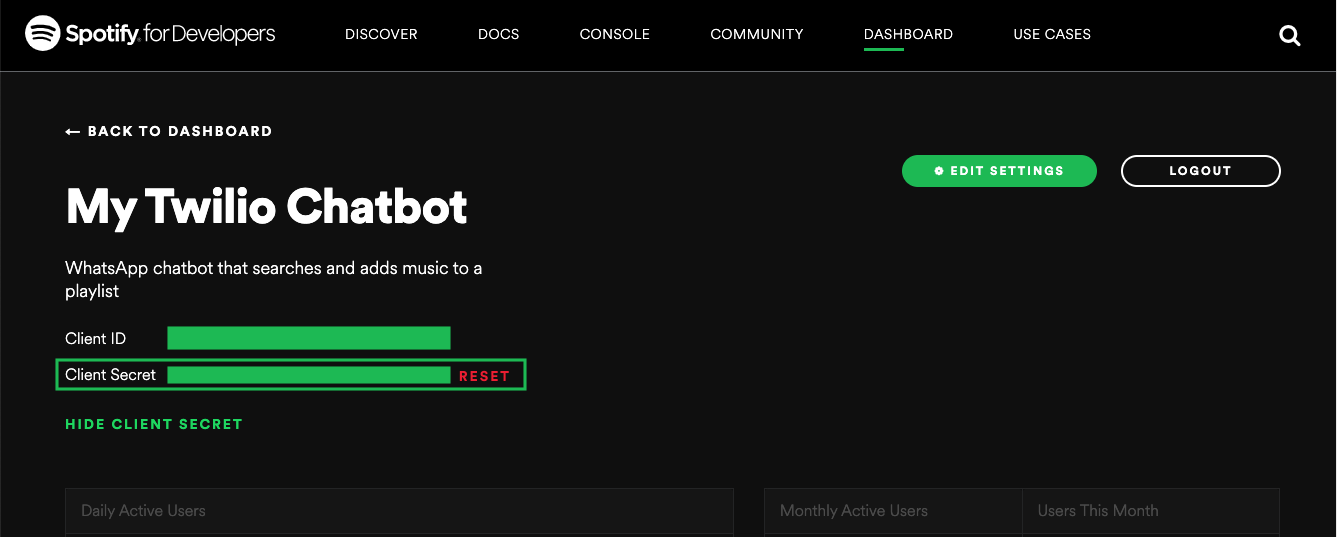
  • Client Id and Client Secret. For this, we need to go back to our Spotify for Developers Dashboard, click on “My Twilio Chatbot” and there you will find this information. You need to click on “Show Client Secret” for this information to show up.


Spotify client id


Spotify client secret
  • Redirect URI. This is the URL we previously configured when we first created our app (http://). You can get it from the “Edit Settings” button.
  • Playlist URI. This is the URI for the specific playlist we will be working with. For that you need to open your playlist and click on “(...)” and then select “Copy Playlist link”


Copy Spotify playlist link
  • Market. This is a parameter on Spotify because there might be some restrictions to play music based on the country you live in. So for example, if you are located somewhere in the European Union, you won’t be able to play a song that is only available in a particular Asian country (if that’s a real case). It won’t really make any sense for you to add a song to the playlist that you won’t be able to play, therefore, we will add this value to our variables to make sure we will only get results from songs we can actually reproduce. You can grab the ISO 3166-1 alpha 2 code for your country and enter it here. For example, use “US” for the United States.

Now let’s start our Python console by typing python in your terminal and then type the following code. This short script will generate a cache file with our tokens, which will be used by our application for future requests. It is important to run these lines in the same directory where the rest of our code will be.

>>> import os
>>> import spotipy
>>> from spotipy.oauth2 import SpotifyOAuth
>>> from dotenv import load_dotenv
>>> load_dotenv()
>>> spotify_user = os.environ.get("SPOTIPY_CLIENT_USERNAME")
>>> spotify_scope = "playlist-modify-private"
>>> oauth = SpotifyOAuth(username=spotify_user, scope=spotify_scope)
>>> user_token = oauth.get_access_token(as_dict=False)

As part of the user token generation (last line above), your browser will take you to a Spotify login page. Once you enter your credentials you will be taken to our redirect URL with a code added to it and this message on your browser:

Spotify authentication

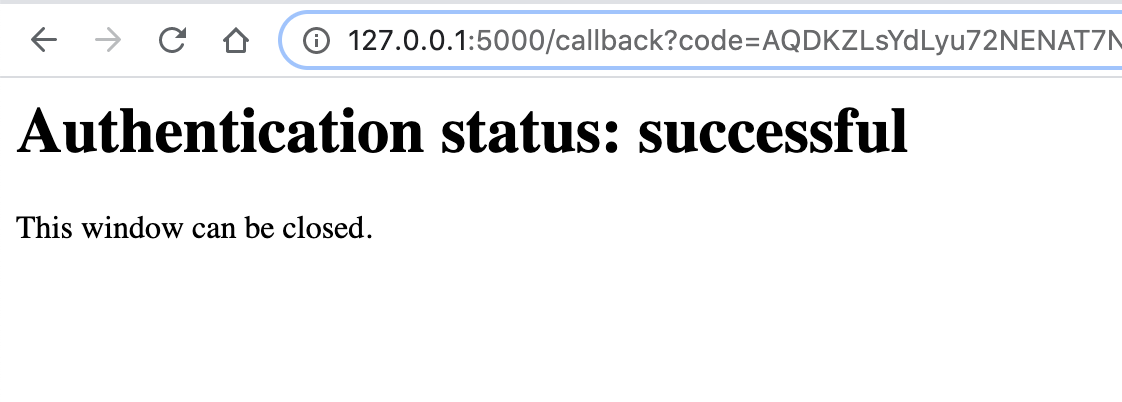
You were probably already logged in to Spotify when testing their API so this window will likely open and close automatically, but still generating your token successfully.

This is a one time process that will only occur now. At the end of it, you will have a new file with a name .cache-<your_spotify_username> that contains your token information that will later be used to send the requests to Spotify and, when needed, the information to refresh your token (each generated token expires after an hour, but worry you must not!, all the process of verifying if a token is expired and obtaining a new token is handled by the methods on the spotipy library).

The cached token has a structure similar to this:

{
    'access_token': '<your_access_token>',
    'token_type': 'Bearer',
    'expires_in': 3600,
    'scope': 'playlist-modify-private',
    'expires_at': 1597259838,
    'refresh_token': '<your_refresh_token>'
}

If you print your user_token variable after it was generated, you will see the string corresponding to the access_token from the cached token structure from above, which is the information we are going to be using next.

>>> print(user_token)

Now type the following to create the Spotify client, passing the token as an argument:

>>> spotify = spotipy.Spotify(auth=user_token)

And finally our search request:

>>> api_results = spotify.search(q="Muse", type="artist")

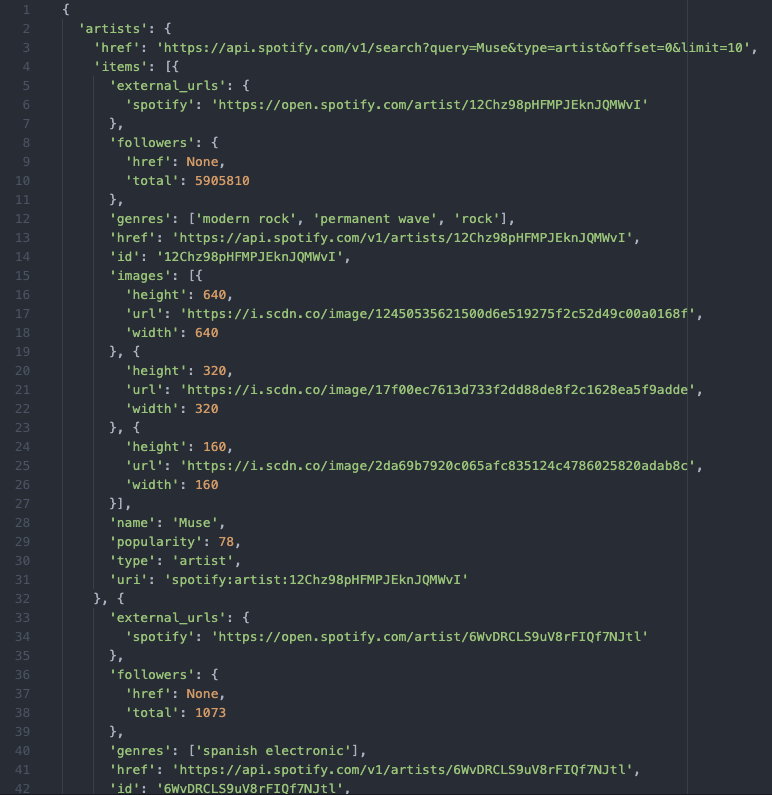
When you print api_results, you will see something like this (which should be very similar to what we received on our direct test on the Spotify Console).

Spotify API search results

We have now tested a basic search with the spotipy library on Python and we have already generated our access token for future requests.

Create the Flask Chatbot Service

Let’s now get to the core of our application. First we will start ngrok, which as mentioned before is a utility to connect the local Flask application to a public URL, and configure our endpoint.

Running ngrok and configure our Twilio endpoint

We need to open a terminal window and run ngrok http 5000 to allocate a temporary public domain that redirects HTTP requests to our local port 5000 where our flask application will be running. On a Unix or Mac OS computer you may need to use ./ngrok http 5000 if you have the ngrok executable in your current directory. The output of ngrok should be something like this:

ngrok output

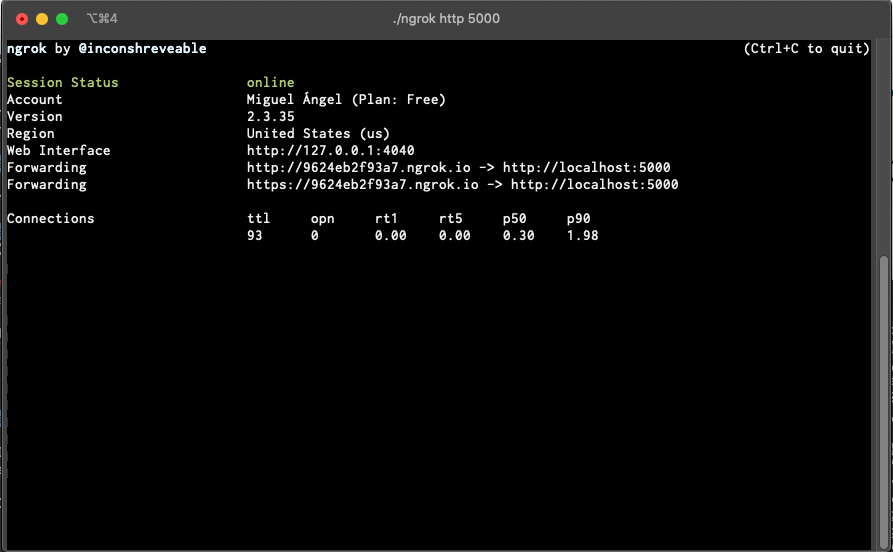
The “Forwarding” lines show the public URL that ngrok uses to redirect requests into our service. What we need to do now is tell Twilio to use this URL to send incoming message notifications.

Go to the Twilio Console, click on Programmable Messaging > Settings > WhatsApp Sandbox Settings. Copy the https:// URL from the ngrok output and then paste it on the “When a message comes in” field, with /jukebox appended at the end. The /jukebox path is where we will install the endpoint of our application.

WhatsApp webhook setup

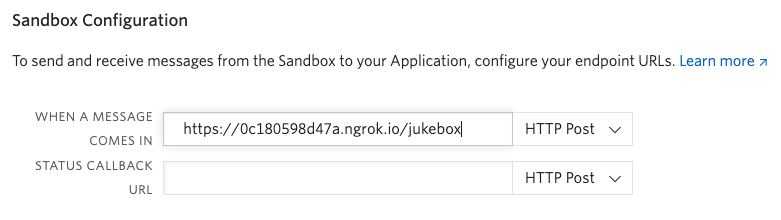
Make sure the request method is set to HTTP Post and don’t forget to click the “Save” button at the bottom of the page to record these changes.

Webhook

The Twilio API for WhatsApp uses a webhook to notify an application when there is an incoming message. Our chatbot application needs to define an endpoint that is going to be configured as this webhook so that Twilio can communicate with it.

Here, we will define our webhook with Flask so let’s create a file twilio_jukebox.py with the following piece of code:

from flask import Flask

app = Flask(__name__)


@app.route('/jukebox', methods=['GET'])
def jukebox():
    # webhook logic here with a response
    pass


if __name__ == "__main__":
    app.run(debug=True)

If you are not familiar with the Flask framework, its documentation has a quick start section that should bring you up to speed quickly. There is also a nice tutorial that can help you a lot.

As mentioned before, this application defines a /jukebox endpoint. Each time an incoming WhatsApp message from a user is received by Twilio, they will in turn invoke this endpoint. The body of the function jukebox() is going to analyze the message sent by the user and should provide the appropriate response.

The if __name__ == “__main__” line makes sure the application will only run when our file is executed as a main script (not imported as a module by some other script).

Now we will add the return of the function just to test the application:

from flask import Flask

app = Flask(__name__)


@app.route('/jukebox', methods=['GET'])
def jukebox():
    return "Hello from Flask!"


if __name__ == "__main__":
    app.run(debug=True)

Leave the terminal session running ngrok and start a second terminal window. After you activate the virtual environment, run the code with python twilio_jukebox.py. You should see something like this in your terminal:

 * Serving Flask app "main" (lazy loading)
 * Environment: production
   WARNING: This is a development server. Do not use it in a production deployment.
   Use a production WSGI server instead.
 * Debug mode: on
 * Running on http://127.0.0.1:5000/ (Press CTRL+C to quit)
 * Restarting with stat
 * Debugger is active!
 * Debugger PIN: 958-679-664

Now let’s take the ngrok application URL that we entered in the Twilio Console and paste it in a new tab on your browser. The request going to the ngrok URL should be redirected to the Flask server you just started, and you should get something like this in your terminal:

127.0.0.1 - - [11/Aug/2020 20:49:46] "GET /jukebox HTTP/1.1" 200 -
127.0.0.1 - - [11/Aug/2020 20:49:46] "GET /favicon.ico HTTP/1.1" 404 -

And this in your browser:

Flask web application

Our application is up and running!

Messages and Responses

One of the key things in our chatbot is to obtain the message entered by the user. This message comes in the payload of the POST request with a key of ’Body’. We can access it through Flask’s request object.

from flask import request
incoming_msg = request.values.get('Body', '')

The response that Twilio expects from the webhook needs to be given in TwiML or Twilio Markup Language, which is an XML-based language. The Twilio helper library for Python comes with classes that make it easy to create this response without having to create XML directly. Below you can see how to create a response:

from twilio.twiml.messaging_response import MessagingResponse

resp = MessagingResponse()
resp.message("This is the response text")

So if we put them together we can test a basic function that will respond with the same incoming message back to the user:

from flask import Flask, request
from twilio.twiml.messaging_response import MessagingResponse

app = Flask(__name__)


@app.route('/jukebox', methods=['POST'])
def jukebox():
    incoming_msg = request.values.get('Body', '')
    resp = MessagingResponse()
    resp.message(incoming_msg)

    return str(resp)


if __name__ == "__main__":
    app.run(debug=True)

Note that the HTTP method in this example changed from GET to POST. This matches the configuration of the webhook in the Twilio Console, which was set to POST as well.

Now run your app one more time and send a message like “Hello there” to your WhatsApp bot.

You should then see a response with the same message:

WhatsApp demo

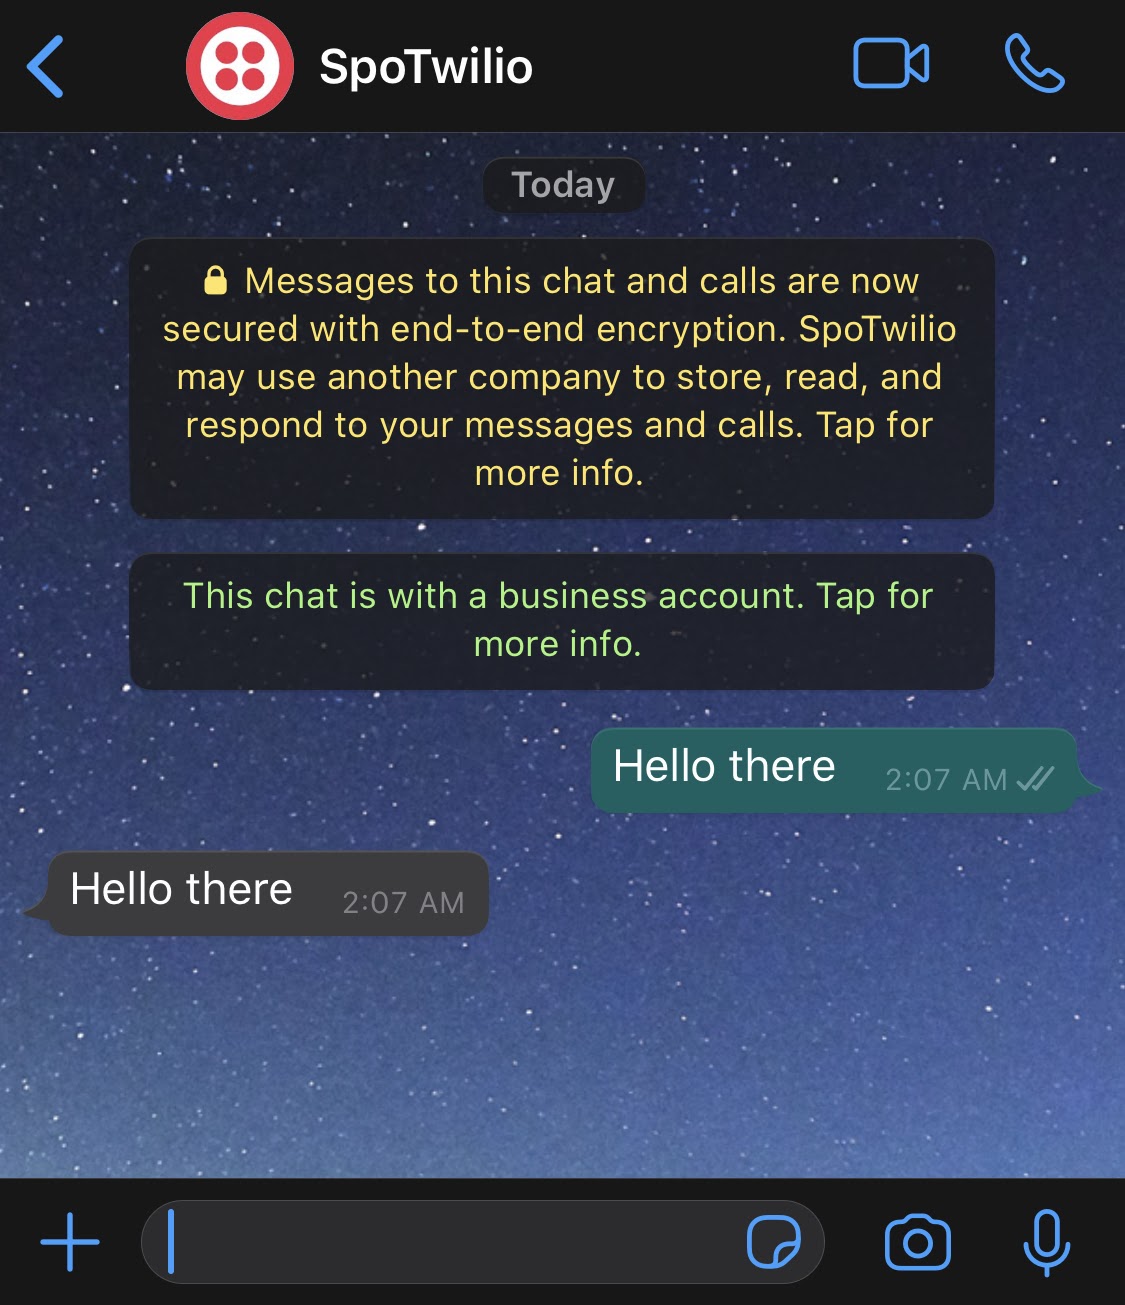
This is what happened: the Twilio API for WhatsApp sent the request containing your message to the URL configured in the Console. Ngrok then redirected the request to our computer, where our application is running locally, and executed our jukebox function defined within the /jukebox endpoint. This function receives the message that was typed on WhatsApp (incoming_msg assignment) and creates a response message with that same text to be sent back to the user (resp assignment).

Your terminal will also display a message like this letting us know it received a POST request, on the /jukebox endpoint and with an HTTP 200 (ok) response:

127.0.0.1 - - [14/Aug/2020 02:07:50] "POST /jukebox HTTP/1.1" 200 -

Flask sessions

A session is a flask object that allows you to store information related to one user from one request to the next in a dictionary. This is implemented on top of cookies, and with the help of cryptographic signatures to keep the information secure.

In order to use sessions, Flask needs to be given a secret key that is used to generate the signatures. The secrets module comes in very handy to generate this key. Let’s open a new terminal window, start a python console and type the following pair of lines:

>>> import secrets
>>> secrets.token_hex(16)
'6061d134dbc8335199d6c2fde4fab240'

The returned string will be your secret key. Now we are going to open our .env file and add a line assigning this to an environment variable.

FLASK_APP_SECRET="<your_secret_key>"

The session is going to be a fundamental part of our logic since we will be simulating a conversation, and for that we need to remember certain things, like if a search cycle has already started, which results have already been shown to the user, etc. We will define a series of variables that will be used to store particular information related to the user on a particular search in our session. Before getting into the code itself, I would like to put you in context of what would be the purpose of each one of these variables:

  • results - Will store a list structure with the results obtained from the Spotipy in the following order:
    • Index that we will use once the user sends the selection back to us
    • Song title
    • Album name
    • Artist Name
    • Spotify song uri to be used when adding the song to the playlist
  • search - a flag that will indicate us if there is an ongoing search cycle
  • next_result - a flag to let us know if there are more results to be shown next and let the user know
  • offset - the value that will let us know which “page” from the total results from Spotify we are currently in. So as the user asks for more results we need to know what’s the current page to know which results to show next
  • search_str - as long as we are in a search cycle, we need to know which search string the user sent in the beginning in order to keep searching if needed

Now let’s go back to our twilio_jukebox.py file and add the session import, as well as the variable assignment that will set the flask secret key for our session. Replace the beginning of the file with the following code:

from flask import Flask, request, session  # session import
from twilio.twiml.messaging_response import MessagingResponse

app = Flask(__name__)

app.secret_key = os.environ.get("FLASK_APP_SECRET")  # Assign the generated key to flask's secret key

Chatbot logic

As a general overview, this chatbot will work depending on certain keywords and logic that will be in our main function:

  • Any word will start the conversation with a greeting
  • search will start the cycle and ask for a search string
  • stop-search to stop the conversation and end the current cycle
  • more. Everytime search results are displayed, 8 items will be shown so this command will allow us to display 8 more available results. You should take note that WhatsApp only allows 1,600 characters on a message, so if your search results are bigger you should consider splitting it into two different messages, reduce the number of results to a lower number or even change the formatting showed here
  • search-again will reset the current cycle and ask again for a search string to lookup
  • Once the results are displayed, it will expect any number corresponding to those results (1, 2, 3… n) to indicate which song will be added to the playlist

With that, let’s go back to our main file up to the point where we left off and let’s complement it section by section with all the conditions that will handle these keywords.

First we will import the rest of the modules we are going to be using, then delete the previous content of the main jukebox function that echoed our message from WhatsApp, and add this new content inside it. The new code is highlighted.


from flask import Flask, request, session
from twilio.twiml.messaging_response import MessagingResponse
import os
from spotipy.oauth2 import SpotifyOAuth
import spotipy
from dotenv import load_dotenv
load_dotenv()

app = Flask(__name__)

app.secret_key = os.environ.get('FLASK_APP_SECRET')


@app.route("/jukebox", methods=['POST'])
def jukebox():
    """
    Chatbot's main logic
    """
    valid_response = False
    resp_messages = []

    if not valid_response:
        resp_message = create_help_message("help")
        resp_messages.append(resp_message)
        resp = send_message(resp_messages)

    print(session)

    return str(resp)


if __name__ == "__main__":
    app.run(debug=True)

At this point we are only receiving any text for the first time so we will generate and send a help message back to go on with the conversation and let the user know what’s next.

Right after the main function definition, we will add two more:

def send_message(messages):
    """
    Receives a list and sends the TwiML response message(s)
    """
    resp = MessagingResponse()

    for message in messages:
        resp.message(message)

    return resp

The send_message function receives a list of strings and creates a response with them. We use a list because there might be times when we will need to send more than one message back to the user.

def create_help_message(message):
    """
    List of response messages depending on what needs to be sent back
    to the user.
    """
    if message == "ask_search":
        return "Ok, which song / album / artist are you looking for? " \
            "Try being as specific as possible. E.g.: _Bad Michael Jackson_"
    elif message == "all_results":
        return "These are all the results. Please type the " \
            "number of the song you would like to add to the playlist " \
            "(example: *9*) or type *search-again* to start a new search. " \
            "You can type *stop-search* to end at any time"
    elif message == "more_results":
        return "Please type the number of the song you would like to add to " \
            "the playlist (Example: *9*). If you would like to see more " \
            "results, type *more* or *search-again* to start a new search. " \
            "You can type *stop-search* to end at any time"
    elif message == "no_results":
        return "No results found. Please try again. You can type " \
            "*stop-search* to end at any time"
    elif message == "more_with_no_results":
        return "No more results are available. Please type the number of " \
            "the song you would like to add to the playlist (Example: *9*) " \
            "or type *search-again* to start a new search. You can type " \
            "*stop-search* to end at any time"
    elif message == "song_selected":
        return "The selected song is already on the playlist. Please select " \
            "a different one or type *search-again* to start a new search"
    elif message == "help":
        return "Hello! I can help you search and add music to our Spotify " \
            "playlist. Let's type *search* to begin!"

The create_help_message function contains the definition of all the messages that are going to be sent back to the user depending on the time and situation.

Let’s save the file, run your application and say “Hello” to your bot.

WhatsApp demo

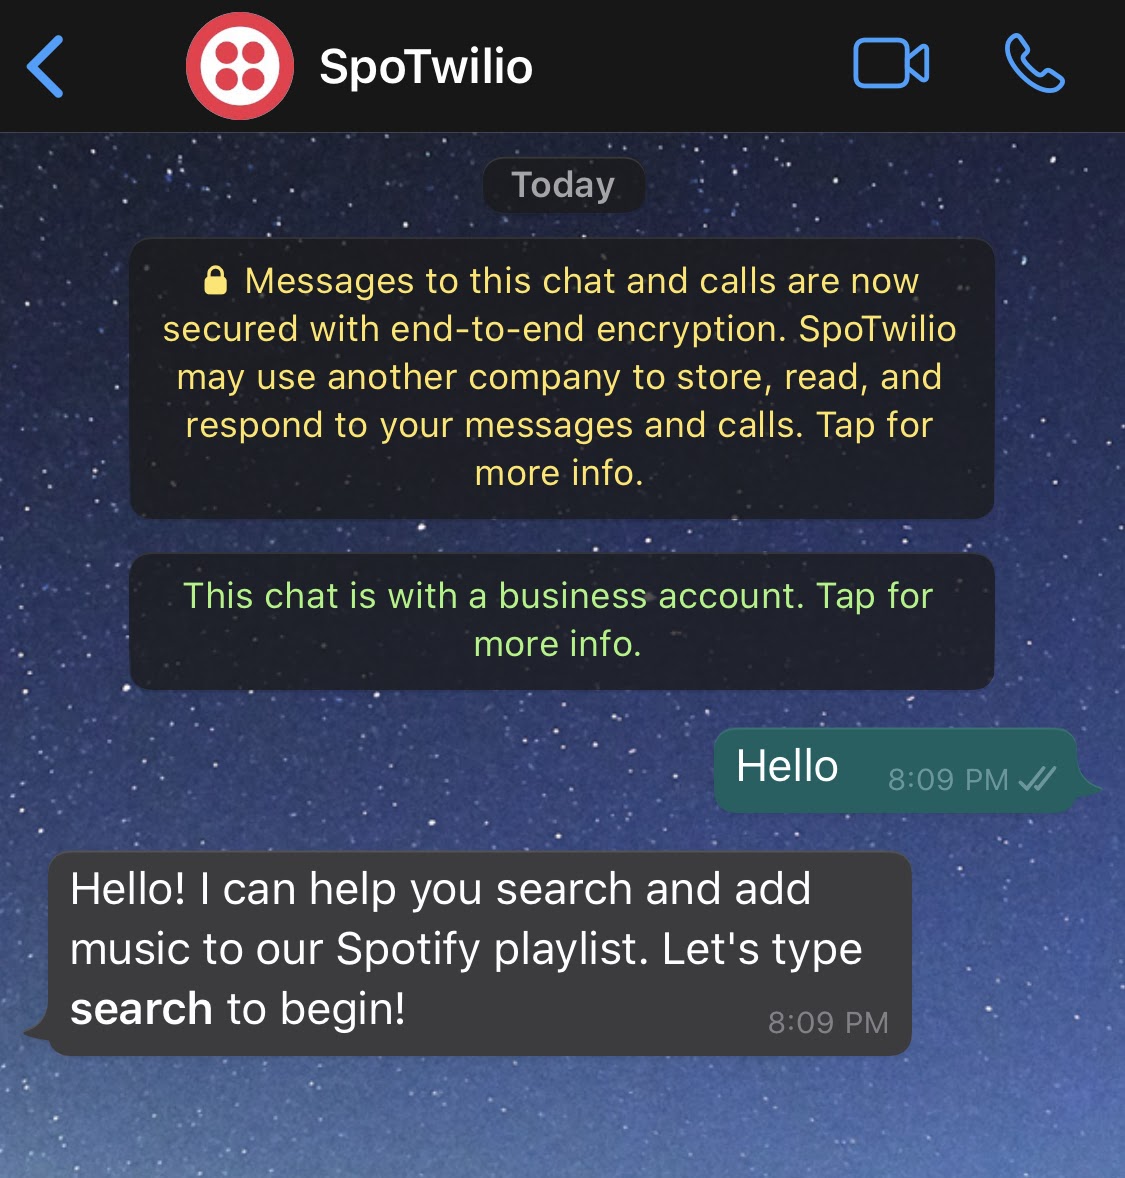
We now started our conversation. Notice that your session has been printed out on your terminal.

<SecureCookieSession {}>
127.0.0.1 - - [25/Aug/2020 20:09:31] "POST /jukebox HTTP/1.1" 200 -

It is currently empty, but let’s keep an eye on it as we complete the application.

Our next step is to add the condition that reads the search and stop-search keywords in the jukebox() function, so let’s go to that. Right after the resp_messages assignment, add the highlighted code:


@app.route("/jukebox", methods=['POST'])
def jukebox():
    """
    Chatbot's main logic
    """
    valid_response = False
    resp_messages = []
    incoming_msg = request.values.get('Body', '').lower()

    if (incoming_msg == 'search' and 'search' not in session) \
            or incoming_msg == 'search-again':
        resp_message = create_help_message("ask_search")
        resp_messages.append(resp_message)
        session['results'] = []
        session['search'] = True
        session['offset'] = 0
        session['next_result'] = True
        valid_response = True
        resp = send_message(resp_messages)
    elif incoming_msg == 'stop-search':
        session.clear()
        help_message = "Got it. Bye!"
        resp_messages.append(help_message)
        resp = send_message(resp_messages)
        valid_response = True
    if not valid_response:
        resp_message = create_help_message("help")
        resp_messages.append(resp_message)
        resp = send_message(resp_messages)

    print(session)

    return str(resp)

We added the incoming_msg assignment (because now we need to know what’s the actual message from the user) with a .lower() function so we don’t have to worry about different ways the user could send each keyword and then our condition that will generate a new message and initialize most of our session variables mentioned earlier.

Save and if you didn’t shut down your app, just make sure it did not get stuck in any errors. If everything’s okay, let’s send the new keyword (search) to our bot.

WhatsApp demo

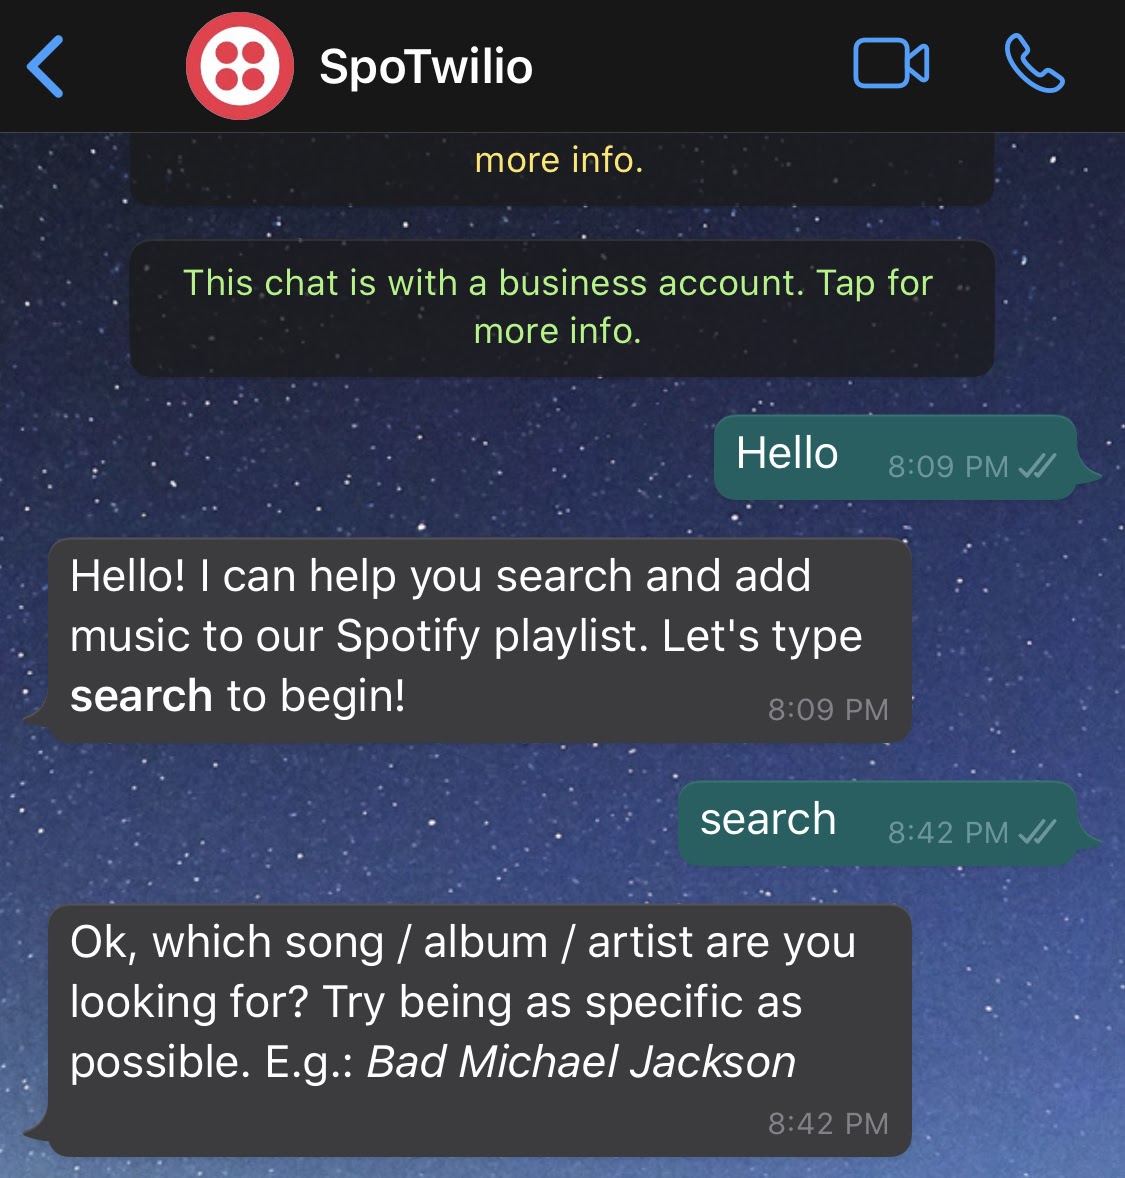
Great! Notice how your session object is now showing more information with the variables we just initialized.

<SecureCookieSession {'results': [], 'search': True, 'offset': 0, 'next_result': True}>
127.0.0.1 - - [25/Aug/2020 20:42:50] "POST /jukebox HTTP/1.1" 200 -

Let’s go on with our next section. Now we need our bot to handle the search string we send to it so that it can look for the information on Spotify:


@app.route("/jukebox", methods=['POST'])
def jukebox():
    """
    Chatbot's main logic
    """
    valid_response = False
    resp_messages = []

    incoming_msg = request.values.get('Body', '').lower()

    if (incoming_msg == 'search' and 'search' not in session) \
            or incoming_msg == 'search-again':
        resp_message = create_help_message("ask_search")
        resp_messages.append(resp_message)
        session['results'] = []
        session['search'] = True
        session['offset'] = 0
        session['next_result'] = True
        valid_response = True
        resp = send_message(resp_messages)
    elif 'search' in session \
            and not incoming_msg.isnumeric() \
            and (
                incoming_msg != 'search-again'
                and incoming_msg != 'stop-search'
            ):
        results, next = search(incoming_msg, 0, [])
        if results == []:
            help_message = create_help_message("no_results")
        else:
            session['results'] = results
            resp_message = respond_results(results, session['offset'])
            resp_messages.append(resp_message)
            session['offset'] += 8
            session['search_str'] = incoming_msg
            if next is None:
                help_message = create_help_message("all_results")
                session['next_result'] = False
            else:
                help_message = create_help_message("more_results")
                session['next_result'] = True
        resp_messages.append(help_message)
        resp = send_message(resp_messages)
        valid_response = True
    elif incoming_msg == 'stop-search':
        session.clear()
        help_message = "Got it. Bye!"
        resp_messages.append(help_message)
        resp = send_message(resp_messages)
        valid_response = True
    if not valid_response:
        resp_message = create_help_message("help")
        resp_messages.append(resp_message)
        resp = send_message(resp_messages)

    print(session)

    return str(resp)

This addition will handle the new keyword, initializing the collection where the results from Spotify will be stored and assign a couple of variables from our session. It will also determine which message needs to be sent back to the user. For this part to work, we need to add four more functions below create_help_message().

def get_user_token():
    """
    Obtain an access token from Spotify
    """
    oauth = SpotifyOAuth(
        username=os.environ.get("SPOTIPY_CLIENT_USERNAME"),
        scope='playlist-modify-private'
    )
    user_token = oauth.get_access_token(as_dict=False, check_cache=True)

    return user_token

This function uses the spotipy library to generate or obtain the access token just the way we did manually before.

def create_spotify_client():
    """
    Creates Spotify API client
    """
    user_token = get_user_token()
    spotify = spotipy.Spotify(auth=user_token)

    return spotify

This is the base of all interactions with the Spotify API.

def search(search_str, offset_val=0, results=[]):
    '''
    Returns a list of coincidences either on songs, albums or artists as well
    as if there are any more results next
    '''
    spotify = create_spotify_client()
    api_results = spotify.search(
        q=search_str,
        limit=8,
        market=os.environ.get("SPOTIFY_MARKET"),
        offset=offset_val
    )
    items = api_results['tracks']['items']
    next = api_results['tracks']['next']

    if len(items) > 0:
        for id, item in enumerate(items):
            song = item['name']
            album = item['album']['name']
            artist = item['artists'][0]['name']
            uri = item['uri']
            new_item = [id+1+int(offset_val), song, album, artist, uri]
            results.append(new_item)

    return results, next

The search function will get the list of tracks with the information sent as a query (in case there is a match), as well as a value for next from spotify which is the request URL for the next set of results or None if there are no more results. Notice how the market variable we talked about earlier is being used now.

def respond_results(results, offset_val):
    """
    Receives the search result and formats it to text for response
    """
    text_results = ''

    for i in range(offset_val, len(results)):
        text_results += "{}.  🎵 {} \n     💿 {} \n     👤 {} \n" \
            "---------------------------------\n".format(
                results[i][0], results[i][1], results[i][2], results[i][3])

    return text_results

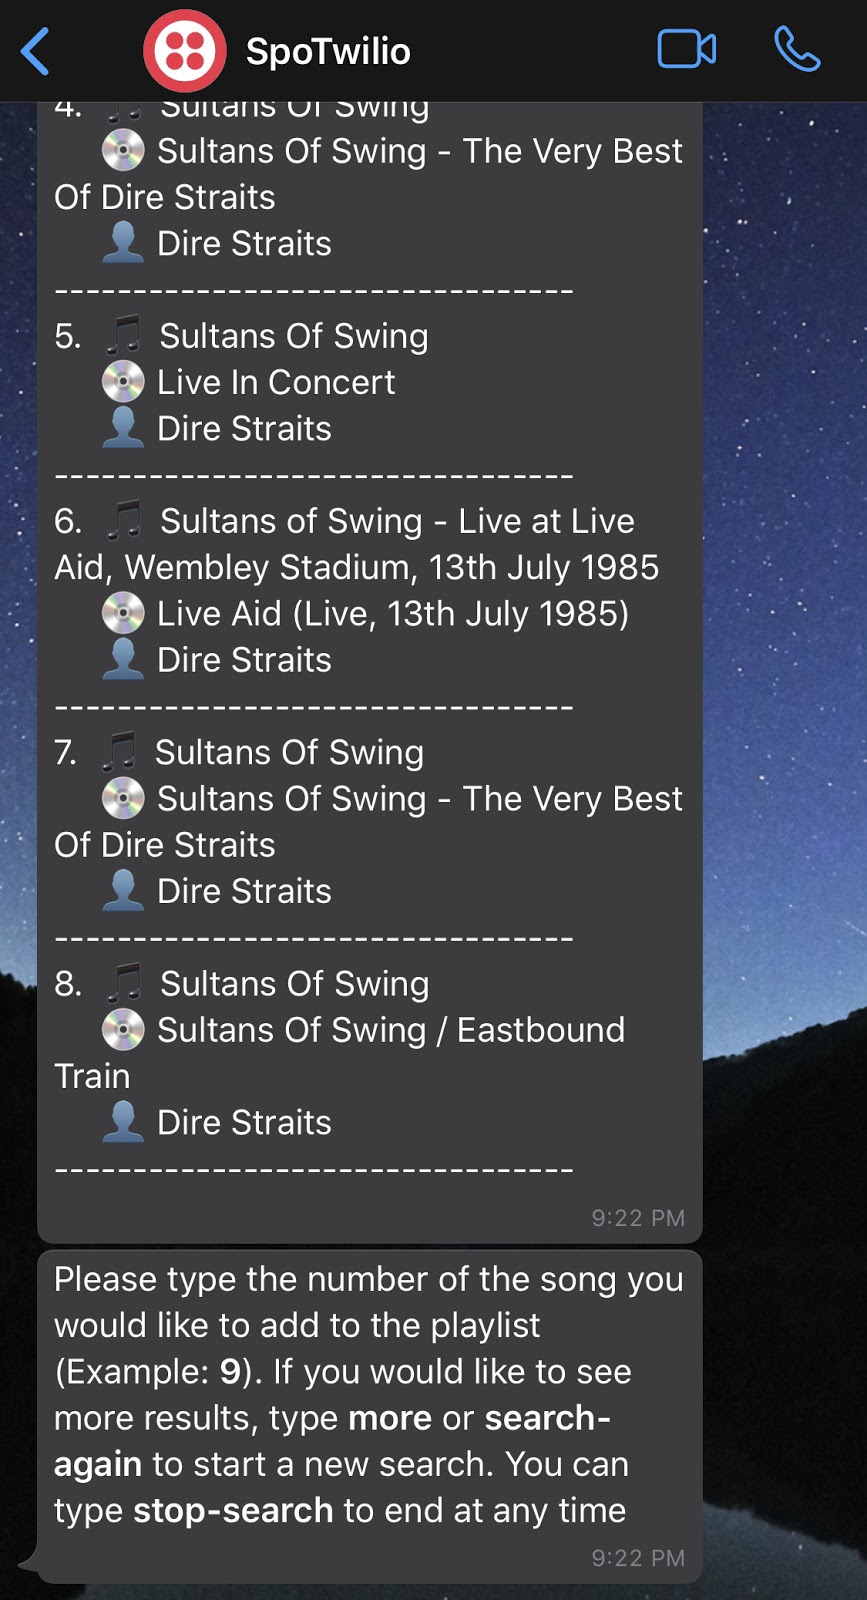
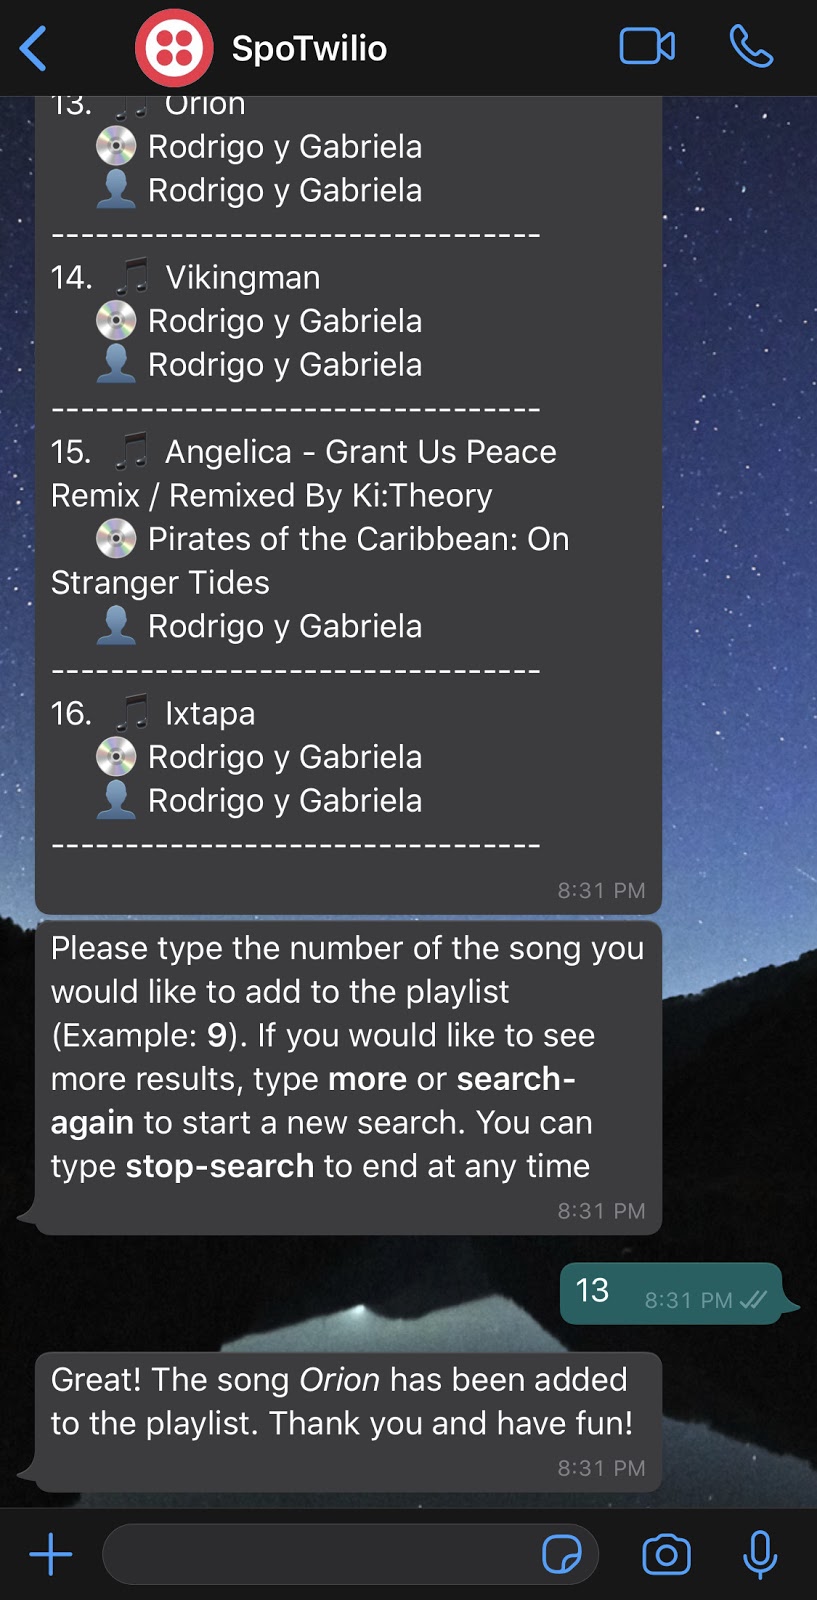
Once the results are obtained, this function will process and format them to be ready to display for the user. Notice that the search function limits the number of results to “8”. This is the number I chose to avoid exceeding the maximum number of characters allowed by WhatsApp in one message. You could change the formatting on respond_results to a more plain message and be able to show 10 or 15 results per message, for example.

It’s time to test our app again. Save it and let’s send our search string. I’ll try “Sultans of Swing Dire Straits”.

WhatsApp demo

WhatsApp demo

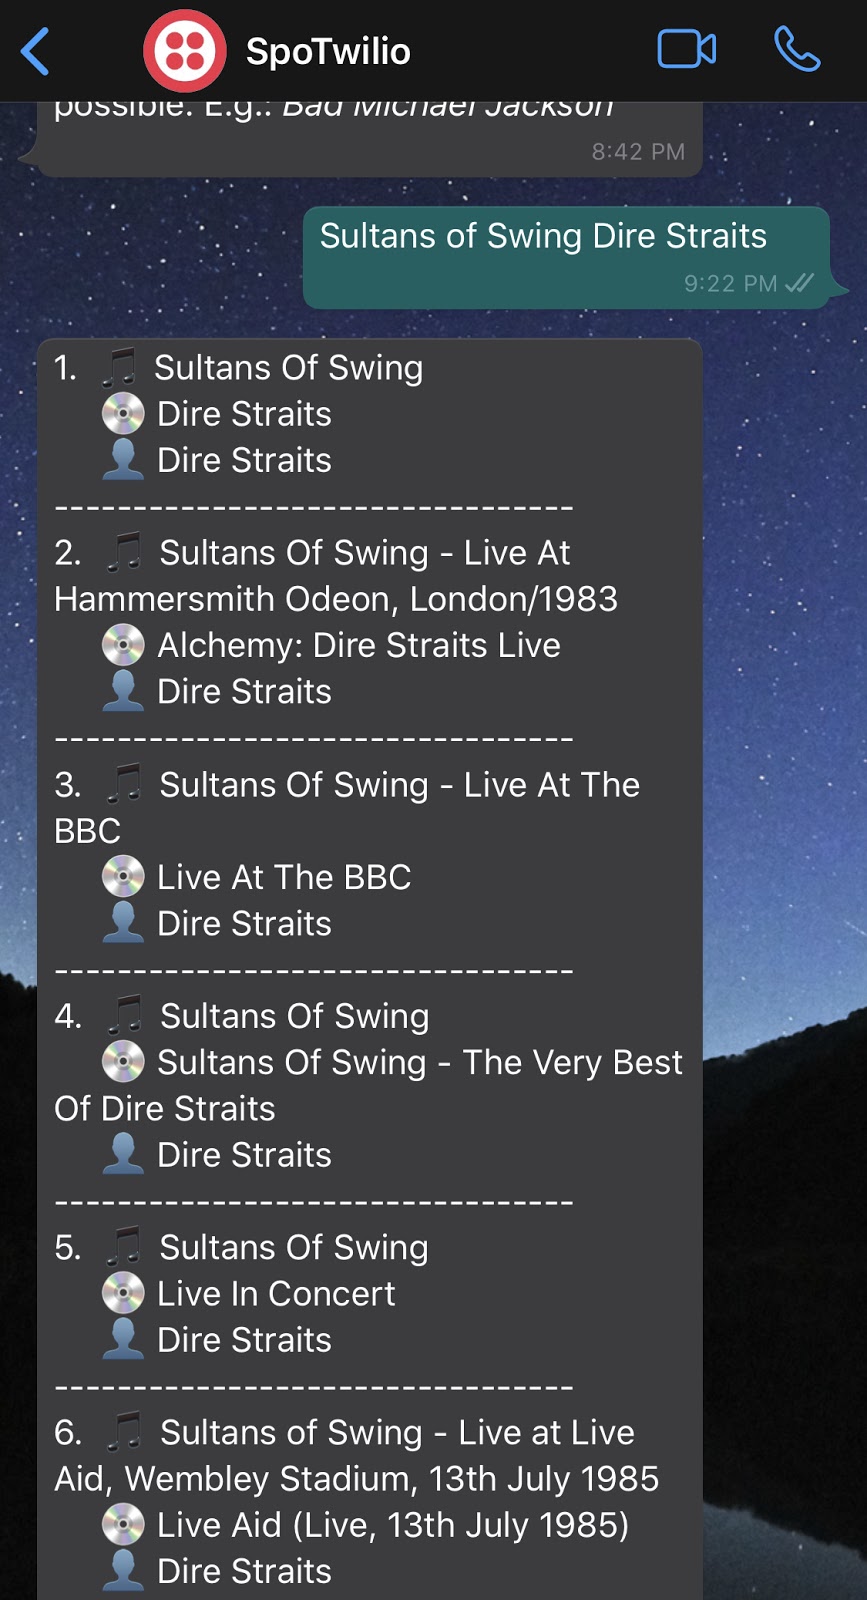
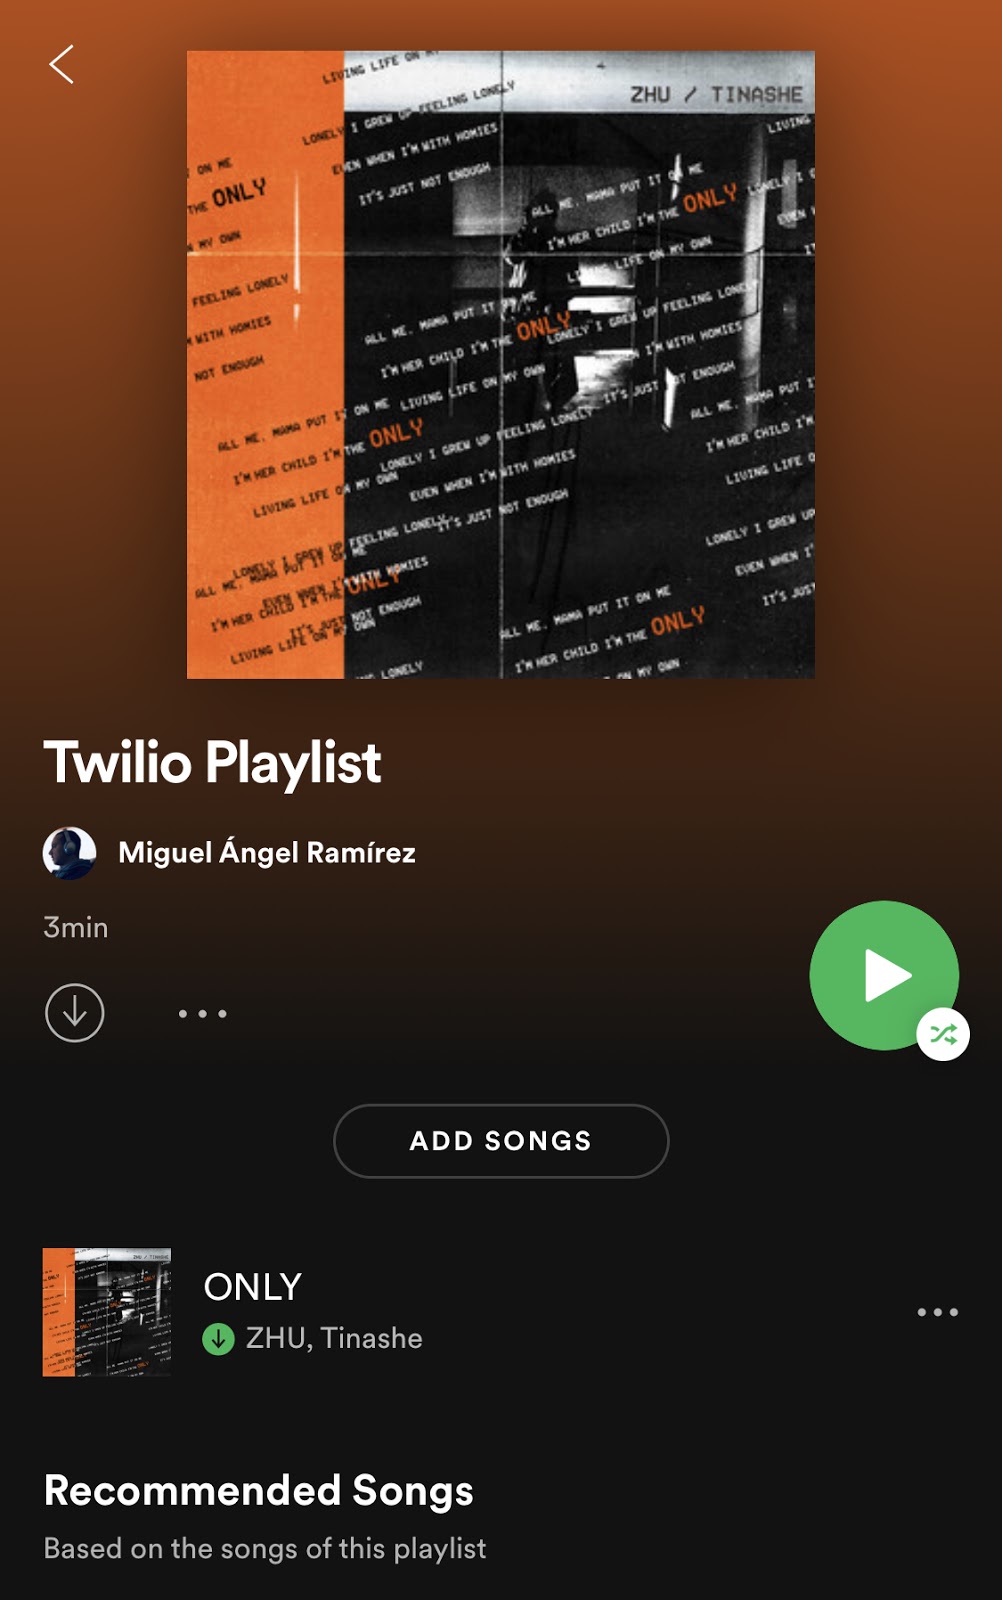
A list of results with the specific format on respond_results function will show up, along with a new instruction message. Notice one more time that our Session object has a lot of information now. This includes our results list with the structure we mentioned earlier, that is because we can’t anticipate what the user will send next, so we will need to know which songs have been shown, their index and URI.

<SecureCookieSession {'next_result': True, 'offset': 8, 'results': [[1, 'Sultans Of Swing', 'Dire Straits', 'Dire Straits', 'spotify:track:37Tmv4NnfQeb0ZgUC4fOJj'], [2, 'Sultans Of Swing - Live At Hammersmith Odeon, London/1983', 'Alchemy: Dire Straits Live', 'Dire Straits', 'spotify:track:3s9QsxxTlcWcga9agSARTV'], [3, 'Sultans Of Swing - Live At The BBC', 'Live At The BBC', 'Dire Straits', 'spotify:track:4yP4oR6G7l9MeHyDmQRRP1'], [4, 'Sultans Of Swing', 'Sultans Of Swing - The Very Best Of Dire Straits', 'Dire Straits', 'spotify:track:6pKDYgGvwfalcsx1tbYfn7'], [5, 'Sultans Of Swing', 'Live In Concert', 'Dire Straits', 'spotify:track:3TiQGEP0UYsT5RpXRo2q0W'], [6, 'Sultans of Swing - Live at Live Aid, Wembley Stadium, 13th July 1985', 'Live Aid (Live, 13th July 1985)', 'Dire Straits', 'spotify:track:1n8WWItMvZ4bASlBKbbeCY'], [7, 'Sultans Of Swing', 'Sultans Of Swing - The Very Best Of Dire Straits', 'Dire Straits', 'spotify:track:7E6jbnH4zCTxJ6ok8gcxuj'], [8, 'Sultans Of Swing', 'Sultans Of Swing / Eastbound Train', 'Dire Straits', 'spotify:track:7eqHsDc6PND6reFaF9ba4b']], 'search': True, 'search_str': 'sultans of swing dire straits'}>

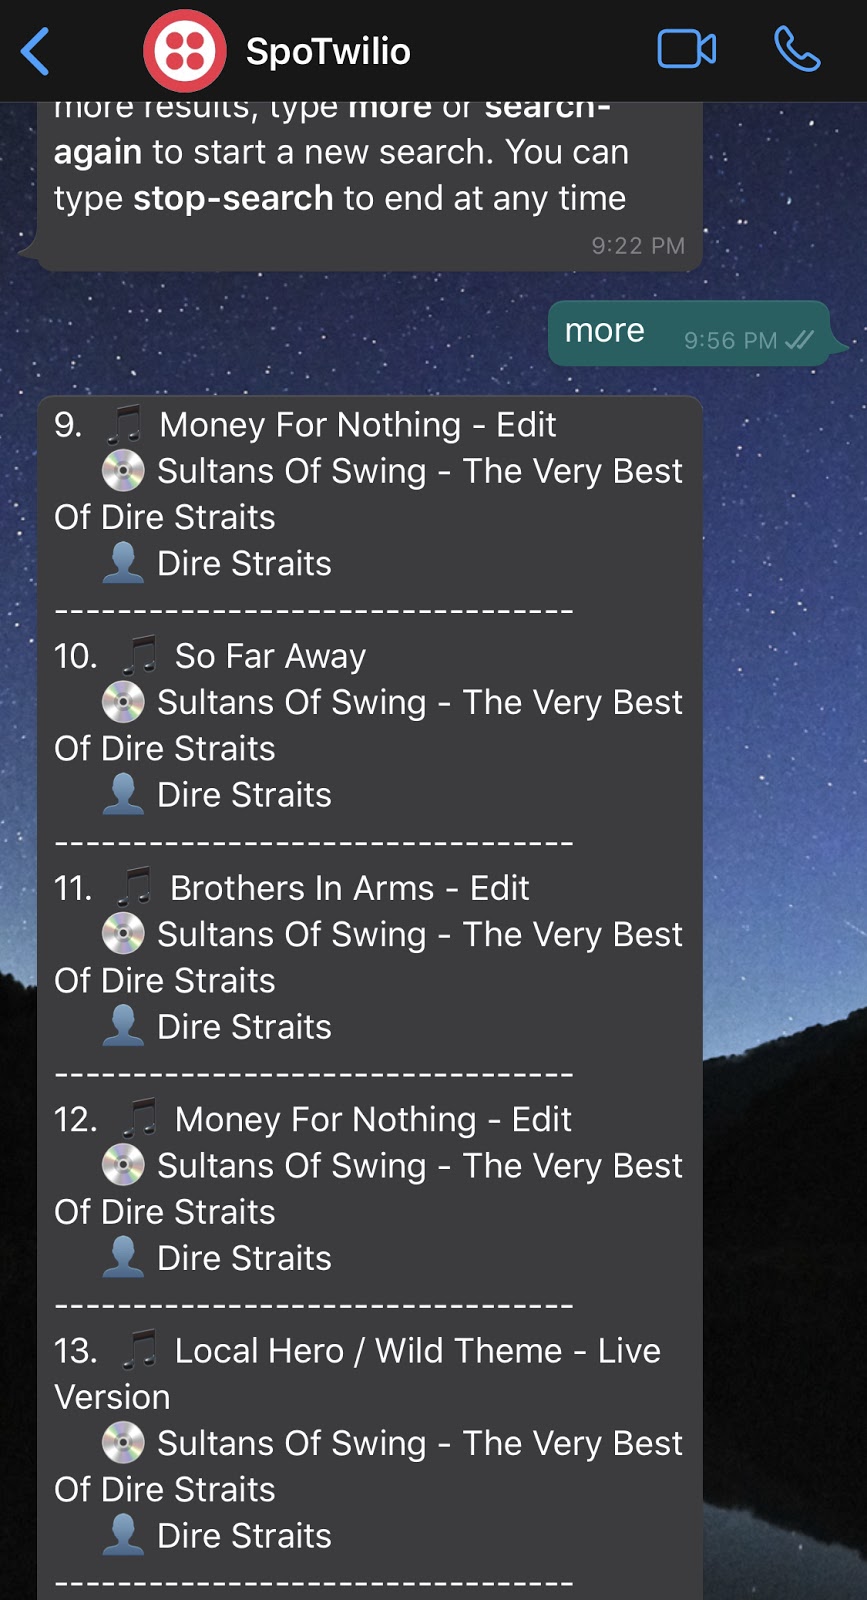
Now let’s say we didn’t find the exact version we are looking for (which I don’t think will be very likely) and that we need to show more results. We will now add the piece of code that handles that:


@app.route("/jukebox", methods=['POST'])
def jukebox():
    """
    Chatbot's main logic
    """
    valid_response = False
    resp_messages = []

    incoming_msg = request.values.get('Body', '').lower()
    
    if (incoming_msg == 'search' and 'search' not in session) \
            or incoming_msg == 'search-again':
        resp_message = create_help_message("ask_search")
        resp_messages.append(resp_message)
        session['results'] = []
        session['search'] = True
        session['offset'] = 0
        session['next_result'] = True
        valid_response = True
        resp = send_message(resp_messages)
    elif incoming_msg == 'more' \
            and session['search'] \
            and len(session['results']) > 0 \
            and session['next_result']:
        results, next = search(
            session['search_str'], session['offset'], session['results'])
        resp_message = respond_results(results, session['offset'])
        resp_messages.append(resp_message)
        session['offset'] += 8
        valid_response = True
        if next is None:
            help_message = create_help_message("all_results")
            session['next_result'] = False
        else:
            help_message = create_help_message("more_results")
            session['next_result'] = True
        resp_messages.append(help_message)
        resp = send_message(resp_messages)

    elif incoming_msg == 'more' and not session['next_result']:
        help_message = create_help_message("more_with_no_results")
        resp_messages.append(help_message)
        resp = send_message(resp_messages)
        valid_response = True
    elif 'search' in session \
            and not incoming_msg.isnumeric() \
            and (
                incoming_msg != 'search-again'
                and incoming_msg != 'stop-search'
            ):
        results, next = search(incoming_msg, 0, [])
        if results == []:
            help_message = create_help_message("no_results")
        else:
            session['results'] = results
            resp_message = respond_results(results, session['offset'])
            resp_messages.append(resp_message)
            session['offset'] += 8
            session['search_str'] = incoming_msg
            if next is None:
                help_message = create_help_message("all_results")
                session['next_result'] = False
            else:
                help_message = create_help_message("more_results")
                session['next_result'] = True
        resp_messages.append(help_message)
        resp = send_message(resp_messages)
        valid_response = True
    elif incoming_msg == 'stop-search':
        session.clear()
        help_message = "Got it. Bye!"
        resp_messages.append(help_message)
        resp = send_message(resp_messages)
        valid_response = True
    if not valid_response:
        resp_message = create_help_message("help")
        resp_messages.append(resp_message)
        resp = send_message(resp_messages)

    print(session)

    return str(resp)

This will bring the next set of 8 results and validate whether there are more to display or not to determine what to respond next, so let’s save and try it one more time, but this time sending more to our bot.

WhatsApp demo

WhatsApp demo

So I just noticed that the first set of results had what I was looking for. We will now let our bot know we want to add our song but first we need to add the last conditions to our main function: The one that handles the number of the song we want to add. We will also need our last two functions.


@app.route("/jukebox", methods=['POST'])
def jukebox():
    """
    Chatbot's main logic
    """
    valid_response = False
    resp_messages = []

    incoming_msg = request.values.get('Body', '').lower()

    if (incoming_msg == 'search' and 'search' not in session) \
            or incoming_msg == 'search-again':
        resp_message = create_help_message("ask_search")
        resp_messages.append(resp_message)
        session['results'] = []
        session['search'] = True
        session['offset'] = 0
        session['next_result'] = True
        valid_response = True
        resp = send_message(resp_messages)

    elif incoming_msg == 'more' \
            and session['search'] \
            and len(session['results']) > 0 \
            and session['next_result']:
        results, next = search(
            session['search_str'], session['offset'], session['results'])
        resp_message = respond_results(results, session['offset'])
        resp_messages.append(resp_message)
        session['offset'] += 8
        valid_response = True
        if next is None:
            help_message = create_help_message("all_results")
            session['next_result'] = False
        else:
            help_message = create_help_message("more_results")
            session['next_result'] = True
        resp_messages.append(help_message)
        resp = send_message(resp_messages)

    elif incoming_msg == 'more' and not session['next_result']:
        help_message = create_help_message("more_with_no_results")
        resp_messages.append(help_message)
        resp = send_message(resp_messages)
        valid_response = True

    elif 'search' in session \
            and not incoming_msg.isnumeric() \
            and (
                incoming_msg != 'search-again'
                and incoming_msg != 'stop-search'
            ):
        results, next = search(incoming_msg, 0, [])
        if results == []:
            help_message = create_help_message("no_results")
        else:
            session['results'] = results
            resp_message = respond_results(results, session['offset'])
            resp_messages.append(resp_message)
            session['offset'] += 8
            session['search_str'] = incoming_msg
            if next is None:
                help_message = create_help_message("all_results")
                session['next_result'] = False
            else:
                help_message = create_help_message("more_results")
                session['next_result'] = True
        resp_messages.append(help_message)
        resp = send_message(resp_messages)
        valid_response = True

    elif incoming_msg.isnumeric() and int(incoming_msg) in [
            result[0] for result in session['results']]:
        # Valid response with an integer that corresponds to a displayed song
        current_songs_in_playlist = get_playlist_songs()
        selected_song_uri = session['results'][int(incoming_msg)-1][4]
        selected_song_name = session['results'][int(incoming_msg)-1][1]

        if selected_song_uri in current_songs_in_playlist:
            help_message = create_help_message("song_selected")
        else:
            add_song_to_playlist(selected_song_uri)
            help_message = "Great! The song _{}_ has been added to the " \
                "playlist. Have fun!".format(selected_song_name)
            session.clear()
        resp_messages.append(help_message)
        resp = send_message(resp_messages)
        valid_response = True

    elif incoming_msg == 'stop-search':
        session.clear()
        help_message = "Got it. Bye!"
        resp_messages.append(help_message)
        resp = send_message(resp_messages)
        valid_response = True

    if not valid_response:
        resp_message = create_help_message("help")
        resp_messages.append(resp_message)
        resp = send_message(resp_messages)

    print(session)

    return str(resp)

Here, when we send the valid id of an existing song, the bot will get a list of all the song URIs that are currently on the playlist (get_playlist_songs()), then the id of the selected song will be looked up on our results list, get the song URI and verify if the song already exists on the playlist. If it does, a message will be returned, otherwise, the song will be added (with add_song_to_playlist()), returning a confirmation message. We can send stop-search to stop the conversion too, but let’s now add our mentioned functions right below respond_results():

def get_playlist_songs():
    """
    Retrieve the list uris from the songs in the playlist
    """
    spotify = create_spotify_client()
    results = spotify.user_playlist(
        user=os.environ.get("SPOTIPY_CLIENT_USERNAME"),
        playlist_id=os.environ.get("SPOTIFY_PLAYLIST_URI")
    )
    items = results['tracks']['items']

    return [item['track']['uri'] for item in items if len(items) > 0]


def add_song_to_playlist(uri):
    """
    Will add the selected song to the playlist by song uri
    """
    spotify = create_spotify_client()

    spotify.user_playlist_add_tracks(
        user=os.environ.get("SPOTIPY_CLIENT_USERNAME"),
        playlist_id=os.environ.get("SPOTIFY_PLAYLIST_URI"),
        tracks=[uri])

    return spotify

We are now using the SPOTIFY_PLAYLIST_URI variable created before.

Save your file and send the last message to our bot:

WhatsApp demo

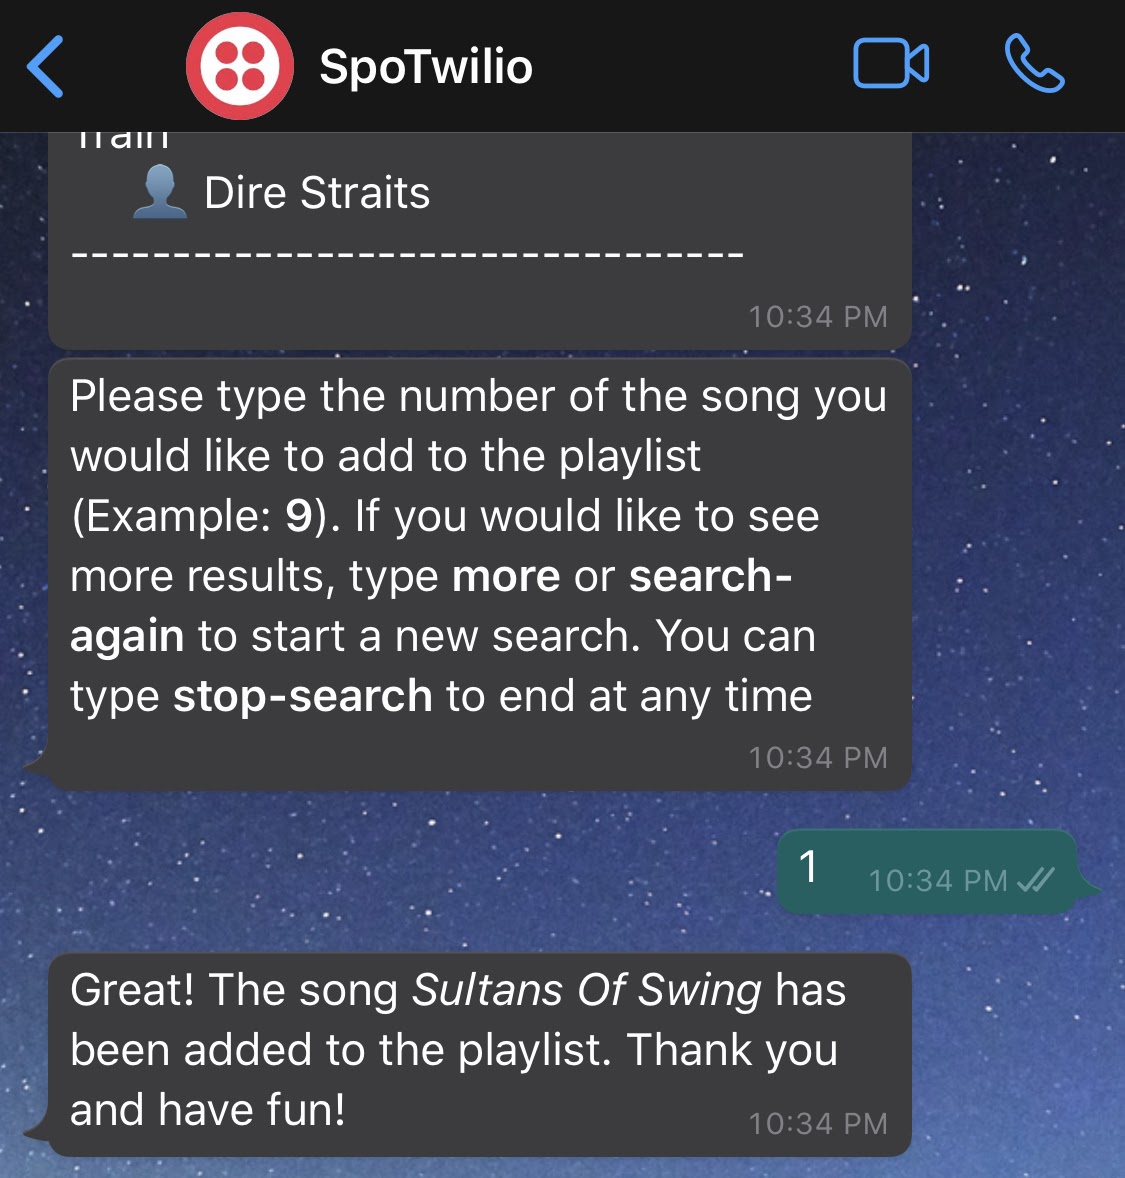
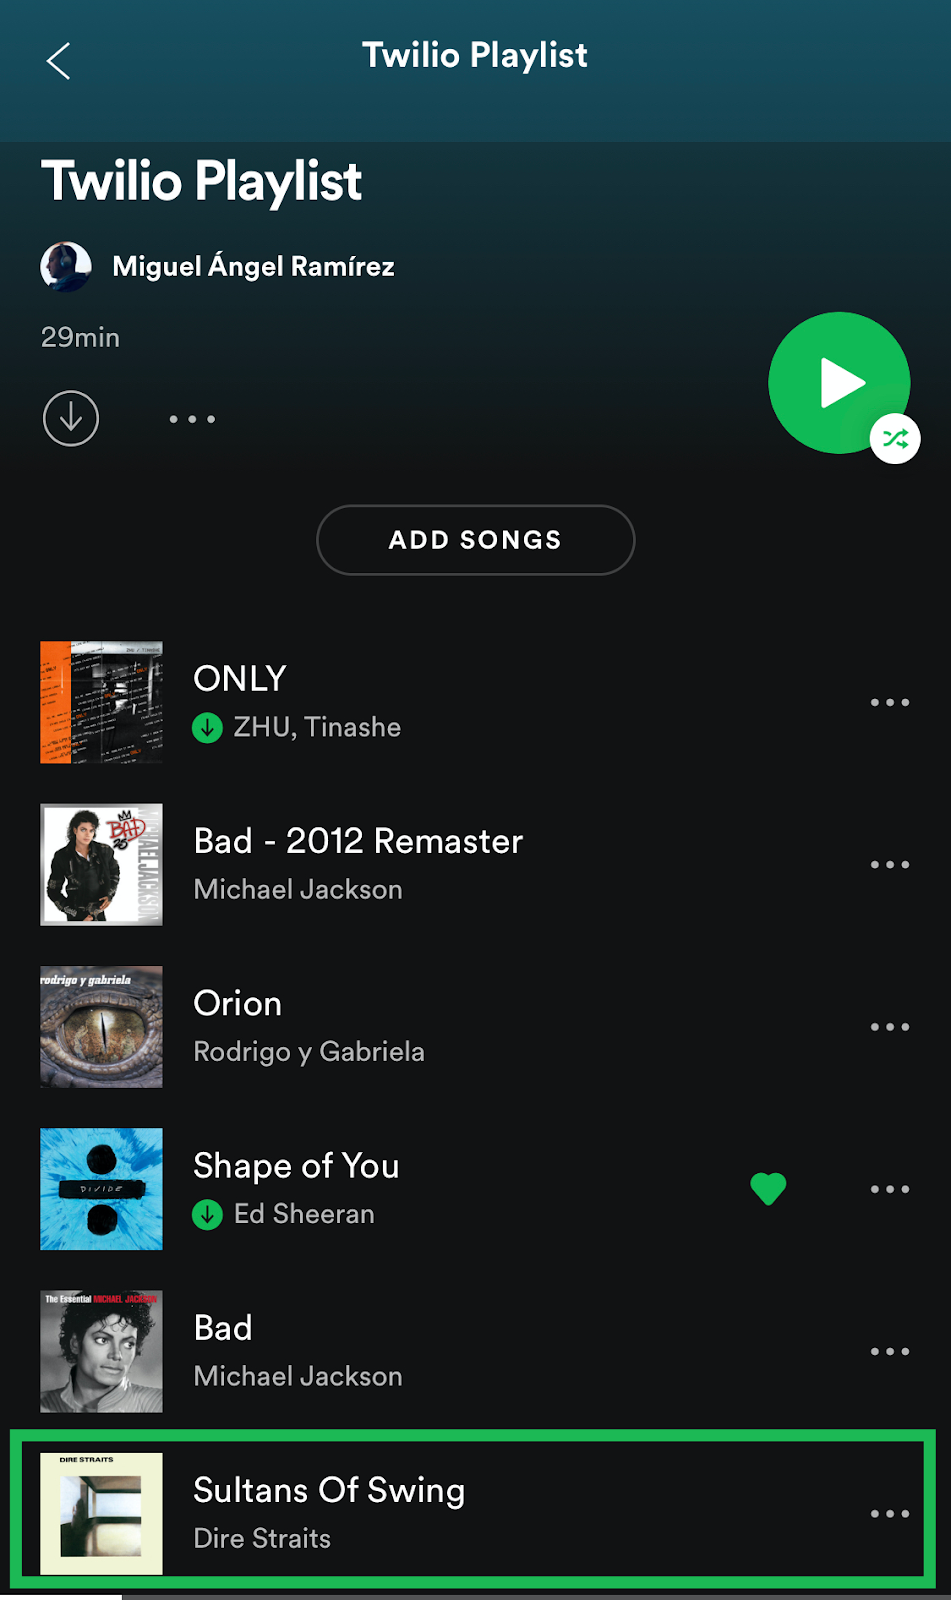
You should now be able to see the confirmation message. Let’s open our playlist on Spotify to confirm:

Spotify playlist

Awesome! And see how our Session object should be now back to the way it started.

<SecureCookieSession {}>

Everything together

Our twilio_jukebox.py file should now look like this:

from twilio.twiml.messaging_response import MessagingResponse
from flask import Flask, request, session
import os
from spotipy.oauth2 import SpotifyOAuth
import spotipy
from dotenv import load_dotenv
load_dotenv()

app = Flask(__name__)

app.secret_key = os.environ.get("FLASK_APP_SECRET")


@app.route("/jukebox", methods=['POST'])
def jukebox():
    """
    Chatbot's main logic
    """
    valid_response = False
    resp_messages = []

    incoming_msg = request.values.get('Body', '').lower()

    if (incoming_msg == 'search' and 'search' not in session) \
            or incoming_msg == 'search-again':
        resp_message = create_help_message("ask_search")
        resp_messages.append(resp_message)
        session['results'] = []
        session['search'] = True
        session['offset'] = 0
        session['next_result'] = True
        valid_response = True
        resp = send_message(resp_messages)

    elif incoming_msg == 'more' \
            and session['search'] \
            and len(session['results']) > 0 \
            and session['next_result']:
        results, next = search(
            session['search_str'], session['offset'], session['results'])
        resp_message = respond_results(results, session['offset'])
        resp_messages.append(resp_message)
        session['offset'] += 8
        valid_response = True
        if next is None:
            help_message = create_help_message("all_results")
            session['next_result'] = False
        else:
            help_message = create_help_message("more_results")
            session['next_result'] = True
        resp_messages.append(help_message)
        resp = send_message(resp_messages)

    elif incoming_msg == 'more' and not session['next_result']:
        help_message = create_help_message("more_with_no_results")
        resp_messages.append(help_message)
        resp = send_message(resp_messages)
        valid_response = True

    elif 'search' in session \
            and not incoming_msg.isnumeric() \
            and (
                incoming_msg != 'search-again'
                and incoming_msg != 'stop-search'
            ):
        results, next = search(incoming_msg, 0, [])
        if results == []:
            help_message = create_help_message("no_results")
        else:
            session['results'] = results
            resp_message = respond_results(results, session['offset'])
            resp_messages.append(resp_message)
            session['offset'] += 8
            session['search_str'] = incoming_msg
            if next is None:
                help_message = create_help_message("all_results")
                session['next_result'] = False
            else:
                help_message = create_help_message("more_results")
                session['next_result'] = True
        resp_messages.append(help_message)
        resp = send_message(resp_messages)
        valid_response = True

    elif incoming_msg.isnumeric() and int(incoming_msg) in [
            result[0] for result in session['results']]:
        # Valid response with an integer that corresponds to a displayed song
        current_songs_in_playlist = get_playlist_songs()
        selected_song_uri = session['results'][int(incoming_msg)-1][4]
        selected_song_name = session['results'][int(incoming_msg)-1][1]

        if selected_song_uri in current_songs_in_playlist:
            help_message = create_help_message("song_selected")
        else:
            add_song_to_playlist(selected_song_uri)
            help_message = "Great! The song _{}_ has been added to the " \
                "playlist. Thank you and have fun!".format(selected_song_name)
            session.clear()
        resp_messages.append(help_message)
        resp = send_message(resp_messages)
        valid_response = True

    elif incoming_msg == 'stop-search':
        session.clear()
        help_message = "Got it. Bye!"
        resp_messages.append(help_message)
        resp = send_message(resp_messages)
        valid_response = True

    if not valid_response:
        resp_message = create_help_message("help")
        resp_messages.append(resp_message)
        resp = send_message(resp_messages)

    print(session)

    return str(resp)


def send_message(messages):
    """
    Receives a list and sends the TwiML response message(s)
    """
    resp = MessagingResponse()

    for message in messages:
        resp.message(message)

    return resp


def create_help_message(message):
    """
    List of response messages depending on what needs to be sent back
    to the user.
    """
    if message == "ask_search":
        return "Ok, which song / album / artist are you looking for? " \
            "Try being as specific as possible. E.g.: _Bad Michael Jackson_"
    elif message == "all_results":
        return "These are all the results. Please type the " \
            "number of the song you would like to add to the playlist " \
            "(example: *9*) or type *search-again* to start a new search. " \
            "You can type *stop-search* to end at any time"
    elif message == "more_results":
        return "Please type the number of the song you would like to add to " \
            "the playlist (Example: *9*). If you would like to see more " \
            "results, type *more* or *search-again* to start a new search. " \
            "You can type *stop-search* to end at any time"
    elif message == "no_results":
        return "No results found. Please try again. You can type " \
            "*stop-search* to end at any time"
    elif message == "more_with_no_results":
        return "No more results are available. Please type the number of " \
            "the song you would like to add to the playlist (Example: *9*) " \
            "or type *search-again* to start a new search. You can type " \
            "*stop-search* to end at any time"
    elif message == "song_selected":
        return "The selected song is already on the playlist. Please select " \
            "a different one or type *search-again* to start a new search"
    elif message == "help":
        return "Hello! I can help you search and add music to our Spotify " \
            "playlist. Let's type *search* to begin!"


def get_user_token():
    """
    Obtain an access token from Spotify
    """
    oauth = SpotifyOAuth(
        username=os.environ.get("SPOTIPY_CLIENT_USERNAME"),
        scope='playlist-modify-private'
    )
    user_token = oauth.get_access_token(as_dict=False, check_cache=True)

    return user_token


def create_spotify_client():
    """
    Creates Spotify API client
    """
    user_token = get_user_token()
    spotify = spotipy.Spotify(auth=user_token)

    return spotify


def search(search_str, offset_val=0, results=[]):
    """
    Returns a list of coincidences either on songs, albums or artists as well
    as if there are more results to show next
    """
    spotify = create_spotify_client()
    api_results = spotify.search(
        q=search_str,
        limit=8,
        market=os.environ.get("SPOTIFY_MARKET"),
        offset=offset_val
    )
    items = api_results['tracks']['items']
    next = api_results['tracks']['next']

    if len(items) > 0:
        for id, item in enumerate(items):
            song = item['name']
            album = item['album']['name']
            artist = item['artists'][0]['name']
            uri = item['uri']
            new_item = [id+1+int(offset_val), song, album, artist, uri]
            results.append(new_item)

    return results, next


def respond_results(results, offset_val):
    """
    Receives the search result and formats it to text for response
    """
    text_results = ''

    for i in range(offset_val, len(results)):
        text_results += "{}.  🎵 {} \n     💿 {} \n     👤 {} \n" \
            "---------------------------------\n".format(
                results[i][0], results[i][1], results[i][2], results[i][3])

    return text_results


def get_playlist_songs():
    """
    Retrieve the list uris from the songs in the playlist
    """
    spotify = create_spotify_client()
    results = spotify.user_playlist(
        user=os.environ.get("SPOTIPY_CLIENT_USERNAME"),
        playlist_id=os.environ.get("SPOTIFY_PLAYLIST_URI")
    )
    items = results['tracks']['items']

    return [item['track']['uri'] for item in items if len(items) > 0]


def add_song_to_playlist(uri):
    """
    Will add the selected song to the playlist by song uri
    """
    spotify = create_spotify_client()

    spotify.user_playlist_add_tracks(
        user=os.environ.get("SPOTIPY_CLIENT_USERNAME"),
        playlist_id=os.environ.get("SPOTIFY_PLAYLIST_URI"),
        tracks=[uri])

    return spotify


if __name__ == "__main__":
    app.run(debug=True)

Running and testing the application

Now it’s time to run our application again with python3 twilio_jukebox.py. Write anything to your WhatsApp chatbot to start the conversation. Write search, follow the instructions and add a few songs to your playlist!

Final demo of the app on WhatsApp

Conclusion

We have just created a digital jukebox using a WhatsApp bot with Python and Twilio that can be used as those classic jukeboxes with a little modern touch, where people can add their favorite music to a playlist.

The repository on GitHub can be found here, where I’m working on a few improvements like providing a song “fun fact” at the end that is taken from Genius through its API. There might be some other things that can be added like time frame restrictions based on the phone number (so that people can only add music every 30 minutes or so), a location restriction (so that people can only add music when within a defined radius), etc. The possibilities are endless!

My name is Miguel Ángel Ramírez and I’m passionate about technology and music. I also enjoy writing to share experiences and knowledge. I occasionally write about other technologies on this blog.

You can find me on: