Build a Live Search Box With Laravel Livewire and MySQL
Time to read: 6 minutes
February 05, 2021
Written by
Reviewed by

Laravel Livewire is a library for building reactive and dynamic interfaces using Blade as your templating engine. It works by making AJAX requests to the server when a user interaction occurs and rendering the updated HTML sent to it by the server.
In this tutorial, we will build a live search page for a list of users stored in a MySQL database. The reactive parts of our interface such as changing loading state, dynamically showing and hiding parts of the web page, etc will be handled by Livewire.
Pre-requisites
To complete this tutorial, you will need the following:
- Composer, npm, and Laravel (version 8.26.1 is used in this article) installed on your computer.
- MySQL installed (for FULLTEXT indexes support).
Set up Laravel, Livewire, and Tailwind CSS
To get started, generate a fresh Laravel application with the Laravel CLI and enter the directory with the commands below:
Next, install Livewire as a composer dependency by running the command below in the project folder.
Since the project doesn’t require any special configuration for Tailwind CSS, and Tailwind CSS is the only npm dependency it needs, we will build it directly using npx. Alternatively, you can link to Tailwind CSS directly from the CDN. For production usage, the documentation recommends that you set it up as a PostCSS plugin. Generate the Tailwind CSS files by running:
The command above will create a tailwind.css file in the public/css folder. We can then import it to our Blade templates using HTML <link> tags as we would any other stylesheet.
Set up database migrations and FULLTEXT Indexes
At this point, ensure that you have a new MySQL database set up for the project and populate the project’s env file with the database credentials (database name, username, and password). Next, we will modify the user migrations file that comes built-in with Laravel to add a bio field and a FULLTEXT index.
The index will cover the name, email, and bio of a given user. That way, any search we perform will scan through all three fields. Open the user migrations file (you can find it at database/migrations/2014_10_12_000000_create_users_table.php) and replace its content with the following:
Note that we are using raw SQL queries to add the index above. That is because Laravel does not have built-in support for FULLTEXT indexes as they are MySQL specific.
While at it, let’s also set up the factories and seeders for the user table whose migration we created above, that way, we can focus on getting our code to work instead of the data in the database.
Open the generated factory file at database/factories/UserFactory.php (feel free to create it if it doesn’t exist) and replace the definition method with the code block below:
Next, direct Laravel to generate users based on the factory above, by changing the run method of the database seeder class (/database/seeders/DatabaseSeeder.php) to the one below.
The code above will generate and add 50 users to the users table when the seeder is run. Apply the migrations and the seeders by running the set of commands below.
Search your database with Traits
We will make our database search a bit flexible by using Traits. Traits help PHP developers achieve code reuse while working around some of the limitations of PHP’s single inheritance model.
For our use case, we will create a Search trait that we can use from any Laravel model by adding a $searchable field to the model. This should represent the fields that have been added to a FULLTEXT index. Then, create a new file, named Search.php, file in app/Models, and add the trait implementation shown below:
Here, we’ve split the search operation into two methods: buildWildCards and scopeSearch. buildWildCards cleans up the search term by:
- Ensuring that there’s no MySQL reserved symbol present in the search term. You can modify it to escape them instead of replacing them if they turn out to be important to the search term for you.
- Adding MySQL wildcard characters (
+and*) to the search term. This helps it to take advantage of MySQL’s boolean mode.
scopeSearch on the other hand is a Laravel local scope (identified by the “scope” prefix). Models are automatically searchable via a static search method once they:
- Import and use the
Searchtrait. - Declare a
$searchablearray that contains the columns that should be searched e.g theUsermodel below searches thename,email, andbiocolumns.
Next, bring the Search trait into the User model class, and set up the $searchable fields as shown below:
Get familiar with Livewire Components
To initialize Livewire in your Laravel app, you need to add the @livewireStyles and @livewireScripts directive within the <head> tag, and at the end of the <body> tag respectively, in your app layout. So, in resources/views/welcome.blade.php add the code below:
Livewire components are meant to live in individual template files rendered within Blade. To render a component, use the @livewire directive or the livewire tag, e.g:
Livewire components are typically attached to a “component class” that performs the necessary computation and holds the data needed to render the component. The classes live in app/Http/Livewire and are automatically generated when you generate a component with php artisan make:livewire.
Traditional JavaScript concepts like data binding and event handling happen in Livewire using the wire: attribute. For instance, The snippet below binds the value of the text field to a $name variable in the component class, and the value of $name is rendered within the h1 tag as it changes.
You can learn more about Livewire’s features and how it handles traditional Javascript operations from the Livewire documentation.
Hook Livewire Components to Blade Templates
Armed with some knowledge of Livewire, we can now set it up in our application. Create the SearchUser component by running the artisan command below, in the project folder.
The command creates two files in our project:
app/Http/Livewire/SearchUser.php: The component class that interacts with our database and prepares the data to be rendered.resources/views/livewire/search-user.blade.php: The component template that holds the UI for the component.
Open the component class (app/Http/Livewire/SearchUser.php) and add the code below to it:
The code above calls the search method on the User model class (which User inherited from the Search trait) and paginates the result. The result is then returned with the component template in the same way we would do it from a regular Laravel controller.
Note that we have added a sleep call to the code above. This is to delay the code execution to simulate a page load. This delay will help us see Livewire’s loading state in action in our development environment.
Next, open the component template (resources/views/livewire/search-user.blade.php) and add the code block below to it:
In the template, we use Livewire’s data-binding functionality to map the $term variable in the component class to the search field. We’ve also used wire:loading to show the div when our data is loading. Finally, we used wire:loading.remove to hide the div containing the search results when loading.
Set up our application’s UI
Now, let’s add the Livewire component by first initializing Livewire in the welcome.blade.php file that was automatically generated by Laravel, and rendering the component within the welcome template. While we’re at it, we will also include the Tailwind CSS file we generated while setting up the application.
Open the welcome.blade.php file and replace its content with the code below:
Testing
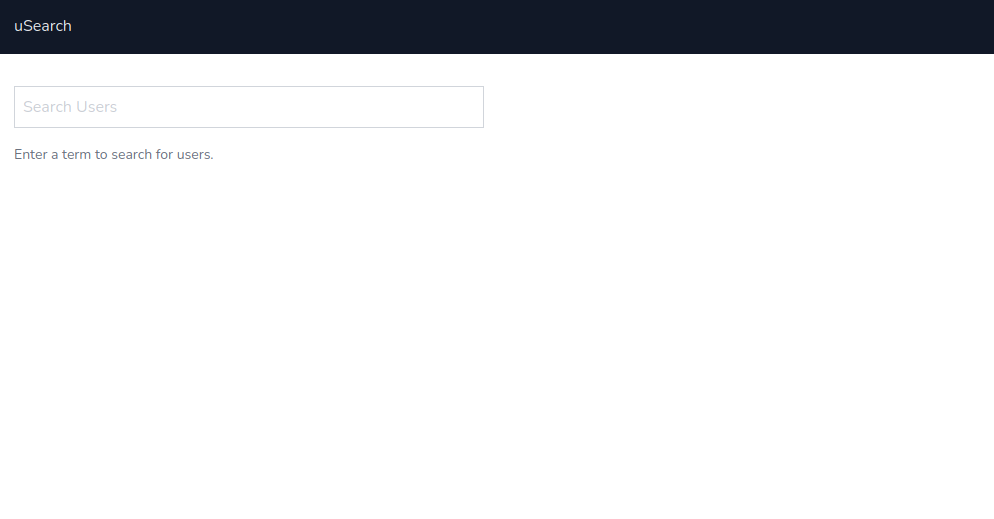
At this point, you are now ready to test out the application. Start the Laravel server by running php artisan serve in a terminal and the command should launch the server on http://localhost:8000. Visit the application URL (http://localhost:8000) in your browser to see the home page below:
Enter a search query using the input field on the page and it should return the list of users whose name, email, or bio matches the query you entered as shown:
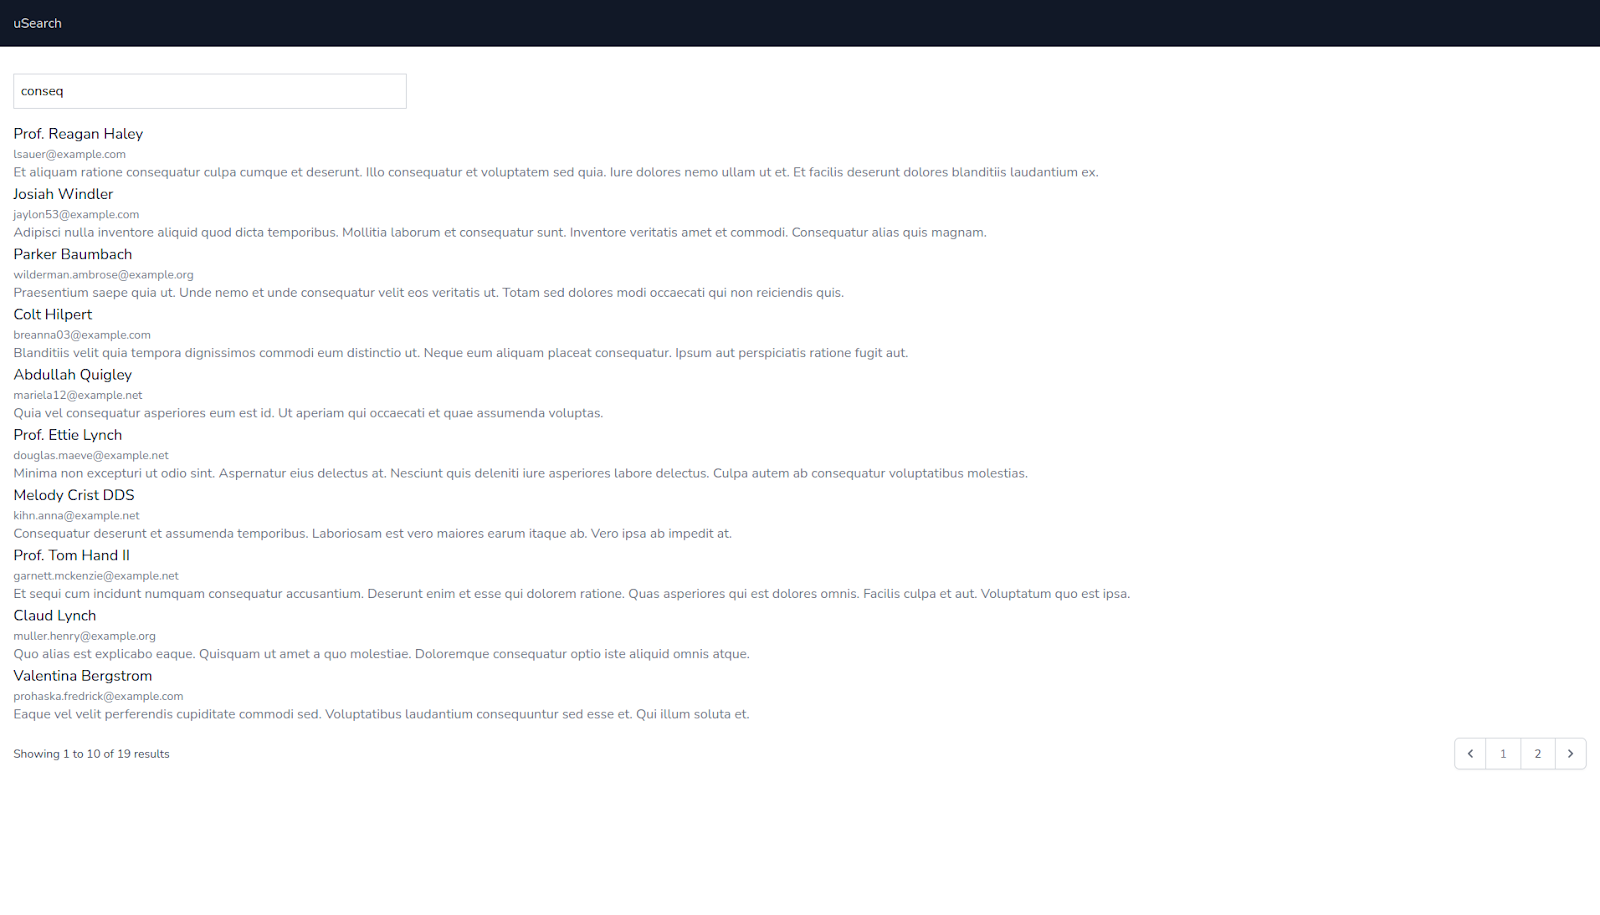
You can also open up your browser’s developer console while searching to see how Livewire moves the network requests between your application’s frontend and the server.
Conclusion
Laravel Livewire presents an approach to building dynamic interfaces that is quite different from frontend frameworks like Vue and React, one that doesn’t require you to leave the comfort of PHP and HTML/Blade templates. The complete source code for this tutorial is available on GitLab. Feel free to raise a GitLab issue if you notice an issue.
Michael Okoko is a CS undergrad at Obafemi Awolowo University. He loves open source and is mostly interested in Linux, Golang, PHP, and fantasy novels! You can reach him via:

Related Resources
Twilio Docs
From APIs to SDKs to sample apps
API reference documentation, SDKs, helper libraries, quickstarts, and tutorials for your language and platform.
Resource Center
The latest ebooks, industry reports, and webinars
Learn from customer engagement experts to improve your own communication.
Ahoy
Twilio's developer community hub
Best practices, code samples, and inspiration to build communications and digital engagement experiences.