Build a Real-time Chat Room App with Laravel, React, and Twilio Conversations
Time to read:
June 23, 2021
Written by
Reviewed by
Previously, we built a Discord-inspired chat room app with Laravel Breeze, React, and Twilio’s new Conversation API. That article was a proof-of-concept to show you the possibilities with Laravel Breeze and Inertia.
Now, we’ll continue from where we left off and make our app “real-time”. We’ll achieve this with the Webhooks feature in Twilio’s Conversation (classic) API, and WebSockets. We’ll also be handling errors the Inertia way.
In this article, we’ll be using Pusher, which is the simplest way of implementing WebSockets into our app. Redis is another great—and non-commercial—solution, but that’s for another time. Now for the fun!
Prerequisites
- A free Pusher account.
- A Twilio account (if you don't have one yet, sign up for a free account here and receive $10 credit when you upgrade)
- Prior experience with Laravel (ideally version 8.0)
- PHP 7.3 (Ideally 8.0)
- Git
- Laravel 8 installed and set up
- Node and NPM installed
- Ngrok
- Postman
- Twilio CLI
Before getting started
If you haven’t already read it, please read the previous article, as this article builds on the app that we created there. However, if you want to start right away, set up the project by running the commands below.
With the application bootstrapped, the dependencies installed, and the APP_KEY generated, there's one thing left to do: set the values of TWILIO_PHONE_NUMBER, TWILIO_ACCOUNT_SID, and TWILIO_AUTH_TOKEN in .env.
To retrieve these values, navigate to the Twilio Console and locate the ACCOUNT SID and AUTH TOKEN inside of the Project Info Dashboard, as seen below.

Note: The value for your Twilio phone number must be in E.164 format. So, if your number is +1 213 456 7899, then you have to set TWILIO_PHONE_NUMBER to +12134567899.
To retrieve the phone number, run twilio phone-numbers:list in your terminal and choose the applicable number from the list, copying the value from the Phone Number column.
Note: If you don't already have a phone number, you can search and buy a Twilio Phone Number from the console.
Let’s redo our pages and components
In our previous article, our frontend was basically just one page where the components switched based on whether we were trying to sign in or chat. Now, we need to create proper routes where our auth and chat will be separate. So first, let’s create an Auth page.
To do that, create a new Javascript file named Auth.js in resources/js/Pages. Then, paste the code below into it.
With the file created, replace the contents of resources/js/Components/signup.js with the code below. It gets rid of functions such as changeChat() and other code that is no longer needed. We’ll explain props and the new Notification component later on.
We’ll need to make a few changes to our Chatform component as well, to get rid of the functions we’ll no longer need—especially our useEffect hook that was in charge of updating our chat every 3 seconds.
Again, don’t worry about the props or the new Notification component, we’ll explain those later on. Replace the current contents of resources/js/Components/chatform.js with the code below.
Finally, we’ll rewrite our home page to only include the Chatform component, since we’re not doing the switching we did in the last article. To do that, replace the contents of (resources/js/Pages/Home.js) with the code below.
Let’s rewrite our routes
In the previous article, we set up Inertia to not return any data in our home page. This time, we’ll return our conversation through this route. But first, let’s create the route for our new Auth page, replacing the "Home" route in routes/web.php with the code below.
Why did we give our route the name ‘signin’? Take a look at our new "Home" route above.
Here’s what this code does. When someone visits the home page, it will check to see if the user is signed in. If the user is not signed in, they will be redirected to the ‘signin’ route.
Note: Since we’re still not using databases or the User model, we’ll not be using the Auth facade. This is a very simplistic authentication, so please don’t take your security ideas from this tutorial. The user will be set later as conversation creation and user creation are similar to what we had the last time.
Next, again in routes/web.php, replace the "convo" route group with the following code.
Don't forget to add the following use statement as well.
You’ll notice there are quite a few differences compared to last time. First of all, instead of instantiating our Twilio service every time we want to use it, we are now utilizing Laravel’s Service Container so that we can use our service through dependency injection.
We also deleted the route that fetched all our messages since we no longer need it; the home route does that now. Also, we are using sessions to save the user data when they sign in, either by phone number or by username.
Finally, you’ll notice that we have a route for our webhook endpoint, hook. The Log::debug($request) is only temporary and it’s only there to make sure that it’s working properly.
It won’t work properly on localhost, so we need to expose our webhook endpoint to the world wide web by firing up Ngrok. Do that by running the command below in the root directory of your project.
You should see output similar to the following in your terminal.
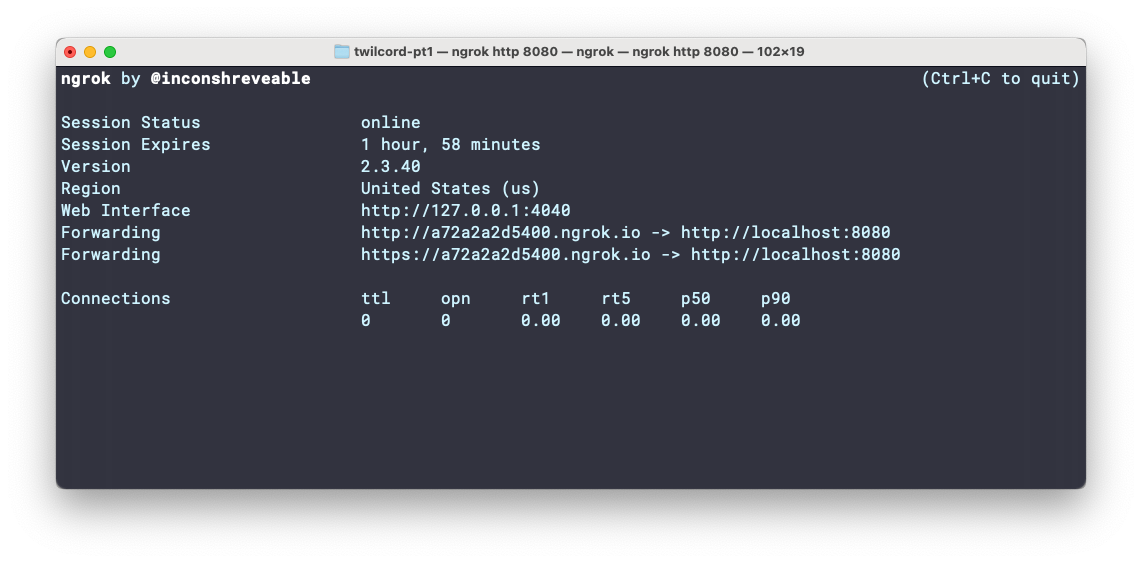
When it's running, copy the http URL from the terminal output and set it as the value of APP_URL in .env.
Now, in a new terminal, run php artisan serve. Before we compile our assets, comment the import Notification lines in resources/js/Components/signup.js and resources/js/Components/chatform.js along with the Notification components.
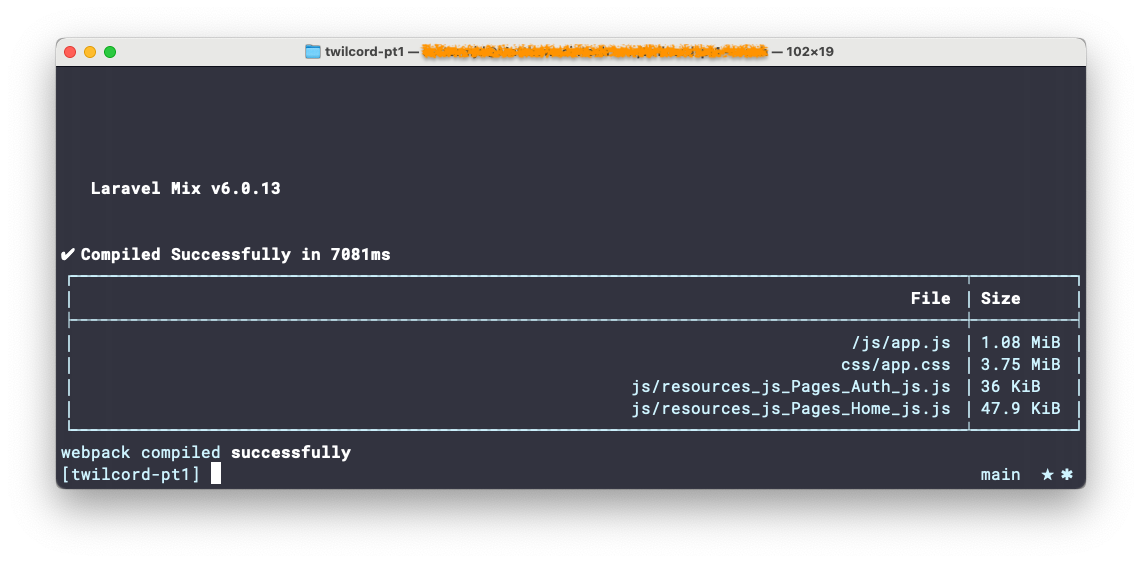
When that's done, run npm run dev in the root directory of the project to compile the frontend assets.
Note: if you're using Linux or macOS, you can background the artisan process before running the command above by pressing Ctrl+z and then bg. If you're using Microsoft Windows, however, you'll need to run the command in a new terminal window.
When successfully built, you should see output in the terminal similar to the screenshot below.
Then, open the ngrok URL in your browser. You should now be seeing the sign-in page. Sign in with both a username and your phone number in E.164 format.
What are webhooks and how do we use them?
In apps that use HTTP, we need to use methods such as GET, POST, PUT, and DELETE, to fetch, input, update, and delete data. HTTP is pretty much always “ask and respond”, which is fine, but it’s not fast. What if we want something to happen without us having to ask?
This is where webhooks come into play. Webhooks are messages that automatically get sent in response to an event. The payload in each webhook message contains data about the event.
Twilio’s Conversations API comes with a Webhooks feature that enables us to make our app real-time. There are two types of webhooks for Twilio: Pre-Event and Post-Event. We’ll be creating Post-Event webhooks, since Pre-Event webhooks are only used when we want to intercept an event.
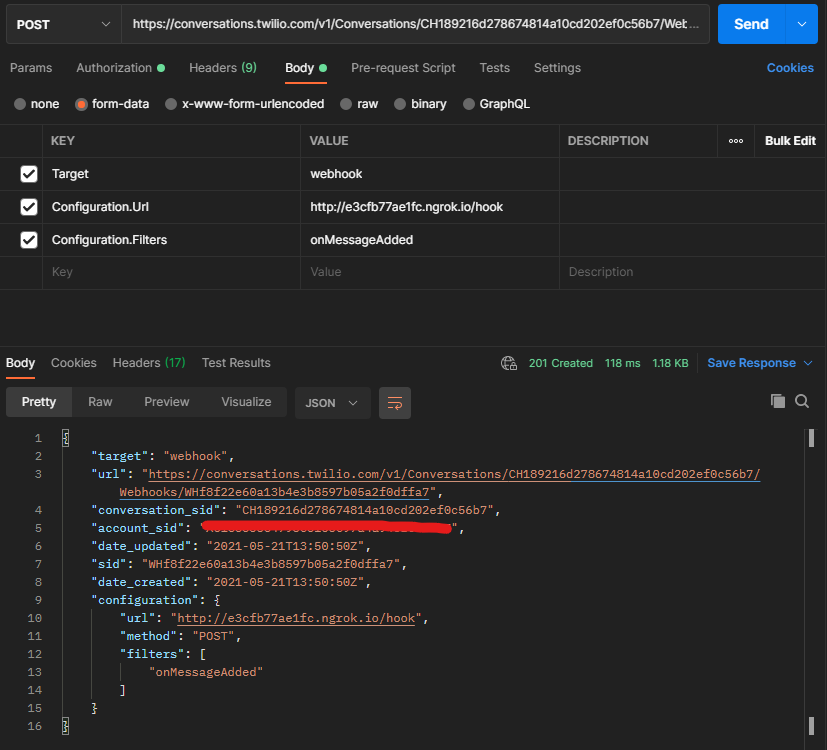
Twilio allows us to configure our webhooks via the Console or via the API. The API is a lot more fun, so let’s fire up Postman, as in the screenshot above.
We’ll create a webhook resource via a POST request to the Conversations (classic) API. The request will need to send three things:
- A target (
Target) - A configuration URL (
Configuration.Url) - A configuration filter (
Configuration.Filters)
The target will always be set to webhook. The configuration URL is our webhook endpoint, so its value will be the Ngrok URL plus /hook. The configuration filters tell Twilio what actions it should fire off webhooks for.
For this tutorial, we’ll only focus on onMessageAdded. However, you should take a look at the filters you have access to, such as onParticipantAdded and onDeliveryUpdated.
Note: You should make sure your calls are authorized by going to the Authorization tab and selecting Basic Auth. Here you will put your Twilio Account SID as your Username and Account Token as your Password.
We’ll create the new webhook with this endpoint that Twilio provides: https://conversations.twilio.com/v1/Conversations/{conversation_sid}/Webhooks. You can get the conversation SID from public/sid.json.
Oh, just one more thing. Laravel may block our webhook to prevent Cross-Site Scripting Attacks (XSS), so we’ll need to make a small configuration change. Open app/Http/Middleware/VerifyCsrfToken.php and change just one line, which you can see below.
After adding that configuration option, go back to Postman and click "Send" to create the webhook.
We can also automate this process by going to app/Services/Twilio.php and adding a few lines. We’ll use the APP_URL in our .env file to create a method for making webhooks. In Twilio.php, add a property to access APP_URL from our .env file and a method to create the webhook:
Now we can utilize this method every time a new conversation is created by adding just one line to our 'Create Conversation' route:
Test the webhook
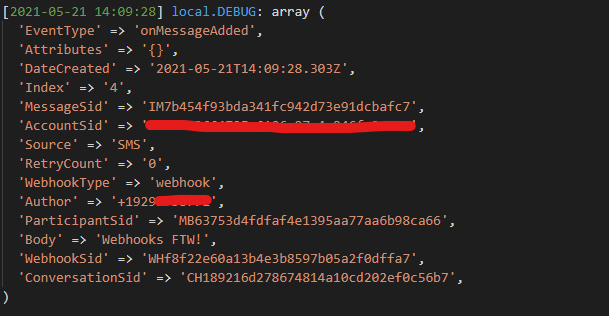
Now that you have your webhook set up, it’s time to test it out. Send a message with a username from the chat window and you should now see a text message in your phone from your Twilio number. Reply to that message from your phone and then go to storage/logs/laravel.log. You should then see the payload that was sent via the webhook.
Nice! Now that we know that our webhook works, we can move on to getting our frontend to work in real-time.
Can you hear the echo?
As you might have realized, there is no mechanism for our chat to update when an SMS is sent. There is also no mechanism for our chat to update if another user connects to the chat and sends a message from their phone/computer.
For the frontend, the library that will help us do this is Laravel Echo. This library listens for any events that are broadcast from the server-side. On the backend, however, we’ll need to implement a bunch of tools and techniques in Laravel that you may or may not already be familiar with: Events, Broadcasting, WebSockets, and Pusher.
Events are pretty self-explanatory. In Laravel, events are fired off every time something happens in our application. Broadcasting, on the other hand, helps us to send events from the backend to the frontend via a WebSocket connection.
WebSockets, in essence, allow a true two-way connection between the client-side and the server-side. Therefore, to implement WebSockets in our app, we’ll be using Pusher. Even though there are other non-commercial solutions, Pusher is very easy to use and set up.
Let’s dig in.
Broadcast your first event
The first thing that we’ll need to do is install Pusher into our project by running the command below
Note: Composer may still install version v5.0.0 so check composer.json. If you see "pusher/pusher-php-server": "5.0" then place the caret in to make it look like "pusher/pusher-php-server": "^5.0" and run composer update pusher/pusher-php-server. Please make sure you do this or you’ll get an error saying Undefined property: stdClass::$channels.
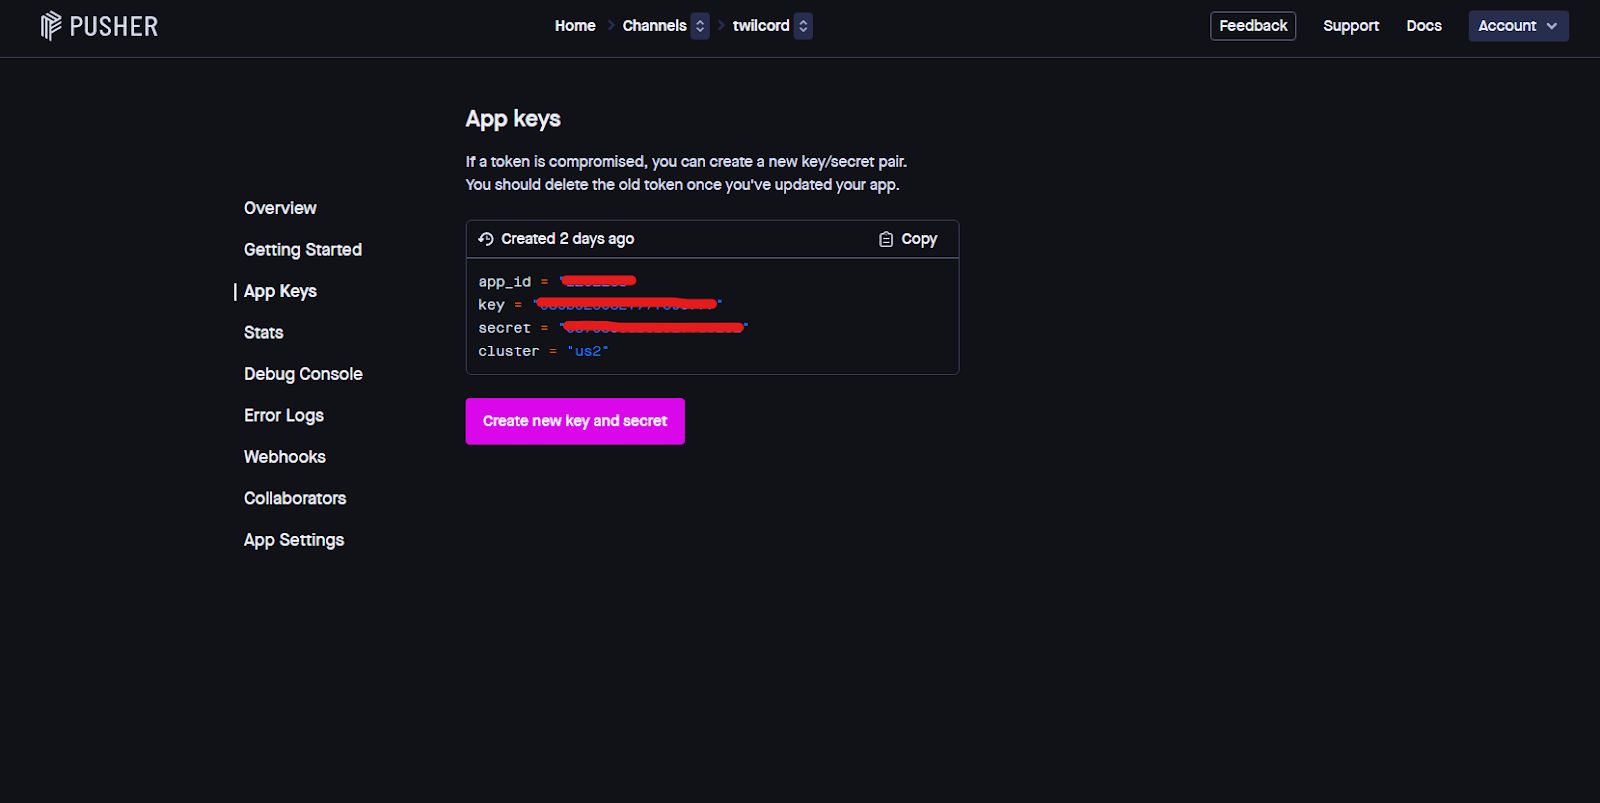
Now, add your Pusher App ID, App Key, and App Secret to .env to the PUSHER_APP_ID, PUSHER_APP_KEY, and PUSHER_APP_SECRET settings, respectively.
You can find these values in the "App Keys" section of your channel, as in the image below.
Note: If you created your app in a different cluster to the default, then you'll need to change the default value of PUSHER_APP_CLUSTER as well, to match your app's cluster.
Next, make Pusher your broadcast driver by setting BROADCAST_DRIVER to pusher in .env, as in the example below
Then, in config/app.php, uncomment the line App\Providers\BroadcastServiceProvider::class under "Application Service Providers". Let’s now create our event by running the following command.
Next, in routes/web.php, we’ll be instantiating and using the broadcast in the hook route. To do that, replace the existing definition with the code below:
Note: Don't forget to add the use statement for MessageCreated and MessagingResponse!
If you’re confused by this code, go back up to the screenshot of the log of our webhook. You’ll see that each key and value in our array is a string. We’re trying to say that the broadcast should only fire when it is indeed a new message, and we do that by comparing the current index count with the previous index count.
Since the index count is a string, we cast it to an integer. The 'sms' that we passed into the MessageCreated event will be passed to the class’s source property.
Note: The reason why we've returned a MessagingResponse object is to disable the default response that you'll receive when you send a message from your phone.
Now it’s time to set up the client-side. Install Laravel Echo and the Pusher Javascript library by running the command below in the root directory of the project.
Once that's done, open resources/js/bootstrap.js and uncomment the lines starting with `import Echo`, `window.Pusher`, and `window.Echo`. The bottom section of the file should then look something like the example below:
Also, make sure that resources/js/bootstrap.js is being imported into resources/js/app.js by adding import './bootstrap' to the top of the file.
Now we need to tell our front-end when the message was created. We’ll also need a mechanism to load the new message once our client gets the message. Luckily, Inertia comes with a feature called Partial Reloads that enables us to just reload a section of our page and only update the data that we want.
To do that, update resources/js/Pages/Home.js to look like the code below:
After making these changes, every time the client receives the MessageCreated event, it will do a partial reload, only updating convo, which is an array that is returned by Inertia.
With those changes made, before we can test them, rebuild the front end assets, by running the following command in the root directory of the project.
Restart your server and run npm run watch. Once your app compiles, send another reply to the text message you received earlier. Now go to the browser (you might also need to do a hard refresh of your page or open a new tab). Your message should come up in the chat without you having to do anything!
At the moment, if someone else sends a message, our chat won’t be updated. We need to fix that. Let your home route look like this:
The toOthers() method broadcasts the event to everyone else except the current user. This prevents endless loops and other errors when our broadcast method is in our home route, where data is already loaded each time a message is created. You should now have a fully-functioning real-time chat room app.
Add in error handling
Currently, when an error occurs in our app, a modal appears. This is okay locally, but if we decided to push it to production, it would create a poor user experience. Let’s handle errors so that they load as text on our page.
Remember the Notification component in our frontend that we had to comment out, because we hadn't yet defined it? Let’s do that now. Create a new file in resources/js/Components, named Notification.js, and in there, add the code below.
With the code updated make sure that you uncomment all lines in resources/js/Components/chatform.js and resources/js/Components/signup.js related to "Notification". Also, remember to rebuild the front end code, by running the following command.
Our Notification component is pretty simplistic. If there is an error message, it will change from its default hidden state to render on the page. The error message is passed to the component by way of props.
Now, we’ll need to set up a mechanism by which the error message will be sent from the server to the client. Inertia has a preferred way for handling errors, but we will not do it their way in this tutorial.
In app/Exceptions/Handler.php, there is a register() method where we can define our exception handling functions. We’ll be using the renderable method to define our custom exception. Replace the body of the register method with the code below.
Note: Don't forget to update the use statements to match those in the example above.
The code checks if our error is an instance of TwilioException. If it is, we'll pass it as a 409 HTTP status code. If the error is not a TwilioException, we’ll presume that it's an HttpException and get its HTTP status code. For everything else, we’ll pass it as a 500 HTTP status code.
Now we need to make sure that our custom error messages are shared with Inertia. Open app/Providers/AppServiceProvider.php where we will be making another change to the boot() method. The final iteration of the boot() method should look like the code below:
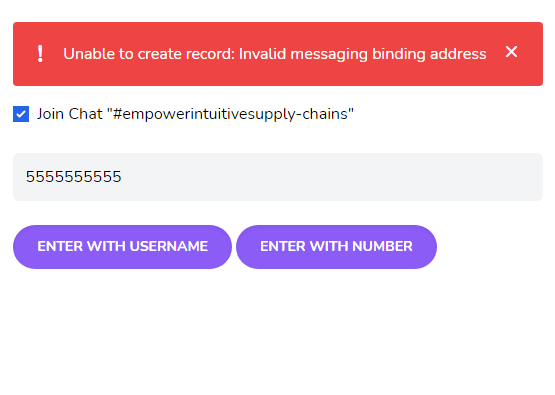
To test out our new exception handling mechanism, let’s create a common error with the Twilio API. Enter a phone number in the wrong format and try to enter the chat with it. You should see an error like this:
That's how to build a real-time chat room app with Laravel, React, and Twilio Conversations (classic) Webhooks
This tutorial covered numerous concepts including webhooks, websockets, error handling with Inertia, and others. If you want to build this app into something for the real world, you should create a user model in which you can create a better authentication mechanism. You should also look into filtering for other actions with Twilio webhooks, such as onParticipantAdded and onDeliveryUpdated.
Lloyd Miller is a freelance full-stack web developer based in New York. He enjoys creating customer-facing products with Laravel and React, and documenting his journey through blog posts at https://blog.lloydmiller.dev
Related Resources
Twilio Docs
From APIs to SDKs to sample apps
API reference documentation, SDKs, helper libraries, quickstarts, and tutorials for your language and platform.
Resource Center
The latest ebooks, industry reports, and webinars
Learn from customer engagement experts to improve your own communication.
Ahoy
Twilio's developer community hub
Best practices, code samples, and inspiration to build communications and digital engagement experiences.