Build Your Own Weather Station With PHP, Python and a Raspberry Pi
Time to read: 8 minutes
March 16, 2022
Written by
Reviewed by
Raspberry Pi, Arduino, BeagleBone, and similar technologies have had a revolutionary impact on so many people around the world.
Because they provide the building blocks of computing for a very low price, anyone, from a school student to a retiree, with a little bit of time and effort, can build a device that perfectly scratches whatever itch they have. They no longer need to wait for a commercial organisation to build it.
One such itch (at least one that I have) is to measure the current temperature and humidity throughout the rooms in my home. Sure, weather app's can tell you the current temperature and humidity, however, they can only do it for a wide geographical area.
So, in this tutorial, you're going to learn how to create a small weather station with a Raspberry Pi, some PHP and Python code, and a temperature and humidity sensor — for under $100.00 — accessible from any device on your home network.
How will the weather station work?
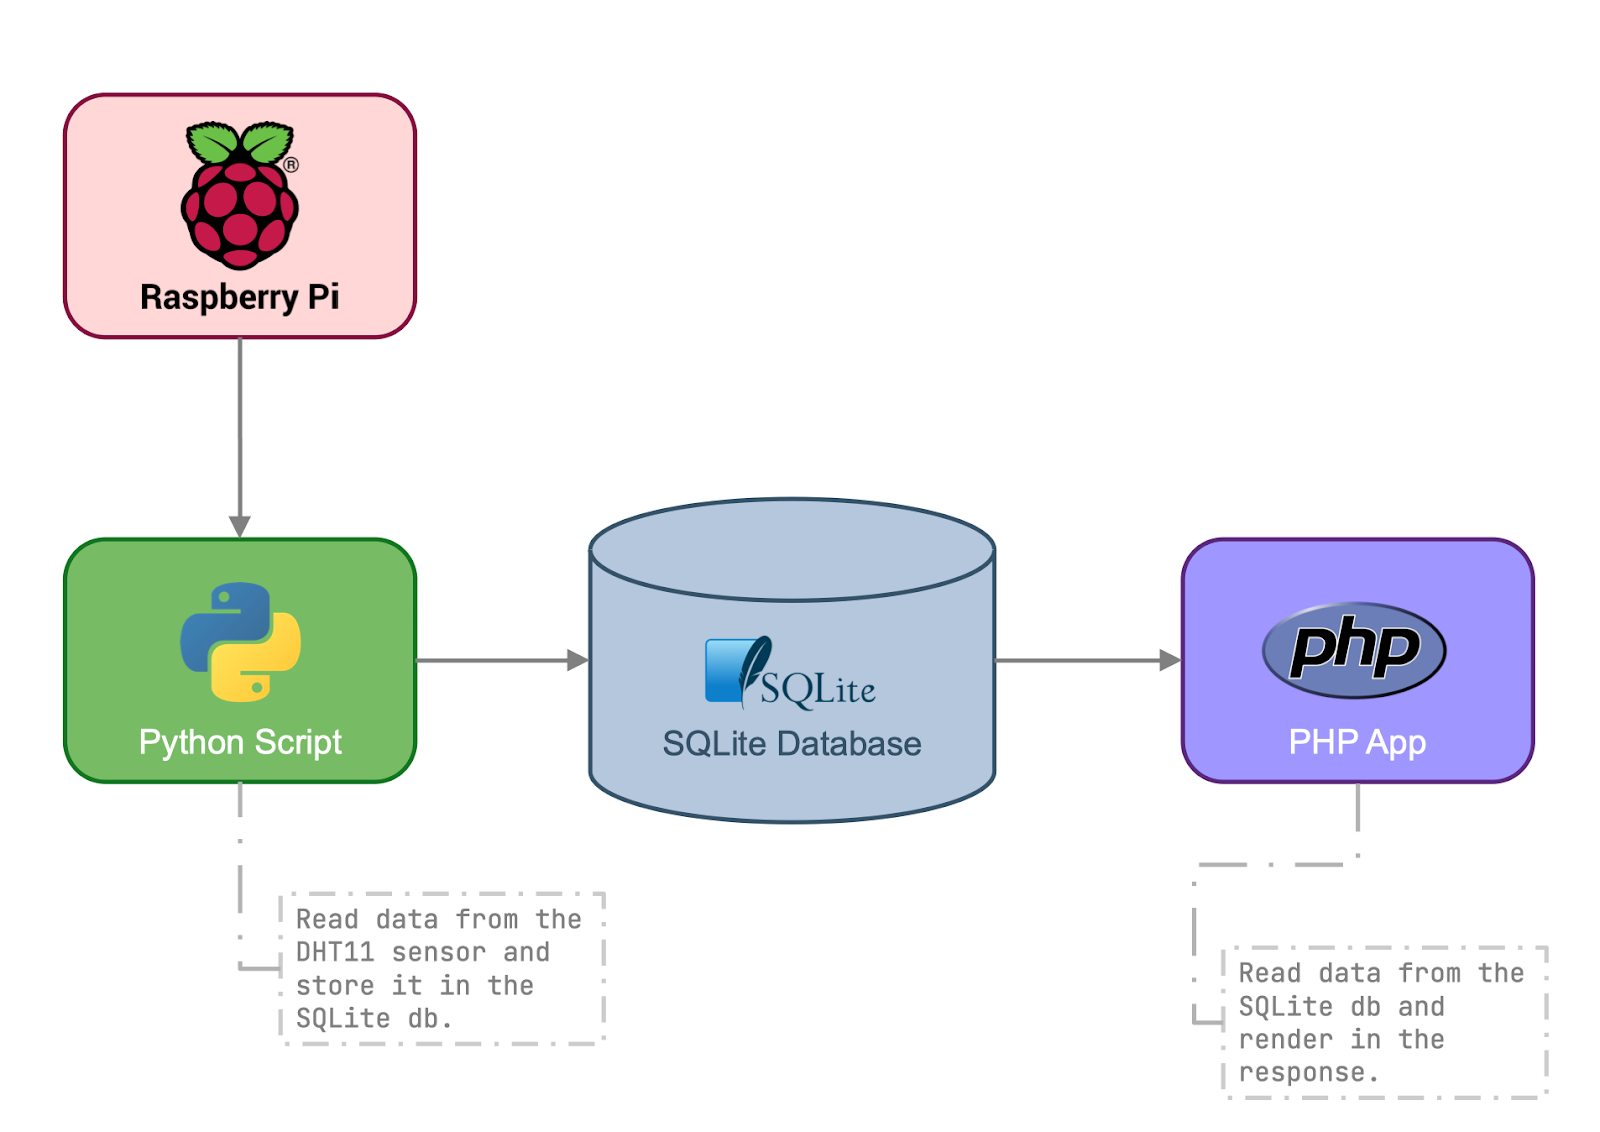
The weather station, as I've alluded to, will be compose of three parts, those being:
- A Raspberry PI connected to a temperature and humidity sensor, via a GPIO (General Purpose Input/Output) Breadboard Extension.
- A Python script to read data from the sensor and store it in an SQLite database.
- A web-based, Single-page Application (SPA), written in PHP. It will read the sensor data from the database and render it in a beautiful, easy-to-read way. To reduce the amount of code required, the application will be based on the Slim Framework and Twig template engine.
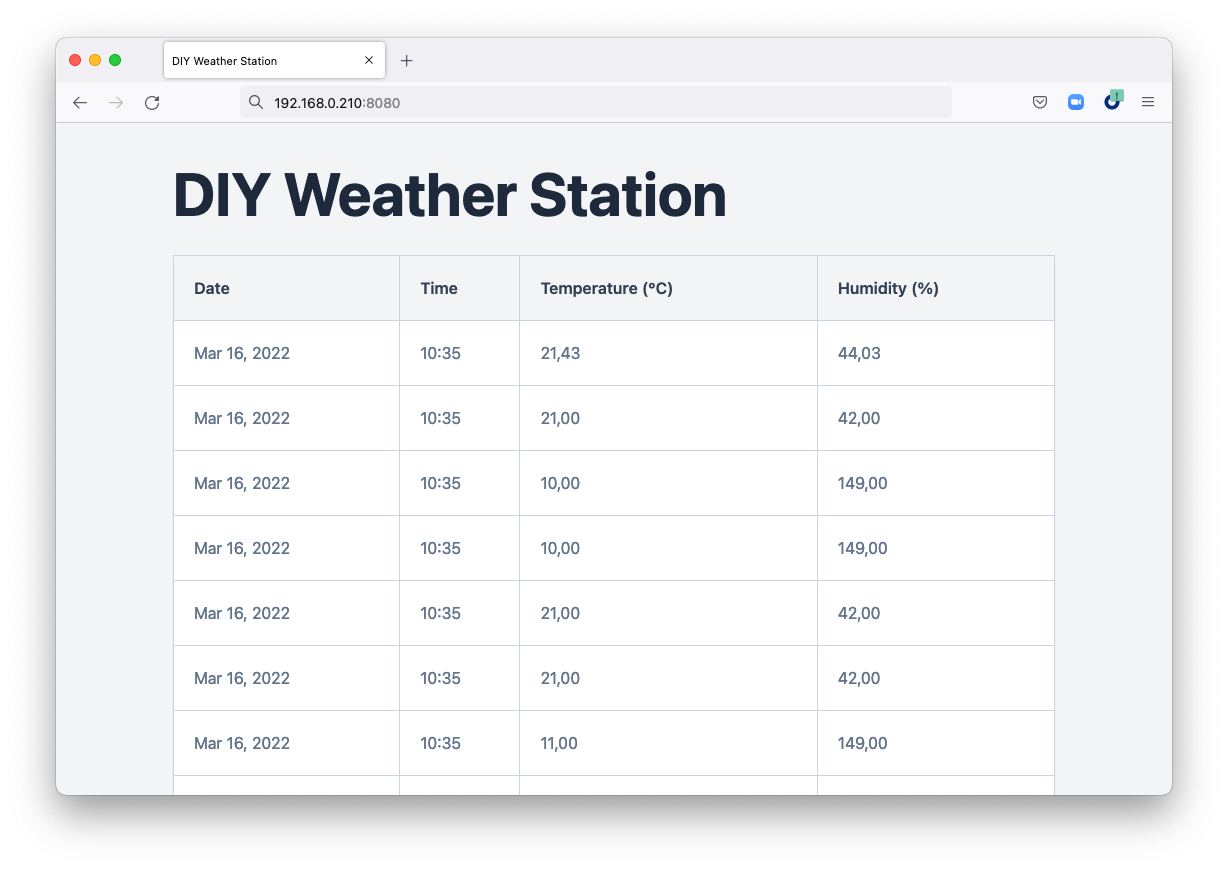
Here's what the web app will look like when it's completed.

Prerequisites
To follow along with this tutorial, you need to have the following:
- A Raspberry Pi (ideally a 3B+ or newer) running Raspberry Pi OS (formerly Raspbian), powered by either a USB cable or wall adapter.
- A DHT11 temperature and humidity sensor, a GPIO Breadboard, four jumper wires, and a 10K Ohm pull up resistor.
I chose the DHT11 sensor as, while it's a little slow and its accuracy isn't as high as other sensors, it doesn't cost much and is readily available. Feel free to use a sensor with greater range and accuracy, such as the DHT22 or AM2302, if you'd prefer and are more experienced.
Connect the DHT11 sensor to the Raspberry Pi
Now, it's time to set up the GPIO Breadboard Extension with the DHT11 sensor, so that the sensor can be read from.
To do that:
- If your Raspberry Pi is in a case, remove the case so that you can access the GPIO pins.
- Plug the T-cobbler onto the breadboard.
- Connect one end of the 40 pin cable to the T-cobbler.
- Connect the other end of the 40 pin cable to the Raspberry Pi's GPIO pins.
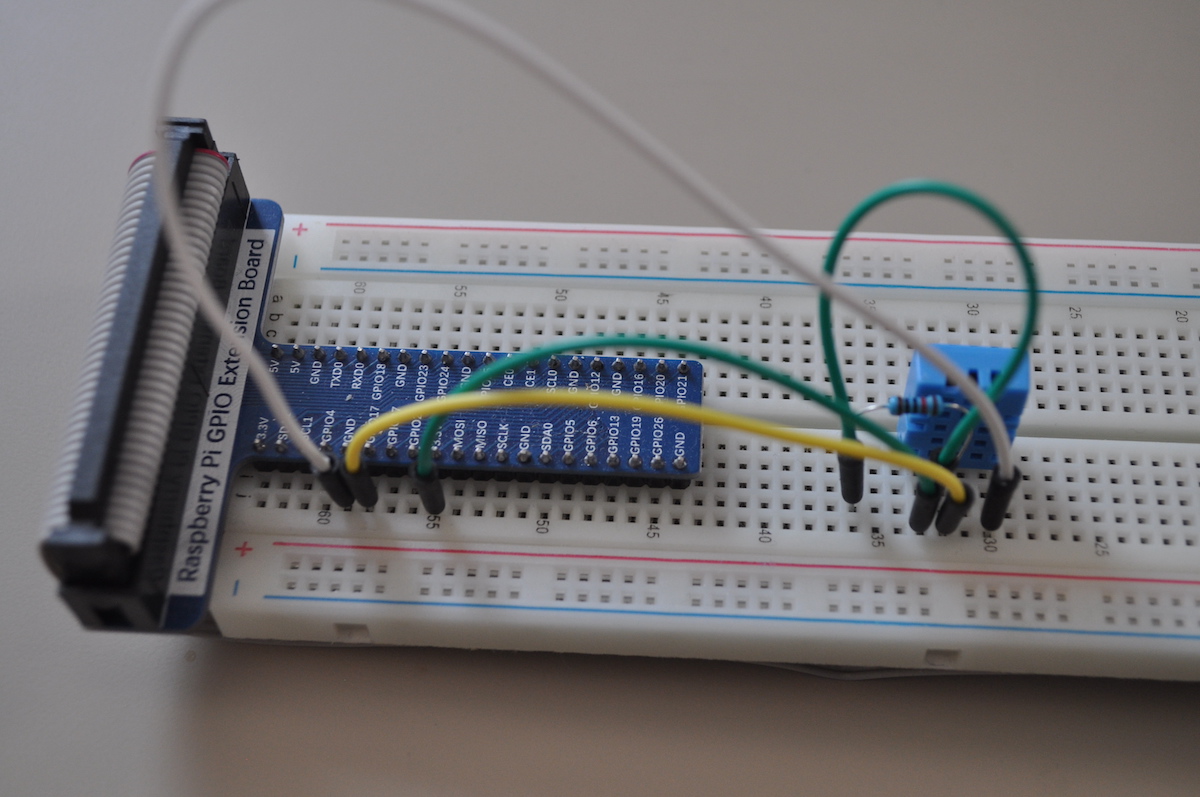
- Connect the DHT11 sensor into the breadboard with the top/front facing to the left-hand side of the breadboard.
- Connect the
GNDof the sensor to a GPIOGNDpin (the white cable). - Connect the
VCCpin of the sensor to the 3,3V pin (the longer green wire). - Connect the
OUTPUTpin of the sensor to pin GPIO 17 (the yellow wire). - Connect a 10K Ohm pull up resistor between the
VCCandOUTPUTpins (the resistor and shorter green wire).
When wired up, it should look like the image below.
Set up the Raspberry Pi
The first thing that you need to do is to install and configure the required software on the Raspberry Pi.
This will include a number of packages (NGINX, PHP with the INTL & PDO SQLite extensions, as well as PHP-FPM, Python3, PIP3, SQLite).
To do that, run the following commands.
Then, you need to add the pi user to the gpio and www-data groups. To do that, run the following command.
Then, you need to change the www-data's shell, and enable it. To do that, run the following command.
Following that, you need to install Pipenv, by running the following command.
Create the application's project directory
Now, it's time to write the weather station's code. To do that, you first need to create the project directory structure and change into the top-level directory. To do that, run the following commands:
The commands create a new directory, named raspberrypi-weather-station. Inside that directory are four sub-directories:
- bin: This will contain the Python script.
- data: this will contain the application's SQLite database.
- public: This will contain the PHP file that will power the PHP application, along with a directory named css, which will contain the PHP applications CSS file.
- templates: This will contain the Twig template that the PHP application will use to render its output.
Create the application's database
The next thing to do is to create the application's SQLite database.
I recommend SQLite because it has very low overhead and it doesn't require a complicated setup or configuration process as other databases do.
The schema will be extremely minimalist, containing just one table containing three columns:
- humidity: This will store the humidity reading.
- temperature: This will store the temperature reading.
- timestamp: This will store the date and time of the reading. The value will be auto-inserted because the default value, if not specified, is the current timestamp (date and time).
To create it, first create the database and then connect to it, by running the command below.
Then, create the schema by running the following command.
Create the Python script to read the DHT11 sensor
The next thing to do is to create a Python script that will read the data from the DHT11 sensor.
But before you can do that, you need to install the Adafruit_DHT package which the script depends on. From your terminal, run the following command.
Now, it's time to create the Python script that will read the temperature and humidity data from the sensor. To do that in the bin directory, create a new Python file named dht11-sensor-reader.py. Then, paste the code below into the file.
The script starts by importing all of the required packages. After that, it creates two functions, one to create a connection to the SQLite database (create_connection) and another to run a SQL query against the database (execute_query).
After that, it defines two variables, gpio_pin and database_file. These store the GPIO pin to read the sensor data from, and the path to the SQLite database file, respectively.
Then, it:
- Attempts to read the humidity and temperature from the DHT11 sensor.
- Connects to the database.
- Writes the retrieved sensor data to the database.
Create a Crontab entry to run the Python script
Now that the Python script is ready, a Cron job needs to be created so that it will be run on a regular basis and populate the database.
To do that, as the pi user, run the following command.
This will open the Crontab editor for the pi user, which will allow you to set how often the script should run.
Then, in the editor, at the bottom of the file, add the following snippet.
This script tells the pi user to cd into /var/www/weather_station and use Python3 to run bin/dht11-sensor-reader.py once every minute.
If you'd like to run the script at a different interval, use crontab guru to quickly build the cron scheduling expression (which in the example above, are the five space-separated asterisks at the start of the line).
With the Crontab entry created, the Python script will be intermittently called, storing records in the SQLite database that you'll be able to view, when you've completed the PHP frontend to the weather station.
Create the PHP web application
Now, it's time to create the PHP application. To start off, as always, you need to install the external dependencies which the application will need. Use Composer to do this, by running the following command.
Create the core script
Then, in the public directory, create a new PHP file, named index.php, and in that file paste the following code.
The first thing that the code does is to, as always, import the required classes and Composer's Autoloader. After that, it initialises the DI (Dependency Injection) Container, registering two services with it.
The first service is named view. It returns a Twig object that retrieves its templates from the resources/templates directory in the root directory of the project, and uses Twig's Intl Extension, so that it can do some nice date and time formatting (among other things).
The second, named 'weatherData', starts off by initialising a \Laminas\Db\Adapter\Adapter object, which provides the connection to the application's SQLite database.
Then, using the adapter, it programmatically generates a SQL query to select all records from the weather_data table, sorted from the most recent to the oldest records. It then runs the query against the database, and stores the results in $weatherData.
You can see the generated query below.
After that, the Slim application is instantiated and the initialised container is passed to it. That way, it has access to both services.
Then, a GET route, with the path /, is registered with the application. When requested, this route will render and return the view template, resources/templates/index.html.twig. $weatherData is passed to the template so that it can render the retrieved sensor data.
Create the view template
Now, it's time to create the view template, so that the content will be rendered and styled professionally. To do that, in the resources/templates directory, create a new file named index.html.twig. Then, in that file, paste the following code.
There's not a lot going on in the template. It imports the stylesheet in the head section and then in the body, iterates over the weather data, printing out in a nicely styled table the date, time, temperature, and humidity data for each available record.
Download the CSS file
To ensure that the application renders as professionally as expected, download the CSS file from the GitHub repository to the public/css directory, and name it styles.css.
Create an NGINX Virtual Host
At this point, the application is ready to use. But, before it can be run, a virtual host has to be added to NGINX. To do that, create a new file in /etc/nginx/sites-available named weather_station. In that file, add the following configuration.
The configuration above sets the root directory where the files will be served from /var/www/weather_station/public, the default file to call, index.php. After that, it configures logging, followed by sending all requests to /var/www/weather_station/public/index.php. Any requests ending in .php, which will be every request, except for the stylesheet.
Next, you have to enable the configuration. To do that, run the command below.
Test the weather station
Now that everything's complete, it's time to test the application. To do that, open http://<<Raspberry Pi IP Address>> in your browser of choice, replacing the placeholder with the IP address of your Raspberry Pi.
When loaded, you should see the page render similar to the screenshot below.
That's how to build your own weather station with PHP, Python and a Raspberry Pi
Admittedly, it's pretty humble in appearance and functionality, but with time it will become a lot fuller featured. What's more, it didn't cost much to create. I hope that it whets your appetite for what you can make using a Raspberry Pi.
In the next part in the series, you'll learn how to send a daily summary via both SMS and email using Twilio and SendGrid.
Matthew Setter is a PHP and Go editor in the Twilio Voices team, and a PHP and Go developer. He's also the author of Mezzio Essentials and Deploy With Docker Compose. You can find him at msetter[at]twilio.com. He's also on LinkedIn and GitHub.

Related Resources
Twilio Docs
From APIs to SDKs to sample apps
API reference documentation, SDKs, helper libraries, quickstarts, and tutorials for your language and platform.
Resource Center
The latest ebooks, industry reports, and webinars
Learn from customer engagement experts to improve your own communication.
Ahoy
Twilio's developer community hub
Best practices, code samples, and inspiration to build communications and digital engagement experiences.