How to Build a Bulk SMS Service with Django and Twilio
Time to read:
March 09, 2023
Written by
Reviewed by

The importance of SMS messaging to businesses can not be overemphasized. From sending a promotional message or an SMS alert about a change of policy, to sending one-time passwords to authorize transactions, there is so much you can do with SMS messaging.
This article teaches you how to leverage the Twilio SMS API to build a Bulk SMS application with Django. In this tutorial, you will build a Bulk SMS app that allows admin users to send messages to customers as SMS. With this app, you will see the power of the Twilio SMS API using the Django framework.
Takeaways:
In this article, you will learn:
- How to integrate the Twilio SMS API into a Django project
- How to send SMS messages using the Twilio Programmable SMS API
- How to use Redis Queue for queuing of long-running jobs.
Prerequisites
You will need the following in order to fully follow along with this tutorial:
- A Twilio account
- A Twilio phone number with SMS capabilities (learn how to buy a Twilio phone number here)
- Python 3.8 or newer
- A basic understanding of Python and Django
- A text editor (e.g. PyCharm or VS Code) installed
Verify your Python Installation
Django is a Python framework; as such, you need to have Python installed and use it as your development language. To confirm that you have Python installed, run the following command:
If Python is not installed, visit Download Python to install it based on your computer's operating system.
Make sure pip (Package Installer for Python) is also set up on your computer. pip is used for the installation of third-party dependencies. You can verify the installation by running the following command:
Installing Django
This project makes use of the free and open-source Django framework, a Python web framework designed to fulfill deadlines and adhere to stringent software specifications.
Building web apps is fast with Django; you can create a complete web application from the ground up within a few hours. Thanks to Django, you can avoid many of the stressors that come along with web development, and instead can focus on writing your business logic.
Before installing Django, create a virtual environment. A virtual environment is an isolated Python environment on your computer. This makes it more likely that, although being dependent on the same local machine, your current project's dependencies won't also include those of other projects.
Run the following command to create a new virtual environment:
You must specifically activate the virtual environment after creating it. To do this, run:
With your virtual environment successfully created and activated, proceed by installing Django.
Creating the project (SMSserviceproject)
A Django project is a website or application built using the Django framework. It consists of smaller submodules (apps) and configurations. A project can contain multiple apps, depending on the complexity of the website. A Django app is a self-contained set of models and views that can be plugged into a Django project. A project is an entire website, while an app is a small part of the project.
Create a new project called SMSserviceproject by running the following command:
The App (SMSapp)
Next, create a new Django app. To create the app, run the following command:
With this, the app is created successfully. Next, add the app to the list of installed apps in SMSserviceproject/settings.py:
Test your app to ensure that everything has been installed and configured properly. To perform this operation, run the server with the following command:
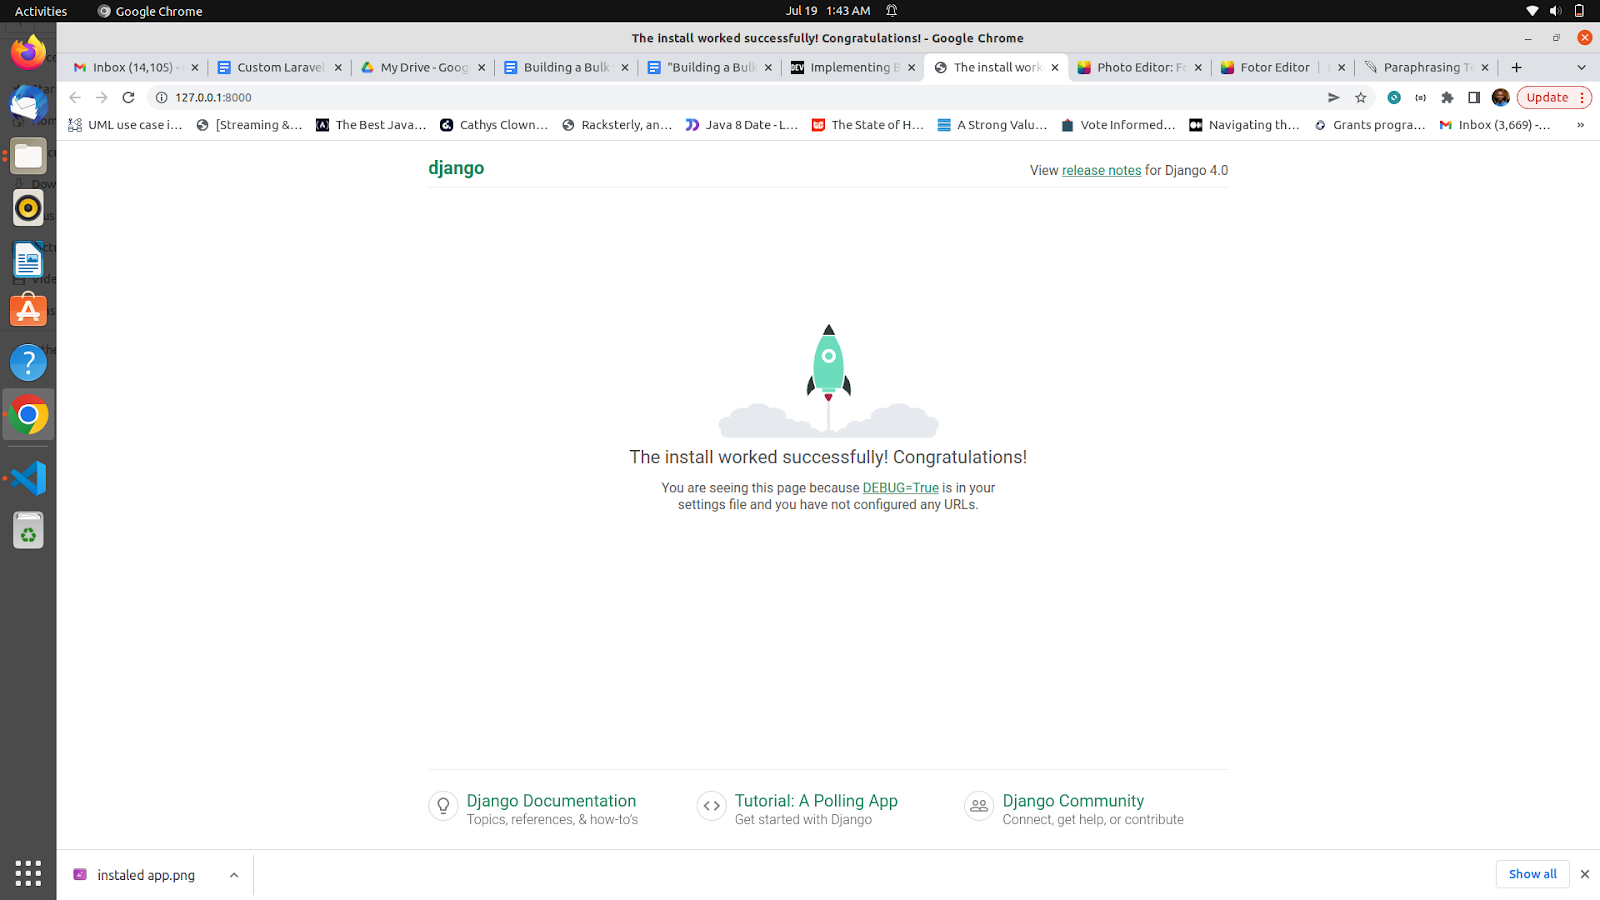
If you navigate to http://127.0.0.1:8000/, boom — you will see the image below, showing that Django is successfully installed, and Django is running. Congratulations on creating your first Django app.
Integrating Twilio into the project
Twilio is a platform as a service (PaaS) company that offers Cloud communication services. Software engineers can use their services to create applications that can make and receive phone calls as well as send and receive text messages. Their API allows software engineers to easily automate and schedule text messages to remind users on their platform of upcoming events.
For this project, you will need to install a few more dependencies — the Twilio Python Helper Library and django-environ. Install them now by running the following command in your activated virtual environment:
Now that you have installed the Twilio library in the project, you will need to get your Twilio credentials.
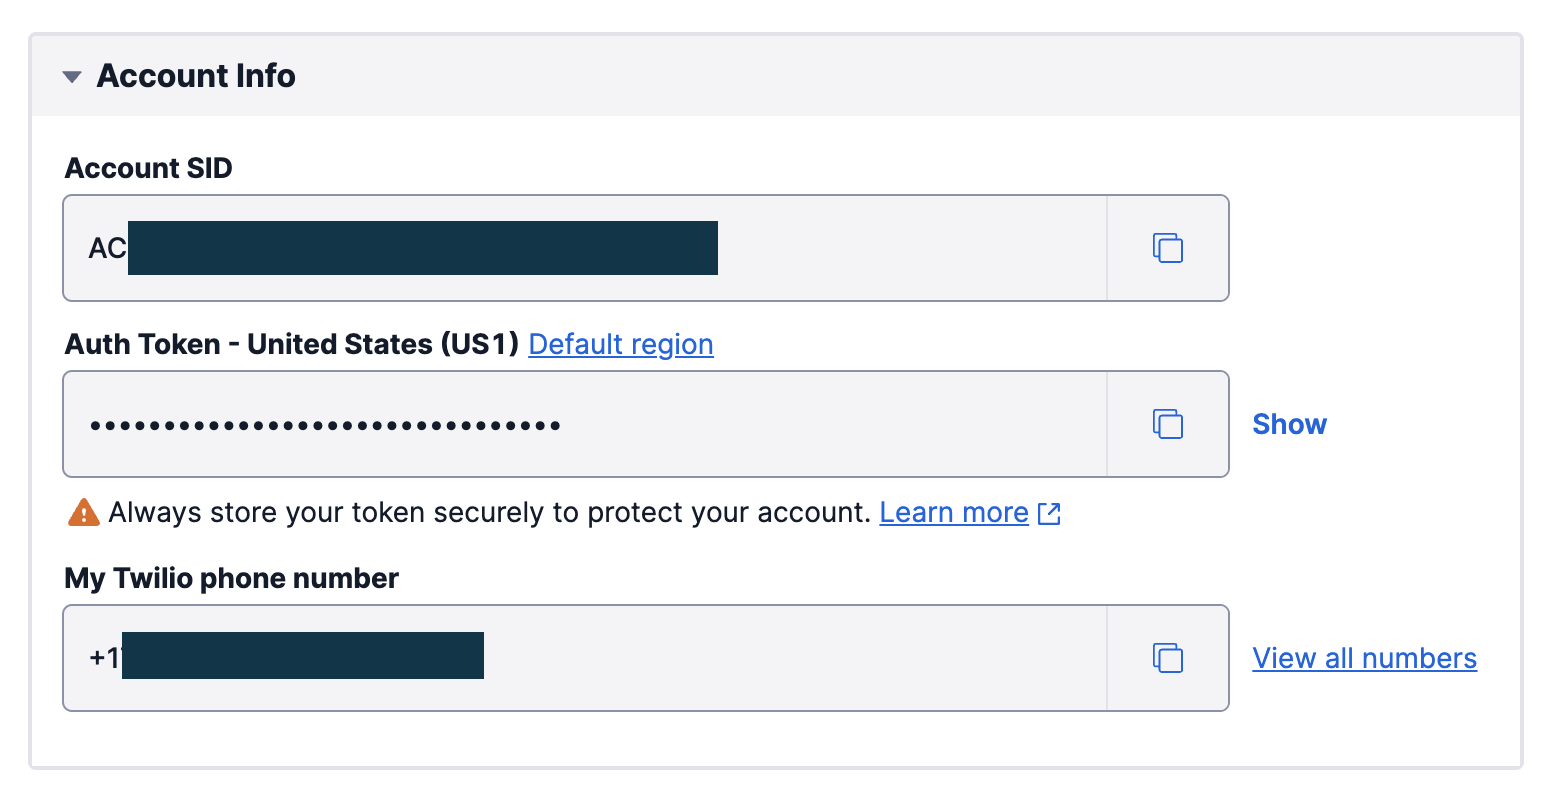
Log in to the Twilio Console. On the dashboard, you will find your Account SID, Auth Token, and Twilio phone number. Take note of these values, as you will need them to configure your Django project:
To keep sensitive information such as your Twilio keys hidden, create a .env file in the same directory as SMSserviceproject/settings.py and add your Twilio keys to the .env file as in the example below, replacing the placeholder text with your actual values:
Next, if you plan to push your code to a GitHub repository, make sure to create a new file called .gitignore to ignore the .env file and keep your private keys safe. Inside the file, add the following line:
Open SMSserviceproject/settings.py in your text editor. Add environ to the imports near the beginning of the file as follows:
Then, after the ALLOWED_HOSTS line, initialize environ so you will be able to access the keys from the .env file:
Now, add the following code to set the environment variables for your Django project. For the purposes of this tutorial, create a hard-coded list of the phone numbers you wish to send bulk SMS to, replacing the placeholder text below. Be sure to enter these phone numbers in E.164 format as well:
Implementing the SMS Service
Open SMSapp/views.py and enter the following code:
Here you define a function called broadcast_sms to send the SMS. This function declares the message and uses the Twilio client to create a new message, passing in the recipient numbers, the message body, and the Twilio phone number.
Next, create a new file in the SMSapp directory called urls.py. In this file, paste the following code:
From the code above, you expose the broadcast endpoint, which calls the broadcast_sms function you added to the view earlier.
You will also need to make a change in SMSserviceproject/urls.py. Open the file and update the code so it matches the following:
Test that your application works by making the following curl request from a terminal window:
If you would rather test in the browser, http://127.0.0.1:8000/broadcast instead.
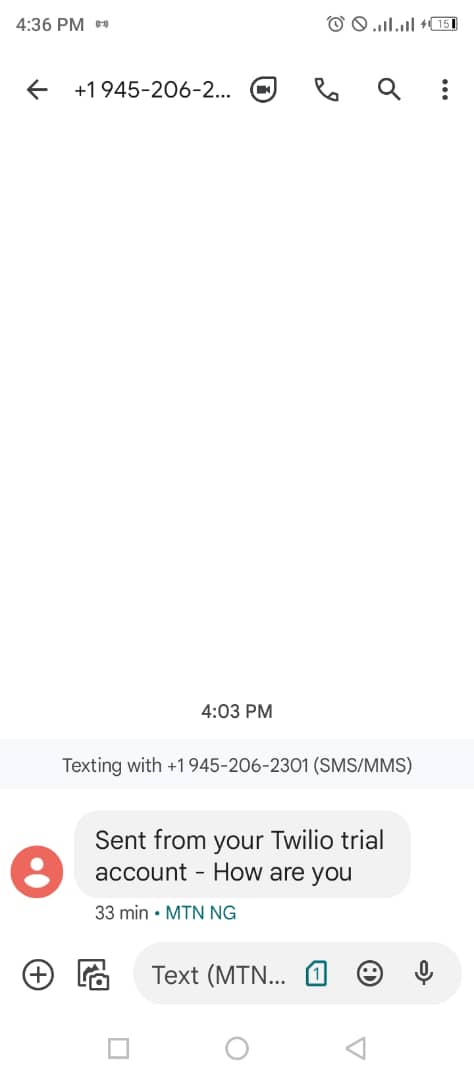
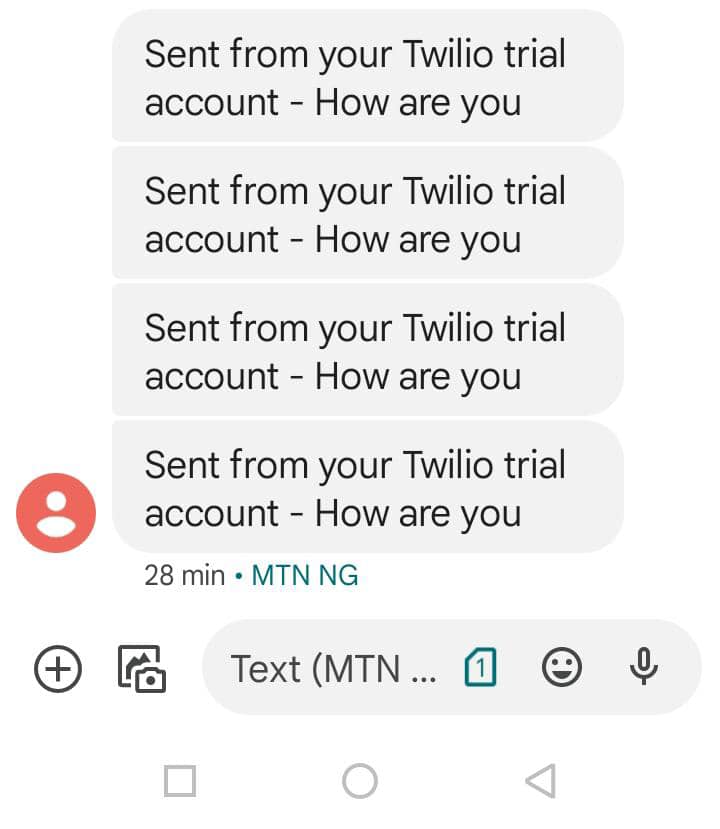
Once you have done this, your application will send out SMS to each of the phone numbers on the list you made earlier.
While the above code works and is fine for sending a small number of messages, but you'll hit rate limits as you increase the number of messages. To solve this problem, you need a task queue to queue sending the messages. Task queuing is necessary when dealing with long-running jobs that would dramatically reduce the performance of an HTTP response. This resource will help you to learn more about task queuing. In this tutorial, you will use Redis Queue for queuing your jobs.
Setting Up Redis Queue
Run the commands below to install Redis on your computer:
Having successfully installed Redis on your machine, you need to install Redis Queue — a simple Python library that allows you to queue jobs and process them in the background with workers.
Applying Redis Queue
Open SMSapp/views.py and replace the code in the file with the following:
In the above code, you have updated the views.py file to include Redis Queue. Here, you created an instance of a queue to track the jobs to be done and invoked the enqueue_in function to schedule a message to be sent out every 15 seconds.
Testing the application
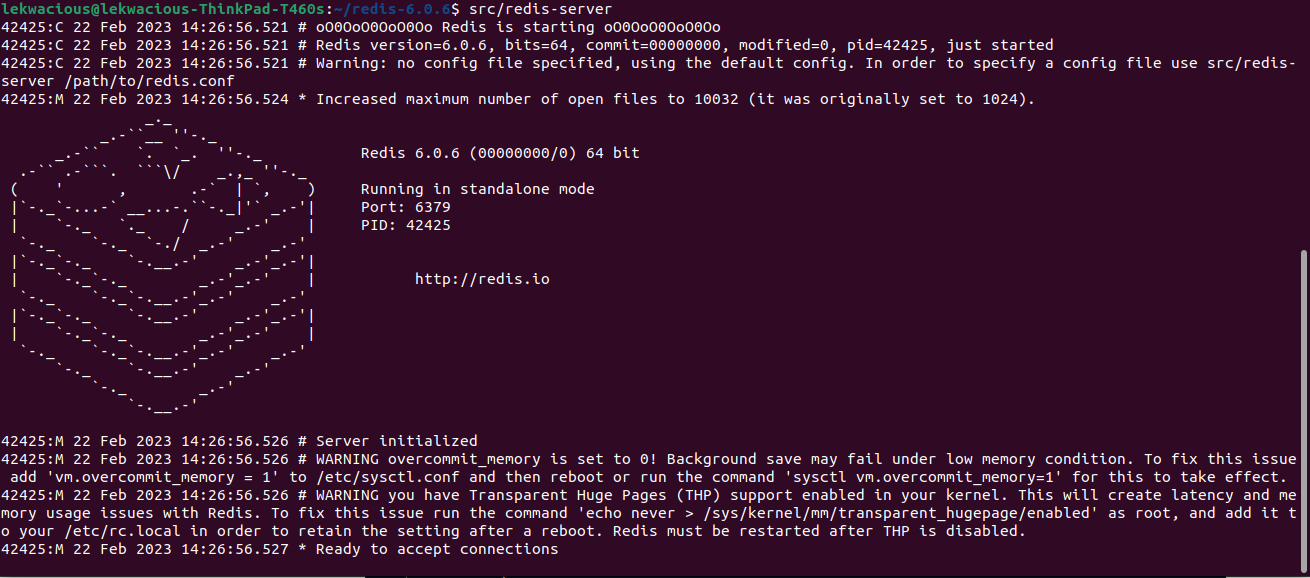
To test the queuing capabilities, run the Redis server while in the redis-7.0.9 folder with the following command:
If the Redis server started successfully, you should see log statements like those below.
Next, open a different terminal window, activate your virtual environment, and start the Redis worker with the command below:
Once you have done this, you should see log statements like the following:

Next, run your Django server, if it is not already running from earlier:
As you when testing the application in a previous step, run the following curl command from a terminal window:
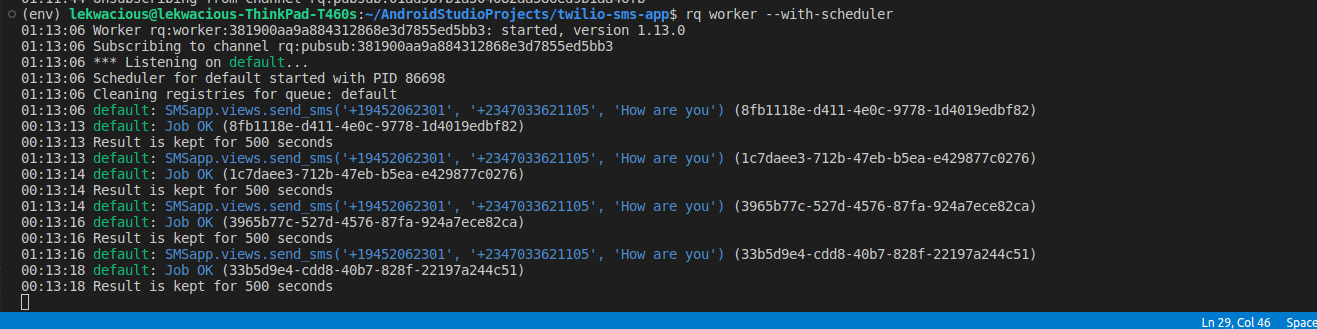
Below is an example output from the rqworker tab. The timestamp shows the time before the next scheduled job.
Conclusion
In this tutorial, you have been able to build a simple bulk SMS application with the power of the Twilio SMS API. You also used Redis Queue to queue the messages, avoiding the rate limits and 429 error responses for making too many concurrent requests to the Twilio API. The entire code base can be found in this GitHub repository. If you would like to continue developing this project, you can upgrade your account to be able to send SMS to any phone number, as a trial account works with only verified numbers.
Eme Anya Lekwa is a Software Engineer. He is passionate about how technology can be employed to ensure good governance and citizen political engagement. He is a mobile and web developer and a technical writer. He can be reached on LinkedIn.


Related Resources
Twilio Docs
From APIs to SDKs to sample apps
API reference documentation, SDKs, helper libraries, quickstarts, and tutorials for your language and platform.
Resource Center
The latest ebooks, industry reports, and webinars
Learn from customer engagement experts to improve your own communication.
Ahoy
Twilio's developer community hub
Best practices, code samples, and inspiration to build communications and digital engagement experiences.