Build a Collaborative Whiteboard with Python, Flask, and Twilio Sync
Time to read: 10 minutes
December 09, 2020
Written by

In this tutorial, we will implement a collaborative whiteboard that can be edited by multiple users at the same time. To build this project we will use three key components:
- Flask, a Python web application framework
- Twilio Sync, a state synchronization service
- Canvas API, a set of functions to draw graphics on a web page using JavaScript and an HTML
<canvas>element
The project will present a whiteboard that you can access from multiple web browsers. When any of the connected users draws on it, the others will immediately display the drawing.

Tutorial requirements
To follow this tutorial, you will need to have the following requirements:
- A computer with Python 3.6 or a newer version installed. If your operating system does not provide a Python package, download an official build from python.org.
- A free Twilio account. If you use this link to register, you will receive a $10 credit when you upgrade to a paid account.
Project environment setup
First, we need to create a directory where the project will live:
Change into the directory, then create a Python virtual environment:
Note that on Windows your Python interpreter may be called python instead of python3.
The next step is to activate the virtual environment. If you are using a Unix or Mac OS computer:
If you are using Windows:
From now on, you will see a (venv) prompt in your terminal or command line window, to indicate that you have activated the environment successfully:
We can now install the dependencies for this project, which are:
- Flask: A Python micro web framework.
- Faker: A library for generating fake data.
- twilio: A library for communicating with the Twilio API.
- python-dotenv: A library for importing environment variables from
.envfile.
Use the command below to install these packages:
You can generate a requirements file (normally named requirements.txt) to record the dependencies in the current environment so that you can replicate the same environment on other machines:
Twilio service setup
To work with Twilio, we have to create a file called .env, where we can save the needed credentials as environment variables:
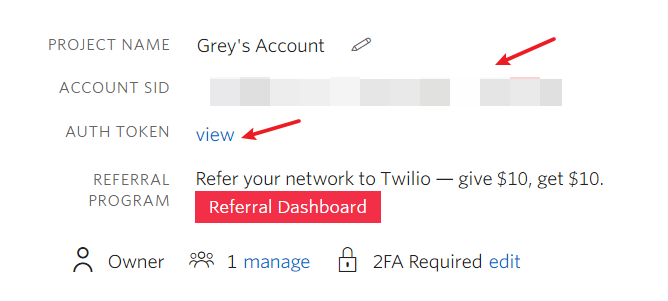
These values identify your account when you connect and talk to the Twilio servers. You can obtain them from your Twilio console. The Twilio Account SID and Auth Token fields are in your dashboard:
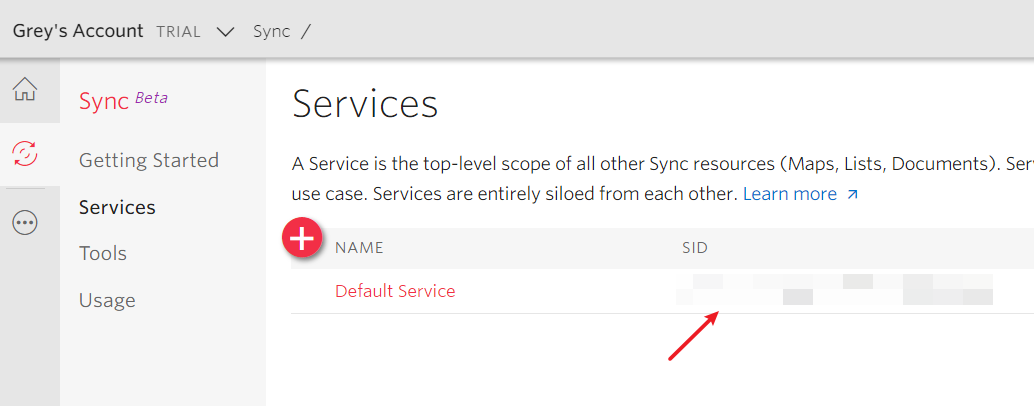
The remaining three variables require a bit of extra work. Find the "All products & Services" button on the left sidebar of the Twilio Console page, then find the “Sync” service in the "RUNTIME" section (click the "Pin" button to pin it on your left sidebar for convenient access). From there access the “Services” menu.
We will use a service called “Default Service”, which should appear on this page. You can copy the SID and set it on the TWILIO_SYNC_SERVICE_SID variable in the .env file:
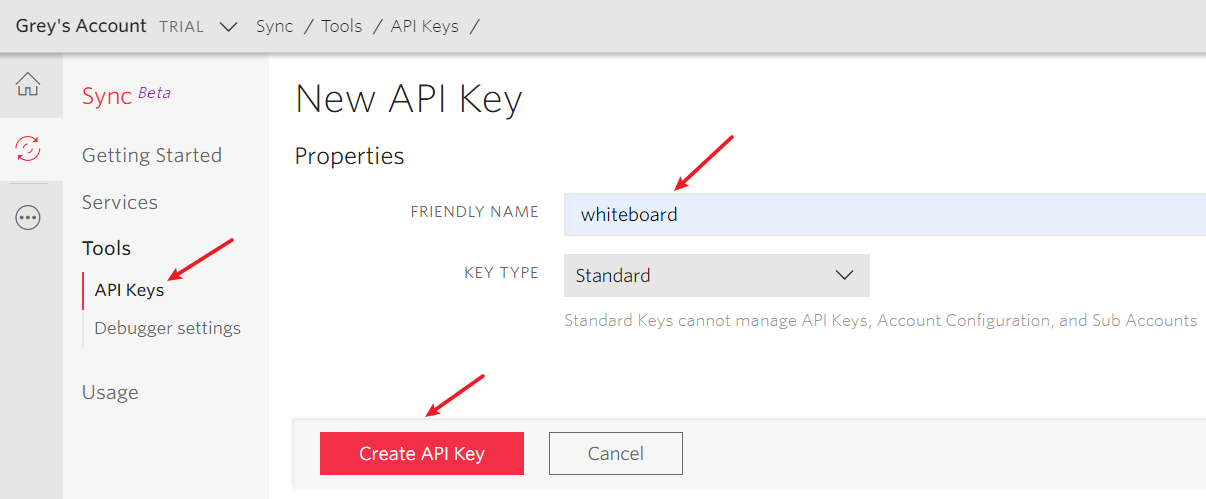
Then click on the “Tools” menu to access the “API Keys” page. Click the red "+" button to create a new API key for this project. Give it a friendly name (I used "whiteboard"):
After clicking the "Create API Key", you will see the API Key ("SID" field) and the API Secret ("SECRET" field):
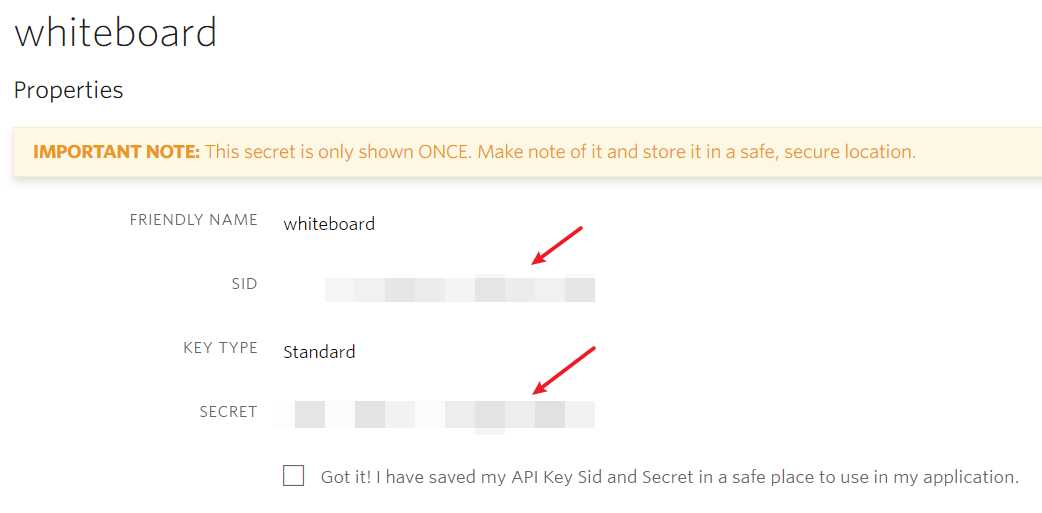
Copy and paste these values to the last two variables in your .env file.
Since these environment variables contain sensitive data, if you are going to use git to manage your project, be sure to add .env to your .gitignore to prevent it from ever being committed into your git history.
Now we are all set to start coding!
Implementing the back end
We don't need to do too much on the server side. Copy the following code in a file named app.py:
First, we import all the functions and classes we will use in our code. Then we create three objects, app is the Flask application instance, fake is the Faker instance used for generating fake usernames.
We create two view functions. The index() function is used for rendering the index page of the application, which will include the front end. The template file is named index.html, we will create it later. The second view function, generate_token() is used to generate Twilio access tokens for clients. These tokens are required by the Twilio Sync JavaScript SDK. In this function, we obtain the values that we saved in the .env file, which Flask imports into the environment. For this we use the os.getenv() function from the Python standard library:
Next, we create an access token. In addition to the credentials above, we also need to provide the user’s identity, as a string. In a real application, you would need to hook this into your authentication system, but for this tutorial, we just get a username passed in the query string as identity. If not provided, we use fake.user_name() to generate a random username:
Now we can create the token object with the AccessToken class from the Twilio package. We pass account_sid, api_key, api_secret, and the username as identity.
We then use the SyncGrant class to add access to the Sync service on the token:
In the end, we generate and return a JSON response that contains identity and token values with flask.jsonify():
Implementing the front end
Now it's time to build the frontend. In the Flask application, HTML templates should be placed in a templates folder, and static files such as CSS and JavaScript files should be in a static folder. In the project directory, we create the templates and static directories:
Basic page structure
Inside the templates folder, create an index.html file. You will also need to create a style.css and main.js file inside the static folder, we will use them later.
The index.html file contains the main page of the application. Here are the contents of this page:
In the <body> element, we include some external JavaScript libraries that we will use:
The page also loads two files that will be in the static folder of our application. For these we will get the actual URL through the url_for() function from Flask:
Implementing the whiteboard with HTML canvas and JavaScript
We need to create a <canvas> element that will become our actual whiteboard on the HTML page. Add it above the <script> tags as shown below:
Use the following CSS to make the whiteboard fill the whole window. Write these styles in a file named style.css in the static directory:
Finally, add the JavaScript potion of the project in main.js, also in the static directory:
The drawLine function draws a straight line on the whiteboard. The function accepts the coordinates of the start point (x0, y0) and end point (x1, y1) and the color to use when drawing. The Canvas API is used to do the drawing.
The onMouseDown, onMouseUp, and onMouseMove functions will be triggered when the user clicks the mouse down, releases the mouse click, and moves the mouse pointer respectively. The drawing variable indicates if the user is drawing at any given time. This variable is set to true when the user clicks the mouse down, and back to false when the mouse button is released.
The onMouseDown function captures the x and y coordinates of the mouse and saves them to current.x and current.y. The onMouseMove and onMouseUp functions call drawLine to draw a line from the current.x, current.y location saved earlier to the new location of the mouse pointer, and then set the current position to current to prepare to draw the next segment when the mouse moves again.
The three mouse handler functions need to be bound to related canvas events:
Finally, we also need to add a onResize function to adjust the canvas size to fill the window when the window size is changed:
Let's test the whiteboard application up to this point. Make sure all the files in the project are in their correct locations. Here is the project structure:
Run your application with the following command from your terminal:
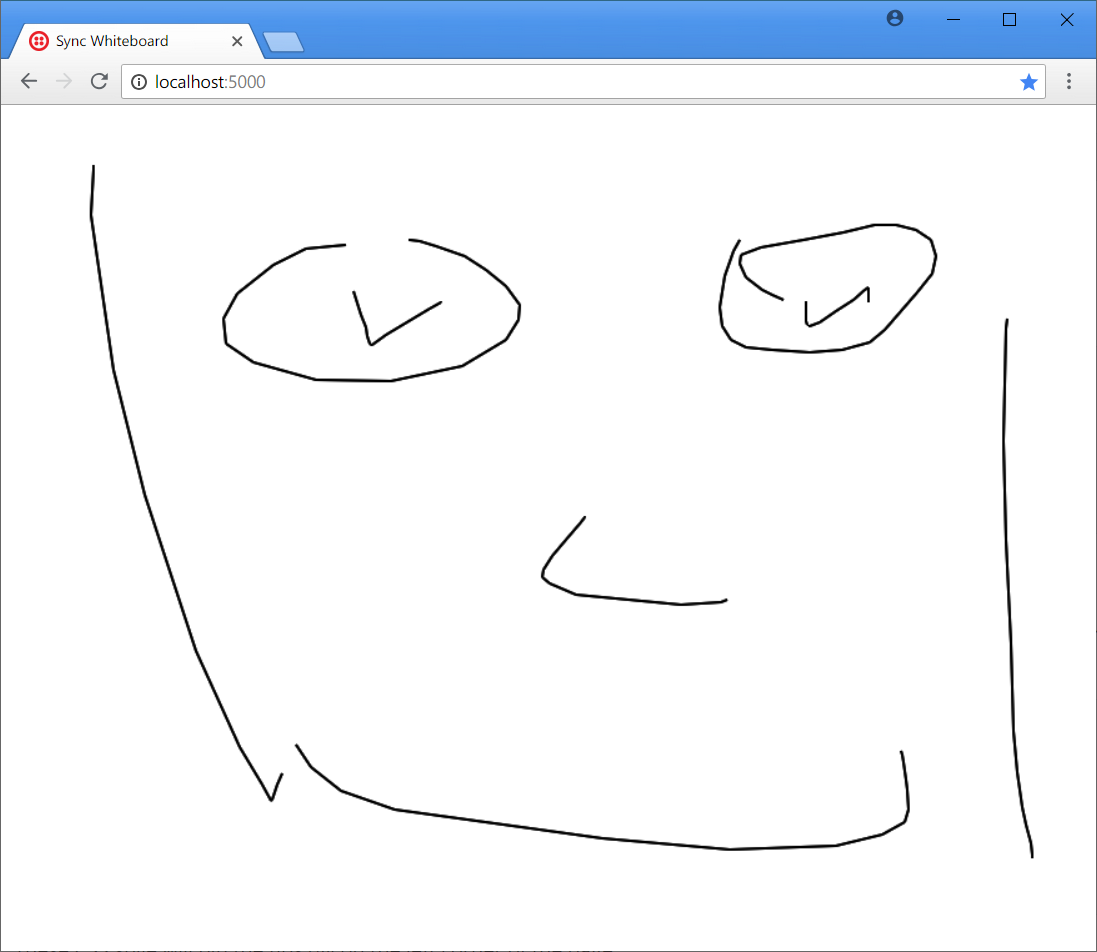
With the Flask application running, navigate to http://localhost:5000 on your web browser and draw anything you want on the white page!
Using the Sync JavaScript SDK to sync the drawing data
The whiteboard works perfectly as a local application. Now we are going to use Twilio Sync to have multiple instances of the whiteboard sharing and collaborating on a common drawing.
As a first step we are going to display some messages on the HTML page to show user the Twilio Sync connection status. Add the following HTML inside the <body> tag and above the <canvas> element, as shown below:
Also add the following CSS style to the style.css file, to pin the tips div to the left corner of the page:
Now we need to create a Sync client, and authenticate it with an access token returned by our Flask server's /token route. This new code needs to be inserted with care. Add the two new variable declarations near the top of the file, with all the other variables, and then add the $.getJSON() call at the bottom after the onResize() call.
When the Sync connection state changes, it will trigger a connectionStateChanged event. At that time we update the message displayed in the tips div to inform the user when the Twilio Sync service is ready.
The Twilio Sync Service provides four different object primitives to store data: Documents, Lists, Maps, and Message Streams. In all cases, when a client updates the data, all other clients are notified and receive the changes.
Since our whiteboard needs to emit the data at a high rate and low latency to a group of clients, the most appropriate primitive to use is Message Streams. In the code snippet below, we create a stream object with syncClient.stream('drawingData') (passing a unique name as argument) and then initialize the syncStream variable with it:
Next, in the drawLine function, we pass the syncStream as an optional argument, and when present we use it to publish a data message with the coordinates of the line to other clients with syncStream.publishMessage(). Then we pass the syncStream argument every time we draw a line in the onMouseUp() and onMouseMove() event handlers.
An interesting problem with synchronizing multiple whiteboards is that the window sizes can be different. To be able to render the drawings on all clients regardless of their window size, the message that is pushed to the Twilio Sync service includes normalized coordinates that go from 0 to 1 in both directions.
Now we are sending the drawing data to the Twilio Sync server. The second part is to update the drawing data when Twilio Sync sends a notification that another client pushed an update. When the data on the Sync service is updated, it will trigger a messagePublished event, and at that point we will call a syncDrawingData function to update the whiteboard:
To make sure that the change made by syncDrawingData does not send another push to the Twilio Sync server, we are not passing the syncStream argument when we call the drawLine function. If syncStream is not set, the function will just return without publishing the data to the Twilio Sync server.
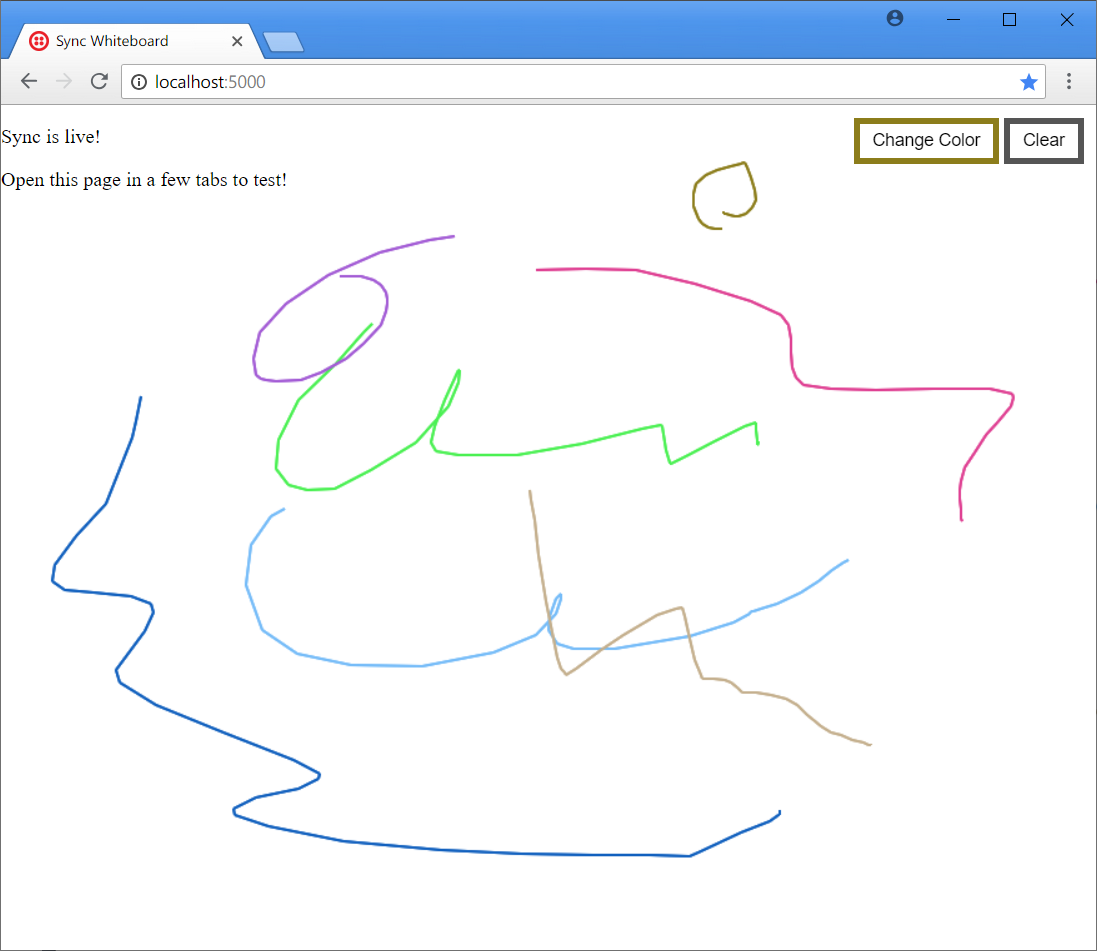
OK, now let's test the sync whiteboard! Make sure your Flask application is running, and then refresh the page on your browser using Ctrl-F5 or Cmd-Shift-R to force the static files to bypass the cache. Then open the page on a second browser tab. After Sync service is loaded, try to draw on one of the windows and you will find the other syncs the drawing in real-time:

Dealing with rate limits
When you draw on the whiteboard, the data sent to the Twilio Sync server in the drawLine function will look like this:
To prevent sending too many requests to Twilio when moving the mouse and reaching the rate limits of the service, we can limit the number of events per second by applying a throttle function on the onMouseMove event listener:
More fun: change colors and clear drawing
Let's add two new fun features for this whiteboard: changing drawing colors and clearing the drawing. Firstly, we need to add two buttons in index.html. Add them above the <canvas> element:
Then apply a CSS style in the style.css file to put these buttons in the right top corner of the window:
Finally, create two JavaScript functions to make the buttons work:
When the "Change Color" button is clicked, the changeColor function will generate a random color value and set it to current.color, then set the color as the border color of the button. When the "Clear" button is clicked, it will clear the whiteboard.
Now clear your browser's cache to ensure it downloads the updated HTML, JavaScript and CSS files, and then you can test these two new buttons:
Adding mobile touch support
For now, this whiteboard only supports web browser users on desktops and laptops, if you want to enable mobile support, you can bind the same functions we are already using to canvas touch events:
The coordinates in touch events are not given in the e.clientX and e.clientY coordinates. Instead the event includes a e.touches list, which contains one or more touch locations. To expand the application to support touch events we can replace all the e.clientX with e.clientX || e.touches[0].clientX, and all the e.clientY with e.clientY || e.touches[0].clientY. Below you can see the updated mouse event handlers with this change:
To test the whiteboard on your mobile phone, you have to make sure the phone and your computer are connected to the same network. Then restart your application with the host option set to 0.0.0.0:
Now visit your computer's IP address on your mobile phone and touch the screen to draw:
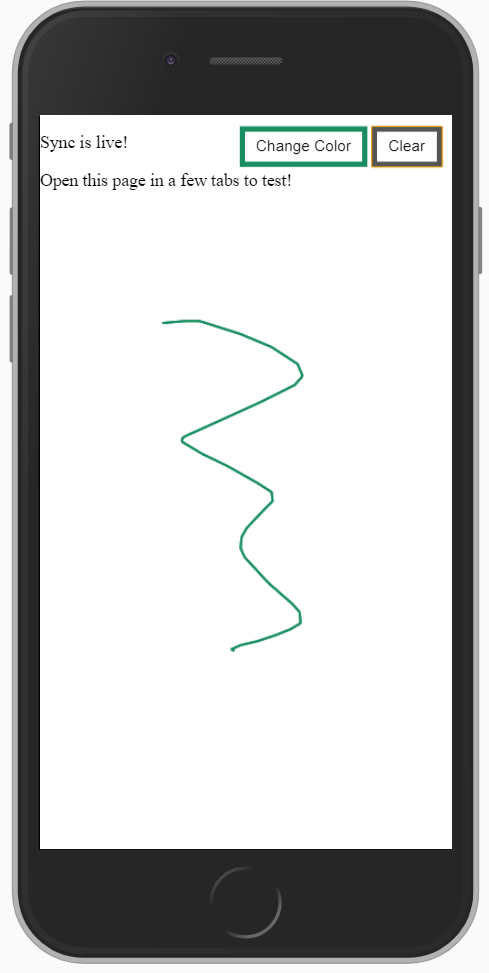
Note that if the phone is unable to connect you may have a firewall in the computer running the Flask application that blocks incoming connections. In that case you may want to disable the firewall for a short period of time to test the application, but remember to turn it back on when you are done.
Conclusion
In this tutorial, we have built a collaborative whiteboard with Twilio Sync, if you want to learn more about Twilio Sync, just read the Twilio Sync docs and the Twilio Sync JavaScript SDK docs. If you want to share this whiteboard with your friends, you can use Ngrok to temporarily expose your application on the Internet.
The complete source code of this whiteboard application can be found on GitHub. Feel free to fork it and add more useful features. Have fun!
Grey Li is a freelance Python web developer and technical writer. He is also a maintainer of the Flask web application framework. You can learn more about him at his website, GitHub, and Twitter.

Related Resources
Twilio Docs
From APIs to SDKs to sample apps
API reference documentation, SDKs, helper libraries, quickstarts, and tutorials for your language and platform.
Resource Center
The latest ebooks, industry reports, and webinars
Learn from customer engagement experts to improve your own communication.
Ahoy
Twilio's developer community hub
Best practices, code samples, and inspiration to build communications and digital engagement experiences.