Constraint Animations on iOS Apps using XCode and Swift
Time to read: 10 minutes
April 26, 2018
Written by

You have likely seen a bunch of animations if you own an Apple device, from third-party apps or Apple’s stock apps. Maybe you thought to yourself, “I wish I knew how to do that. That’s really cool but it looks so complicated!”
Well if that describes you, follow along with me through this tutorial to discover that creating animations in iOS is not as hard as you imagined.
Tools You’ll Need
To follow along with this tutorial, assuming you are an iOS developer looking to explore the world of animations, you will need:
- A Mac running the latest point release of OS X Sierra or later.
- Xcode 8 or later.
- Basic knowledge of the Swift 4 language and Auto Layout.
If you don’t have any of these things, you can go ahead and get them. I’ll wait…
Getting Started
You’re back? Good. Now that you have all the required tools, we can take the first steps on our grand adventure. I have prepared a small dummy project to demonstrate the basics of constraint animations just for you. You can download it here or check out the repo on GitHub.
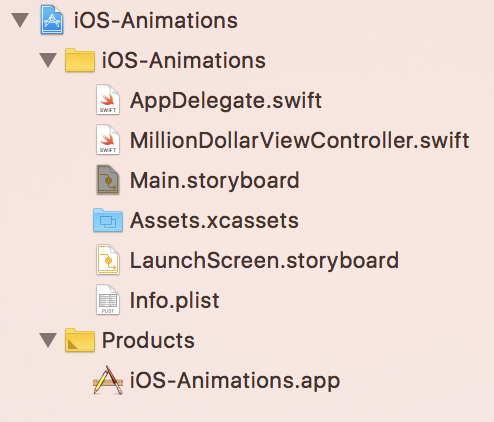
Go ahead and open the project file. You’ll find a file structure that looks like this:
Open Main.storyboard and you will see the MillionDollarViewController embedded in a navigation controller all set up for you.
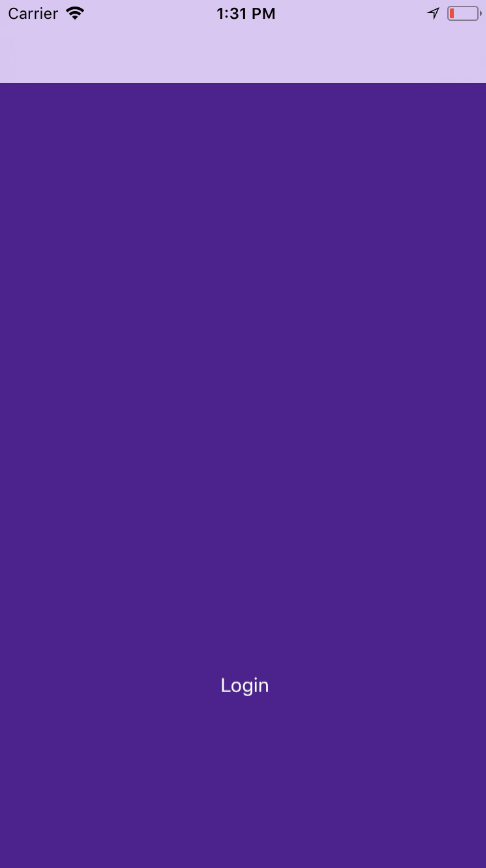
Build and run the project on the simulator, and you’ll see a static scene that looks like this:
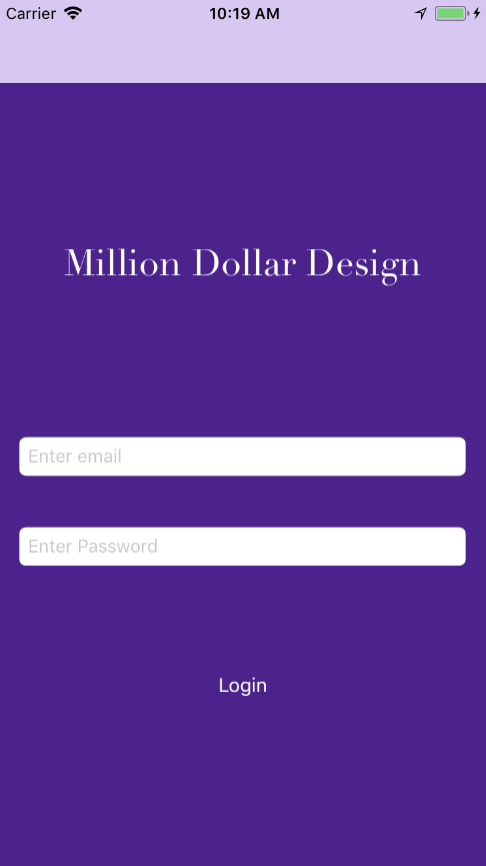
The scene has the Million Dollar Design label, the email and password text fields, and the login button which does nothing.
The scene is connected to its custom class, MillionDollarViewController.swift. All these views are already connected to the file for you.
Working with Constraints
Since we are going to be animating view constraints, we should at the very least know what a constraint is. You can look at a constraint as a rule that Auto Layout follows to determine the position or size of a view in its container.
Constraints have two animatable properties: the constant and the multiplier.
One thing you should have in mind when animating is that an animation is like a journey: you have to provide a starting point and an ending point over a period of time.
OK, enough niceties. Let’s jump right in and start animating.
For our first project, let’s say you would like to make your views slide in from the left side of the screen when the app starts. Here’s how you would go about it…
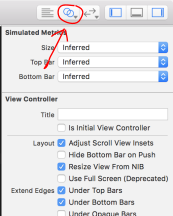
First you would have to add outlets for the constraints you want to animate. So open Main.storyboard, select the Million Dollar View Controller, and click on the Assistant Editor in the top right section of Xcode (the one that looks like two overlapping circles).
Click on the Million Dollar label and find the constraint that centers it horizontally. If you’re not sure which one it is, it’s the long one that goes straight down the middle of the scene. If you click on it, it will be highlighted in the Document Outline on the left side. From there you can either Option drag or right click drag to the the swift file just under the connection for the passwordTextField. It will look like this:
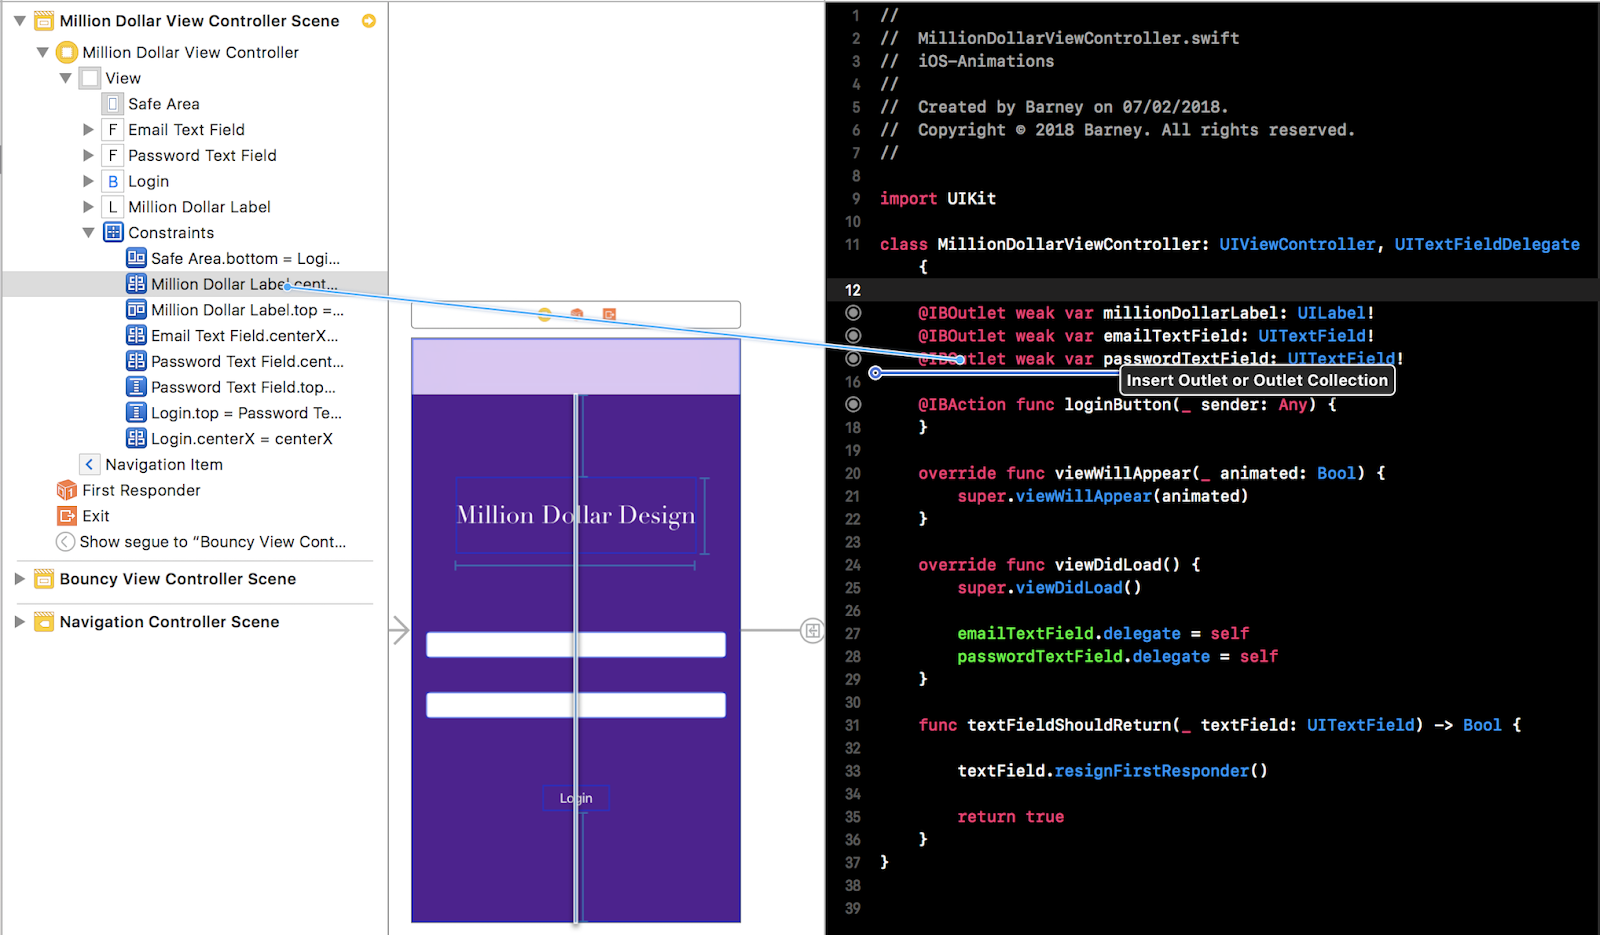
Give it a name in the pop-up that shows up. Make sure it’s an outlet and is of type NSLayoutConstraint and then hit connect.
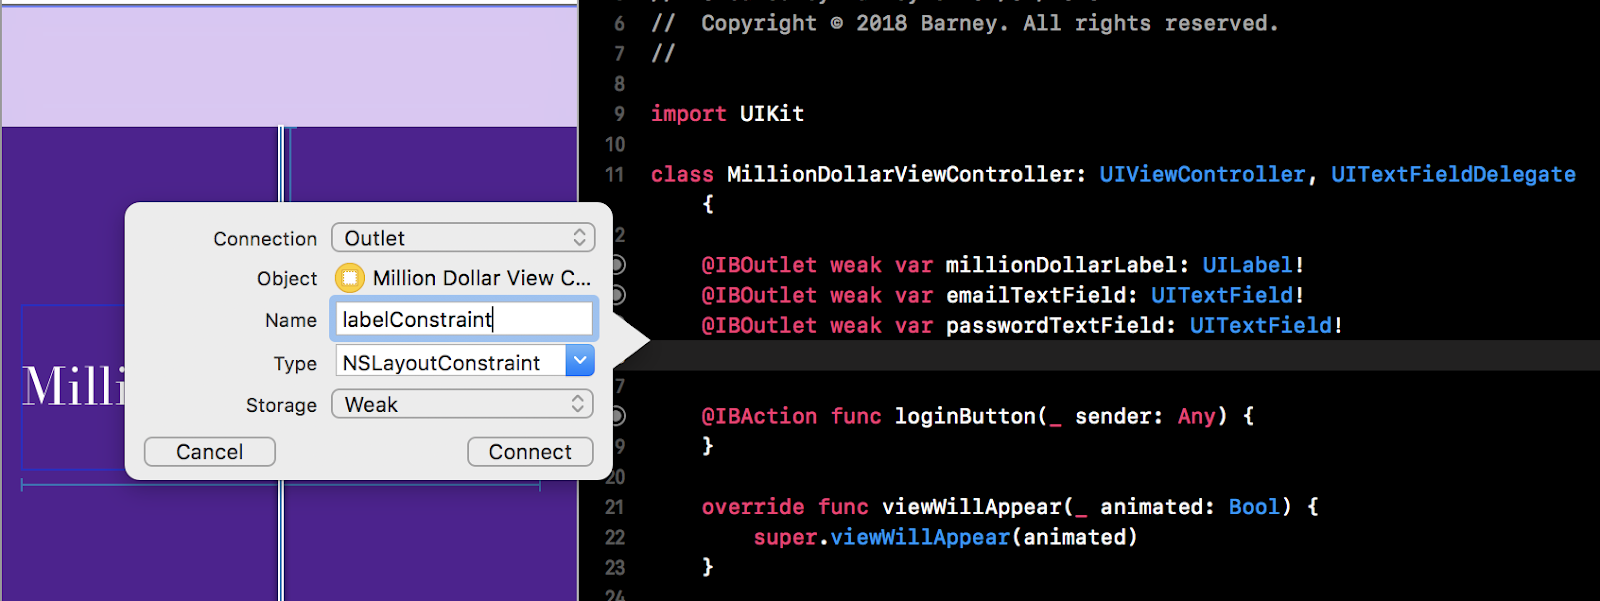
Do the same for the email and password text fields.
Once you’re done, it’s time to give the views a starting point in a position that is off-screen.
Open MillionDollarViewController.swift and add an implementation of viewWillAppear(animated:). Add the following code just above the viewDidLoad() method:
In your implementation of viewWillAppear(animated:), after the call to the super, add the following code:
Build and run the project. It should look something like this:
You’re doing well so far. Now let’s get into the actual animating.
The best place for our views to slide into the screen would be in a viewDidAppear(animated:) method. So add an implementation for that like this:
The UIView Animation API
After the call to super, if you type UIView.animate and call the UIView’s class method, animate, the Xcode autocomplete will offer you a few options:

- The first provides an animation implementation with a duration and an animations closure.
- The second adds a completion closure to the first one in case you need to do something after the animation completes.
- The third offers the additional option of a delay and animation options. This is the one we are going to use. Go ahead and select it. (Don’t worry too much about the other two options which handle keyframes and spring. We’ll cover them later.)
Fill in the parameters with 1.0 second duration. We don’t need a delay, so give that a 0.0. Leave the options parameter as an empty set for now and in the animations closure, reverse the constraints’ constants to reposition the views back to their original positions. We don’t need the completion closure, so initialize it as nil.
It should look like this:
Build and run your project to see your first animation.
Did nothing happen? Were there absolutely no animations? Constraints are handled by their overlord, called Auto Layout, and it determines where everything will be set up when the view loads.
How do you force views to update on demand? Well, you have to ask for your views to be laid out by calling a UIKit method called layoutIfNeeded().
When you’re animating constraints, the thing you want to animate is the layout. So if you call layoutIfNeeded() inside the animations closure, it will animate any layout changes.
layoutIfNeeded() will update every center and bound for every view in the layout.
Now, as the last line in the animations closure, call self.view.layoutIfNeeded().
Your viewDidAppear(animated:) method should look like this:
Build and run once more and marvel in the beauty of your animation.

Easy, right? Now let’s dive a little deeper into what we have just done.
You may have noticed the animation you just created feels a little bit off. It moves at a constant speed and comes to a sudden stop. But that’s not how things work in the real world.
To make it more natural, we should make sure it slowly decelerates before coming to a stop.
To do that, we have to mess around with the options parameter.
If you type ‘.’ in our empty set, it will give you a couple of options from the UIViewAnimationOptions enumeration.
The most basic ones are:
- .curveEaseIn – The animation begins slowly and speeds up as it progresses.
- .curveEaseOut – The animation begins quickly and slows down as it completes.
- .curveEaseInOut – The animation begins slowly and accelerates in its mid-phase and slows down as it completes (a combination of the two above).
- .autoReverse – The animation runs backwards and forwards indefinitely (this has to be paired with the
.repeatoption).
The .curveEaseOut option is the one we need because our animation begins outside the screen and we don’t see the start. Go ahead and add it to the options set like this:
Note: If you’re adding just a single option, you don’t necessarily need to add it inside a set; you can go ahead and add it by itself. However, if you want to add a couple of options, they have to be inside a set, separated by commas. I prefer having the set either way.
I encourage you to play around with the options and see what happens with each.
Build and run your project and see if you notice the difference.
It’s a lot smoother, right?
You may now be thinking how much cooler it would be for the view to slide in independently, with one slightly behind the other. That’s where the delay parameter steps in.
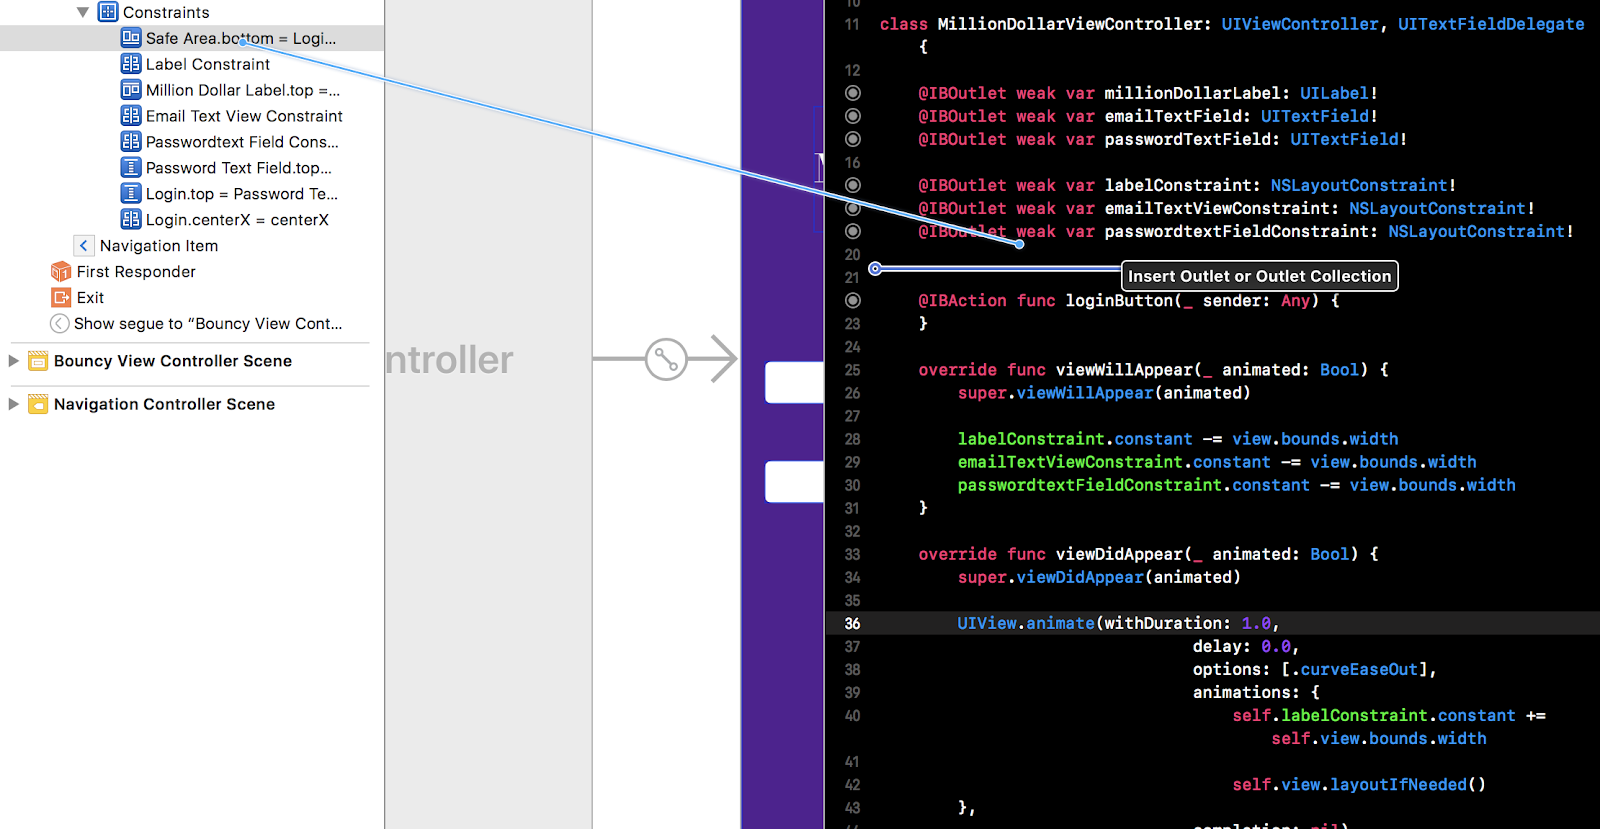
Copy the whole UIView.animate method and paste it twice just below the first one.
The first call to UIView.animate should animate the labelConstraint with no delay and call layoutIfNeeded(). The second call to UIView.animate should animate the emailTextViewConstraint with a delay of 0.3 seconds and call layoutIfNeeded(). The third call to UIView.animate should animate the passwordConstraint with a delay of 0.6 seconds and call layoutIfNeeded().
Your viewDidAppear(animated:) should look like this:
Build and run to see how much cooler your animation is.
Sure, delay can cause some pretty amazing animations, but what if I told you that there’s even more? Yes, it can get better.
Just like we did before, we should give the button an off-screen starting position.
Grab the constraint that centres the loginButton in the view and add an outlet for it named loginButtonCentreConstraint.
Then, at the bottom of viewWillAppear(animated:), add the line that moves the button off-screen:
Now let’s add a fancy bounce animation to the loginButton. Add a fourth call to our BFF, the animations API, but this time, pick the one with usingSpringWithDamping: and initialSpringVelocity: parameters.
Give it a duration of 1.0, 0.4 damping, an initial velocity of 10, an empty set for the options parameter, and a nil for the completion.
For the animations closure, animate the loginButton back to the centre. Don’t forget to call layoutIfNeeded()…
It should look like this:
Build and run and watch the awesomeness!
Animating with bounce is one of the coolest and simplest animations to perform, but it’s important to understand what we just did, starting with the new parameters:
- usingSpringWithDamping – You can think of this parameter as the stiffness of the spring that has a value between 0 and 1. There will be more oscillations closer to 0 and more stiffness closer to 1.
- initialSpringVelocity – This is exactly what it sounds like. The velocity at which the spring will start animating at.
Note: Both of these parameters take CGFloats. So to all you curious people out there, don’t go adding Strings. The compiler will not like it very much.
Also it’s important to note that we do not add animation curves when using spring. That’s because UIKit uses a custom timing curve to match the type of spring you define and if you decide to go ahead and add the curves, they will be completely ignored.
There’s no specific values to input for the damping and spring velocity. As always, I encourage you to play around with the values and find what works for you.
Bonus: Handling the Keyboard
Bonus round! Who doesn’t love extra things?
Now, if you play around with the text fields, you’ll realize when the keyboard appears, it obscures the password text field and you can’t really tell what you’re typing. That can get super annoying.
If you’ve done this kind of thing before, you know there’s a couple of ways to fix this. One popular way is to put everything in a scroll view and just have the obscured view scroll up the keyboard’s height. But that’s not what we’re doing today.
If you’re thinking there’s a way to fix it with constraint animations, you’re absolutely correct!
Let’s jump right into it before our users get annoyed and start burning things.
Just like before, get the loginButton’s bottom constraint and the millionDollarDesignLabel’s top constraint to the safe area and connect them to MillionDollarViewController.swift.
Make sure the connection is an outlet and is of type NSLayoutConstraint. Give them the names loginButtonBottomConstraint and labelTopConstraint, then click ‘Connect’.
When the keyboard is shown or hidden, iOS sends out the following notifications to any registered observers:
- UIKeyboardWillShowNotification
- UIKeyboardDidShowNotification
- UIKeyboardWillHideNotification
- UIKeyboardDidHideNotification
Each keyboard notification includes information about the size and position of the keyboard on the screen. You can access this information from the userInfo dictionary of each notification using the UIKeyboardFrameBeginUserInfoKey and UIKeyboardFrameEndUserInfoKey keys.
You should always use the information in these notifications as opposed to assuming the keyboard is a particular size or in a particular location. The size of the keyboard is not guaranteed to be the same from one input method to another and may also change between different releases of iOS. In addition, even for a single language and system release, the keyboard dimensions can vary depending on the orientation of your app.
Note: The rectangle contained in the UIKeyboardFrameBeginUserInfoKey and UIKeyboardFrameEndUserInfoKey properties of the userInfo dictionary should be used only for the size information it contains. Do not use the origin of the rectangle (which is always {0.0, 0.0}) in rectangle-intersection operations. Because the keyboard is animated into position, the actual bounding rectangle of the keyboard changes over time.
The first thing we’ll do is to register to receive keyboard notifications, so go ahead and add the following code right after the textFieldShouldReturn(_ textField:) implementation:
The compiler will throw errors if the methods in the selector are not exposed to Objective-C, so add an @objc selector before thefunc keyword in the keyboardWillShow(notification:) and keyboardWillHide(notification:). They should now look like this:
We could add the implementation for acquiring the keyboard dimensions in each of the methods, but since they are similar, it would make more sense to have the implementation in one method and call it from our methods with a slight difference.
Add the following method under these two methods ☝:
Our new method takes a showing boolean parameter that will be true if the keyboard is showing and false if not, and a notification parameter that will be passed from the keyboardWillShow(notification:) and keyboardWillHide(notification:) methods.
We then grab the keyboard size, the keyboard animation duration, and the keyboard animation curve.
Note: Because the height of the keyboard can change during its transition onto the screen, you should always use UIKeyboardFrameEndUserInfoKey to help you avoid having your content get obscured by the keyboard. It’s important to note that we grab the UIKeyboardFrameEndUserInfoKey and not the UIKeyboardFrameBeginUserInfoKey because the keyboard is animated into position over time and we should only get the keyboard frame height after the animation is done.
Now that we have the tools we need, add a call to the animations API we’re already familiar with right after the changeInHeight definition:
Back in our keyboardWillShow(notification:) and keyboardWillHide(notification:) methods, call adjustingHeight(showing: notification:) with a true showing parameter for keyboardWillShow(notification:) and a false showing parameter for keyboardWillHide(notification:).
They should now look like this:
The last thing we have to do is add a call to registerForKeyboardNotifications()
at the end of our viewDidLoad() implementation.
Build and run the project once more and notice how the views animate upwards in perfect sync with the keyboard.
If you’re like me, you may be feeling like the the space between the keyboard and the login button is too large. So, in the animations closure, divide the change in height by 1.5 for the loginButtonBottomConstraint and then build and run for the final time.

Nice work
Congratulations! You now have the skills and power to go out into the world and animate all the constraints you can find!


Related Resources
Twilio Docs
From APIs to SDKs to sample apps
API reference documentation, SDKs, helper libraries, quickstarts, and tutorials for your language and platform.
Resource Center
The latest ebooks, industry reports, and webinars
Learn from customer engagement experts to improve your own communication.
Ahoy
Twilio's developer community hub
Best practices, code samples, and inspiration to build communications and digital engagement experiences.