Dockerize your SQL Server and use it in ASP.NET Core with Entity Framework Core
Time to read:
September 20, 2022
Written by
Reviewed by
I love learning and writing blogs about .NET and related technologies. One of my favorites over the past 10 years or so has been Entity Framework (EF) and Entity Framework Core (EF Core). I have used it professionally with MS SQL Server, Postgres, and MySQL. But the thing I don’t like is installing these databases on my computer, they are large, they add services that run on startup, and consume lots of resources.
Instead, when I want to write an application using EF and one of those databases, I download a docker image for the database, start up the container, and connect to that instance from my .NET application. When I’m done for the day, I shut down the container, and when I’m done with the application, I delete the container, and image, and my system is clean of the database.
The other great thing about using a database in Docker, is that it works on any operating system! I can start my work on Windows, then switch to Linux and change nothing about how I work or write my code.
This workflow greatly improves the productivity of developers and teams, so let's learn how to achieve this.
Prerequisites
You will need the following things in this tutorial:
- A Windows, Linux, or Mac machine
- .NET 6 SDK (or newer)
- A .NET code editor or IDE (e.g. VS Code with the C# plugin, Visual Studio, or JetBrains Rider)
- Docker Engine. You can install the engine using Docker Desktop (Windows, macOS, and Linux), Colima (macOS and Linux), or manually on any OS.
- Some experience with ASP.NET Core MVC or Web API and EF is recommended, but not required.
Though this tutorial uses .NET 6, you can adapt it to work with newer and older versions of .NET.
Run SQL Server in a Docker Container
You'll be using Docker to quickly spin up and teardown SQL Server containers, but first, verify that Docker is running. Open a terminal and run:
If it is not running, you will get an error that looks like this:
Note the message “This error may indicate that the docker daemon is not running”. Follow the instructions for starting Docker on your operating system.
Download and Run the SQL Server Docker Image
You can download a Docker image, create a container for that image, and start the container using a single command. Run this command to download the SQL Server image and run it as a container:
Here's what the arguments do:
-e "ACCEPT_EULA=Y", sets an environment variable read by SQL Server stating that you accept the end user license agreement-e "SA_PASSWORD=A&VeryComplex123Password", sets an environment variable for the system administrator password-p 1433:1433, forwards the SQL Server port from inside the container to outside the container, without this you could not access SQL Server from your host computer--name sql-server-2022, give the container instance a namemcr.microsoft.com/mssql/server:2022-latest, the image to download from Docker hub
That’s it!
You now have SQL Server running on your computer. Any application that can connect to a traditional SQL Server can connect to this one. To connect to the SQL Server, use localhost for the hostname, and SA for the username, and “A&VeryComplex123Password” for the password.
Press CTRL + C to stop the container.
You can start the container again using this command:
sql-server-2022 is the name of the previously created container.
If you want to use a different version of SQL Server, go to the Microsoft SQL Server image on Docker Hub and scroll down to see the available tags. Choose the version that suits you and replace <TAG> with your chosen tag in the below command, and replace <CONTAINER_NAME> with a name of your choice:
That’s it, you now have a fully working SQL Server up and running in a container. You can use any tool you are familiar with to connect to it, just like any SQL Server you have used in the past.
If your SQL Server container isn't running, start it now using this command:
Leave the container running and open a new terminal for the upcoming commands.
Create a Web API that consumes the SQL Server
This part will be familiar to you if you have worked with .NET, SQL Server, and EF. If you haven’t, don’t worry, I will walk you through it step by step.
You are going to create a Web API application using top level statements, but not Minimal API. Optionally, you will turn off HTTPS redirection and Swagger documentation to keep the Program.cs file smaller for this tutorial.-
Navigate to the SalesApi directory.
Add these two NuGet packages:
You'll use EF Core to manage the data in the SQL Server, and you are going to use AutoFixture to generate sample data for the database.
Optionally, you can delete the files WeatherForecast.cs and Controllers/WeatherForecastController.cs.
Create a new directory named Data, and add the following four new files to it.
Product.cs, a basic representation of a product:
ProductCategory.cs, some sample product categories:
SalesContext.cs, your EF Core database context, which will be used to add and retrieve data from the database:
Seeder.cs, this seeds the database with 100 rows of product data generated by AutoFixture:
Open the appsettings.Development.json file and add the ConnectionStrings property with the SalesDb connection string to it:
Now it is time to integrate the data code you just added. In the Program.cs file, you'll add the SalesContext to the dependency injection container, and seed the database the first time you run the application
Open the Program.cs file. At the top of the file, add two using statement:
Right below the builder.Services.AddControllers() line, add the following lines:
These lines get the connection string from configuration which includes the appsettings.json file, and adds the SalesContext to the service collection.
One more change needed in Program.cs, seed the database.
Below the line var app = builder.Build();, add the following code:
In a development environment, this code retrieves an instance of the SalesContext from the service collection, creates the database if it doesn’t exist, and seeds it if it is empty. It is also common to use EnsureDeleted before EnsureCreated to start from an empty database each time.
There, that is all the wiring up you need to do.
Create a new controller in the Controllers directory, name it ProductsController.
Replace the content of the ProductsController.cs file with the following code:
This constructor will have a SalesContext passed to it via dependency injection.
The Get method takes optional take and skip parameters, allowing you to paginate through the database table.
One last change, open the Properties/launchsettings.json file, look for the profile named SalesApi or http, and change the launchUrl to products.
That’s it. Now, start your application using your IDE or using dotnet run.
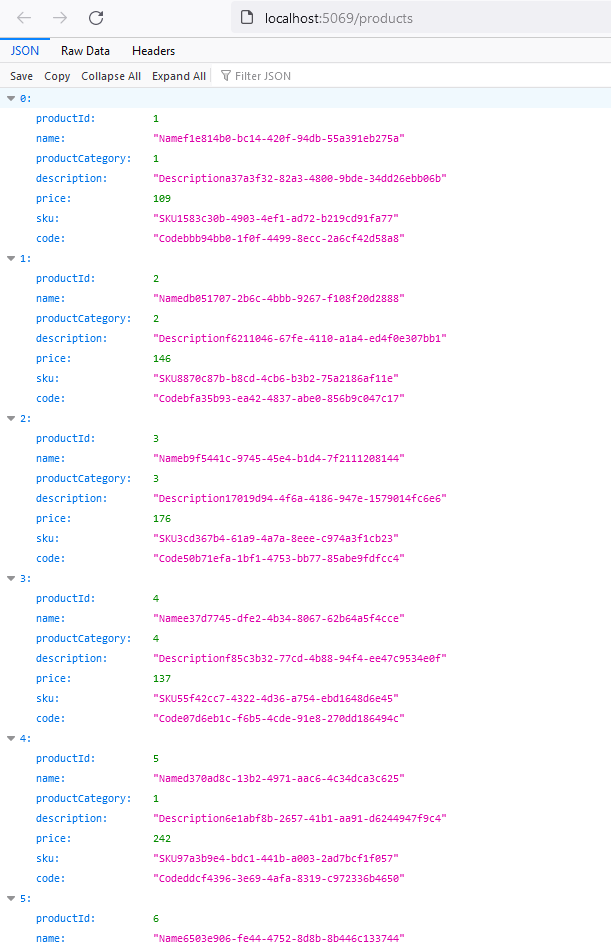
The application will start, connect to the SQL Server running in a Docker container, check if a database named “SalesDb” exists, creates and seeds the database if necessary, and then opens a page in your web browser with the first 10 entries from the Products table.
Conclusion
Traditionally, installing Microsoft SQL Server is a complicated, long task that takes a lot of disk space. But with Docker containers, you can spin up a SQL server in minutes and tear it down to reclaim disk space. In this tutorial, you learned how to run a database locally with Docker. Then, you created a .NET 6 application that uses that containerized database. The application is in no way different because of the way the database is running.
As a next step, consider running other services in Docker containers, you might want to try Redis. You could also try running your .NET application in a Docker container.
You can find the source code for this sample on GitHub.
Bryan Hogan is a blogger, podcaster, Microsoft MVP, and Pluralsight author. He has been working on .NET for almost 20 years. You can reach him on Twitter @bryanjhogan.

Related Resources
Twilio Docs
From APIs to SDKs to sample apps
API reference documentation, SDKs, helper libraries, quickstarts, and tutorials for your language and platform.
Resource Center
The latest ebooks, industry reports, and webinars
Learn from customer engagement experts to improve your own communication.
Ahoy
Twilio's developer community hub
Best practices, code samples, and inspiration to build communications and digital engagement experiences.