Create a Contact Form in PHP with Laravel and Twilio SendGrid

March 03, 2020
Written by
Ugendu Ositadinma
Contributor
Opinions expressed by Twilio contributors are their own

Create a Contact Form in PHP with Laravel and Twilio SendGrid.png

Rolling out your own email solution from scratch can prove to be challenging due to issues such as avoiding being flagged as SPAM or scaling to many users. Luckily, APIs such as Twilio SendGrid exist to fix deliverability and scale when implementing email-based solutions.

If you are interested in sending out newsletters to users, email notifications for admin related actions, or also keeping track of successful and failed email triggers keep reading. Throughout this guide, we will be focusing on dispatching emails to various end-users. To achieve this, we will be using Twilio SendGrid and Laravel to dispatch emails to various recipients. Once completed, you will have built an email form that can be incorporated into your Laravel application.

Screen Shot 2020-03-03 at 11.36.49 AM.png


Installing dependencies and requirements

To complete this tutorial, we need to install all of the dependencies required to send emails using SendGrid and Laravel.

You should have the following modules/packages installed:

Once you have Laravel installed on your machine, you can proceed to create a new project using the Laravel CLI:

$ laravel new project_name

Or using the Composer create-project command:

$ composer create-project --prefer-dist laravel/laravel project_name

Next, we will need to install the SendGrid package to be able to send and manage emails. To achieve that, we will need to use Composer to install the dependency with the command below:

$ composer require sendgrid/sendgrid

Once installed, make sure to set your SendGrid API credentials in your .env file as that will be used for authenticating the email requests:

SENDGRID_API_KEY=XXXXXXXXXXXXXXXXXXXXXXXXX

NOTE: Your SendGrid API Key can be found here. 

After all of these configurations have been set up, we need to create a controller called EmailController to house the code for the email functionality. e can achieve that using this command:

$ php artisan make:controller EmailController

In case you’re not familiar with Laravel, all controllers are found in the app/Http/Controllers directory.

Now let's make our controller aware of the SendGrid email module by requiring it in the class:

<?php
namespace App\Http\Controllers;

use Illuminate\Http\Request;
use SendGrid;

class EmailController extends Controller
{
    //
}

Creating the view

We need to create a view where we can test this code to make sure it works as expected and returns the expected results. We will create a view in our resources/views/ directory called send-email.blade.php. Add following code:

<!doctype html>
<html lang="{{ str_replace('_', '-', app()->getLocale()) }}">
  <head>
    <!-- Required meta tags -->
    <meta charset="utf-8">
    <meta name="viewport" content="width=device-width, initial-scale=1, shrink-to-fit=no">

    <!-- Bootstrap CSS -->
    <link rel="stylesheet" href="https://stackpath.bootstrapcdn.com/bootstrap/4.3.1/css/bootstrap.min.css" integrity="sha384-ggOyR0iXCbMQv3Xipma34MD+dH/1fQ784/j6cY/iJTQUOhcWr7x9JvoRxT2MZw1T" crossorigin="anonymous">

    <title>Laravel + SendGrid</title>
    <style>
        form {
            background-color: #fff;
            width: 1000px;
            float: center;
            margin: auto;
            margin-top: 100px;
        }
    </style>
  </head>
  <body>
    <form method="post" action="{{ route('send-email') }}">
        @csrf
        @if ($errors->any())
            <div class="alert alert-danger">
                <ul>
                    @foreach ($errors->all() as $error)
                    <li>{{ $error }}</li>
                    @endforeach
                </ul>
            </div>
        @endif
        <div class="form-group row col-8">
            <div class="form-group col-12">
                <label for="email">Email Address(es)</label>
                <input type="text" class="form-control" name="email" id="email" placeholder="Example: johndoe@email.com,JohnDoe@email.com, " required>
                <small id="email" class="form-text text-muted">Enter the comma separated email addresses</small>
            </div>
            <div class="form-group col-12">
                <label for="subject">Subject</label>
                <input type="text" class="form-control" name="subject" id="subject" placeholder="Email Subject" required>
            </div>
            <div class="form-group col-12">
                <div class="form-group">
                    <label for="emailBody">Email Body</label>
                    <textarea class="form-control" id="emailBody" name="body" rows="3"></textarea>
                </div>
            </div>
            <button type="submit" class="btn btn-primary">Submit</button>
        </div>
    </form>

    <!-- Optional JavaScript -->
    <!-- jQuery first, then Popper.js, then Bootstrap JS -->
    <script src="https://code.jquery.com/jquery-3.3.1.slim.min.js" integrity="sha384-q8i/X+965DzO0rT7abK41JStQIAqVgRVzpbzo5smXKp4YfRvH+8abtTE1Pi6jizo" crossorigin="anonymous"></script>
    <script src="https://cdnjs.cloudflare.com/ajax/libs/popper.js/1.14.7/umd/popper.min.js" integrity="sha384-UO2eT0CpHqdSJQ6hJty5KVphtPhzWj9WO1clHTMGa3JDZwrnQq4sF86dIHNDz0W1" crossorigin="anonymous"></script>
    <script src="https://stackpath.bootstrapcdn.com/bootstrap/4.3.1/js/bootstrap.min.js" integrity="sha384-JjSmVgyd0p3pXB1rRibZUAYoIIy6OrQ6VrjIEaFf/nJGzIxFDsf4x0xIM+B07jRM" crossorigin="anonymous"></script>
  </body>
</html>

Trigger the mail function

Now that we have created the views, we need to write the function responsible for triggering and dispatching the email to the various email addresses. In the EmailController.php file, add this method to enable the email dispatch. That should look like this:

<?php

public function sendEmail(Request $request) {
    $this->validate($request, [
        'email' => 'required',
        'subject' => 'required',
        'body' => 'required',
    ]);

    $emails = $request->email;
    $subject = $request->subject;
    $body = $request->body;

    $senderEmail = "SENDER_EMAIL";
    $senderName = "SENDER_NAME";

    /** An array to store the status codes for all emails to have a record of all successful emails */
    $emailReports = [];

    /** Exploding the string to get the email addresses individually */
    $addressesArray = explode(',', $emails);

    for ($i = 0; $i < count($addressesArray); $i++) {
        $email = new SendGrid\Mail\Mail();
        $email->setFrom($senderEmail, $senderName);
        $email->setSubject($subject);
        $email->addTo($addressesArray[$i]);
        $email->addContent("text/plain", $body);
        $sendgrid = new SendGrid(getenv('SENDGRID_API_KEY'));
        try {
            $response = $sendgrid->send($email);
            /** Push the email address and status code into the $emailReports array */
            array_push($emailReports, $addressesArray[$i] . " => " . $response->statusCode());
        } catch (Exception $e) {
            echo 'Caught exception: ',  $e->getMessage(), "\n";
        }
    }
    return $emailReports;
}

NOTE: Don’t forget to replace the “SENDER_EMAIL” and “SENDER_NAME” values with the correct entries.

Now we need to create the routes needed to call the controller methods for email dispatch.

Creating the routes

In the web.php file located in the routes directory, we will add the following route to return the view and hence, trigger the sendEmail() function when called.

<?php

Route::get('/', 'EmailController@emailView')->name('email-view');
Route::post('/send-email', 'EmailController@sendEmail')->name('send-email');

Here is the complete EmailController:

<?php

namespace App\Http\Controllers;

use Illuminate\Http\Request;
use SendGrid;

class EmailController extends Controller
{

    public function emailView() {
        return view('send-email');
    }

    public function sendEmail(Request $request) {
        $this->validate($request, [
            'email' => 'required',
            'subject' => 'required',
            'body' => 'required',
        ]);

        $emails = $request->email;
        $subject = $request->subject;
        $body = $request->body;

        $senderEmail = "SENDER_EMAIL";
        $senderName = "SENDER_NAME";

        /** An array to store the status codes for all emails to have a record of all successful emails */
        $emailReports = [];

        /** Exploding the string to get the email addresses individually */
        $addressesArray = explode(',', $emails);

        for ($i = 0; $i < count($addressesArray); $i++) {
            $email = new SendGrid\Mail\Mail();
            $email->setFrom($senderEmail, $senderName);
            $email->setSubject($subject);
            $email->addTo($addressesArray[$i]);
            $email->addContent("text/plain", $body);
            $sendgrid = new SendGrid(getenv('SENDGRID_API_KEY'));
            try {
                $response = $sendgrid->send($email);
                /** Push the email address and status code into the $emailReports array */
                array_push($emailReports, $addressesArray[$i] . " => " . $response->statusCode());
            } catch (Exception $e) {
                echo 'Caught exception: ',  $e->getMessage(), "\n";
            }
        }
        return $emailReports;
    }
}

Testing

To see the application in action, all you need to do is start up your development server using the command below in the terminal of your local machine.

$ php artisan serve

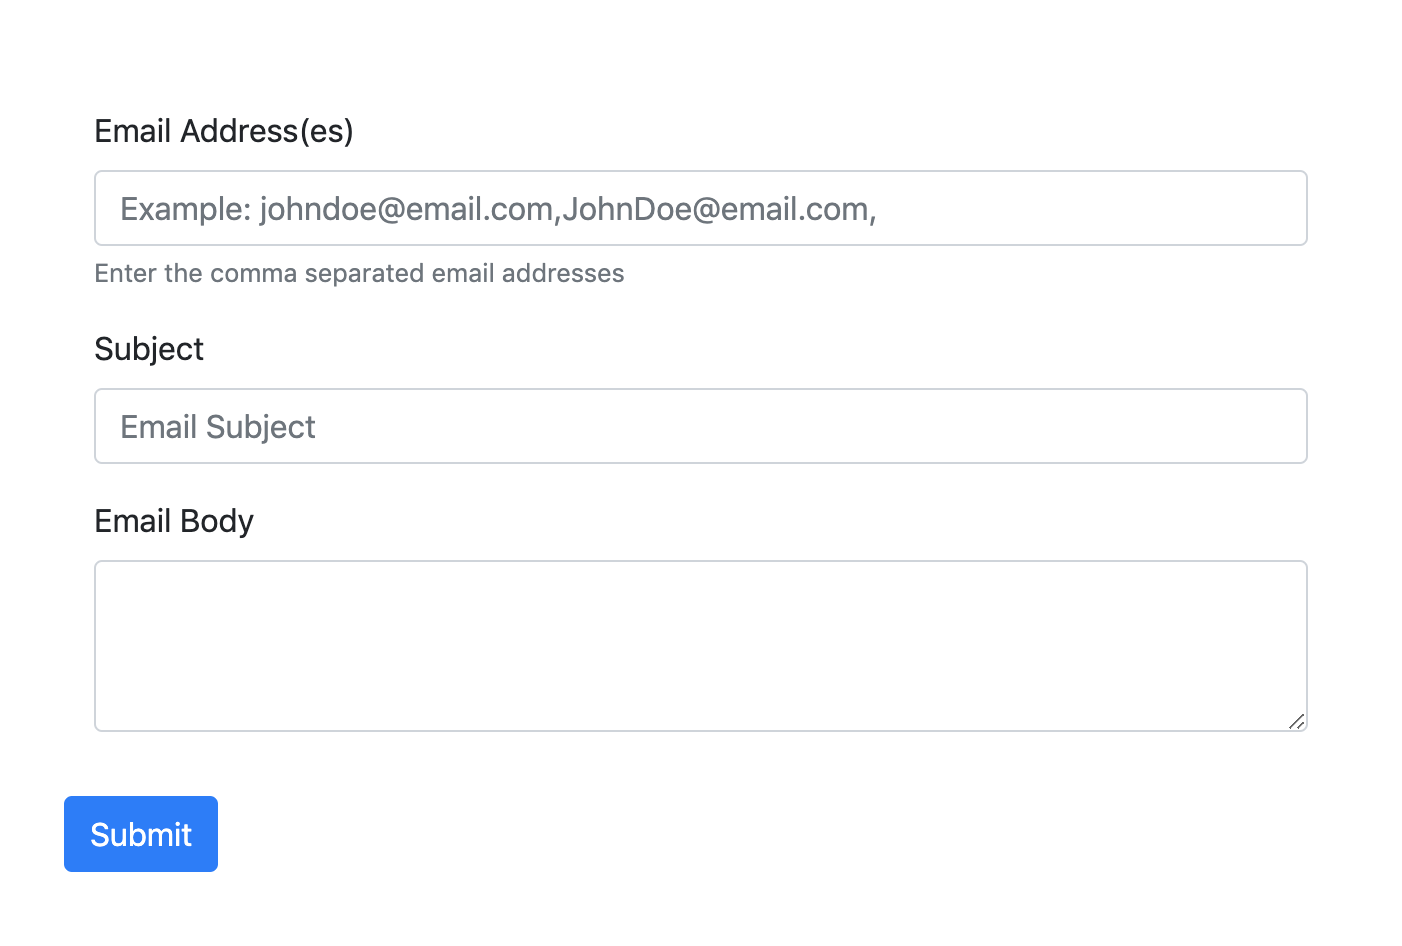
Finally, using the web browser of your choice, visit http://localhost:8000. Fill in the form and submit your message.

Conclusion

You should now be able to use SendGrid to send emails with so much ease. Now that you have finished this tutorial, you could extend the application by adding a MySQL database to store users’ information, programmatically retry failed email triggers, and also send emails to a group of end-users.

You can always reach out to me using any of the following channels if you need assistance with anything related to this topic. I would love to see what you are building.

Ugendu Martins Ositadinma