How to Create Twitter SMS Notifications Based on Tweets, Retweets, and Mentions
Time to read:
February 13, 2019
Written by
This post is part of Twilio’s archive and may contain outdated information. We’re always building something new, so be sure to check out our latest posts for the most up-to-date insights.

Twitter released it’s 2018 Q3 report in October 2018 and it was way better than financial experts had estimated. Twitter’s CEO, Jack Dorsey, in a statement following the report said:
“We’re achieving meaningful progress in our efforts to make Twitter a healthier and valuable everyday service.”
Twitter realized a 29% year-over-year increase in advertising revenue, meaning more businesses are taking to the service to market their products and services. If you have a business on Twitter, you could receive tweets frequently, some within seconds of each other. It is very important that you respond to them promptly in order to satisfy your customers. While it is great that Twitter sends out a notification whenever there’s an event on your account, it would be even better to receive a real-time SMS.
In this tutorial, we are going to learn how to send an SMS when an event occurs.

Tutorial Requirements
For this tutorial, you will need a:
- PHP development environment
- Global installation of Composer
- Global installation of ngrok
- Twilio Account
- Twitter Account
Setup Our Development Environment
Let’s start by creating our project directory. I have named mine Twitter-Twilio. We need two dependencies for this tutorial, Twilio SDK for PHP, which makes it easy to interact with the Twilio API and TwitterOauth, a PHP library for use with the Twitter OAuth API.
Within the root of your project directory, run the command:
That’s all we need to do for now. We’ll come back to this directory later.
Create a Twitter Developer Account
For our use case, we need to use Twitter’s Account Activity API. Specifically, we will use tweet_create_events for the following actions taken to or by the subscribed user:
- Retweets
- Replies
- Mentions
Before we delve into that, you need to create a Twitter Developer Account if you don’t already have one. Your account has to be approved before you can access the API, so make sure to confirm your email at the end of the application. Also, make sure to check your inbox if they request more information about your usage of the API.
Create a Twitter App
On the Apps page of your approved developer account, create an app. I have named mine Twitter-Twilio. On the Permissions tab of your app, enable read, write, and direct messages. Lastly, click on the Keys and tokens tab. You’ll find your app’s consumer key and token. Generate your app’s access token and access token secret. Take note of all the keys and tokens. We’ll use them later in our code.
Get Access to the Account Activity API
We need to get access to the Account Activity API. Navigate to the Dev Environments page, and under “Account Activity API Sandbox” click “Set up dev environment”, name the environment and select the Twitter app. I named my dev environment “development”. Take note of what you name your dev environment, we’ll use it later in our endpoint URLs.
Create an INI File
For this tutorial we are going to save sensitive credentials in an ini configuration file. In the root of our project directory, create a file called app.ini and add the following credentials:
Note: You can find your Twilio credentials from your Twilio project dashboard.
Create the Account Activity Webhook
So far we have created a Twitter app and requested access to the Account Activity API. The next step is to create a webhook that will receive Twitter events. As described in the documentation, our first step is to write code that receives a Twitter Challenge Response Check (CRC) GET request and responds with a JSON response.
In our project folder, create a file called webhook.php and add the following code:
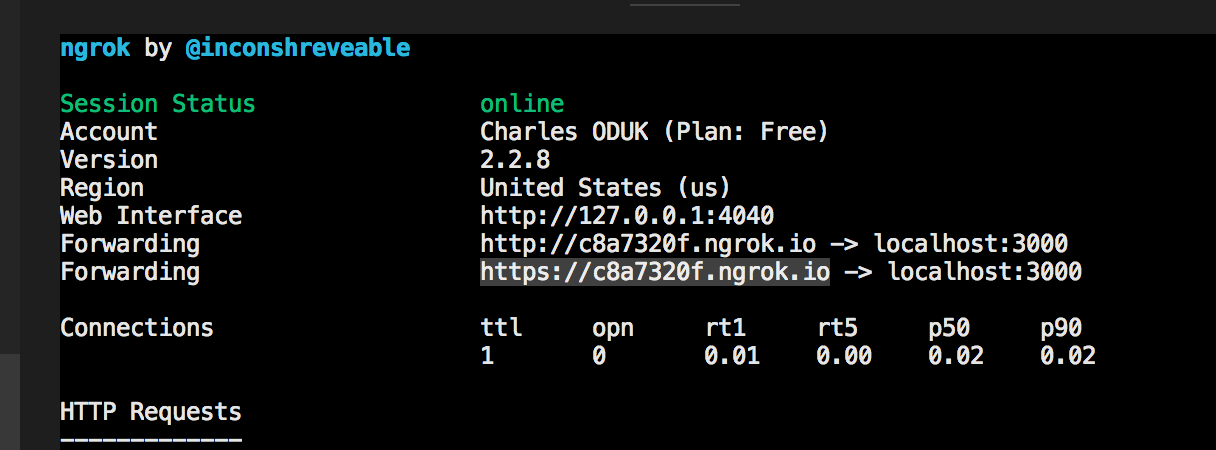
The code above listens for a GET request and is required in order to register our webhook. In order to make this webhook accessible through a public URL, we will use ngrok. From your terminal, run the command:
On a new terminal window, run the command:
You should have an output similar to this on your terminal:
Great! We have written the logic that registers our webhook and made it available through a public URL. Now we need to write the code that triggers the registration of our webhook. Let’s go ahead and create a new file called register-webhook.php and add the following code:
Note: In the URL account_activity/all/development/, “development” is the name of my dev environment. Make sure to replace it with yours if you chose a different name.
We have used TwitterOAuth to handle authentication and to make a call to the webhook registration URL. Make sure to replace the value of the $webhook_url with the https URL you got from ngrok. Upon a successful webhook registration, we will be subscribed to our Twitter app.
With ngrok and localhost servers still running in other terminal windows, open a new terminal window and run the command:
You should see this in your terminal window:

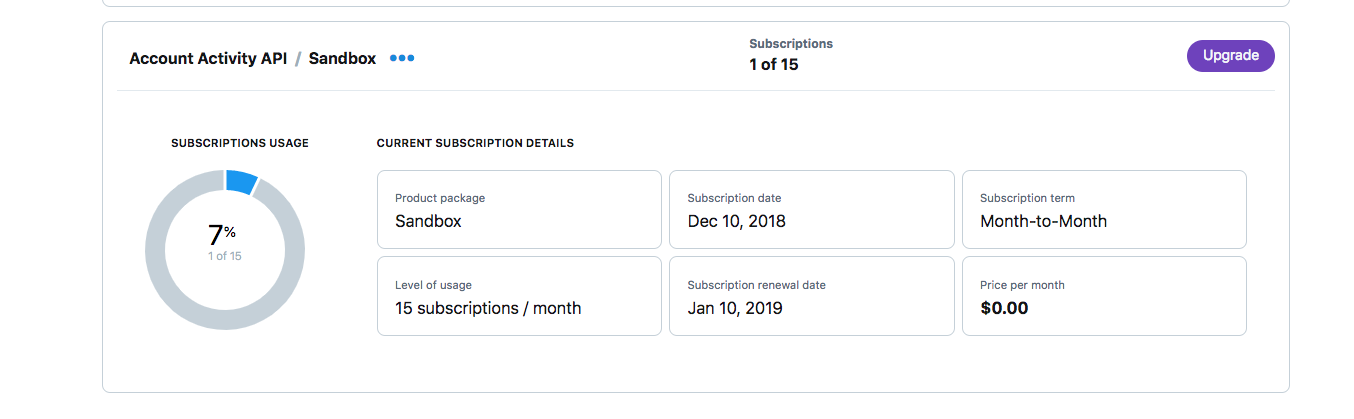
On your developer account subscriptions page, you should now see this at the bottom:
Add Event Logic to the Webhook
So far our webhook.php file only listens for a GET request. When a Twitter event is triggered, we will receive them via a POST request. Let’s add the code that listens for a POST request and handles sending messages for the different events:
Note: Remember to enter a verified phone number if you are using a trial account, otherwise enter any number you’d like to receive the notifications from.
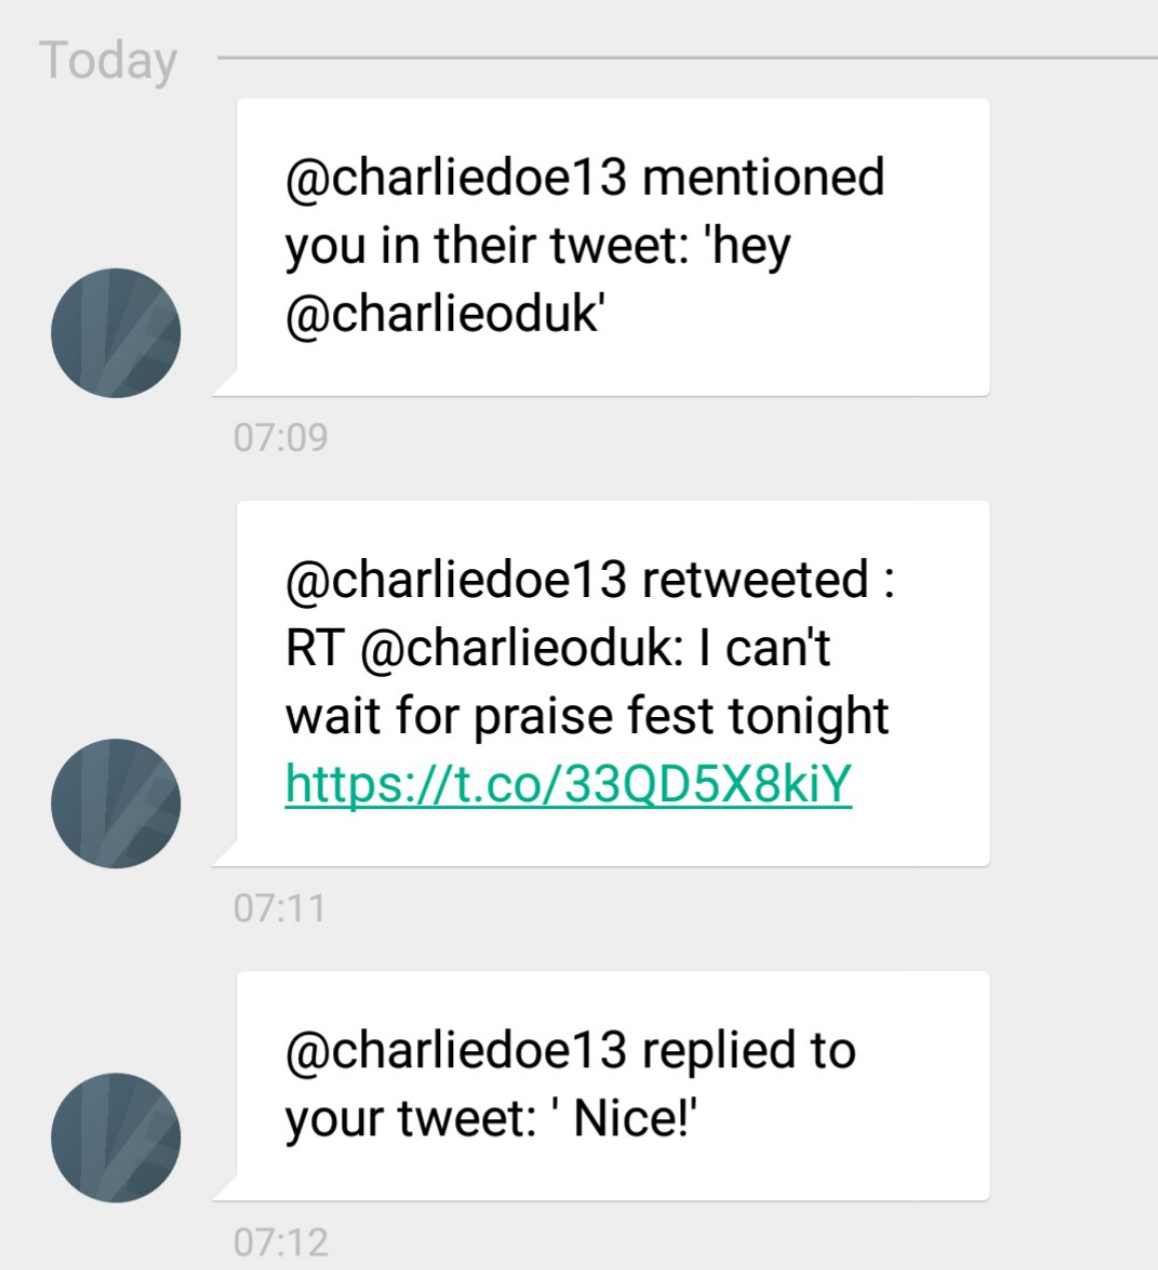
Test Our Webhook
Now that we have our webhook set up, let’s go ahead and test it. Have a friend mention you in a tweet, retweet one of your tweets and reply to your tweet. You should get messages similar to these:
Conclusion
Congratulations! You have just set up a webhook to listen to Twitter events and send corresponding SMS texts using Twilio. Twitter Account Activity API can be used for a lot more than we have just done. You could work on building a customer service chatbot that not only alerts you about your customers concerns, but also provides a timely response. I look forward to hearing about your projects.
The complete code can be found on Github. You can reach me on:
Email: odukjr@gmail.com
Twitter: @charlieoduk
Github: charlieoduk

Related Resources
Twilio Docs
From APIs to SDKs to sample apps
API reference documentation, SDKs, helper libraries, quickstarts, and tutorials for your language and platform.
Resource Center
The latest ebooks, industry reports, and webinars
Learn from customer engagement experts to improve your own communication.
Ahoy
Twilio's developer community hub
Best practices, code samples, and inspiration to build communications and digital engagement experiences.