Creating a Priority Queue for your Call Centre with TaskRouter
Time to read: 12 minutes
February 19, 2015
Written by

Queueing, lining up, waiting your turn. It’s part of life, especially for the British. Yes, we’re good at it. Yes, we even like it. Yes, that is why I wanted to write about it.
The new Twilio TaskRouter makes building and managing queues easy. In this post I’m going to show you how to build a call centre queueing system with TaskRouter in under 25 lines of Ruby.
But not all queues are equal, nor are all queuers. Sure, for the most part joining the back of a queue means you will need to wait for everyone in front of you to do their business before it’s your turn. Some people just want to join at the front of the queue though. In the real world this is just not cool. Unless you’re at an airport of course, in which the distance a person has recently flung themselves around the world with a particular airline feeds directly into how much of the queue they can skip. On the phone however, no-one knows if you’re queue jumping.
For many businesses this means they can offer different support tiers to their customers. Having a free support tier means all your customers can get in touch if they have difficulties with your product or service. Adding a premium tier to your support means you can deal with your high value customers or those requiring special attention much quicker by adding them to the front of the queue.
So, in this post we won’t just build a call centre queue, but we’re going to add priorities to the queue all within that 25 line limit. We’ll learn how to get started with TaskRouter, how it integrates with calls coming into Twilio and how to start interacting with it using the REST API.
We’ll start by building an application that places incoming calls into a single queue and then dishes them out to available agents. We’ll then augment that queue by giving priorities to certain calls so that they jump the queue and get the attention of the next available agent first. You can code the app up with me as we go or feel free to grab the taskrouter_priority repo from GitHub with the full example.
Getting started
If you want to follow along with this code, you will need a few things:
- Ruby (I’m using the latest, version 2.2.0)
- A Twilio account (we will be buying a couple of numbers, so you will need to upgrade your Twilio account to complete this application)
And that’s it! Jump into the terminal and kick up a new project:
We’ll start by creating a Gemfile for our dependencies, app.rb for our application code and config.ru to set application config and run our server.
Drop the following into your Gemfile:
I’m including Sinatra so we can easily create a server and envyable to load our config into the environment. We’ll use a config.ru file to boot the application. This handles loading our dependencies, our config and the application file itself. Add this to your config.ru:
Now run
Our application now needs some configuration. I already included the envyable gem, so we can create a config file and start filling in the credentials that we need.
Then, in config/env.yml let’s add our Twilio credentials:
Setting up the TaskRouter
You’ll notice in the configuration we created in the prior section we added a couple of variables that you might not recognise. These refer to elements of TaskRouter which we need to create within our account portal. The first thing we need is a Workspace which will act as a container for the TaskRouter elements we will use in this application. Let’s head to our account portal and create one right now. It needs a Friendly Name, let’s call it “Call Center Priority Queue”. Since we are creating a queue, you can pick the First In, First Out template.

Creating the Workspace using the template will set up a number of other elements in TaskRouter. As we picked the First In, First Out template we now have a system that will assign Tasks to Workers in the order that they are created.
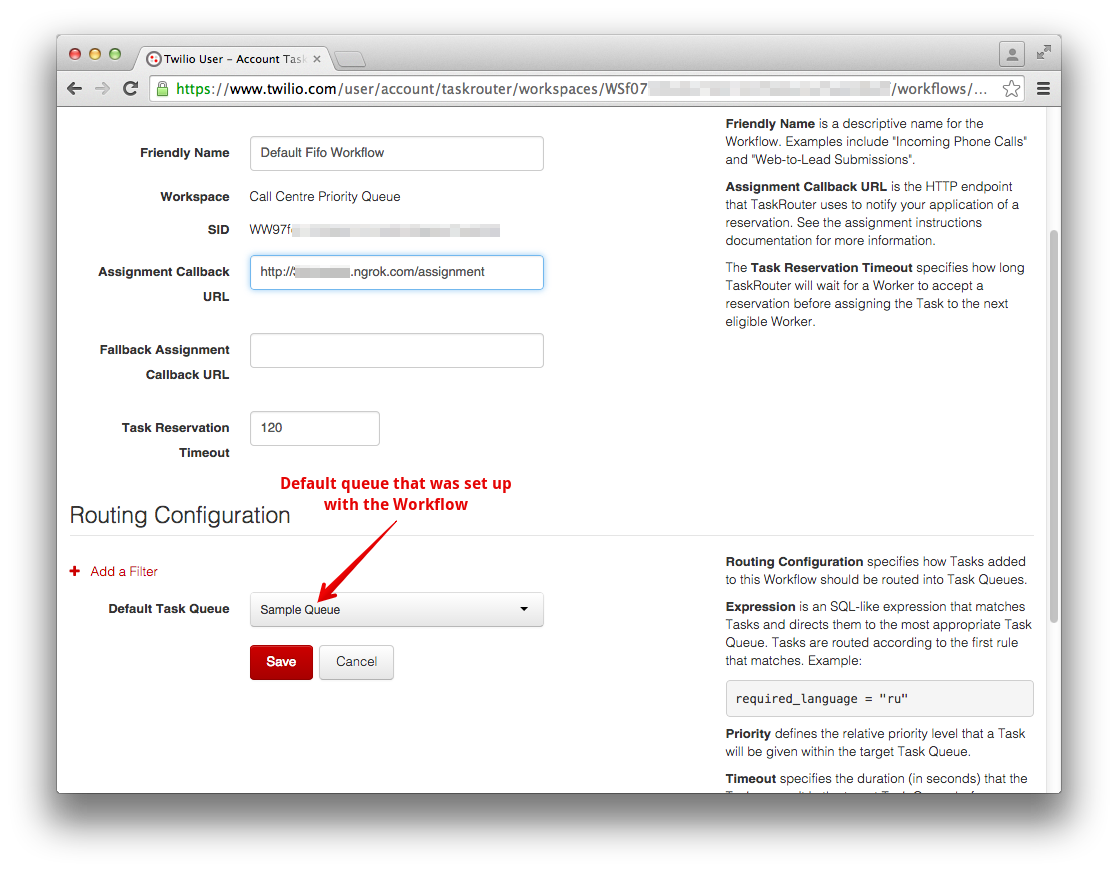
Clicking on the Workflows tab you will see that we have a “Default Fifo Workflow” set up. Under Task Queues there is a “Sample Queue” ready for us to use. You won’t find anything in Workers or Tasks just yet, but the Activities tab has four states set up that we can use for our Workers once they have started dealing with Tasks. Note that only one of the Activities refers to the Worker being available.
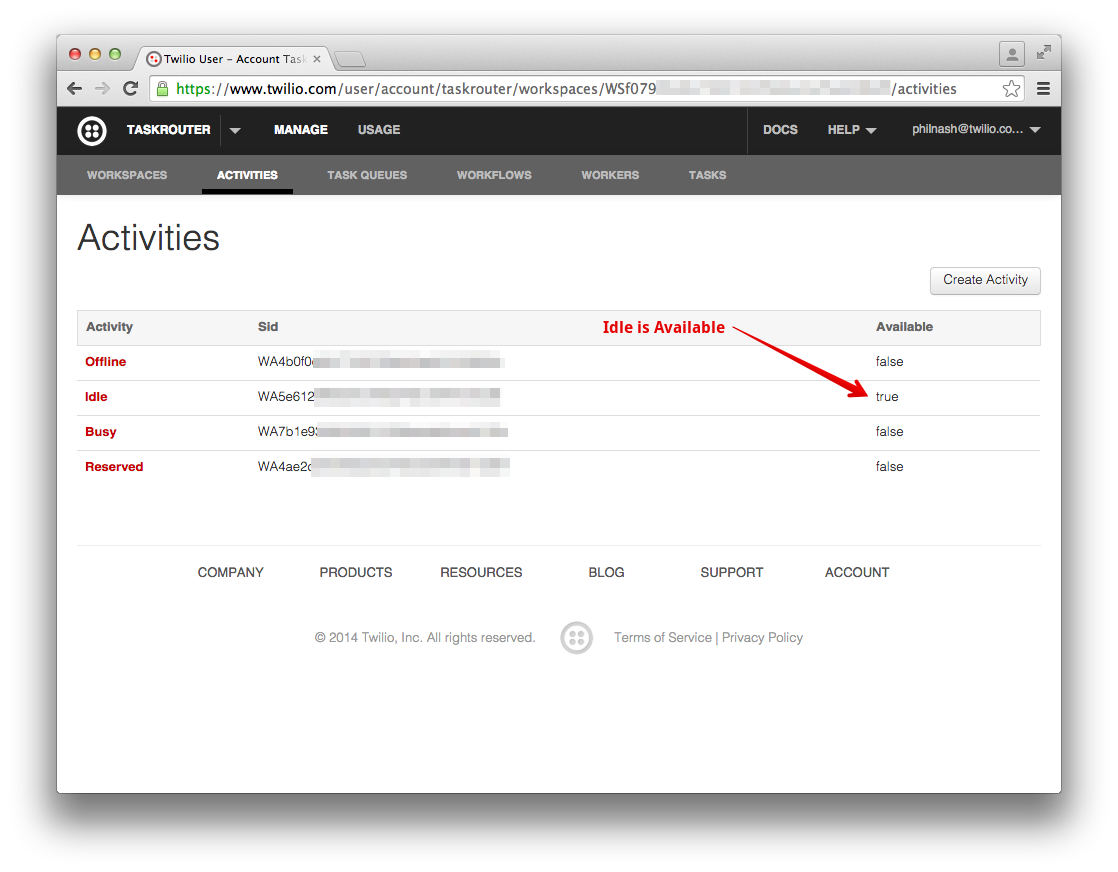
By default, if we create a Task with this Workflow it will be placed on the Sample Queue. If we then create a Worker and set its Activity to “Idle” (i.e. Available) the Workflow will reserve the Task for that Worker and place the Worker into a “Reserved” state. Our application will then be responsible for placing the Worker into the “Busy” state, completing the Task and setting the Worker to “Idle” again. We’ll see how this all fits together as we build the application up.
We need to copy the Workspace SID and the Workflow SID into our config/env.yml file so we can use them later. You can grab them from their respective tabs in your account.
We just need one more thing from your account portal before we get back to building the application, the phone number that customers will call in on. You can access the numbers in your account by clicking on the dropdown menu in the header and selecting “Voice & Messaging”, or you can just click here to buy a number. Make sure you get a phone number that supports voice calls.
Configuring our Number
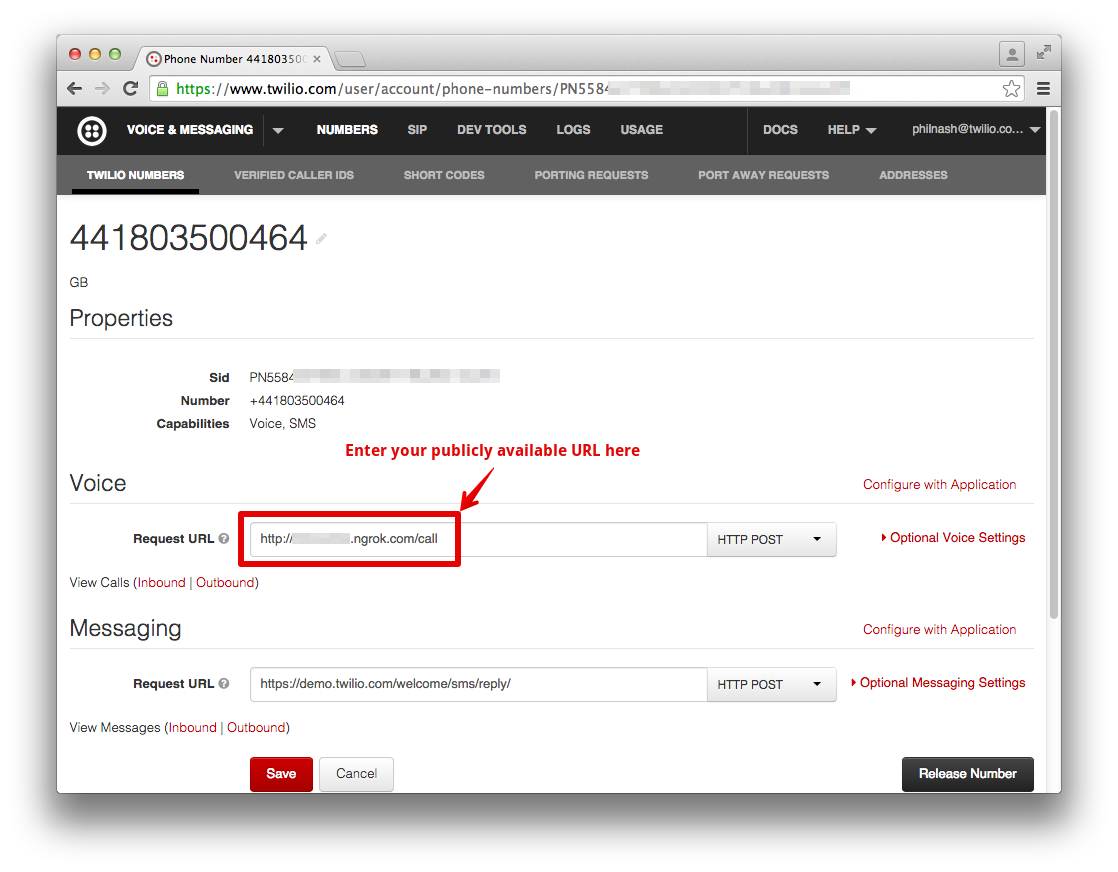
Once you have bought your number, click through to configure it. We need to make our server publicly available so that Twilio can send webhooks to it when the number receives calls. I recommend using ngrok for this, as described by my esteemed colleague Kevin in this post on testing webhooks locally. If you are using ngrok, then start it up to forward to port 9292, Rack’s default like so:
Edit the number you just bought, adding your ngrok URL with the path /call to the voice request URL. It should look a bit like this:
Leave ngrok running in a terminal window for the rest of the post.
Building out the Queue
Let’s build the first webhook we need for this application. The first thing we want to do when someone calls our number is to send them into our new queue. Much like before TaskRouter came along, we are going to use the TwiML verb for this. Instead of naming a queue we are going to pass our Workflow SID. This will automatically create a Task out of every incoming call and pass that into our Workflow. I added a welcome message to the call as well so the code looks like this:
Let’s make sure this works. You can start your server with the command:
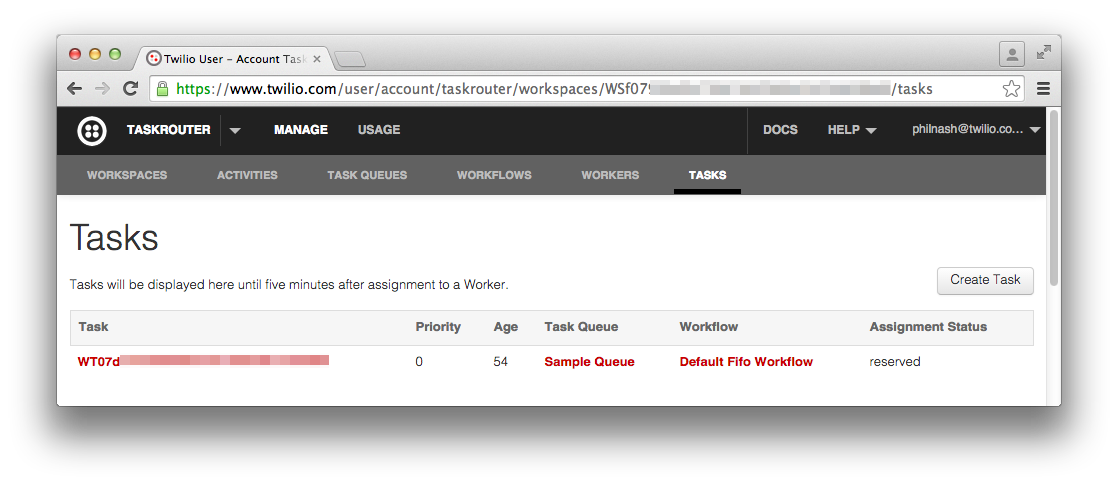
Give your number a call, you will hear the message you set up followed by some hold music. Not so exciting so far but before you hang up take a look at the Tasks tab in the TaskRouter dashboard. You will find a Task sitting in the Sample Queue with an Assignment Status of “pending”. We’ve created our first Task! Sadly we have no way of dealing with it just yet so hang up your phone. Refresh the Tasks page and you’ll find the Task has been canceled.
When a Task is added to the TaskQueue the Workflow will check for available Workers to handle it. Once there is an available Worker TaskRouter notifies our app with a webhook, so we need to start ourselves a Worker and then build the endpoint in our application.
Creating a Worker
You can create a Worker in the account portal, but that’s no fun. Not now we have started writing code anyway. So let’s get back into the terminal and see what we can rustle up with the TaskRouter REST API. Firstly:
This will load up an irb session with our Gemfile dependencies preloaded. We then need to instantiate ourselves a Twilio::REST::TaskRouterClient. This client is like the Twilio::REST::Client that you may be used to except it only concerns itself with TaskRouter objects. First we load our environment variables with envyable, then we initialize the TaskRouterClient with our account credentials and a Workspace SID. To show it’s working let’s list our current Workers.
That’s right, we have no workers! Let’s change that. When we create a worker we need to give it a Friendly Name and we can give it any attributes we want. Attributes are intended to allow you to describe the skills and capabilities of a worker so that you can manage what tasks they are assigned. To do this, we pass in a JSON object of attributes. When TaskRouter assigns this Worker a Task we will receive this attributes object as part of the webhook. For now, let’s add a Worker called “Me”, give it the attribute “contact_uri” and set it to your own phone number (your actual phone, not a Twilio number). Make sure to include the country code for the number too.
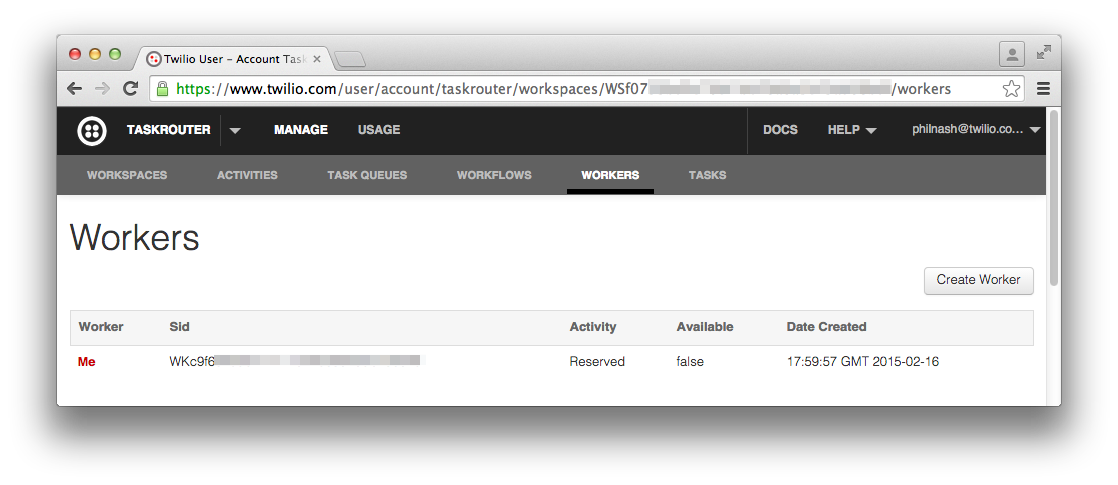
You can go to the account portal and check you can see the Worker there too. You’ll see that our Worker is currently Offline and therefore not available. You could update that in the account portal again, but let’s stick with the console for now.
To update our Worker’s activity, we need to find out the activity SID for the Idle activity and update our Worker’s activity SID to match that.
We have a live Worker! Let’s make sure this is working as we expect. Call your Twilio number up again, you’ll hear the message then the hold music. If you look at the Tasks dashboard you will find you have a Task that has the Assignment Status “reserved”, look at the Workers tab and you will see your Worker with the “Reserved” Activity. Hangup and the Task will transfer to “canceled” and your Worker will return to “Idle”.
Next we need to set up our application to receive the webhook when a Task is being assigned our Worker.
Receiving instructions
So far, we have an endpoint that intercepts calls and creates Tasks on our Queue. We have created a Worker and it is ready to receive Tasks. With both these items in place we look to the assignment callback.
When the TaskRouter wants to assign a Task to a Worker it sends a webhook to our defined endpoint with the details of the Task and the Worker. Our application needs to respond and say what the Worker is going to do. There are few possible responses and there are more details on those in the documentation, but here’s a quick rundown:
accept: the most basic response, this tells TaskRouter that your Worker will do the job, but how the Task is completed is now up to your application
reject: also fairly basic, this returns the Task to the queue to be assigned again
call: this will make a call to a Worker with a TwiML URL provided, allowing your application to handle the call the way it wants to
redirect: accepts the Task and redirects the Task’s call to a TwiML URL you provide
dequeue: this response does a lot, it handles all the cases for simply transferring a call to an agent, we’re going to use it now
So we want to respond to our assignment callback with a dequeue instruction which tells TaskRouter to connect the incoming call with our Worker’s contact_uri attribute. We respond to the TaskRouter with JSON, so let’s build up that response now.
Firstly we need to require the json module from the standard library:
Then we build our endpoint:
Pretty simple, right? This isn’t handling our priorities just yet, but we’re about to connect our first call through our TaskRouter queue. We need to restart our server:
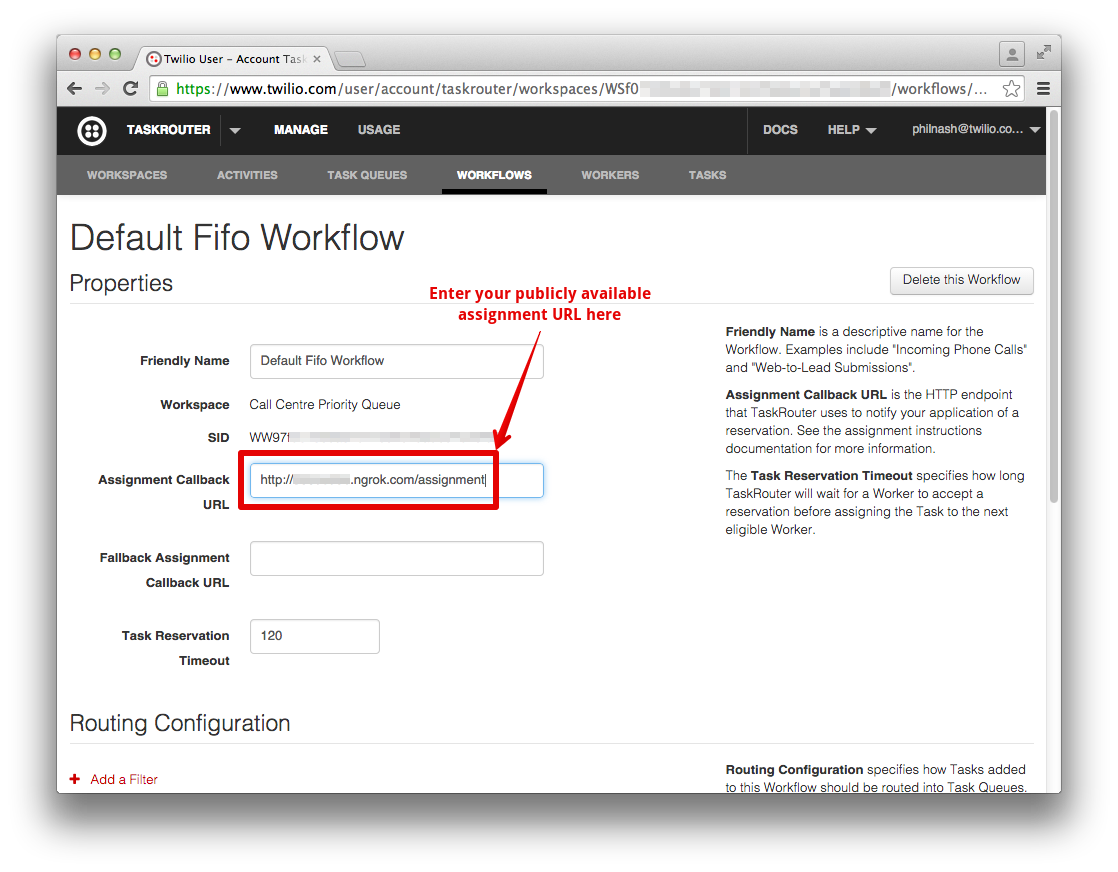
Our ngrok server should still be running, grab the URL again. Open up the Workflow admin, edit your Workflow and add your ngrok URL with the path /assignment to the Assignment Callback URL field. It should look a bit like this:
Now we are ready to connect a call! We’re going to be calling our Twilio number which will place the call into our Workflow’s Task Queue. Our Worker is already live and waiting for calls so the TaskRouter will assign the call which will connect our inbound call to our Worker’s contact_uri and the call will be connected. As you already know, we set our Worker’s contact_uri to our own phone number so we can’t make the call from that phone. If you have a spare phone lying around grab that. If you don’t have that luxury hit the Heroku Deploy button on this Twilio Client GitHub project and you’ll have your own browser phone set up in no time.
Testing time
Punch in the number you bought at the start of this post, you will hear the message you set up followed by the Twilio default hold music. During this time a Task is created and sent through the Workflow you supplied. TaskRouter will notice your Idle Worker and reserve the Task for it. It makes a POST request to your /assignment endpoint which responds with the dequeue instruction and the call is connected to your worker. And your phone rings!
There was a little bit of magic here, the default instruction takes the contact_uri attribute that we set on the Worker and forwards the call to it. Notice that the call came from your original Twilio number. That is because the dequeue instruction takes that from the incoming call’s target number. You can set the to and from numbers within the JSON instruction if you want to, but this way is easier all round.
Adding priorities
I know what you’re thinking, “This has been a very long winded way of doing call forwarding so far. Where’s the priority queue?”
Let’s get to that now.
If you made the test call just now and you have hung up, then you will see in the account portal that your Worker is still set to “Busy”. In order to deal with a queue we are going to have to reset the Worker to “Idle” after each call. Open the Activities tab, grab the SID for the Idle Activity and add that to your config/env.yml file like so:
In your assignment callback add one extra key to the JSON object:
This will set your Worker back to Idle once a call is complete. Set your Worker to “Idle” via the form in the admin for now. Go ahead and make a couple of calls to your Twilio number. You should see two Tasks appear in the admin and you can then answer them one by one as they get forwarded to your phone. At the end, your Worker will be Idle again.
Priorities
We need a way to figure out which of our incoming calls are priority calls or otherwise. For the purposes of this demo, I’m going to set up a second number that dials into the same TwiML and will be my priority line. You could do the same within your application or you could look up customers by the number they dial from and set their priority that way.
Buy yourself another number in your Twilio account. Set the voice request URL to the same URL as your original number. Now add the new number to your config/env.yml file like so:
Back in the application we need to check whether our customer has called in on our priority number or not. If they have we can set a status on the task that our Workflow can check for and prioritise the Task.
Change the /call endpoint to do this check and set some TaskAttributes within the verb.
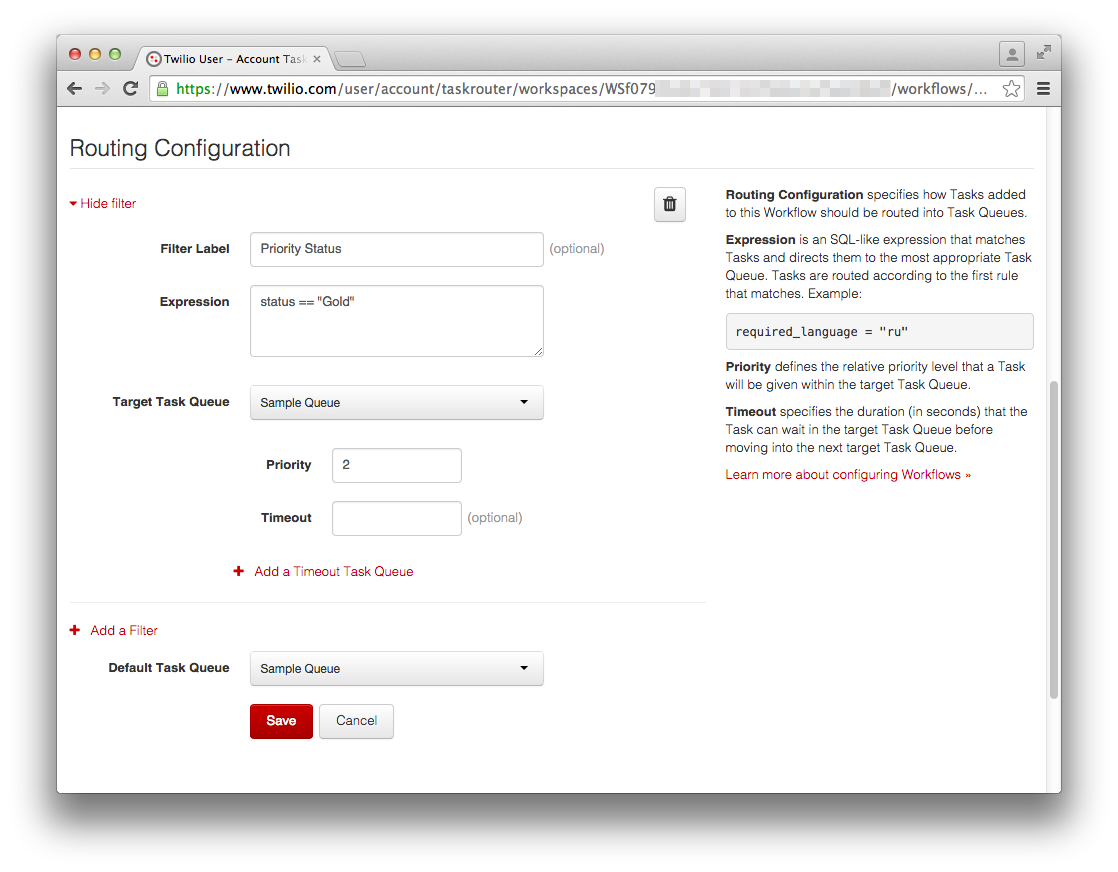
After we reload our server we just need to adjust our Workflow to prioritise these calls. In the account portal open the Workflow for editing. At the bottom of the form is a section for “Routing Configuration”. Currently just the default queue is in there. Every call that comes into this queue is placed at the end of the Sample Queue and answered in turn.
Click “Add another filter” and start to fill in the form that appears. The filter name is just a description for us, let’s call it “Priority Status”. The expression is a SQL-like statement that can be used to match attributes on the Task. As we just added a “Gold” status to calls into our priority number let’s use the expression status == "Gold". You can read more about expressions in the documentation. Finally, since we want these calls to be a higher priority, let’s set the priority of Tasks that match our expression to 2 (Tasks are priority 1 by default). Save the Workflow and let’s test our Priority system.
Final Testing
For this you need two spare phones or two Twilio Client pages set up. From one call your original number and from the other call your new priority number. Your phone will start to ring and if you answer it and open up the Tasks page you will see two Tasks, one with priority 2 which has been assigned and the other with priority 0 that is pending. Once you answer and hang up on the first call, the second one will dial through to your phone. Your priority system is up and running!
TaskRouter and away!
Hopefully with this example, you can see the power of TaskRouter. With two simple endpoints and a little configuration we have the basis of a call centre that can prioritise incoming calls and distribute them amongst one or more agents. Check out the final code on GitHub.
This is just the start of what you can do with TaskRouter. From here we could add more incoming numbers that could direct to different queues depending on whether it was a support call or a sales call. We can also start setting timeouts on queues such that if a call isn’t dealt with within a certain time it can be moved to a queue where it will get answered quicker. We could also create our call centre within the browser using Twilio Client and the TaskRouter Worker.js libraries to create a UI for our agents.
This is just scratching the surface of what can be achieved with TaskRouter and a few lines of code. If you’ve got ideas about how to extend this app, entirely new uses of TaskRouter or if you’re British and disappointed in me for encouraging queue jumping just grab me on Twitter at @philnash or drop me an email at philnash@twilio.com.
Happy task routing!
Related Resources
Twilio Docs
From APIs to SDKs to sample apps
API reference documentation, SDKs, helper libraries, quickstarts, and tutorials for your language and platform.
Resource Center
The latest ebooks, industry reports, and webinars
Learn from customer engagement experts to improve your own communication.
Ahoy
Twilio's developer community hub
Best practices, code samples, and inspiration to build communications and digital engagement experiences.