Develop a Symfony App Using Svelte and Webpack Encore to Manage Your Twilio Message History

September 27, 2022
Written by
Joseph Udonsak
Contributor
Opinions expressed by Twilio contributors are their own
Reviewed by

Develop a Symfony App Using Svelte and Webpack Encore to Manage Your Twilio Message History

Globalization has changed more things than one can imagine – and software development is not immune. Combined with the recent trend for separating client side and server side operations, poly-repositories have become a de facto standard for application structure.

However, for all its benefits it may not be sustainable for small teams or businesses eager to break out of the conceptualization phase and deliver an MVP (Minimum Viable Product). In such scenarios, the visibility and singular source of truth offered by a mono-repository can translate to faster and smoother deployment of new features.

This article will show you how to combine the new kid on the block, Svelte with the tried-and-trusted Symfony to develop an application, all the while using Webpack Encore to bundle the Svelte app. At the end of this article, you will have built an application to interact with your Twilio message history.

Prerequisites

To follow this tutorial, you need the following:

Set up the application

Start by creating a new Symfony application and changing into the new application's directory using the following commands.

symfony new svelte_demo
cd svelte_demo

Next, install the Symfony project dependencies. For this project we will require the following:

  1. Maker: This will help us with creating controllers, entities and the like
  2. Twig: Twig will be used to render our HTML templates
  3. Twilio PHP Helper Library: This makes it easy to interact with the Twilio API from your PHP application
  4. Webpack Encore: Webpack Encore is a simpler way to integrate webpack into your application.

Run the following commands to install the dependencies.

composer req --dev maker
composer require twig twilio/sdk webpack

Next, install the Javascript dependencies for the project, by running the following commands.

yarn add --dev \
    axios \
    carbon-components-svelte \
    carbon-icons-svelte \
    svelte-loader svelte \
    svelte-routing

 The dependencies are as follows:

  1. Axios: Axios will be used to make API requests and get the appropriate response
  2. Carbon Components Svelte and Carbon Icons Svelte: The Carbon Design system by IBM will be used to render the UI components of the Svelte application
  3. Svelte: This adds Svelte to our project
  4. Svelte-loader: This is a webpack loader for Svelte
  5. Svelte-routing: A declarative Svelte routing library with SSR support.

Next, open webpack.config.js (created by the previous commands) and update it to match the following code.

const Encore = require("@symfony/webpack-encore");

if (!Encore.isRuntimeEnvironmentConfigured()) {
  Encore.configureRuntimeEnvironment(process.env.NODE_ENV || "dev");
}

Encore
  // directory where compiled assets will be stored
  .setOutputPath("public/build/")
  // public path used by the web server to access the output path
  .setPublicPath("/build")
  .addLoader({
    test: /\.svelte$/,
    loader: "svelte-loader",
  })
  /*
   * ENTRY CONFIG
   *
   * Each entry will result in one JavaScript file (e.g. app.js)
   * and one CSS file (e.g. app.css) if your JavaScript imports CSS.
   */
  .addEntry("app", "./svelte/app.js")

  // When enabled, webpack "splits" your files into smaller pieces
  // for greater optimization.
  .splitEntryChunks()
  .enableSingleRuntimeChunk()
  .cleanupOutputBeforeBuild()
  .enableBuildNotifications()
  .enableSourceMaps(!Encore.isProduction())
  .enableVersioning(Encore.isProduction())

  .configureBabel((config) => {
    config.plugins.push("@babel/plugin-proposal-class-properties");
  })

  // enables @babel/preset-env polyfills
  .configureBabelPresetEnv((config) => {
    config.useBuiltIns = "usage";
    config.corejs = 3;
  });

let config = Encore.getWebpackConfig();
config.resolve.mainFields = ["svelte", "browser", "module", "main"];
config.resolve.extensions = [".mjs", ".js", ".svelte"];

let svelte = config.module.rules.pop();
config.module.rules.unshift(svelte);

module.exports = config;

With this configuration, Webpack will take all the Javascript files (and Svelte components) and bundle them into a single Javascript file. This reduces the burden on the client as it doesn’t have to make multiple requests to load static files. It also provides an avenue for further optimization techniques such as code splitting. While this article does not cover bundling of CSS files, this is another area in which Webpack excels.

To help with bundling the Svelte components, the configuration enables the earlier installed Svelte loader. In addition to this, it specifies the output directory for the bundled .js file. This is by no means everything on offer, you can find a full list of features here. You can read more about how Svelte handles bundling here.

Add the Svelte component

Create a new folder named svelte, in the top-level directory of the project. This folder will contain all the files related to the components and helper functions required by the Svelte application.

In the svelte folder, create a new folder named components. In this folder, create a new file named App.svelte and add the following to it.

<h1>Twilio MessageBook</h1>
<p>
    Using Svelte, Symfony and Webpack Encore to build an 
    application that interacts with Twilio Message Log
</p>

<style>
    h1 {
        text-align: center;
        color: red;
    }

    p {
        text-align: center;
    }
</style>

Next, in the svelte directory, create a new file named app.js and add the following code to it.

import App from "./components/App.svelte";
const app = new App({
    target: document.body,
});
export default app;

This file is what was specified as an entry point in the webpack configuration. Next, bundle your application by running the following command in the top-level directory of the project.

yarn watch

This command bundles your Svelte application into a single app.js file. It also watches your svelte folder for file changes - upon which it regenerates the app.js file.

Add a controller for the index page

In a new terminal, run the following command in the top-level directory of the project. This will create a new controller responsible for rendering the index page of the application.

symfony console make:controller IndexController

Then, update the newly created src/Controller/IndexController.php file to match the following code.

<?php

namespace App\Controller;

use Symfony\Bundle\FrameworkBundle\Controller\AbstractController;
use Symfony\Component\HttpFoundation\Response;
use Symfony\Component\Routing\Annotation\Route;

class IndexController extends AbstractController
{
    #[Route('/', name: 'app_index')]
    public function index(): Response
    {
        return $this->render('index/index.html.twig');
    }
}

Next, update templates/index/index.html.twig to match the following.

{% extends 'base.html.twig' %}

{% block title %}Twilio Message Logs{% endblock %}

{% block stylesheets %}
    <link rel="stylesheet"
          href="https://unpkg.com/carbon-components-svelte/css/white.css"
    />
    <link rel="icon"
          href="https://www.twilio.com/assets/icons/twilio-icon.svg"
          type="image/svg+xml"
    />
{% endblock %}

{% block javascripts %}
    {{ encore_entry_script_tags('app') }}
{% endblock %}

{% block body %}{% endblock %}

The encore_entry_script_tags() function reads public/build/entrypoints.json, generated by Encore, to know the exact filename(s) to render. In addition to that, the CSS for the Carbon components UI library is imported.

View the application

To view the application as it currently is, launch the Symfony application using the following command.

symfony serve

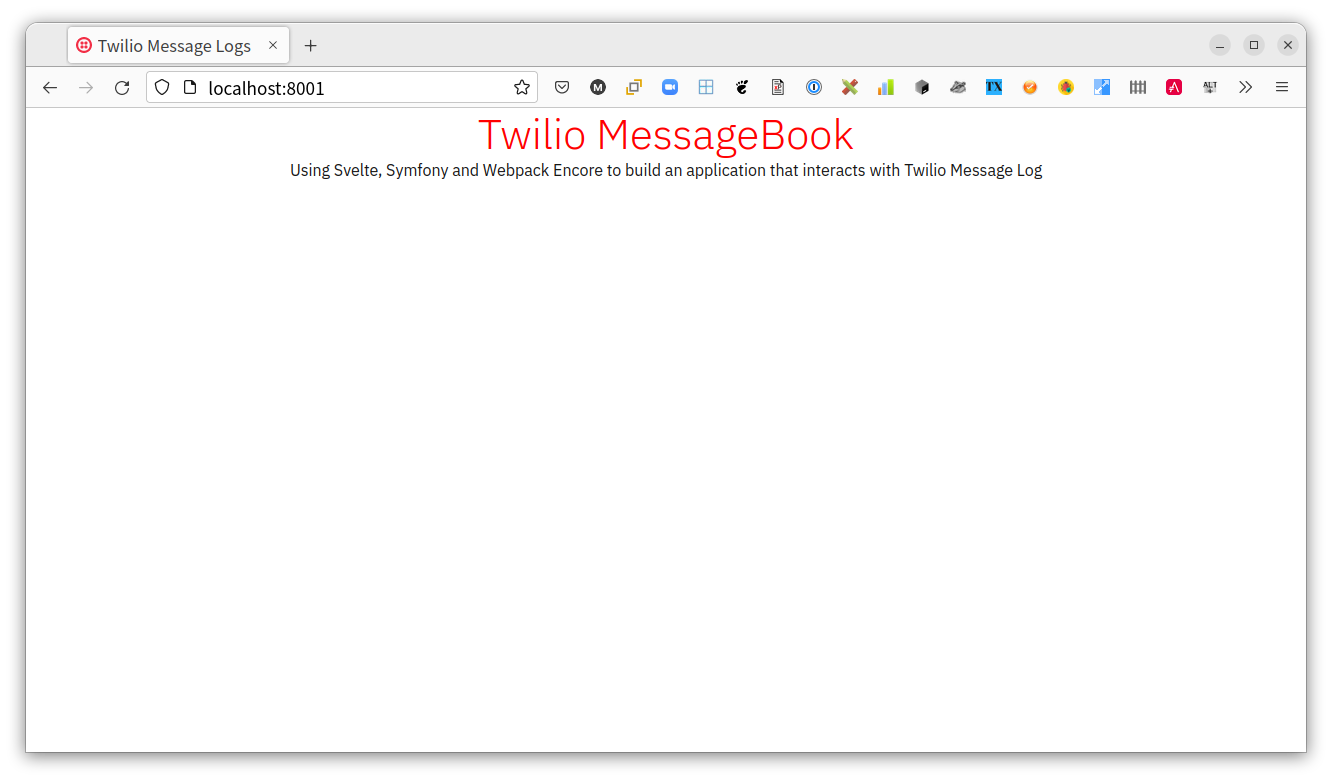
By default, the project is available at localhost:8000. Open the URL in the browser where you should see it look like the following screenshot.

The initial version of the Symfony, Svelte, webpack application running in Firefox

Having completed the foundation of the application, it’s time to build the backend and frontend features.

Building the backend

Add Twilio Credentials

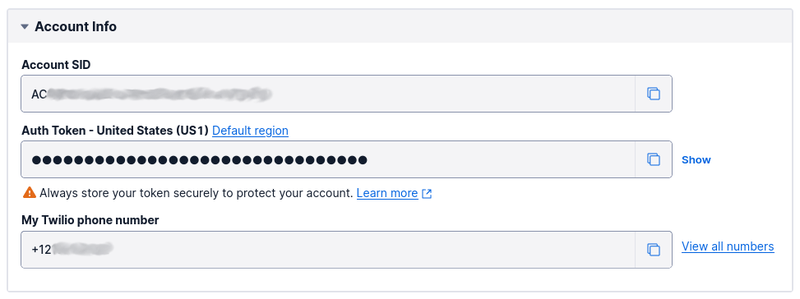
The first thing to do on the backend is integrate with the Twilio API using the earlier installed Twilio PHP Helper Library. But before writing the code, you need to make a note of two key parameters:

  1. Your Twilio Account SID
  2. Your Twilio Auth Token

These can be retrieved from your Twilio Console dashboard from the "Account Info" panel.

Retrieve you account SID, auth token, and twilio phone number in the Twilio Console

Next, add local environment variables for your Twilio Account SID and Auth Token. First, create .env.local from the .env file by running the following command.

cp .env .env.local

.env.local files are ignored by Git as an accepted best practice for storing credentials outside of code to keep them safe. You could also store the application credentials in a secrets manager, if you're really keen.

Next, add the following variables to the newly created .env.local file.

TWILIO_ACCOUNT_SID="<<TWILIO_ACCOUNT_SID>>"
TWILIO_AUTH_TOKEN="<<TWILIO_AUTH_TOKEN>>"

Finally, replace the two placeholders in .env.local with your Twilio Account SID and Auth Token, respectively.

Implement the MessageLogService

The next step is to implement a service that interacts with the Twilio API and provides the requisite functionality to carry out:

  1. Retrieving all messages
  2. Retrieving a single message
  3. Deleting a message

In the src folder, create a new folder named Service. Then, in the src/Service folder, create a new file named MessageLogService.php and add the following code to it.

<?php

namespace App\Service;

use Twilio\Rest\Api\V2010\Account\MessageInstance;
use Twilio\Rest\Client;

class MessageLogService 
{
    private Client $twilio;

    public function __construct(
        string $twilioAccountSid,
        string $twilioAuthToken,
    ) {
        $this->twilio = new Client($twilioAccountSid, $twilioAuthToken);
    }

    public function getMessages(): array 
    {
        return array_map(
            fn(MessageInstance $message) => $message->toArray() + ['id' => $message->sid],
            $this->twilio->messages->read()
        );
    }

    public function getMessage(string $messageSid): array 
    {
        return $this->twilio->messages($messageSid)->fetch()->toArray();
    }

    public function deleteMessage(string $messageSid): void 
    {
        $this->twilio->messages($messageSid)->delete();
    }
}

This service has a constructor that takes your Twilio Account SID and the Auth Token as parameters with which it creates a Twilio Client.

The getMessages(), getMessage(), and deleteMessage() functions make the respective function calls to the Twilio API and pass the response back where required. Per the requirements of the Twilio Client, the getMessage() and deleteMessage() functions require the MessageSid in order to get a single message.

Add the service definition for MessageLogService

Next, add a service definition which will bind the arguments for the MessageLogService with the environment variables defined earlier. To do that, add the following to the services key in config/services.yaml

App\Service\MessageLogService:
    arguments:
        $twilioAccountSid: '%env(resolve:TWILIO_ACCOUNT_SID)%'
        $twilioAuthToken: '%env(resolve:TWILIO_AUTH_TOKEN)%'

With this, the service container is able to initialize and inject the MessageLogService object wherever it is called.

Add a controller for the API routes

Next, create a new controller to handle API requests from the frontend by running the following command.

​​symfony console make:controller APIController --no-template

This creates a new file named APIController.php in the src/Controller folder. Open it and update the code to match the following.

<?php
namespace App\Controller;

use App\Service\MessageLogService;
use Psr\Cache\CacheItemInterface;
use Symfony\Bundle\FrameworkBundle\Controller\AbstractController;
use Symfony\Component\HttpFoundation\JsonResponse;
use Symfony\Component\HttpFoundation\Response;
use Symfony\Component\Routing\Annotation\Route;
use Symfony\Contracts\Cache\CacheInterface;

#[Route('/api/', name: 'app_api_')]
class APIController extends AbstractController 
{
    public function __construct(
        private MessageLogService $messageLogService,
        private CacheInterface    $cache
    ) {}

    #[Route('messages', name: 'get_messages', methods: ['GET'])]
    public function getMessages(): JsonResponse 
    {
        $messages = $this->cache->get(
            'messages',
            function (CacheItemInterface $cacheItem) {
                $cacheItem->expiresAfter(300);
                return $this->messageLogService->getMessages();
            }
        );

        return $this->json(
            [
                'data' => $messages,
            ]
        );
    }

    #[Route('message/{messageSid}', name: 'get_message', methods: ['GET'])]
    public function getMessage(string $messageSid): JsonResponse 
    {
        $message = $this->cache->get(
            "message_$messageSid",
            fn() => $this->messageLogService->getMessage($messageSid)
        );

        return $this->json(
            [
                'data' => $message,
            ]
        );
    }

    #[Route('message/{messageSid}', name: 'delete_message', methods: ['DELETE'])]
    public function deleteMessage(string $messageSid): JsonResponse 
    {
        $this->messageLogService->deleteMessage($messageSid);
        $this->cache->delete("message_$messageSid");

        return $this->json(null, Response::HTTP_NO_CONTENT);
    }
}

In addition to making the required call to the MessageLogService, the controller also caches message resources to prevent repeated network requests for already retrieved resources.

With this code in place, the API now has the following routes:

EndpointMethodFunction
/api/messagesGETGet all messages
/api/message/{messageSid}GETGet a single message for the provided SID
/api/message/{messageSid}DELETEDelete  a single message for the provided SID

Delegate the routing to the frontend

It is important to note that with this project structure, routing is first handled by the backend. Using Route annotations in controllers or routes declared in config/routes.yaml, Symfony determines how the incoming request should be handled. The Svelte application only takes charge of routing once the index page is loaded.

This means that upon refresh, instead of allowing Svelte to determine the appropriate component to be rendered, Symfony will render an exception page because it cannot determine how the route should be handled.

The solution is to create a subscriber for the NotFoundHttpException which is thrown when Symfony cannot find a route for the specified URL, and render the index page instead of the associated error page. Create the subscriber by running the following command.

symfony console make:subscriber RouteNotFoundExceptionSubscriber

Respond to the prompt as shown below.

What event do you want to subscribe to?:
 > kernel.exception

A new file named RouteNotFoundExceptionSubscriber.php will be created in the src/EventSubscriber folder. Open this file and update it to match the following.

<?php

namespace App\EventSubscriber;

use Symfony\Component\EventDispatcher\EventSubscriberInterface;
use Symfony\Component\HttpFoundation\Response;
use Symfony\Component\HttpKernel\Event\ExceptionEvent;
use Symfony\Component\HttpKernel\Exception\NotFoundHttpException;
use Symfony\Component\HttpKernel\KernelEvents;
use Twig\Environment;

class RouteNotFoundExceptionSubscriber implements EventSubscriberInterface {

    public function __construct(
        private Environment $environment
    ) {}

    public static function getSubscribedEvents(): array 
    {
        return [
            KernelEvents::EXCEPTION => 'onKernelException',
        ];
    }

    public function onKernelException(ExceptionEvent $event): void 
    {
        if ($event->getThrowable() instanceof NotFoundHttpException) {
            $event->allowCustomResponseCode();
            $response = new Response(
                $this->environment->render('index/index.html.twig'),
                Response::HTTP_OK
            );
            $event->setResponse($response);
        }
    }
}

When a kernel exception event occurs, the onKernelException function will be called with an ExceptionEvent passed as a parameter. This subscriber should only take action if the thrown exception is an instance of NotFoundHttpException in which case, the index/index.html.twig template is rendered and returned as a response.

Additionally, the response code is changed from 404 to 200. Changing the response code was only made possible because of the call to the allowCustomResponseCode() function.

With this in place, any route which is unfamiliar to Symfony will be handled on the frontend. Only when the route is also unfamiliar to the Svelte application will an error page be rendered.

Build the frontend

Build the API helper functions

First, create helper functions which will handle API calls. In the svelte folder in the project's top-level directory, create a new file named Api.js and add the following code to it.

import axios from "axios";

const _responseData = response => {
    const {data} = response.data;
    return data;

}
export const getMessages = async () => {
    const response = await axios.get("/api/messages");
    return _responseData(response);
}

export const getMessage = async messageSid => {
    const response = await axios.get(`/api/message/${messageSid}`);
    return _responseData(response);
}

export const deleteMessage = async messageSid => {
    await axios.delete(`/api/message/${messageSid}`)
}

Build the DeleteMessage component

The first component to be built is the DeleteMessage component. In the svelte/components folder, create a new file named DeleteMessage.svelte and add the following code to it.

<Modal
        danger
        preventCloseOnClickOutside
        bind:open={modalIsOpen}
        modalHeading="Delete all instances"
        primaryButtonText="Delete"
        secondaryButtonText="Cancel"
        on:click:button--secondary={closeModal}
        on:click:button--primary={handleDelete}
        on:open
        on:close
        on:submit
>
    <p>This is a permanent action and cannot be undone.</p>
</Modal>

{#if showAsIcon}
    <Button
            kind="danger-tertiary"
            on:click={openModal}
            iconDescription="Delete"
            icon={TrashCan}
            size="small"
    />
{:else }
    <div class="centered">
        <Button
                kind="danger-tertiary"
                on:click={openModal}
        >
            Delete Message
        </Button>
    </div>
{/if}

{#if displayLoading}
    <Loading kind="danger"/>
{/if}

<style>
    .centered {
        display: flex;
        justify-content: center;
        align-items: center;
        padding: 1%;
    }
</style>

<script>
    import {Button, Loading, Modal} from "carbon-components-svelte";
    import TrashCan from "carbon-icons-svelte/lib/TrashCan.svelte";
    import {createEventDispatcher} from "svelte";
    import {deleteMessage} from "../Api";

    const dispatch = createEventDispatcher();

    export let messageSid;
    export let showAsIcon;

    let modalIsOpen = false;
    let displayLoading = false;

    const openModal = () => {
        modalIsOpen = true;
    }

    const closeModal = () => {
        modalIsOpen = false;
    }

    const handleDelete = async () => {
        closeModal();
        displayLoading = true;
        await deleteMessage(messageSid);
        dispatch("delete", {messageSid});
        displayLoading = false;
    }
</script>

This component renders a button which can be clicked to initiate the delete process. This button can be rendered as an icon or a regular button, depending on the value of the showAsIcon prop.

When the button is clicked, a modal is displayed to ask for the user’s confirmation. If the user clicks the "Delete" button, a loader is displayed and an API request is made via the deleteMessage helper function.

On a successful delete, a delete event is dispatched by the component. This allows different parent components to use the DeleteMessage component even though they have divergent steps to take if the operation is completed successfully.

Build the Message component

In the svelte/components folder, create a new file named Message.svelte and add the following code to it.

<Breadcrumb noTrailingSlash>
    <BreadcrumbItem>
        <Link to="/">All Messages</Link>
    </BreadcrumbItem>
    <BreadcrumbItem isCurrentPage>Message</BreadcrumbItem>
</Breadcrumb>

<Tile light>
    <h1 class="header"> Message [ { messageSid } ]</h1>

    {#if isLoading}
        <SkeletonText paragraph lines={10}/>
    {:else }
        <Accordion>
            <AccordionItem open>
                <svelte:fragment slot="title">
                    <h2>Overview</h2>
                </svelte:fragment>
                <h3>Sender</h3>
                <p class="detail">{getPhoneNumber(message.from)}</p>
                <h3>Recipient</h3>
                <p class="detail">{getPhoneNumber(message.to)}</p>
                <h3>Message</h3>
                <p class="detail">{message.body}</p>
                <h3>Status</h3>
                <p class="detail">{message.status}</p>
                <h3>Segments</h3>
                <p class="detail">{message.numSegments}</p>
                <h3>Price</h3>
                <p class="detail">{message.price} ({message.priceUnit})</p>
                <h3>Medium</h3>
                <p class="detail">{getMedium()}</p>
            </AccordionItem>
            <AccordionItem>
                <svelte:fragment slot="title">
                    <h2>Timeline</h2>
                </svelte:fragment>
                <h3>Created</h3>
                <p class="detail">{getFormattedDate(message.dateCreated)}</p>
                <h3>Sent</h3>
                <p class="detail">{getFormattedDate(message.dateSent)}</p>
                <h3>Updated</h3>
                <p class="detail">{getFormattedDate(message.dateUpdated)}</p>
            </AccordionItem>
        </Accordion>

        <DeleteMessage
                messageSid={messageSid}
                showAsIcon={false}
                on:delete={handleDelete}
        />
    {/if}
</Tile>

<style>
    .header {
        text-align: center;
        padding: 10px;
    }

    .detail {
        margin-bottom: 20px;
    }
</style>

<script>
    import {
        Accordion, 
        AccordionItem, 
        Breadcrumb, 
        BreadcrumbItem, 
        SkeletonText, 
        Tile
    } from "carbon-components-svelte";
    import {Link, navigate} from "svelte-routing";
    import {getMessage} from "../Api";
    import {onMount} from "svelte";
    import DeleteMessage from "./DeleteMessage.svelte";

    export let messageSid;
    let isLoading = true;
    let message = null;

    onMount(async () => {
        message = await getMessage(messageSid);
        isLoading = false;
    });

    const handleDelete = () => {
        navigate("/", {replace: true});
    }

    const getFormattedDate = dateObject => {
        const {date} = dateObject;
        const options = {
            weekday: "long",
            year: "numeric",
            month: "long",
            day: "numeric"
        };
        return new Date(date).toLocaleTimeString("en-US", options)
    }
    const getMedium = () => {
        const medium = message.from.split(":")[0];
        return `${medium.charAt(0).toUpperCase()}${medium.slice(1)}`;
    }

    const getPhoneNumber = phoneNumber => phoneNumber.split(":")[1];
</script>

This component has one prop named messageSid which corresponds to the SID of the message to be rendered. Using the getMessage() helper API function, a request is made to get the message details once the component is mounted. These details are then rendered accordingly.

A handleDelete() function is defined and passed as a handler for the DeleteMessage component. In this case, the application redirects to the dashboard.

Build the Messages component

In the svelte/components folder, create a new file named Messages.svelte

As it might be easy to overlook, note that the previous component is named Message (singular) whereas this one is Messages (plural).

Then, add the following code to the file.

{#if isLoading}
    <DataTableSkeleton showHeader={false} showToolbar={false}/>
{:else }
    <Tile>
        {#if showDeleteNotification}
            <div class="notification-container">
                <InlineNotification
                        lowContrast
                        kind="success"
                        title="Success"
                        subtitle="Message deleted successfully"
                />
            </div>
        {/if}
        <DataTable
                zebra
                sortable
                {pageSize}
                {page}
                headers={tableHeaders}
                rows={messages}
                title="Twilio Message Logs"
                description="All the messages in your Twilio logs"
        >
            <svelte:fragment slot="cell" let:row let:cell>
                {#if cell.key === "sid"}
                    <div class="sid-container">
                        <Link to={`message/${cell.value}`}>
                            {cell.value}
                        </Link>
                        <DeleteMessage
                                messageSid={cell.value}
                                showAsIcon={true}
                                on:delete={handleDelete}
                        />
                    </div>
                {:else}
                    {cell.value}
                {/if}
            </svelte:fragment>
            <Toolbar>
                <ToolbarContent>
                    <ToolbarSearch
                            persistent
                            value=""
                            shouldFilterRows
                            bind:filteredRowIds
                    />
                </ToolbarContent>
            </Toolbar>
        </DataTable>
        <Pagination
                bind:pageSize
                bind:page
                totalItems={messages.length}
                pageSizeInputDisabled
        />
    </Tile>
{/if}

<style>
    .notification-container {
        display: flex;
        width: 100%;
        justify-content: end;
        align-items: end;
    }

    .sid-container {
        display: flex;
        align-items: center;
        justify-content: space-between;
    }
</style>

<script>
    import {
        DataTable,
        DataTableSkeleton,
        InlineNotification,
        Pagination,
        Tile,
        Toolbar,
        ToolbarContent,
        ToolbarSearch,
    } from "carbon-components-svelte";
    import {getMessages} from "../Api.js";
    import {onMount} from "svelte";
    import {Link} from "svelte-routing";
    import DeleteMessage from "./DeleteMessage.svelte";

    let pageSize = 10;
    let page = 1;
    let isLoading = true;
    let showDeleteNotification = false;
    let messages = [];
    let filteredRowIds = [];

    const tableHeaders = [
        {key: "body", value: "Message"},
        {key: "direction", value: "Direction"},
        {key: "price", value: "Price"},
        {key: "status", value: "Status"},
        {key: "sid", value: "MessageSid"}
    ];

    onMount(async () => {
        messages = await getMessages();
        isLoading = false;
    })

    const handleDelete = (event) => {
        showDeleteNotification = true;
        setTimeout(() => {
            showDeleteNotification = false;
        }, 3000);
        const messageSid = event.detail.messageSid;
        messages = messages.filter(({sid}) => sid !== messageSid);
    }
</script>

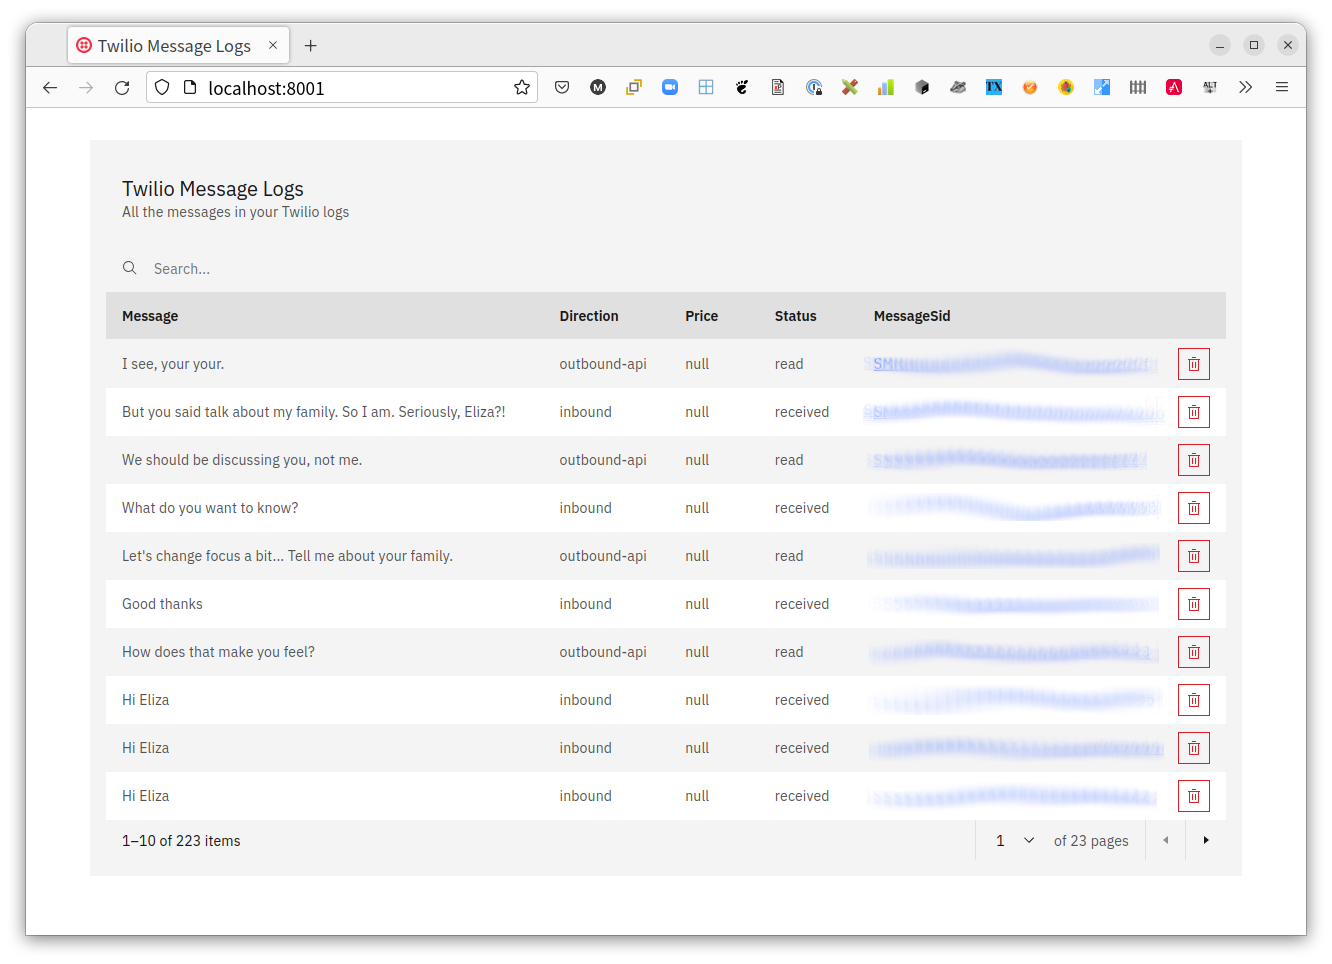
On mount, this component retrieves all the messages from the backend via the getMessages() helper function. This information is then rendered in a paginated table which also allows for sorting and filtering.

The DeleteMessage component is also rendered (as an icon). As was done for the Message component, a handleDelete() function is declared to handle the dispatched event. In this case, a notification is displayed showing the user that the message was deleted successfully. Additionally, the deleted message is filtered out of the list of messages currently rendered.

Build the PageNotFound component

The last component to be built is the component to be rendered for unfamiliar routes. In the svelte/components folder, create a new file named PageNotFound.svelte and add the following code to it.

<div class="centered">
    <Grid>
        <Row>
            <Column>
                <h1 class="error__heading">Error 404: Page Not Found</h1>
            </Column>
        </Row>
        <Row>
            <Column>
                <div class="centered">
                    <Link to="/">Return to dashboard</Link>
                </div>
            </Column>
        </Row>
    </Grid>
</div>

<style>
    .error__heading {
        color: red;
        font-size: 5rem;
    }

    .centered {
        display: flex;
        justify-content: center;
        align-items: center;
        padding: 1%;
    }
</style>

<script>
    import {Column, Grid, Row} from 'carbon-components-svelte';
    import {Link} from 'svelte-routing'
</script>

This component renders an error message, and a link which redirects the user to the dashboard.

Update the App.svelte component

Open svelte/components/App.svelte and update the code to match the following.

<Content>
    <Grid>
        <Row>
            <Column>
                <Router url="{url}">
                    <Route path="message/:messageSid" let:params>
                        <Message messageSid="{ params.messageSid }"/>
                    </Route>
                    <Route path="/" component="{ Messages }"/>
                    <Route component="{PageNotFound}"/>
                </Router>
            </Column>
        </Row>
    </Grid>
</Content>

<script>
    import {Column, Content, Grid, Row} from 'carbon-components-svelte';
    import {Route, Router} from "svelte-routing";
    import Messages from "./Messages.svelte";
    import Message from "./Message.svelte";
    import PageNotFound from "./PageNotFound.svelte";

    export let url = "";
</script>

With these in place, the application is complete. If you stopped the yarn watch process, bundle your application by running the following command.

yarn dev

Now, run your Symfony application using the symfony serve command and navigate to localhost:8000 to see the application in action. Use a different port if Symfony bound to a port other than 8000 on your development machine.

Screenshot of dashboard showing all messages

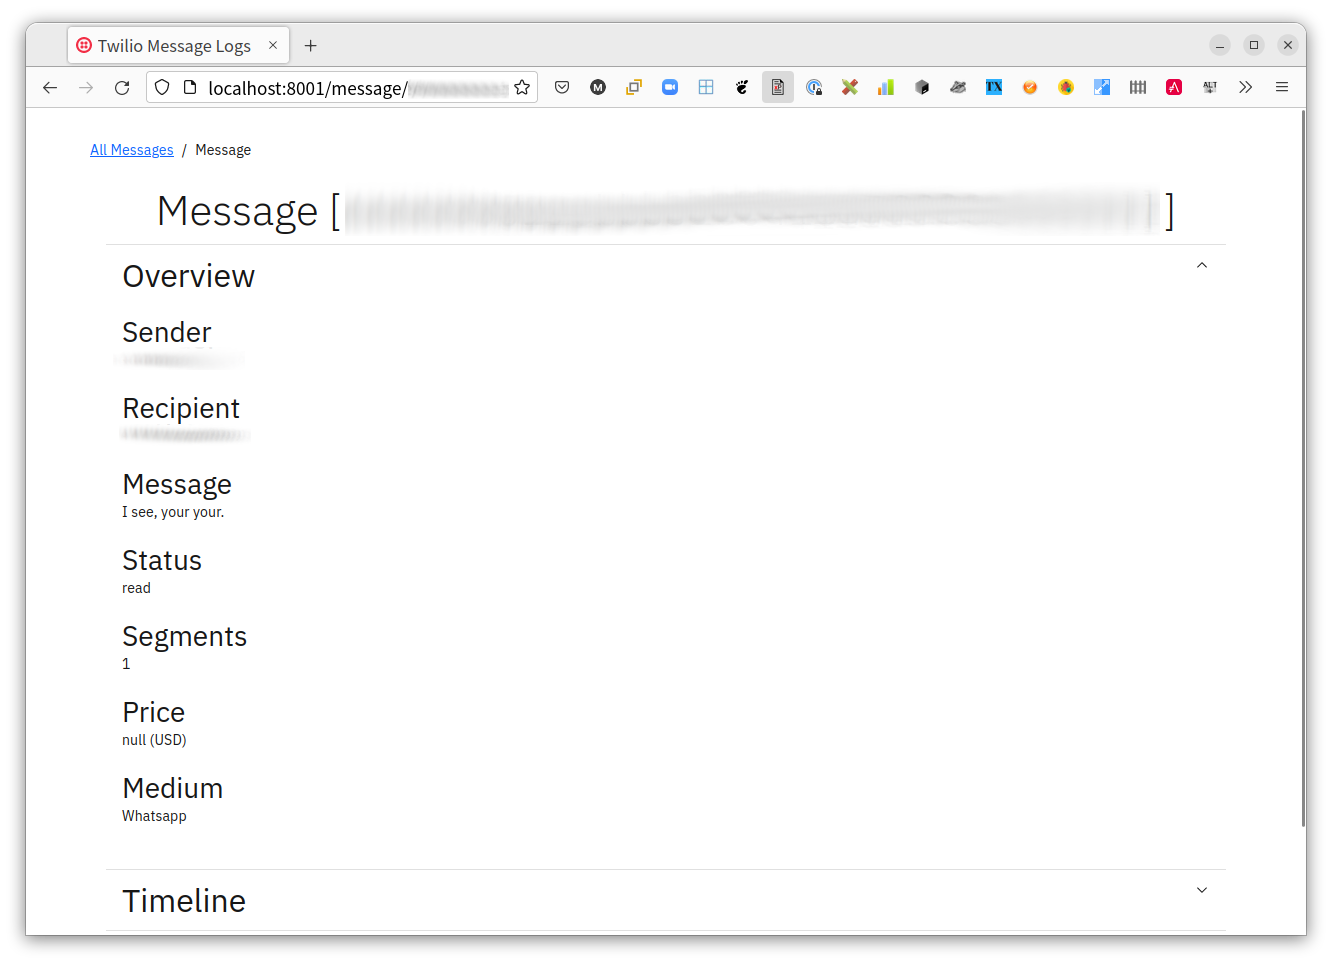
Then, click on any of the Message SIDs in the "MessageSID" column to view a message's details. You can see an example in the screenshot below.

Screenshot of page showing message details

That's how to develop a Svelte app powered by Symfony and Webpack Encore

In this article, you have learnt how to combine a Svelte frontend with a Symfony backend in a mono-repository application. In addition to properly configuring webpack, you also learnt how to delegate routing to the frontend via an event subscriber.

While Svelte is still largely considered a new kid on the block, it has already attained maturity status. With a minimal learning curve, less boilerplate, and a smaller footprint than the more popular and well-known frontend frameworks Svelte is finding its way into the production environment of ever more organizations, and becoming a viable option for greenfield projects as well.

You can review the final codebase on Github. Until next time, make peace not war ✌🏾

Joseph Udonsak is a software engineer with a passion for solving challenges – be it building applications, or conquering new frontiers on Candy Crush. When he’s not staring at his screens, he enjoys a cold beer and laughs with his family and friends.