Easy Image Optimization in PHP
Time to read:
May 23, 2023
Written by
Reviewed by
Images. We use them each and every day on websites for a wide variety of purposes. From product photos on an e-commerce site to staff images on a consulting firm's website, modern websites would be far less engaging without them. Disable images for any modern website and you'll see what I mean!
However, images come at a cost. In 2023, images make up the largest proportion of modern websites, behind videos, a proportion that has been growing for several years, since images were added to the HTML spec in 1995.
While they can make pages and sites more engaging and attractive, though, images can significantly slow down page load speed and increase storage costs.
So in this, reasonably short, tutorial I'm going to show you how to optimise images in PHP with only a negligible loss of quality — if any.
Prerequisites
To follow along with the tutorial, you will need the following:
- Docker Engine and Docker Compose if you'd like to use the Docker Compose configuration available in the project's GitHub repository and avoid installing all of the required tools. Or, install the following image optimisation tools: jpegoptim, jpegtran, optipng, pngquant, and svgo.
- PHP 8.2 with the Fileinfo and one, or both, of the GD and Imagick extensions
- Composer installed globally
- jq
- A PNG, JPEG, GIF and SVG file to test the application with
- Some experience with Mezzio would be ideal, but it's not essential
How do you optimise images?
There are two key ways to optimise images: choose the best file format, and use image compression.
There are a number of file formats common to the web, with the primary ones being PNG, JPEG, and GIF. However, there are newer formats as well, such as SVG, and WebP. Here's a quick summary:
- AVIF: One of the two newer image formats, it is open and royalty-free. What's more, it's supported on almost every major browser. It's ideal if you really need to save bandwidth.
- GIF: The other main format for the web and also very widely supported. They're great for small images and simple animations. However, they're limited to a maximum of 256 colours and don't offer great performance.
- JPEG/JPG: This is one of the oldest image formats for the web, and arguably the most widely supported one available today. It can store images at much smaller file sizes with a minimal reduction in quality.
- PNG: PNG supports both lossy and lossless compression, and was designed as a modern replacement to the GIF and JPEG formats. It also has an animated variant, called APNG or Animated PNG.
- SVG: SVG files are plain text, not binary. Given that, they can achieve a high compression ratio and can be edited in any text editor on any operating system. What's more, being a vector graphic, they're very scalable, in contrast to raster graphics, such as PNG and JPG.
- WebP: The second of the two newer image formats, it was created by Google in 2011. WebP files can be compressed more than JPG and PNG, yet with no discernible loss of quality. It supports both lossless and lossy compression, transparency, and animation.
Image compression, if you're not familiar with it, is:
a process applied to a graphics file to minimise its size in bytes without degrading image quality below an acceptable threshold.
There are two types of image compression:
- Lossy compression removes parts of an image that the algorithm determines can be removed and which are probably indiscernible to the human eye. Given that, every time a file is compressed, more of the original image is irretrievably lost. JPEGs and lossy WebP use lossy compression.
- Lossless compression, doesn't remove or lose any data from the original image during compression but does remove unrequired metadata, such as some of its EXIF data. Given that, the original image data can always be retrieved, no matter how many times an image was compressed. This is helpful for work such as photography, However, file sizes are often larger than when using lossy compression. Some image formats that use lossless compression are PNG, GIF, and lossless WebP.
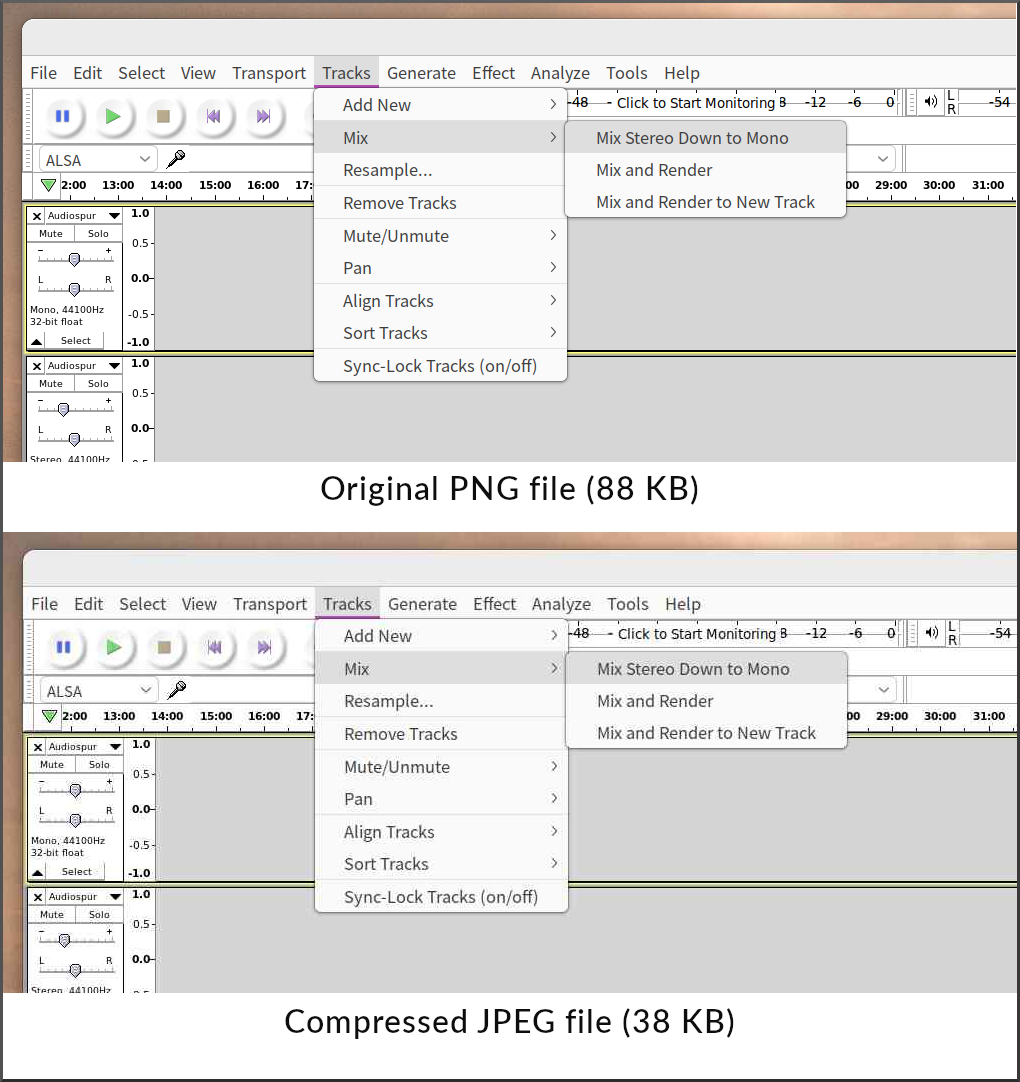
Take the two images below. The lossy-compressed JPEG isn't quite as clear as the original lossless PNG, but the difference is only negligible. And, depending on your needs, that loss of quality is likely acceptable — especially for the notable reduction in the file's size.
With that in mind, let's now build an application that can compress images in both lossy and lossless formats.
How will the application work?
There's not much to it. The application will allow an image to be uploaded and compressed, whether in the same file format or in a different one. It will have one route (/). This route will accept POST requests and look for three properties in the submitted form or POST data:
- image: An image to be uploaded and compressed. There are no checks on the uploaded image's type. Ideally, though, the file type should be restricted to a specific set, such as those supported by modern browsers.
- file_name: The desired name for the new image file, including its extension. The filename's extension determines the new file's format.
- image_quality: The desired quality, or compression level, for the new image. This is an integer ranging from 0 to 100, where 0 indicates the least amount of quality and 100 the most.It's worth noting that this setting only takes effect if the desired file format uses lossless compression.
Scaffold the application
The first thing to do is to scaffold the application. We're going to save some time by using the Mezzio Skeleton project to do this. Run the following commands, wherever you store your PHP projects, to scaffold the application, change into the project's top-level directory, and create the image upload directory (data/uploads).
When prompted, answer the questions as follows:
If you see the following at the end of the script output, run composer update to correct the issue.
Install the required packages
The next thing to do is install the required packages. Gladly, there are only two:
- Image Optimizer: It optimises a wide array of file formats, using tools such as jpegoptim, optipng, and svgo.
- Intervention Image: It provides an easier and quite intuitive way of working with images in PHP over using extensions such as GD and Imagick directly.
To install it, run the command below.
Create a handler class
Next, it's time to create a handler class to contain the logic for processing the uploaded image. Handler classes are analogous to Controllers in other frameworks, such as Laravel.
To create it, run the command below.
Now, open the new class, src/App/src/Handler/ImageCompressionHandler.php, and update it to match the code below.
The class defines two constants, one for the image upload base path (IMAGE_UPLOAD_PATH) and the other for the default image quality level (DEFAULT_IMAGE_QUALITY).
Then, in the handle() method, it starts off by attempting to retrieve the file_name and image_quality properties from the submitted form data. After that, it retrieves the uploaded image and moves it to the image upload directory (data/uploads), to help avoid security vulnerabilities.
Then, an ImageManager object ($manager) from the Intervention package is instantiated and initialised to use the Imagick extension for manipulating images. The object then creates a new image from the original, compressing it to the desired quality level. This defaults to the default quality level if the quality level was not specified. After that, it uses the Image Optimizer package to perform further image optimisations to reduce the file to the smallest file size.
The method finishes by returning a JSON response containing the name, size, and file type for both the original and the new image.
Register the handler with the DI container
Next, we need to register the handler with the DI (Dependency Injection) container so that it can be used to handle requests to the route when required. To do that, update the getDependencies() method in src/App/src/ConfigProvider.php to match the following.
Update the routing table
Finally, it's time to update the routing table so that requests to the default route are handled by the new handler class. To do that, update the anonymous function at the end of config/routes.php to match the following code.
Test the application
With the application complete, it's time to test it. Before that can happen, start it by running the following command from the project's top-level directory.
Alternatively, start it using Docker Compose, by running the following command.
Regardless of how you launch the application, it will be available on port 8080 on localhost.
Now, compress an image by running the following command. Replace the image on line 2 with an image that you have handy, and change the file name and image quality as desired.
After running the command, you should see JSON printed to the terminal, similar to the example below.
In addition to seeing the difference in file sizes, have a look at the original and new images and see if you can discern any noticeable quality difference. If not, play with the value of image_quality until you can.
That's how to compress images in PHP
Admittedly, this tutorial has only scratched the surface, but it shows just how easy it can be to compress an image in PHP, when using the Intervention Image package. What other functions would you use?
Matthew Setter is a PHP and Go editor in the Twilio Voices team, and a PHP and Go developer. He’s also the author of Mezzio Essentials and Deploy With Docker Compose. You can find him at msetter[at]twilio.com. He's also on LinkedIn and GitHub.
"Desert" by Michael Sutton is not licensed but available in the public domain.
Related Resources
Twilio Docs
From APIs to SDKs to sample apps
API reference documentation, SDKs, helper libraries, quickstarts, and tutorials for your language and platform.
Resource Center
The latest ebooks, industry reports, and webinars
Learn from customer engagement experts to improve your own communication.
Ahoy
Twilio's developer community hub
Best practices, code samples, and inspiration to build communications and digital engagement experiences.