Find your U.S. Representatives and Congressional Districts with SMS and ASP.NET Core
Time to read: 10 minutes
June 27, 2022
Written by
Reviewed by

When someone runs for office in the United States of America (U.S.), they have to fulfill certain "Ballot Access Requirements" to become listed on the ballot. One of those requirements could be that you need a certain number of signatures per district. So when volunteers and campaign workers go out to gather signatures, it is instrumental to know which congressional district (CD) the signee belongs to. However, knowing which congressional district you are from is not common knowledge, especially in areas where the district cuts right through counties, cities, and neighborhoods.
States redraw their congressional districts every decade after getting an updated population count from the Census Bureau. Each district is represented by a single U.S. representative in the U.S. House of Representatives. However, the manner in which these districts are drawn often result in unique and odd shapes which can be confusing. This is why constituents living just a street apart sometimes live in different districts, and as a result, vote in different house races.
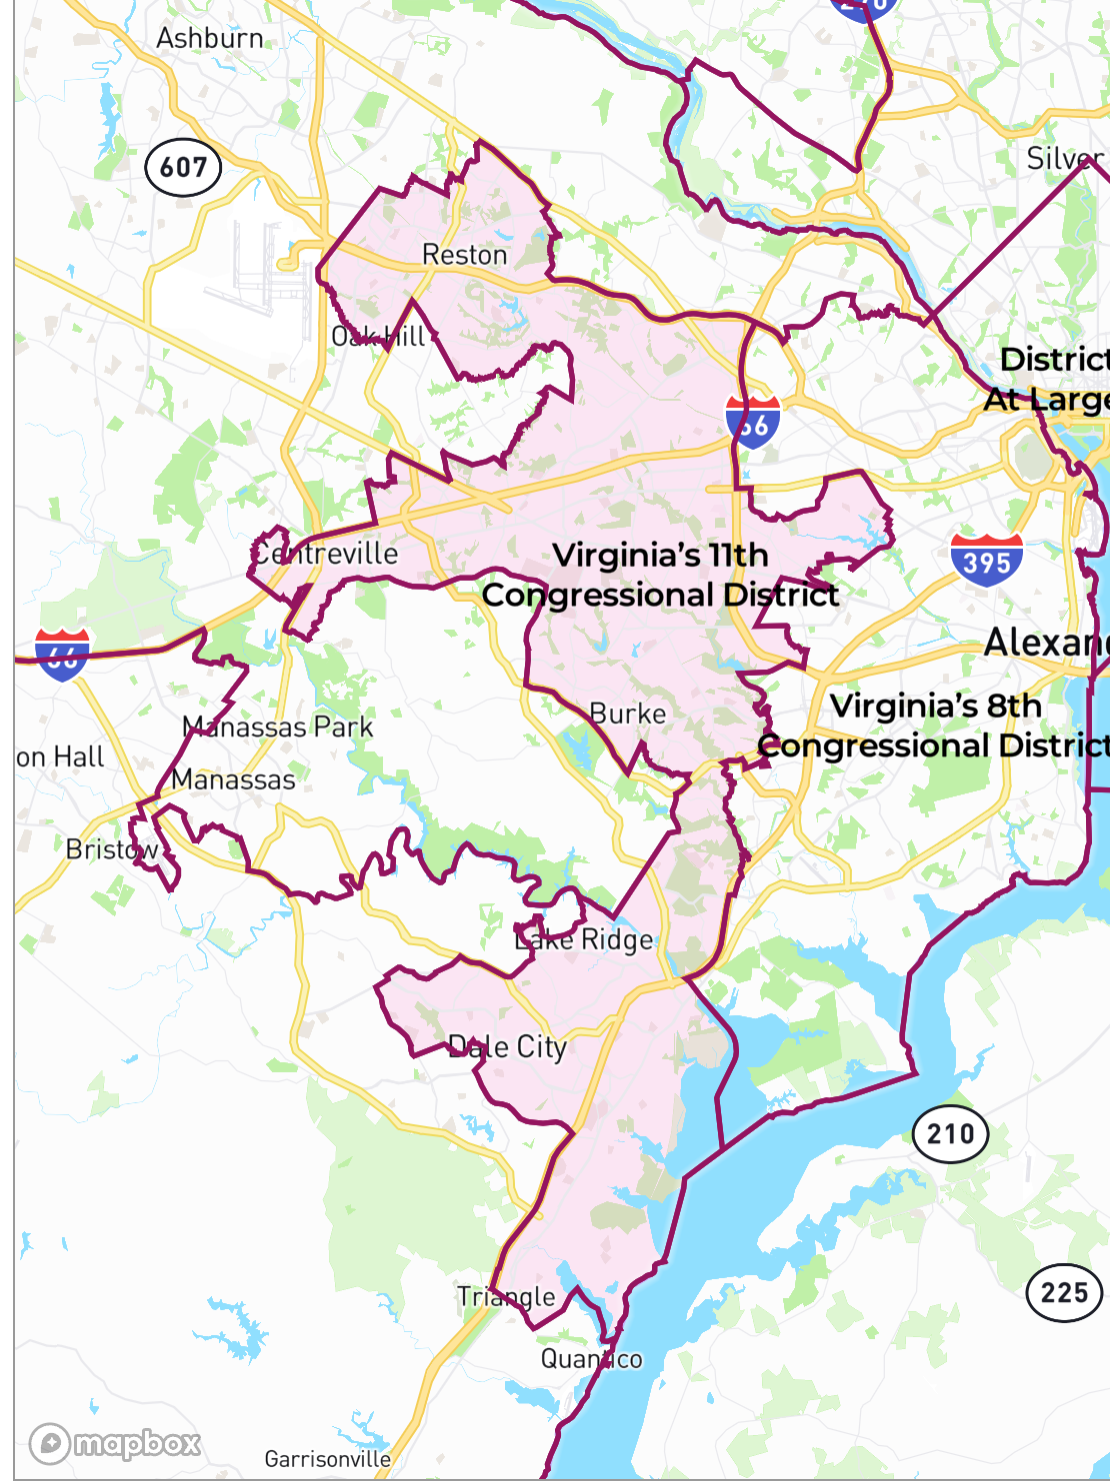
When I gathered signatures, the first question I had to ask over and over again was "what congressional district are you from?", and 95% of the time, the answer was "I don't know". That's because in Northern Virginia, the border between the 10th and 11th congressional district cuts directly through some counties, cities, neighborhoods, and streets.
The house.gov website has a tool to look up your congressional district and representative, but unfortunately, the tool is slow and painful to use, especially when you're on the go on mobile internet.
That's why instead of using web technology, I built a solution using connectivity technology that's more accessible, more reliable, and simpler. Using Twilio SMS, I built a phone number that you can text your address to and you will receive a response with your congressional district and representative. Let me walk you through how you can build this SMS bot using Twilio, C# .NET, and Google's Civic Information API.
Prerequisites
You'll need a couple of things to follow along:
- .NET 6 SDK (older or newer should work too)
- A code editor or IDE (I recommend VS Code with the C# plugin, Visual Studio, or JetBrains Rider)
- The ngrok CLI, and optionally, a free ngrok account
- A Twilio account (If you register for a free Twilio account, you'll receive trail credit to try out Twilio products)
- A Twilio Phone Number
- A personal phone or the Twilio Dev Phone to test your bot
- A free Google Cloud account
You can find the source code for this tutorial on GitHub. Use it as a reference if you run into any issues, or submit an issue if you need assistance.
Get Started with the Google Civic Information API
This SMS bot will use the Google Civic Information API to look up the U.S. congressional districts and representatives. This API has a free tier as part of the Google Cloud Platform.
Go to the Google Cloud Console and create a new project. Once the project is created, select the project using the project dropdown in the top-left navigation bar.
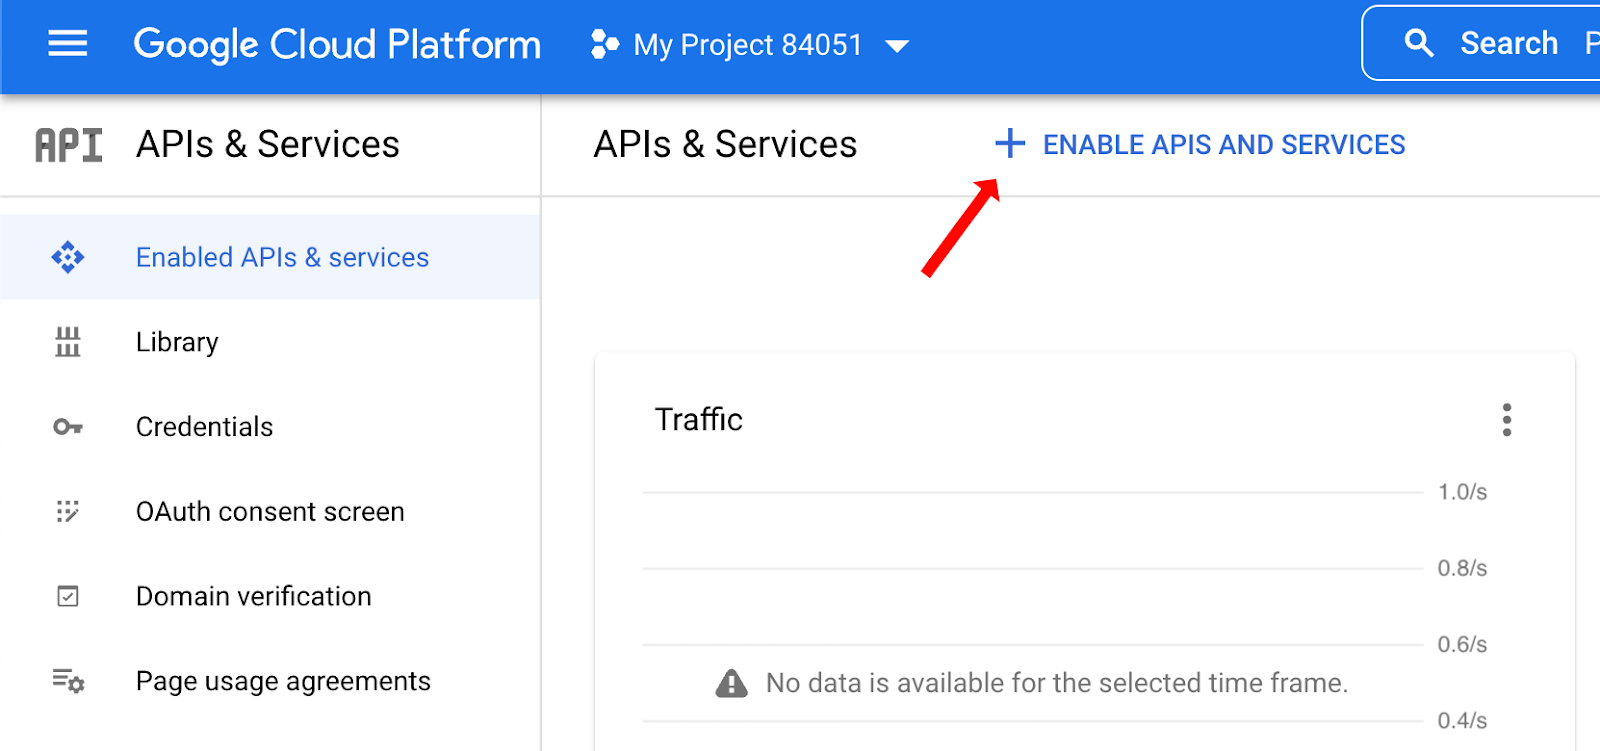
You'll first need to enable the Civic Information API. Click on "ENABLE APIS AND SERVICES", then search for the "Civic Information API".
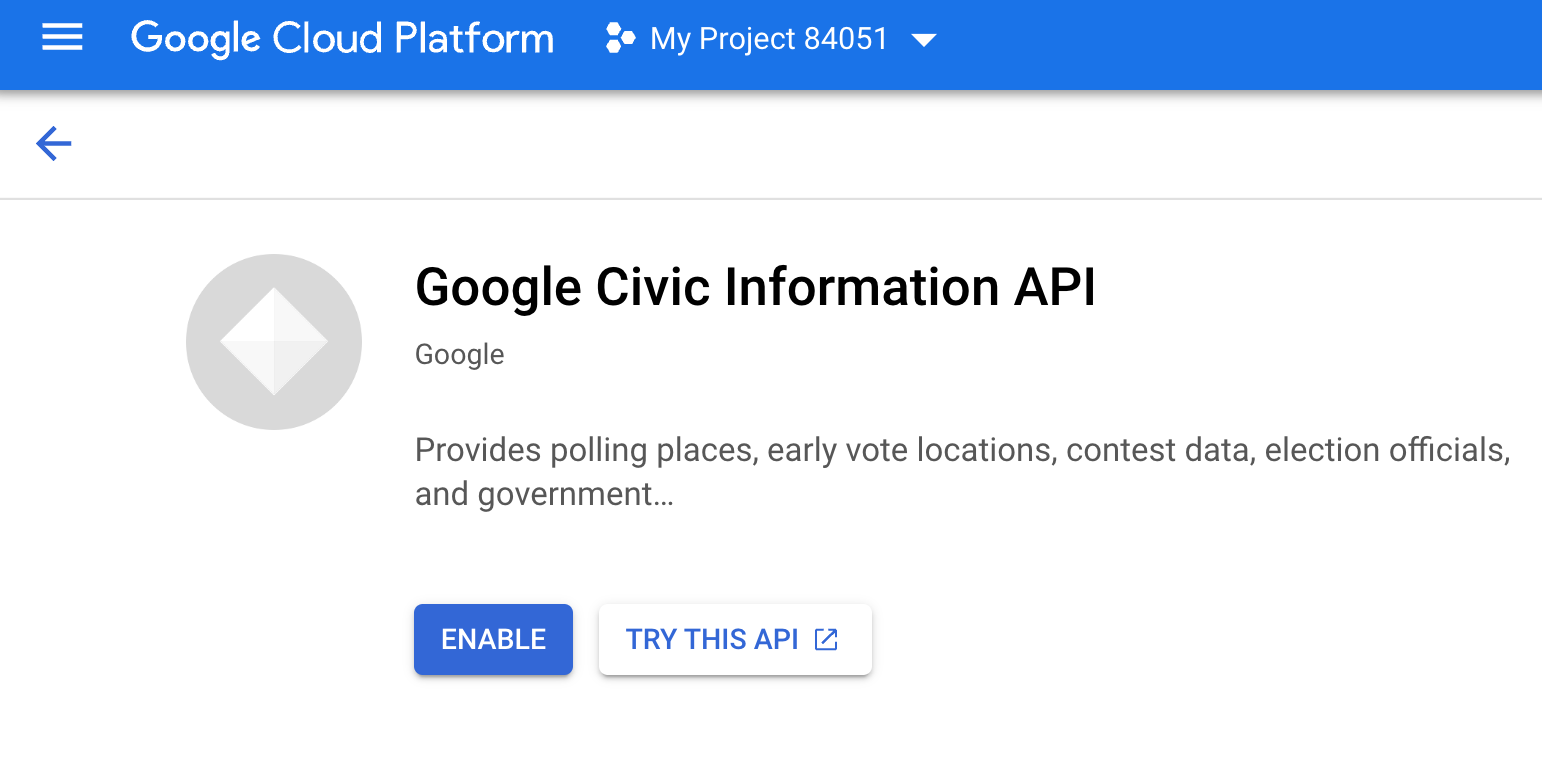
Click on the search result and then click ENABLE.
Now that the API is enabled for your project, you'll need to create an API token to be able to authenticate when consuming the API from your .NET project.
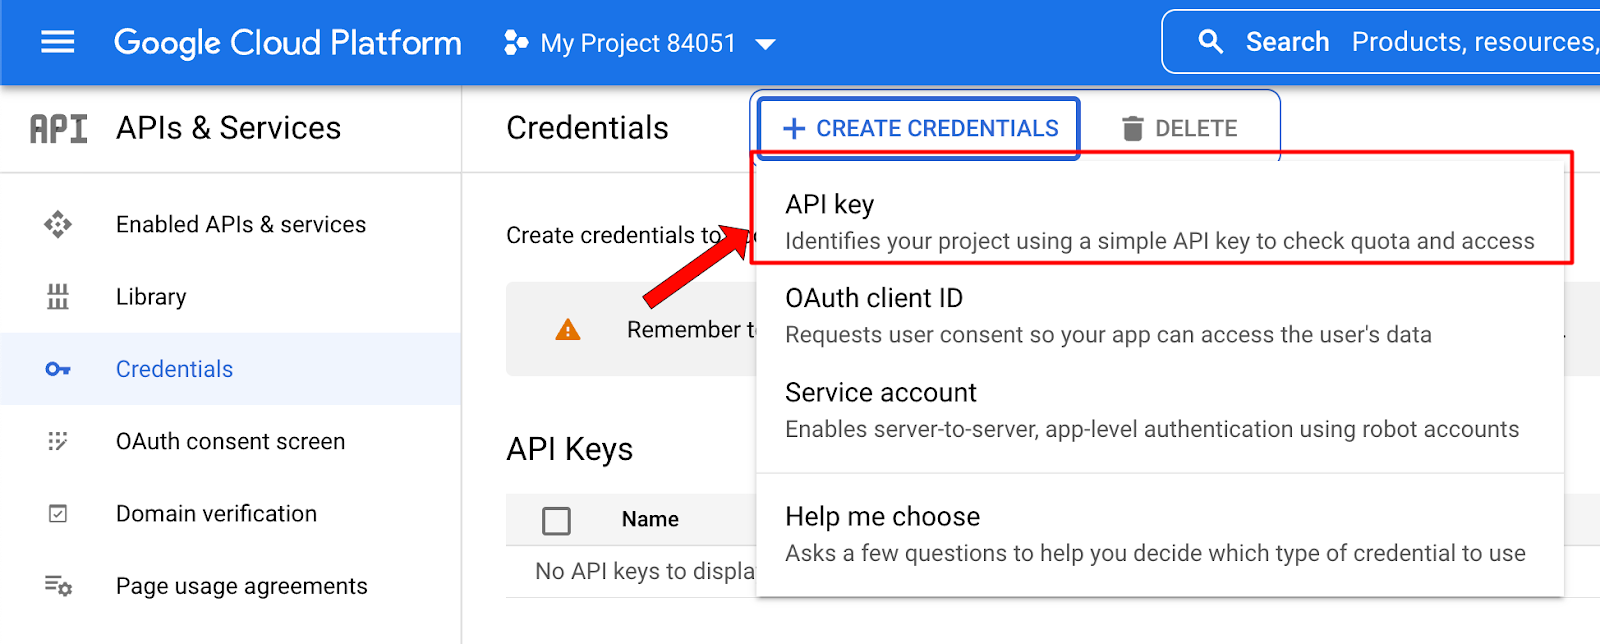
Navigate to the Credentials page, click on "CREATE CREDENTIALS" and then on "API key".
A modal will appear showing your API key. You will need this API key later, so copy and paste the API key somewhere safe. Next, click on the "Edit API key" link.
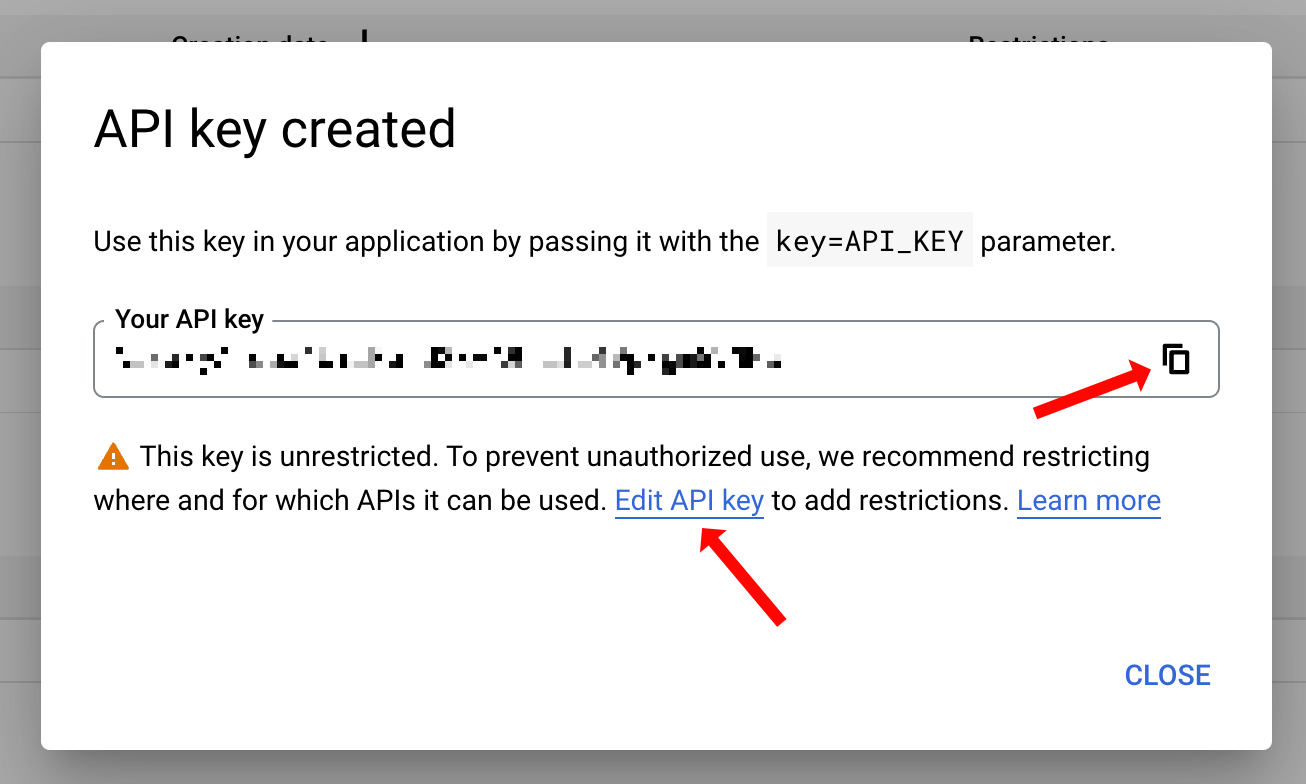
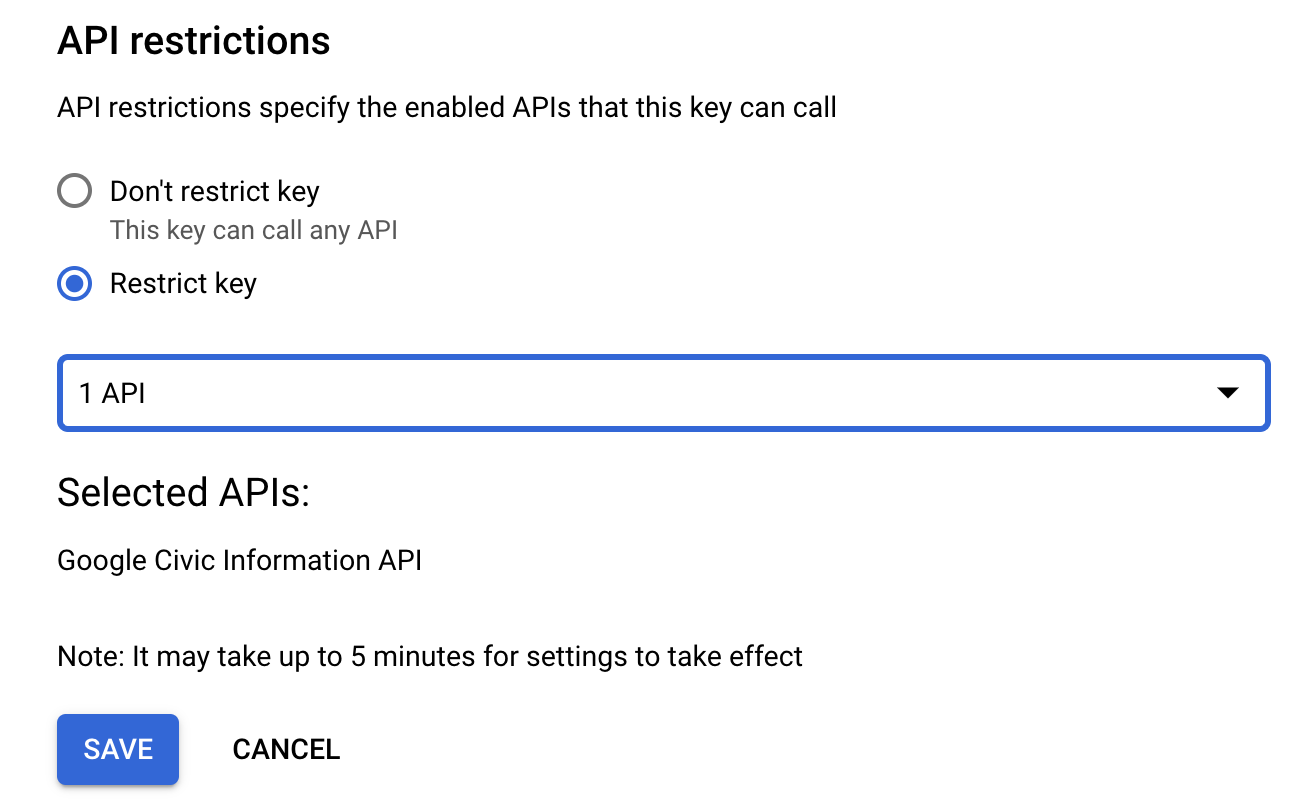
On the "Edit API key" page, you can configure the name and restrictions for your API key. This step isn't strictly required, but it is a good practice to follow the principle of least privilege, which means you should only give accounts and keys the level of access necessary to do their job.
In that spirit, find the "API restrictions" field and click on the "Restrict key" radio button.
Click on the newly appeared dropdown and select the "Google Civic Information API" option, and then hit Save.
You're all done setting up your GCP project and API key. Let's go try out the API!
Try out the Civic Information API
Open a new tab in your browser and navigate to the Civic Information API documentation for getting representatives by address.
The representativeInfoByAddress will be the specific method that you'll be using for this project.
You can pass a couple of parameters to the method to filter down the representative information, most importantly the required address field. This address field expects a physical mail address, however, it can be a partial address. You can pass in just the ZIP code, the city and state, or a full address including the street and number.
The HTTP response will contain divisions, offices, and officials for the given address:
divisionsare the political geographic areas that the address is within. Among these you would find the U.S. congressional districts.officesare the political offices someone can be elected to within the returneddivisions.officialsare the elected officials holding the returnedoffices.
By default, representativeInfoByAddress will return all divisions, offices, and officials that represent the given address, all the way from the highest office of the President down to the local offices.
To filter this down, you can pass in the levels and roles parameters.
This bot will look for U.S. representatives, so to filter down to only return representatives, you'll need to pass in country into the levels parameter because the U.S. representative is a national office, and you'll need to pass in legislatorLowerBody to the roles parameter because U.S. Congress has two houses: the Senate is the upper body and the House of Representatives is the lower body.
Click the "Try it now" link at the top of the page and play around with the method.
Set the address field to 10600 Little Run Farm Ct, Vienna, the levels to country, and roles to legislatorLowerBody, and then click EXECUTE.
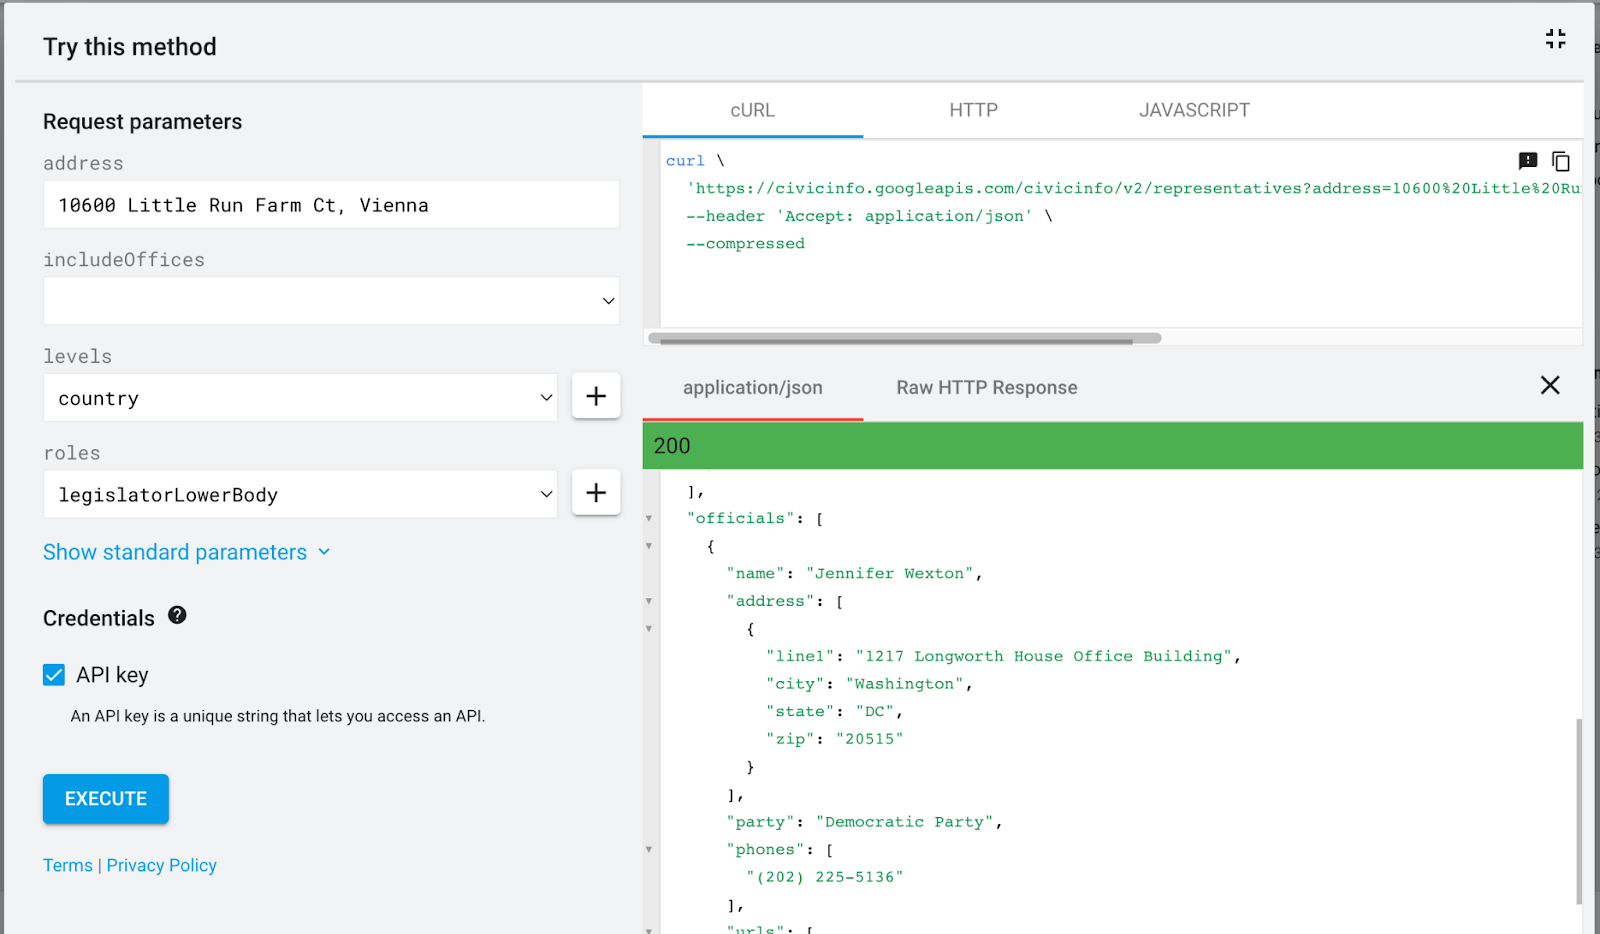
The response should have a single division, office, and official.
Now change the address field to Little Run Farm Ct, Vienna and click EXECUTE again.
This time no division, office, or official is returned. Why is that?
When you look up this street and overlay the congressional district maps, you can see that the border of district 10 and 11 cuts through this street. In fact, the border follows a creek that runs between house number 10600 and 10602.
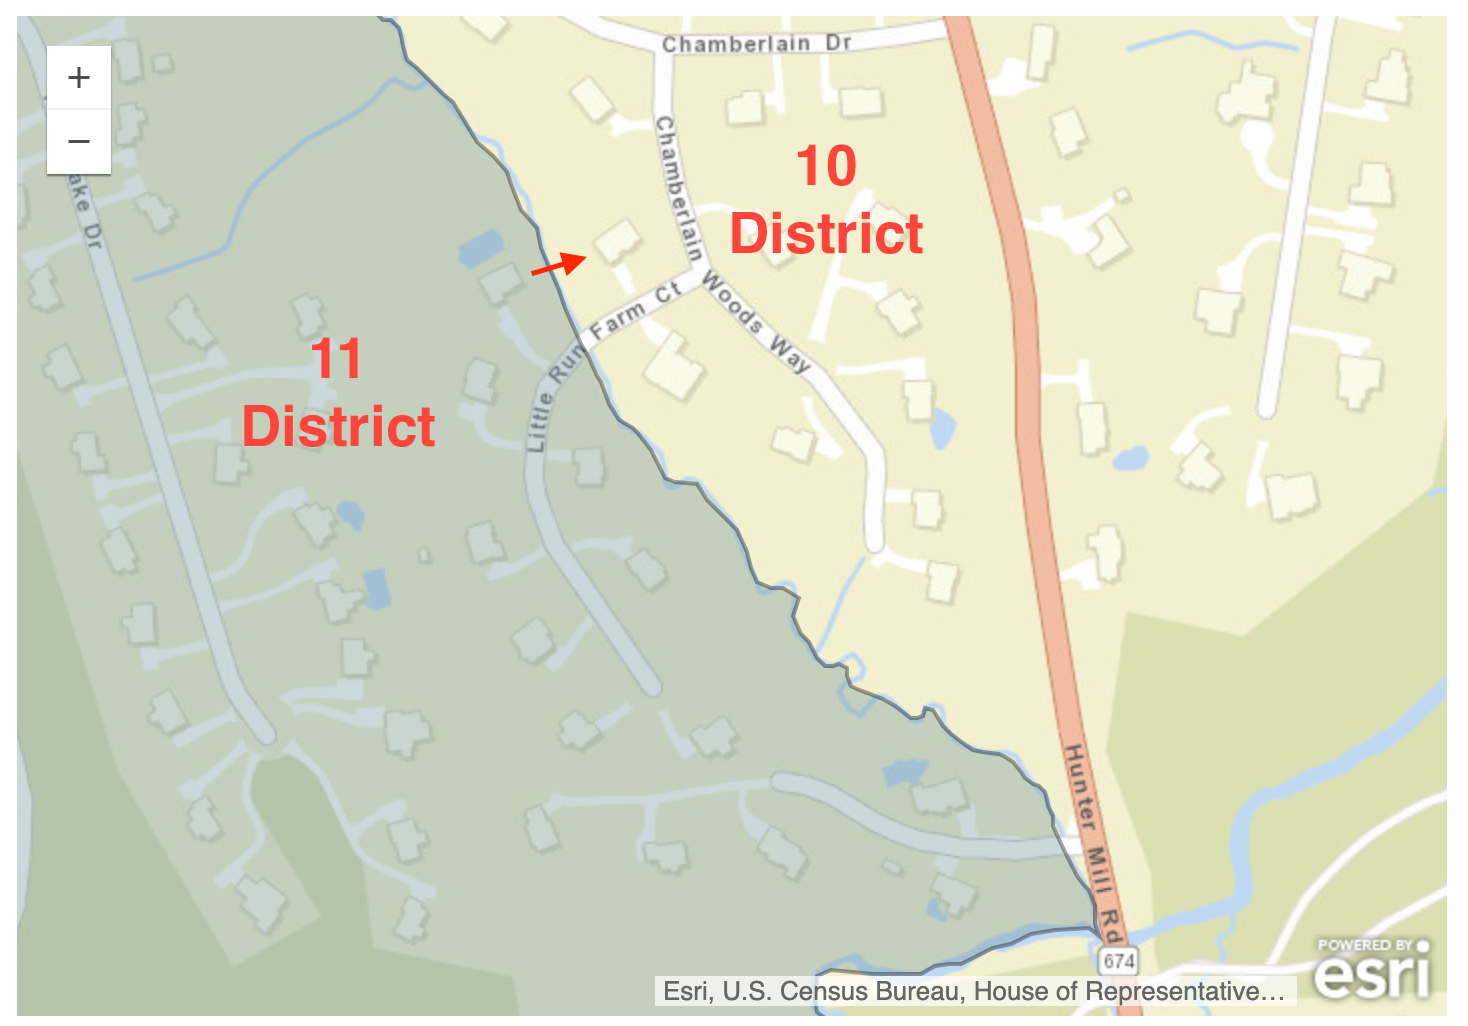
That's why the Civic Information API cannot determine the district when you pass in the street without a house number, and as a result, representativeInfoByAddress returns nothing.
This does not mean you always have to enter a full address, in fact when you put in the ZIP code 20301 without anything else, representativeInfoByAddress returns the information for the 8th congressional district. That's because the entire ZIP code is located within district 8, so the API doesn't need more information to determine the district.
Now that you're more familiar with the Civic Information API and specifically the representativeInfoByAddress method, it's time to consume the API from .NET!
Build an SMS bot to look up representatives
This project will be built on ASP.NET Core Minimal APIs. Open a shell and run the following command to create the project and navigate into the project folder:
Open the project in your preferred editor.
Retrieve Representatives from the Civic Information API
You can consume the Civic Information API using an HTTP client, but Google generates .NET libraries for all of its APIs including this one, which is convenient. You can install the library by adding the Google.Apis.CivicInfo.v2 NuGet package using the following command:
Create a new file RepresentativeLookupClient.cs and add the following C# code:
The RepresentativeLookupClient constructor accepts the GCP API key as the gcpApiKey parameter, which is then used to create a new CivicInfoService object that is stored into the service field.
The GetRepresentativeByAddress method accepts an address as a parameter and returns a Task that will resolve to a Representative object. In this method, a RepresentativeInfoByAddressRequest object is created passing in the service into the constructor and the address into the Address property.
The Levels and Roles property are hard-coded to Country and LegislatorLowerBody to filter down to U.S. representatives and congressional districts.
The API request is made using the request.ExecuteAsync method, which is surrounded by a try/catch block to handle some of the exceptions that can be thrown. When the API fails to parse the address, a custom exception of type FailedToParseAddressException is thrown. When no offices are returned, because the API couldn't determine the correct congressional district, or for some other reason, then a custom exception of RepresentativeNotFoundException is thrown. These two custom exceptions will be caught later to provide user-friendly messages to the end user.
However, if an office is returned, then a new Representative object is created with the data from the response.
Create 3 new files named Representative.cs, FailedToParseAddressException.cs, and RepresentativeNotFoundException.cs and then update each file with the contents listed below.
Representative.cs:
FailedToParseAddressException.cs:
RepresentativeNotFoundException.cs:
To use the RepresentativeLookupClient in your future API endpoints, you'll need to add it to ASP.NET Core's Dependency Injection (DI) container. Open your Program.cs file and add the highlighted lines to the existing code:
The GCP API key you created earlier needs to be configured using the GcpApiKey configuration key. Since the API key is a secret, you should avoid hard-coding it or storing it in source control.You can use environment variables or a secure vault service, or for local development, you can use the .NET Secrets Manager also known as user secrets.
Run the following command to initialize user secrets in your project:
Next, configure the GCP API key as a user secret:
Replace [YOUR_GCP_API_KEY] with the API key secret you copied earlier.
The RepresentativeLookupClient is now ready to be used! Feel free to add some code to quickly test it out, otherwise, move to the next step where you'll integrate the client into your minimal API.
Create your Twilio Webhook
There's a useful library called Twilio.AspNet which will help you build Twilio webhooks.
Add the Twilio.AspNet.Core NuGet package to install the library:
Then, open your Program.cs file and update it with the following code:
The new /message endpoint accepts a couple of parameters that will be dependency injected.
The MessagingResponse object will help you construct TwiML to respond to an incoming message.
The first message you will respond with, is an introductory message. To only introduce the bot once, a cookie is used to keep track of whether the sender has been greeted with the introduction.
The messagingResponse.Message method is used to create a TwiML Message verb that will respond to the sender. The Results.Extensions.TwiML method creates a TwiMLResult that will serialize the messagingResponse to XML and set the correct content-type header.
If the sender has already been greeted, the bot responds with "YOU HAVE BEEN GREETED ALREADY!".
However, this last message is a placeholder. Replace the placeholder with the following code:
Once the sender has been greeted, the bot will assume that whatever message is sent next will be the address to return representative information for. The message that is sent will be stored in the form encoded "Body" parameter.
After getting the body of the message, the bot will request an instance of RepresentativeLookupClient from the DI container, then the bot invokes the RepresentativeLookupClient.GetRepresentativeByAddress method passing in the body as a parameter.
If no exception occurs, two messages will be added. One message will describe the district and representative, and the other will return the image of the elected official, if an image is provided.
Your project is ready! Start your project using dotnet run.
To quickly test out your /message endpoint, you can use the following PowerShell or Bash script in a new shell tab:
PowerShell:
Bash:
Replace [YOUR_LOCALHOST_URL] with one of the localhost URLs printed out when running your .NET project.
The first web request will be responded to with the following TwiML:
The subsequent request will be responded to with the following TwiML:
If everything is working as expected, you can now configure your Twilio Phone Number to use your Minimal API endpoint as the SMS webhook.
Configure your Twilio SMS Webhook
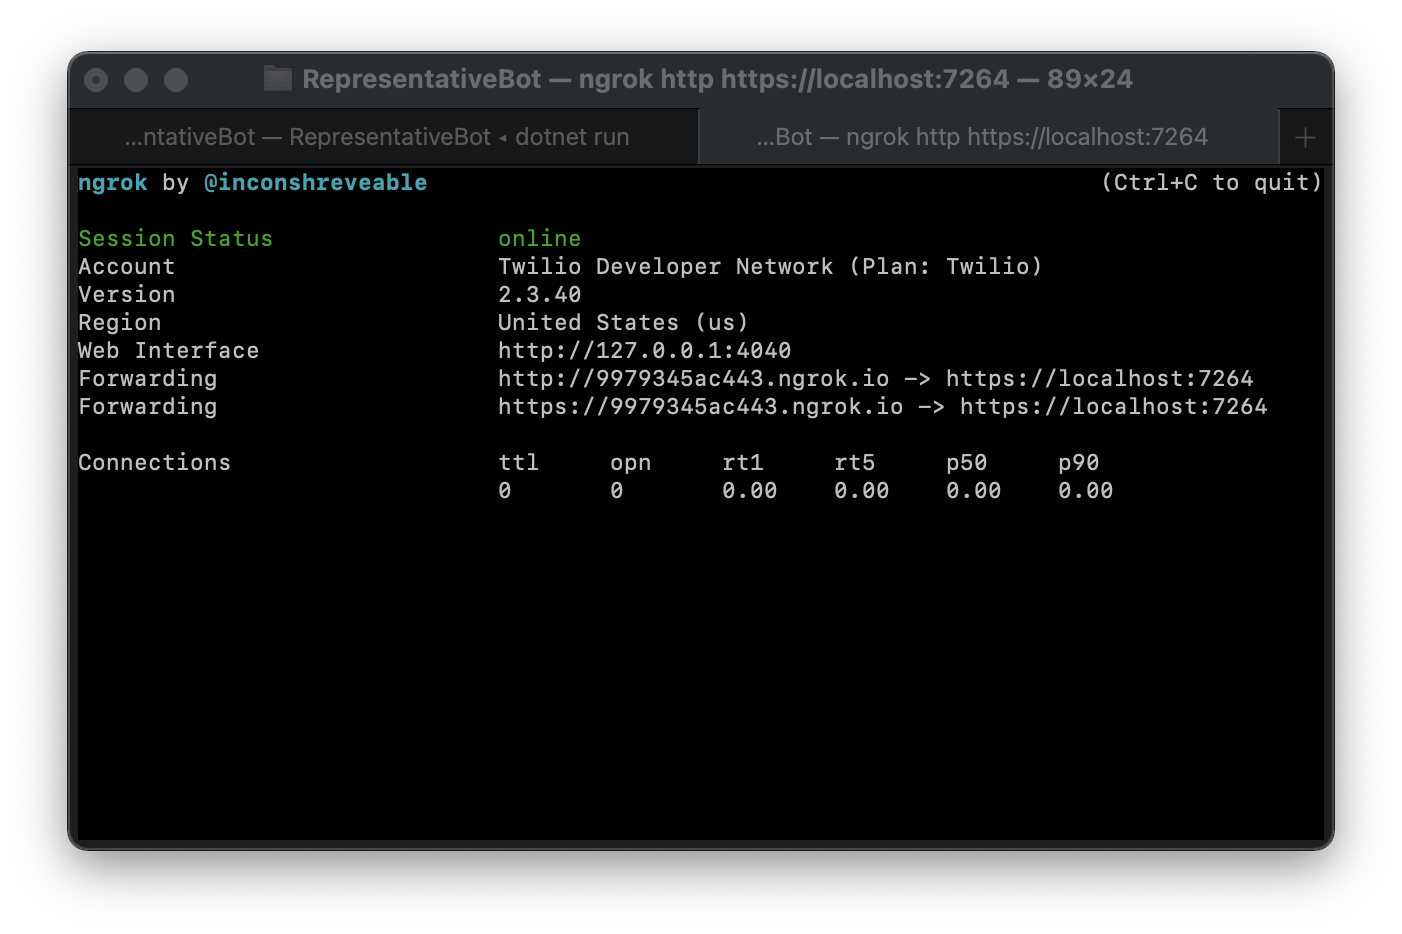
Start your project if it isn't running yet (dotnet run) and take note of one of the localhost URLs printed out by the application. For Twilio to be able to send HTTP requests to your local web server, the server needs to become publicly accessible. ngrok is a free secure tunneling service that can make your local web servers public.
Run the following ngrok command in a separate shell:
Replace [YOUR_ASPNET_URL] with the localhost URL from your .NET application. If you're using an HTTPS localhost URL, you'll need to authenticate ngrok.
The ngrok command will display an HTTPS Forwarding URL that makes your local web server public.
Now it's time to update your Twilio Phone Number to send HTTP requests to your /message endpoint via the ngrok Forwarding URL. The URL should look something like https://1cc74f4c9f70.ngrok.io/message.
Go to the Active Phone Numbers section in the Twilio Console and click on your Twilio Phone Number.
This will take you to the configuration for the phone number. Find the Messaging section and under the "A MESSAGE COMES IN" label, set the dropdown to Webhook. In the text field next to it, enter your ngrok forwarding URL with /message appended to it. Select “HTTP POST” in the last dropdown.
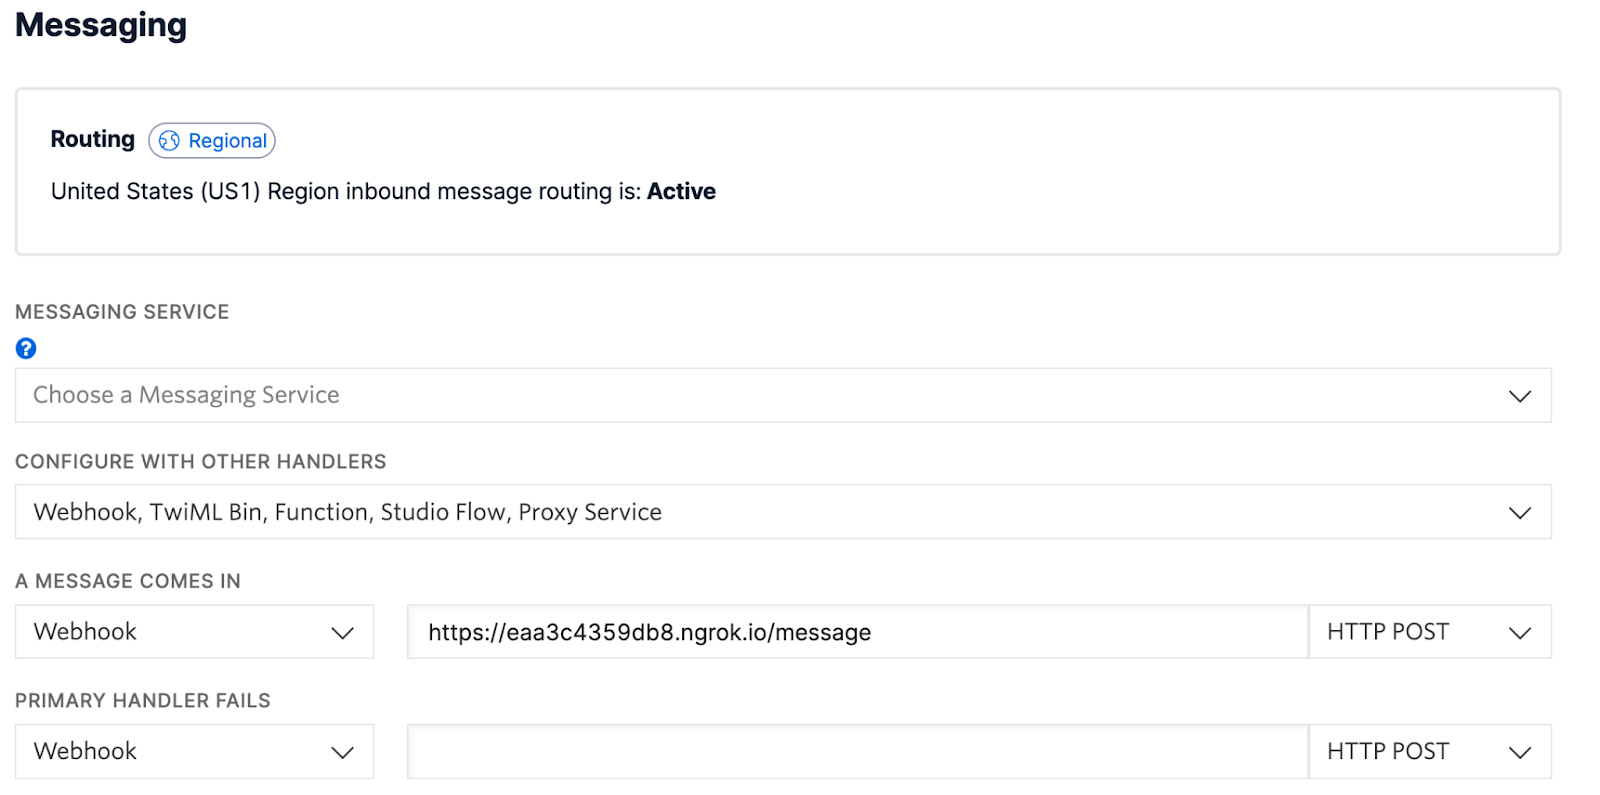
Finally, click the Save button at the bottom of the page.
Test your SMS Twilio Bot
To test your bot, you can either use a personal phone to send text messages, or you can use the Twilio Dev Phone to test.
Send a text message to your Twilio Phone Number with anything as the body. You should receive the greeting you configured. Once you've been greeted, reply with any address that you want to retrieve representative and district information for.

Future improvements
This bot is a great start, however, you can improve this solution in a couple of ways:
You can respond to the user with more information about the elected official and how to reach them. And instead of only returning U.S. representatives, you could return elected officials from every level.
Currently, anyone can send HTTP requests to your webhook and pretend to be Twilio. This bot doesn't respond with any sensitive information so the risk is lower, however, it is always a good idea to secure your webhooks using webhook signature validation.
In this tutorial, you manually spun up a secure tunnel using ngrok, but you could also do this programmatically so that a tunnel is created and your Twilio SMS webhook is updated whenever you start your .NET application.
Next steps
If you made it this far, a big shout-out to you! 🎉
In this tutorial, you learned how to respond to incoming text messages with Twilio, but if you’re looking to learn more, you can also initiate text messages yourself using the Twilio SDK, or send emails using Twilio SendGrid.
If you found this useful, let me know and share what you're working on. I can't wait to see what you build!
Niels Swimberghe is a Belgian American software engineer and technical content creator at Twilio. Get in touch with Niels on Twitter @RealSwimburger and follow Niels' personal blog on .NET, Azure, and web development at swimburger.net.
Image credit: Matthew Geason has kindly allowed us to use his picture of the U.S. Capitol.
Related Resources
Twilio Docs
From APIs to SDKs to sample apps
API reference documentation, SDKs, helper libraries, quickstarts, and tutorials for your language and platform.
Resource Center
The latest ebooks, industry reports, and webinars
Learn from customer engagement experts to improve your own communication.
Ahoy
Twilio's developer community hub
Best practices, code samples, and inspiration to build communications and digital engagement experiences.