Get SMS Updates from GitHub with Twilio, Python and GitHub Actions
Time to read: 7 minutes
April 17, 2020
Written by

In November 2019 at GitHub Universe, several new products were introduced. Among them was the announcement of GitHub Actions. Actions is a tool within GitHub that enables continuous integration and a wide range of automation. You get a Docker container where you can execute anything from scripts to binaries to other Docker containers.
Actions are language agnostic so you can define them in any programming language and execute them in containers. In this post we’ll build an action with Python and Twilio to send you SMS notifications regarding Pull Requests or Issues in your GitHub repository.
Tutorial requirements
- Python 3.6 or newer. If your operating system does not provide a Python interpreter, you can go to python.org to download an installer
- Git installed on your system
- A phone with an active connection for receiving the SMS
- A GitHub Account. You can Sign up for GitHub if you don’t have an account
- A Twilio account. If you are new to Twilio create a free account now!
Getting a Twilio phone number and credentials
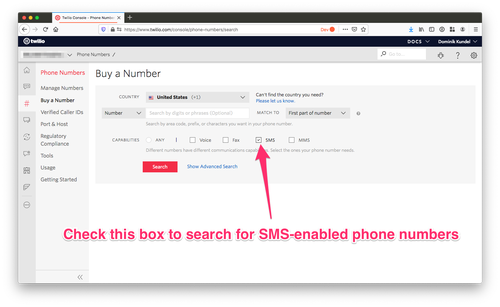
After you create your Twilio account it's time to get a phone number. Go to the Phone Numbers section in your Twilio Console and search for a phone number in your country and region, making sure that the SMS checkbox is ticked.
Once you have that phone number added to your account, make sure to note it down somewhere. We'll need it later.
Get your account credentials
The credentials are used to authenticate against the Twilio service and confirm your identity. We will use the “Account SID” and the “Authentication Token” values. You can find both of them in the Twilio Console.
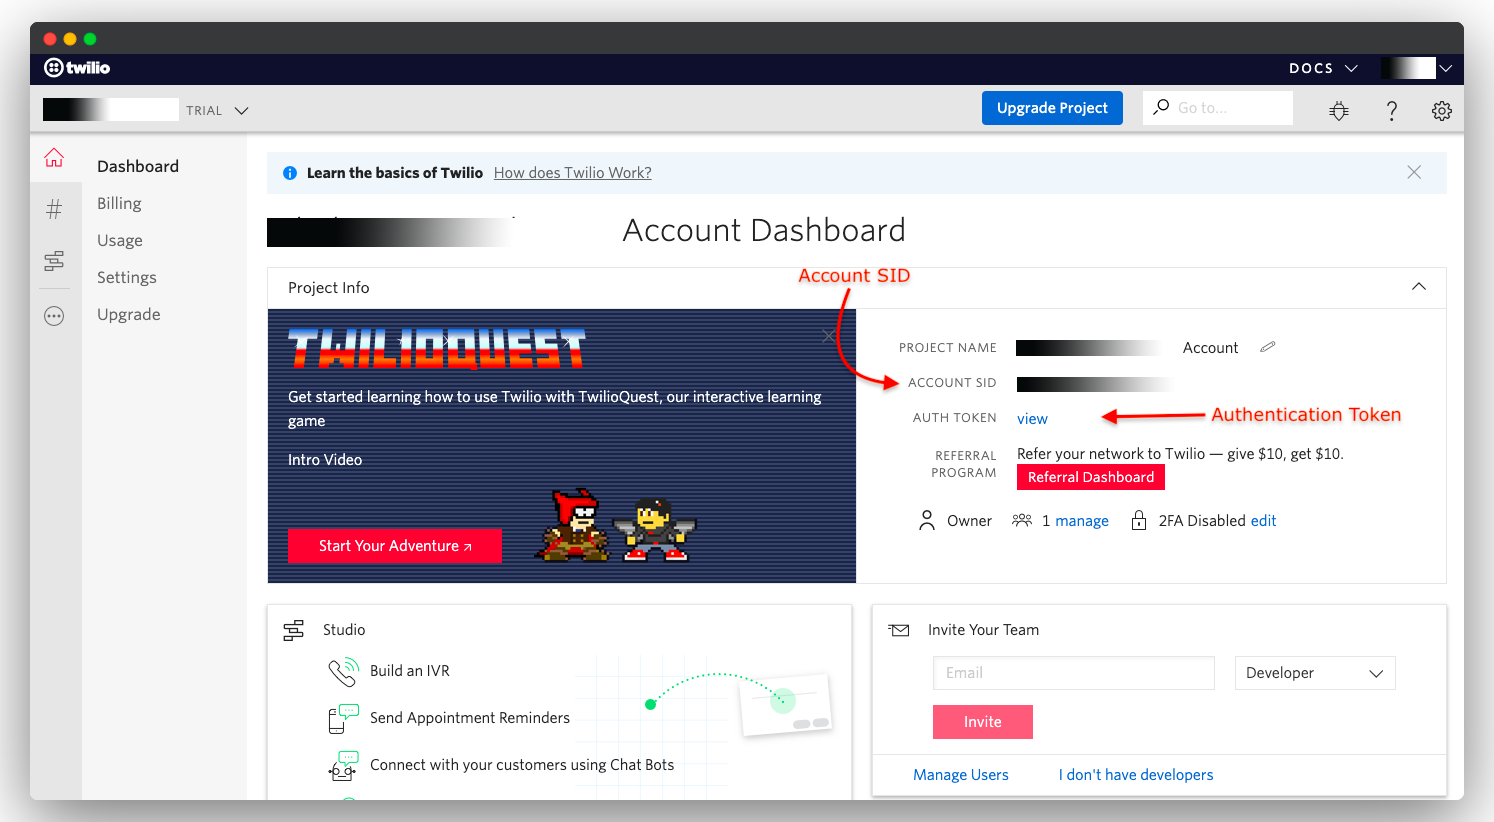
You can note these down too since we’ll be needing them while using the action.
Setting up your development environment
Since we’re using Python it’s always best to use a virtual environment on anything new. First we’re making a new folder and initializing the virtual environment there and initialize a git repository and install the python-twilio helper library.
On Unix/ Mac OS systems, open the terminal and execute these commands:
On Windows Systems the commands are:
We’ll be needing 3 files for our project. Our folder tree will be like this:
Building the action with Python
We’re going to edit the app.py file to define how our action should work and to send the SMS. The idea is simple. If a Pull Request or Issue is opened on the target repository, we will send the SMS with the title, author and repository name.
Let’s begin writing our app.py file:
To start we import the Twilio client and get all the configuration options from environment variables.
You can see that there are many environment variables with a INPUT_ prefix. This is because GitHub Actions will pass any input variables we define in that way. You can find more about inputs in the Official GitHub Actions Documentation.
The input variables that we are using include the title and number of the issue or pull request, the action, and the sending and receiving phone numbers. Because GitHub treats issues and pull requests separately we have to use a conditional to retrieve the title and number, which can come as an issue or a pull request.
The environment variables with the GITHUB_ prefix are the variables which are provided by default in the Actions Runtime by GitHub. We are importing the actor (the user), the event (issue, pull request, etc.) and the repository name.
Response logic
Next we’ll define the output response. We’re going to do that by using multiple if conditions and using the action variable which is assigned above. The logic is simple, we’re going to check if the event is a Pull Request or Issue and if they are opened or closed. Our response will be based on these conditions.
This code block checks if a Pull Request or Issue is opened or closed and assigns the response variable with an appropriate message. We’re using Python’s f-strings to format the message that we want to send out. Bear in mind that we’re only checking if a pull request or issue is opened or closed. If anything other than those triggered the action, then the response will be a generic message regarding what the event was and who triggered it.
Sending the message
Remember that you imported the Twilio Helper Library in the 2nd line. We are now ready to initialize the Twilio client and send the message.
Here we initialize the Twilio client. The Account SID and Auth Token will be defined as environment variables, and will be automatically imported by the client to authenticate. The create function is where we create the SMS message by defining the message body, the “from” and the “to” phone numbers.
All together
Here is the complete action code:
Configuring the action
As mentioned above, GitHub is going to execute our action inside a Docker container. In this section we are going to define the Dockerfile for the action and a metadata file that will provide GitHub all the information it needs to run the action.
Dockerfile
A Dockerfile contains instructions and arguments that define the contents and startup behavior of a Docker container. Below you can see the Dockerfile that we are going to use for this action:
We’re initializing the Docker container with a Python 3.7 image, copying our application file, installing the Twilio package dependency and setting up the command that runs the action. The GitHub Actions Docs is a great reference if you’re new to Docker and Dockerfiles and on how to use it with GitHub Actions.
Action metadata
The action.yml is the heart of the action. This file defines what inputs should be provided to the container environment and how the action should run. We’ll define the action.yml like this:
In the inputs section we use some default values which are taken from the issues and pull request events defined by the GitHub API, which is available in the Actions context as github.event. You can find out more on what’s available in this context here.
The runs section defines that the action will run as a Docker container with our Dockerfile. The branding section is used to define how the action is going to look in the GitHub Marketplace, from where others can find it.
GitHub provides full documentation for the metadata file format.
Push it!
GitHub actions need to be on their own GitHub repository before they can be used. We had initialized a git repository on our project directory when we started, so now we need to push it to GitHub.
Log in to your GitHub account and create a new repository. You can use any name you’d like for it, but if you need a suggestion, use py-twilio-action. To keep things simple, Initialize it without a readme file.
To push our project to GitHub, use the following commands:
Be sure to edit the <repo> with the location of your GitHub repository. Depending on the case this can be in the form git@github.com:<username>/<repo_name> or https://github.com/<username>/<repo_name>. If you don’t have automatic authentication set up on your system you will be prompted to authenticate when you run the push command.
After you push the project you should see the repository and the three files on your GitHub repository page.
Configuring the workflow
The repository for our SMS action is now complete. Now we need to go to the GitHub repository on which we want to use this action and configure it to run by writing a workflow file. If you do not have a repository of your own to try this on, you can use the same repository that you created in the previous section for the action itself.
A workflow is a YAML file that tells the Actions environment what to do, when and how to do it. A single workflow file can invoke multiple actions, and a repository can define multiple workflows as necessary.
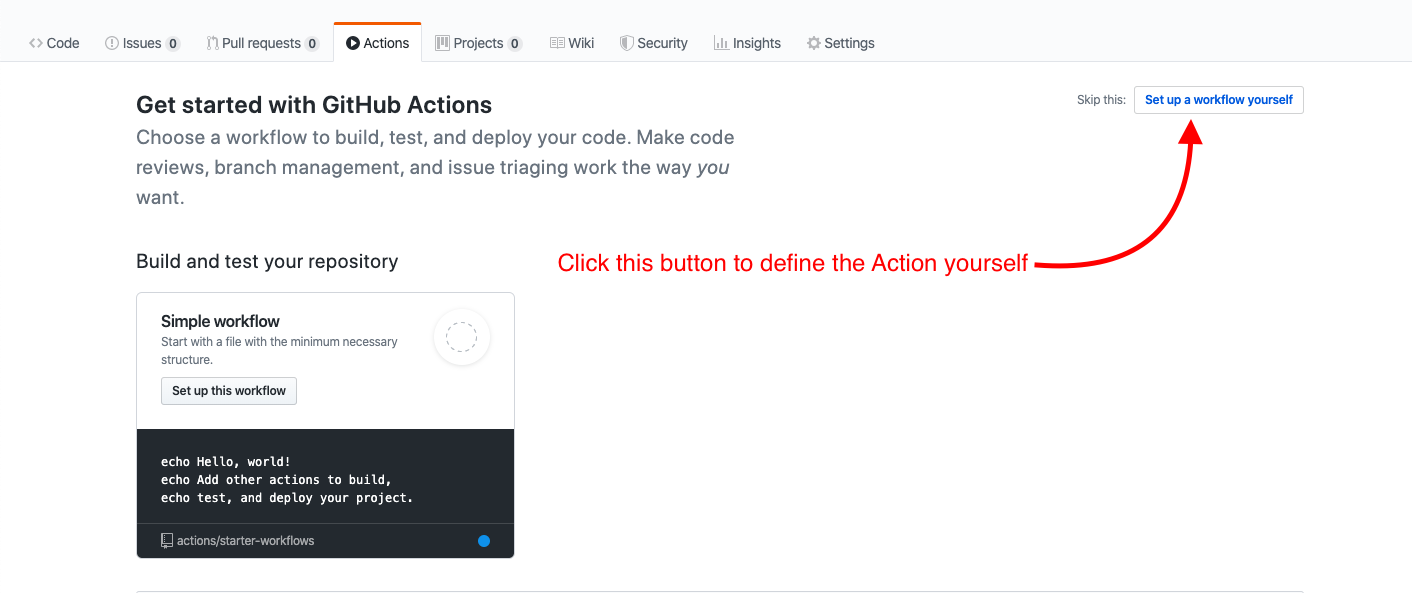
For defining a workflow go to the “Actions” tab in your repository and click on the “Set up a workflow yourself” button.
You’ll be taken to the GitHub UI to edit the workflow file. We’re editing this file directly on GitHub because the web-based editor will check for errors and provide an autocomplete feature.
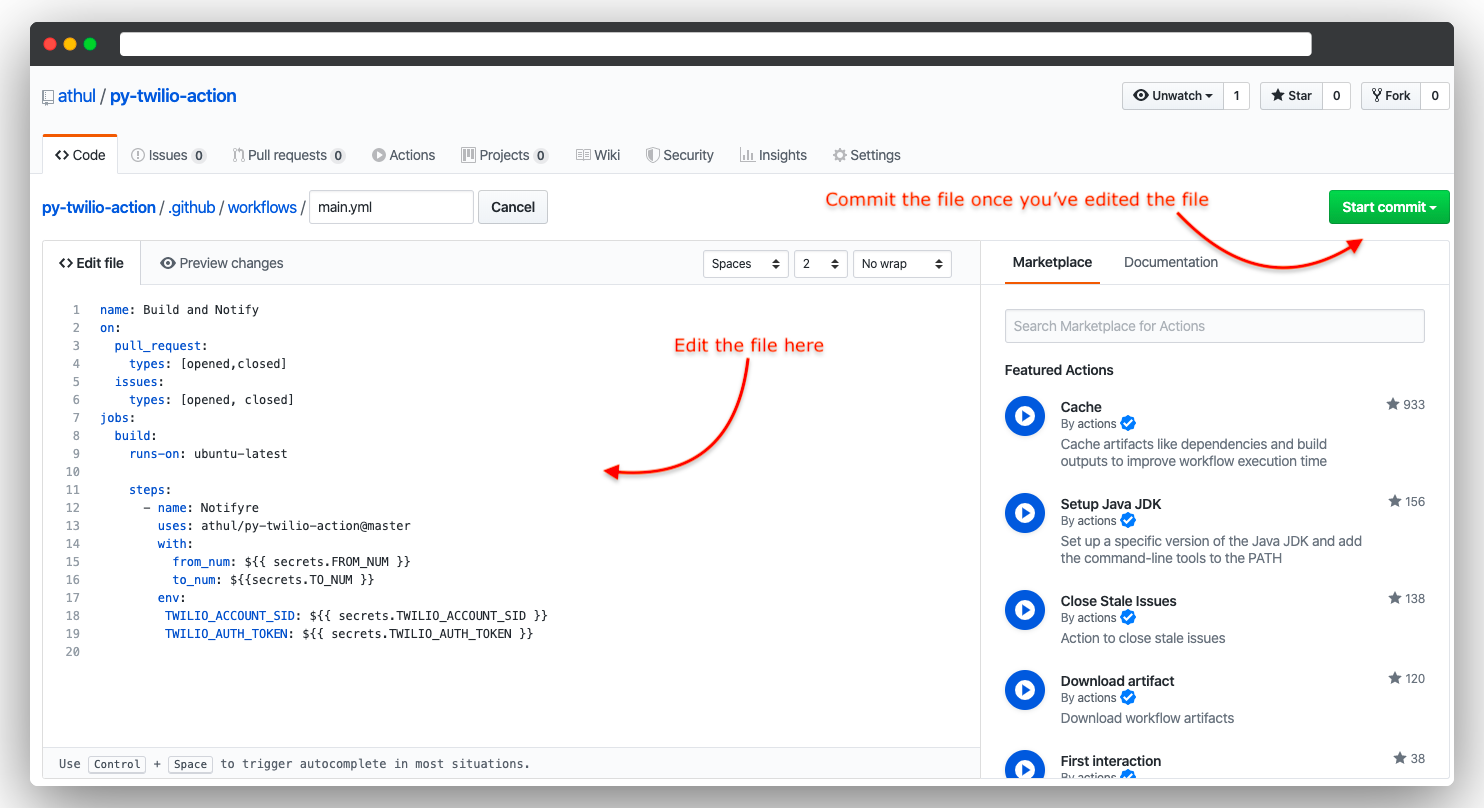
Clear the contents of the default work file and paste the content given below:
Make sure you edit the username and repo_name with your username and the action repository’s name.
Setting up the secrets
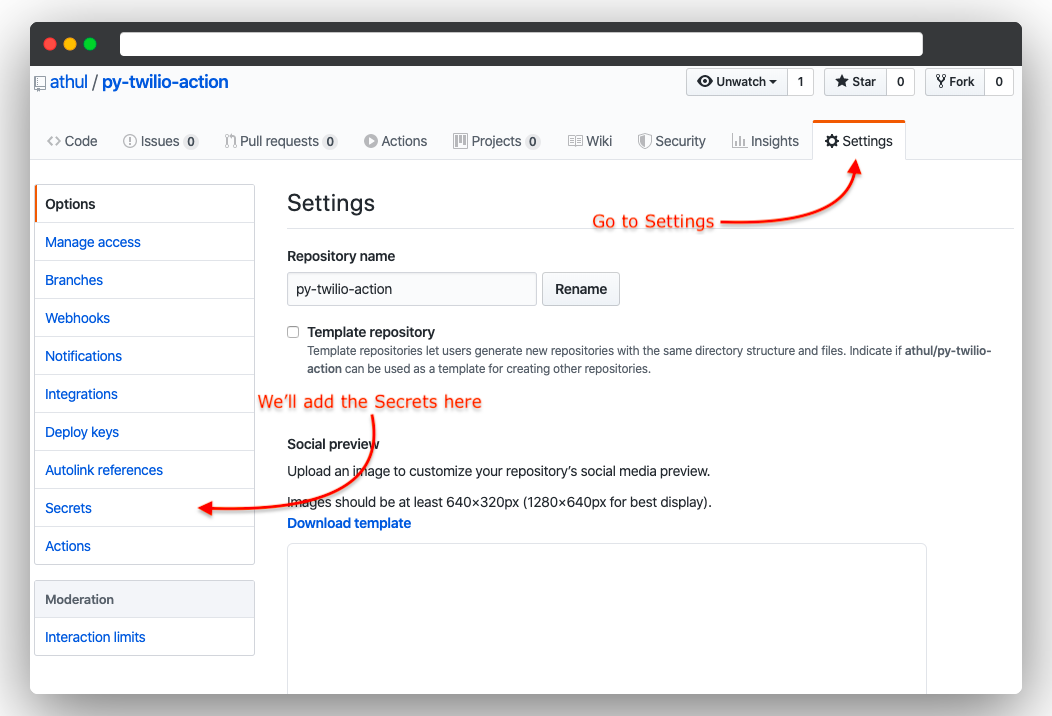
For safekeeping, the Twilio Account SID, Auth Token and the phone numbers will be defined as secrets in the repository where you want to run the action. To the secrets go to the “Settings” tab of that repository and then click on the “Secrets” button in the side navigation bar.
Secrets are case sensitive so be careful when you add them. We are going to add the secrets like this.
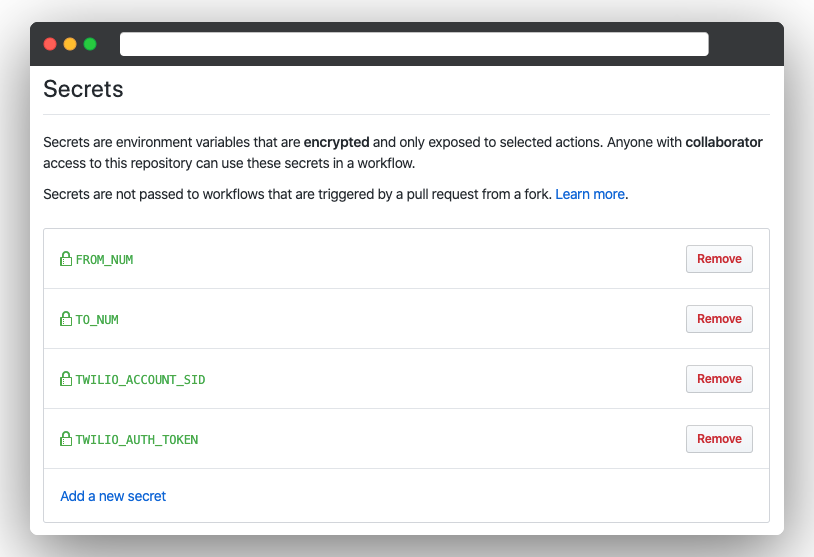
FROM_NUMholds your Twilio NumberTO_NUMholds your personal number, where the SMS will be sentTWILIO_ACCOUNT_SIDholds your Twilio Account SIDTWILIO_AUTH_TOKENholds your Auth Token
Keep in mind that the phone numbers have to be entered in the E.164 format.
Sending the SMS
In the workflow we defined our action to be limited to Issues or Pull Requests opened and closed:
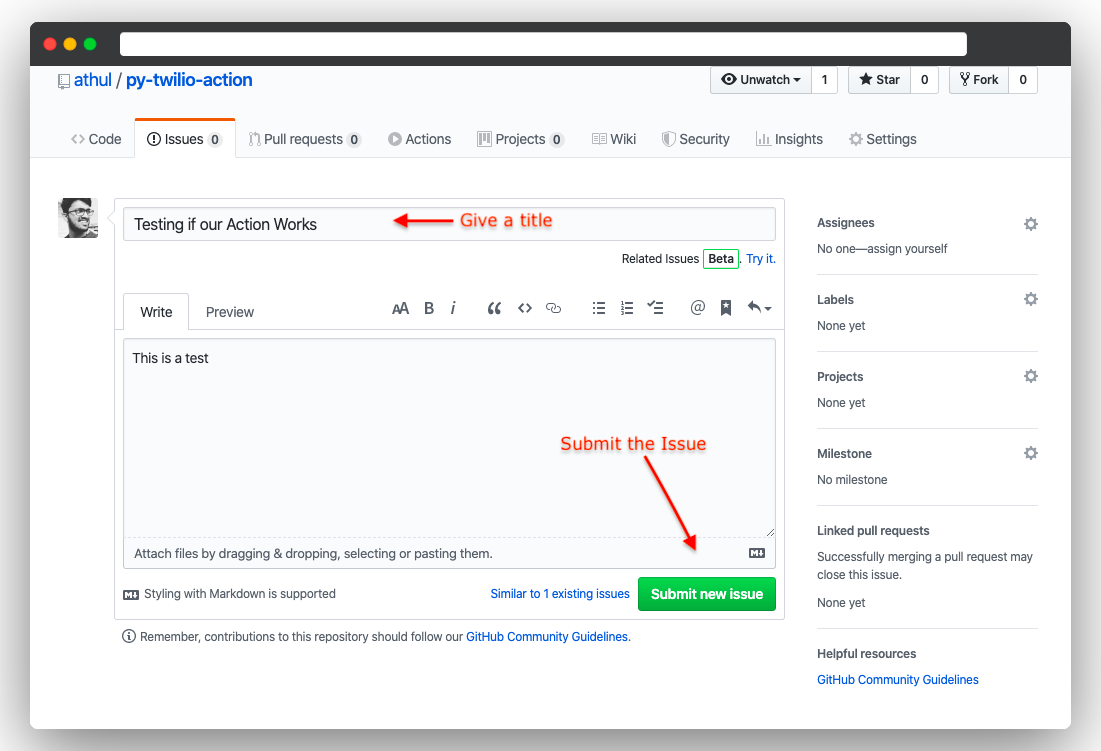
So to test out if our action is working we have to create a new issue or pull request. Below you can see how to submit a new issue:
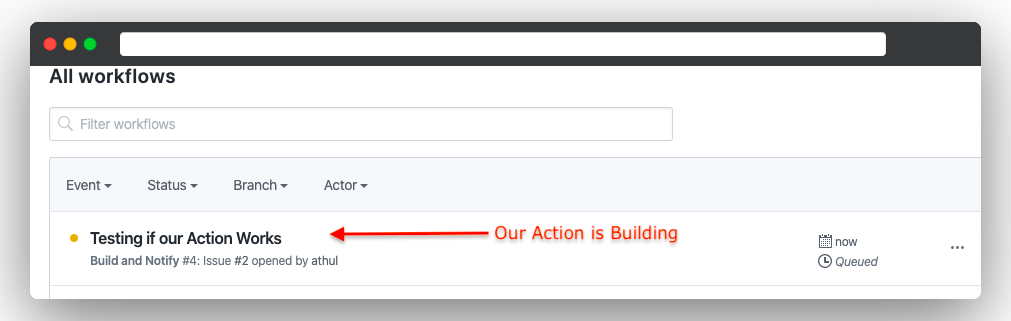
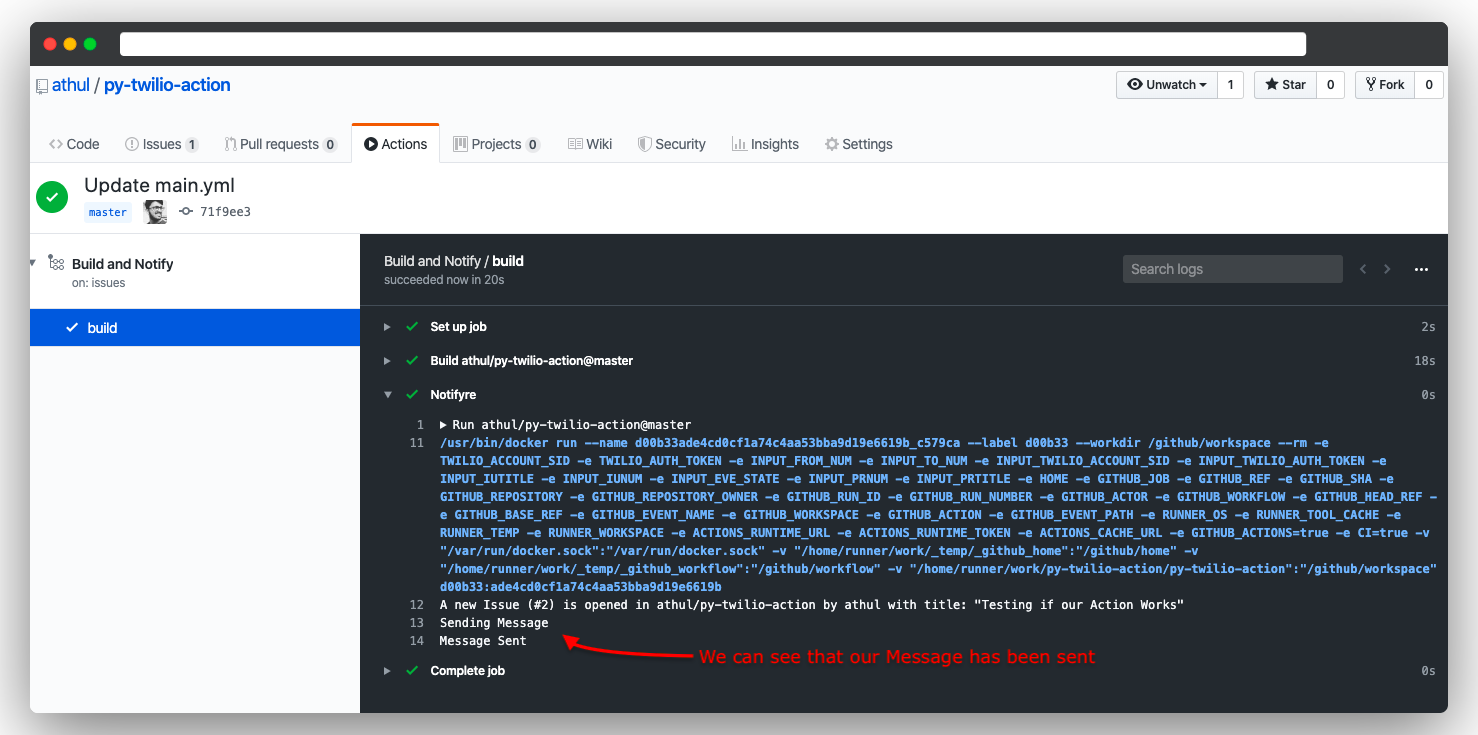
After we submit the issue the workflow we defined will run. Go to the “Actions” tab and you can see that a workflow has been initiated:
The workflow will run automatically and we can see the logs as it runs:
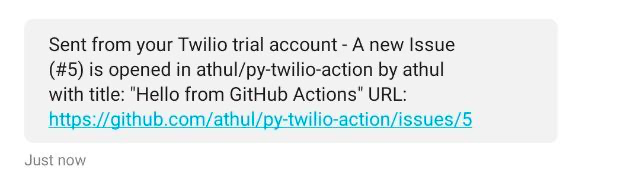
Once the action completes you will receive the SMS:
Give yourself a pat on the back because you built a GitHub Action from scratch… How awesome is that ⚡️.
What's next?
This is just a sample of what you can do with GitHub Actions, Twilio and Python. Maybe you can hack the code to receive an SMS when someone stars or forks your repository. Maybe get an SMS when someone comments on an issue or pull request. The applications are limitless!
You can find the above action, which is open sourced, on GitHub. I would love to get your feedback and your issues if you found any while using this action. You can find many actions ready to be used in the GitHub Marketplace, including an SMS action from Twilio.
Let’s take a look at what we learned with this tutorial
- Setup our development environment and initialized a git repository
- Got a Twilio phone number
- Used the Twilio Helper Library for Python to build an action
- Made a Dockerfile and an action.yml file to make a valid action for GitHub
- Made a workflow file for a GitHub repository
- Got a GitHub update via SMS with our action
- Above all we’ve built a GitHub action from scratch!
The GitHub Actions Docs is a valuable reference for building many more actions, and I hope that you build awesome things ⚡️
If you have any questions you can contact me 😄
- Email : athul8720@gmail.com
- GitHub: athul
- Twitter: athulcajay

Related Resources
Twilio Docs
From APIs to SDKs to sample apps
API reference documentation, SDKs, helper libraries, quickstarts, and tutorials for your language and platform.
Resource Center
The latest ebooks, industry reports, and webinars
Learn from customer engagement experts to improve your own communication.
Ahoy
Twilio's developer community hub
Best practices, code samples, and inspiration to build communications and digital engagement experiences.