How to Get Started with Docker Compose and Symfony
Time to read: 8 minutes
May 24, 2021
Written by
Reviewed by
Developing software across teams is difficult - be it managing codebases or ensuring everything works for everyone at all times.
While Git has gone a long way in terms of version control and ensuring that everyone can work on a codebase without issues, there's still the risk of disruption as a result of the working environment.
Developers have varying preferences in terms of preferred operating systems (Windows, macOS, and Linux). The same is also true of the environments their applications are deployed to.
As a result, when certain errors occur, it becomes difficult to trace the source of the problem. In fact, it can be even more confusing if an error only occurs on one OS, leading to the famous phrase: It works on my machine.
Enter Docker
It adds predictability to applications by building them in containers, which are small and lightweight execution environments. Containers make shared use of the underlying operating system kernel, but otherwise, run in isolation from one another.
By integrating Docker into your Symfony project, you can be assured that whenever your application is running, the environment and its configuration will be the same—regardless of where it's deployed.
In this article, I will show you how to use Docker with a Symfony project. Nginx will be used as the webserver, PHP-FPM will process PHP requests, and MySQL will be the backend database. The application to be built will display famous quotes made by renowned historians over the years.
Prerequisites
- Previous experience with Symfony, Twig, and ORMs (specifically Doctrine).
- You will also need to understand some basic terms associated with Docker (such as container, image, network, and service). Jeff Hale wrote a brilliant series that explains these terms. Feel free to go through it if any of these terms is unfamiliar.
- Composer globally installed.
- Docker Desktop.
- The Symfony CLI tool.
Getting started
To get started, create a new directory named symfony_docker and switch to it, using the commands below
Create the Docker Compose configuration
Because the different containers that compose our application need to communicate, we will use Docker Compose to define them. In the root of the symfony_docker directory, create a new file called docker-compose.yml using the command below.
This file will hold all the configuration for the containers to be built in our application stack, from how the containers are to be built to the networks and volumes accessible to the containers.
In docker-compose.yml, add the configuration below.
version refers to the schema version. services defines the list of containers our application stack will consist of.
Note: Services are really just “containers in production.”
In the following sections, we'll describe the containers for our MySQL database, PHP, and Nginx web server.
Define the database container
To define the database container, in docker-compose.yml, update the services element to match the following example:
container_name sets the actual name of the container when it runs, rather than letting Docker Compose generate it.
image lets Docker know what image (blueprint) we want to build the container from. In this case, we've specified mysql:8.0 because we want to use version 8 of MySQL.
command specifies the authentication plugin to be used by MySQL for authenticating users. Using the environment key, we can specify environment variables such as the database's name, user, and password, as well as the root user's password.
We need a port to connect to our database. Using the ports key, we specify a port on our local development machine and map it to a port on the container which will be used to handle database connections.
Note: Port 4306 was specified in the event that MySQL service is already running on your computer.
Finally, we declare a volume, using the volume key. According to the Docker documentation:
Volumes are the preferred mechanism for persisting data generated by and used by Docker containers
We declare a volume in this case so that our database won't be lost when the containers are destroyed or rebuilt.
Define the PHP container
Unlike the database container, we need to specify some additional instructions to set up our PHP container. To do this, we will build the PHP container from a Dockerfile. In the root directory, symfony_docker, create a directory called php. Then, in symfony_docker/php, create a file named Dockerfile.
Note: this file has no extension.
Then, in symfony_docker/php/Dockerfile, add the following.
Note: In the last two lines of symfony_docker/php/Dockerfile, please replace "you@example.com" with your email address and "Your Name" with your actual name.
In addition to scaffolding a container from the PHP-FPM image, we will do the following:
- Install the PHP extensions Symfony depends on.
- Set the working directory of the container to
/var/www/symfony_docker - Install composer
- Install the Symfony CLI
Next, add the example below to docker-compose.yml after the database configuration.
As can be seen, the PHP container is defined differently. Instead of specifying an image, we specify a build context. This way, when the docker-compose command is run, the instructions declared in php/Dockerfile will be used to build the container.
Port 9000 on the computer is mapped to port 9000 on the container, just as we mapped a port on the computer to a port on the container for the MySQL database.
We declare a volume again to persist the data generated by the container. In this case, our Symfony application will be created in the /var/www/symfony_docker directory of the PHP container. However, it will be persisted in the app directory in the project.
Finally, the depends_on key was used. This creates a dependency between the PHP and database containers instructing Docker to build and start the database container before the PHP container.
With the PHP container defined, create the app directory in the root directory of the project, which the container requires, using the command below.
Define the Nginx container
Before we build the Nginx container, let's write the default configuration for the server. In the root of the project, create a directory called nginx and in it create a configuration file named default.conf using the commands below.
Add the configuration below to nginx/default.conf.
This is a basic Nginx configuration required for running a Symfony project. The only thing done differently is the specification for fastcgi_pass. Notice that in this case we specify port 9000 of the PHP container, because this is the default port that PHP-FPM listens on for requests..
Next, add the Nginx container's configuration to docker-compose.yml, in the example below, after the PHP container's configuration.
Build the containers
With this in place, we can finally build our containers by running the command below.
When the containers are built, you will see something similar to the screenshot below in your terminal.

If you open Docker Desktop, you should see your newly created container as shown in the screenshot below.

Create the Symfony application
To create the Symfony application, we need to initiate a terminal in our PHP container. There are two ways of doing this:
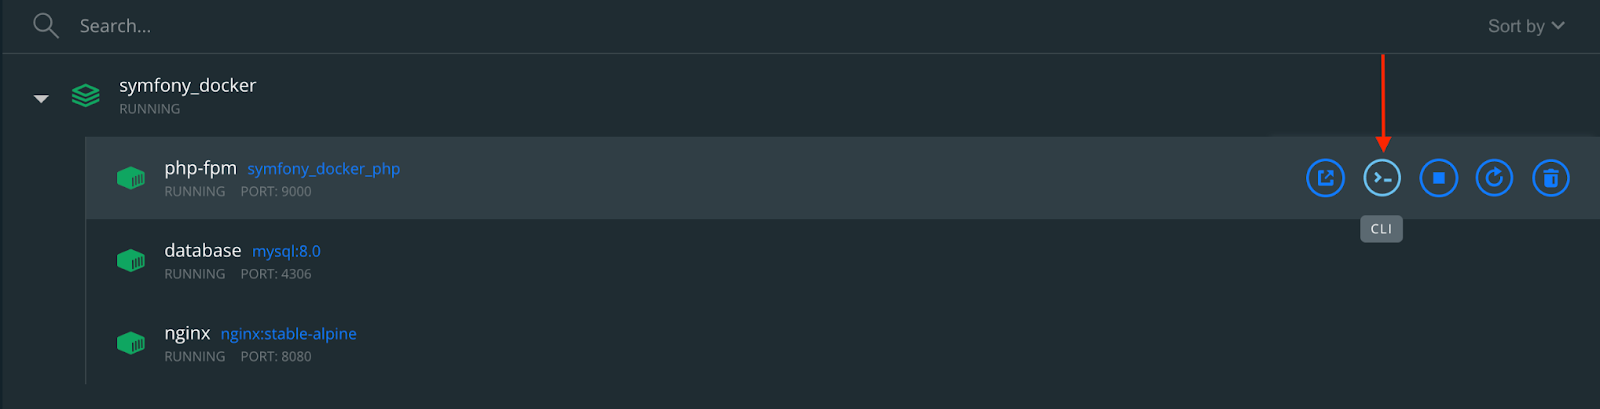
- Using Docker Desktop. By expanding the
symfony_dockerapplication, you get to see the containers it is composed of. You can initiate the CLI by clicking on the button highlighted in the screenshot below. This runs the docker exec command and opens a terminal for you to interact with.
- Run the docker exec command. To do that, run the command below
Regardless of the approach you chose, in the newly opened terminal, ensure that your setup meets the requirements for a Symfony application by running the following command.
If it meets the requirements, you will see the following output in the terminal.
Next, create a new Symfony project by running the following command.
If successful, you will see the following text in the terminal output:
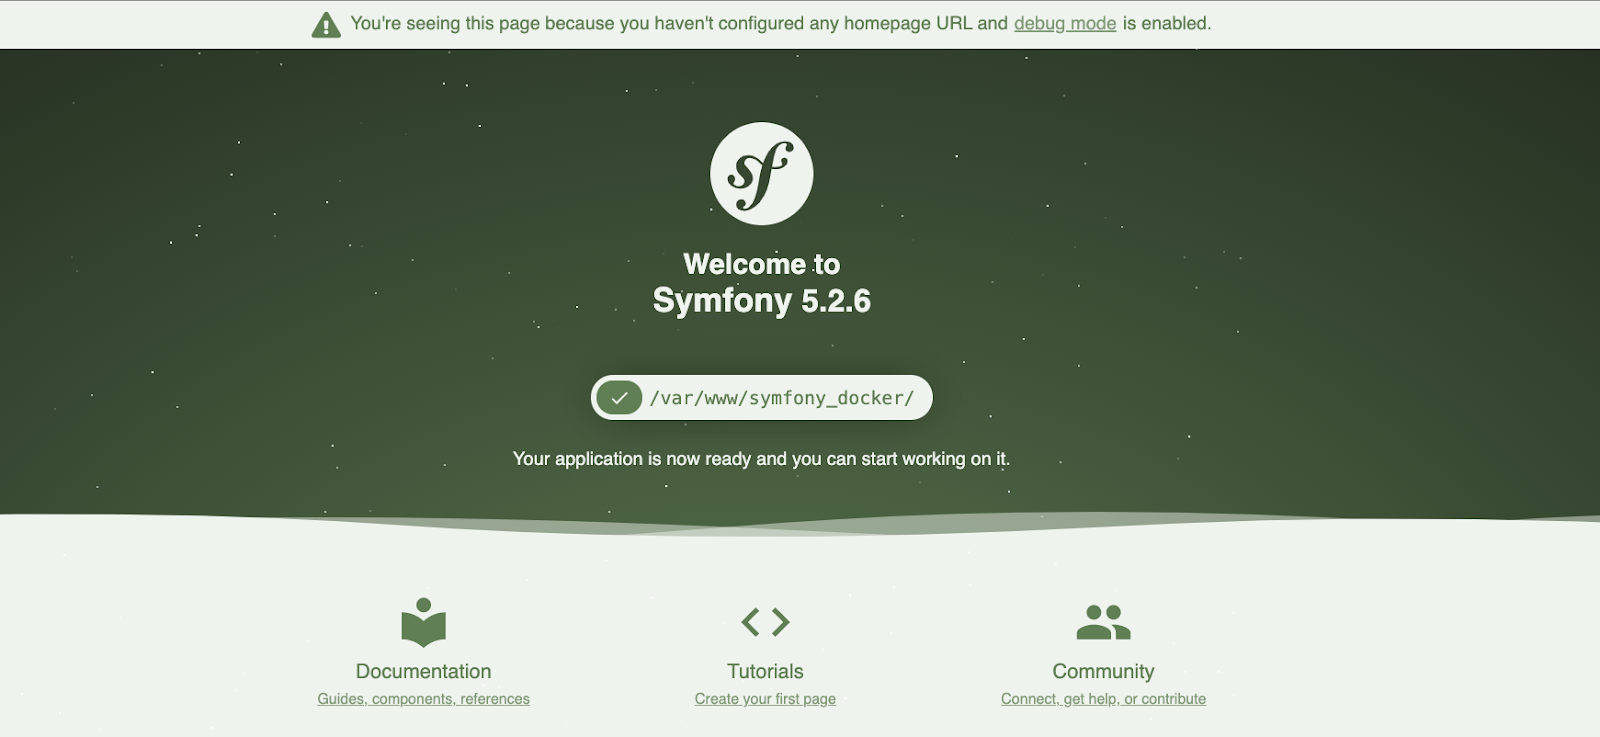
With the application created, navigate to http://localhost:8080/ and you will see the default Symfony index page, which you can see an example of below. Also, if you look in the app directory, you will see that the Symfony project has been persisted there.
Back in our PHP container CLI, let's add some development dependencies for the application we are building. Run the following command to do so.
To persist and retrieve quotes in and from the database we’ll need an ORM, Doctrine ORM to be precise, and the Twig template engine will be required to render the front end. Add these dependencies by running the command below
Next, create a .env.local file from the existing .env file which Symfony generated during the creation of the project. To do that, run the command below.
Finally, update the database parameters in .env.local to allow your application to connect to your database container. Replace the current DATABASE_URL entry in the file with the version below.
Create the quote entity
Next, we need to create an ORM entity that will handle interacting with the MySQL database. Use the Symfony Maker bundle to do that, by running the command below.
Answer the questions asked as shown below.
An entity named Quote.php will be created in the src/Entity directory. Open src/Entity/Quote.php and add a constructor function as shown below.
Create a migration to update your database using the following command.
Run your migrations using the following command.
Answer with "yes" when prompted and your database will be updated with a new table, named "quote".
To confirm that it has been created, open a new terminal window and run the following command, from within the symfony_docker directory.
When the terminal is opened, connect to your database with the following command.
Provide your MYSQL_ROOT_PASSWORD when prompted. Because we specified the database we intend to connect to, we can query for the tables using the following command.
You should see something similar to the screenshot below:
Create the quote fixture
Next, we need to load the database with a set of generated quotes so that, when the app is ready, we'll have quotes to retrieve and display. To do that, in the PHP container, run the following command.
The fixture will be located in src/DataFixtures/QuoteFixture.php Open the file and update it to match the code below.
To load the fixtures in our database, run the following command in the PHP container.
Respond with "yes" when prompted to load the fixtures in the database. Following that, confirm that the quotes have been loaded by running the following command in the database container.
Your table should look like the one shown below.
Creating the quote controller
Next, we need to create a new controller that will use the ORM entity to retrieve the quotes from the database and render them in the view for us to see. To do that, in the php container, run the following command.
When the command completes, a new controller, named QuoteController.php, will have been created in the src/Controller directory. Open the file and update it to match the code below.
Style the view
Finally, let's make the view look professional and easy to read. To do that, we'll style it using Bootstrap. Update app/templates/base.html.twig to match the code below.
Next, open app/templates/quote/index.html.twig and edit its content to match the following.
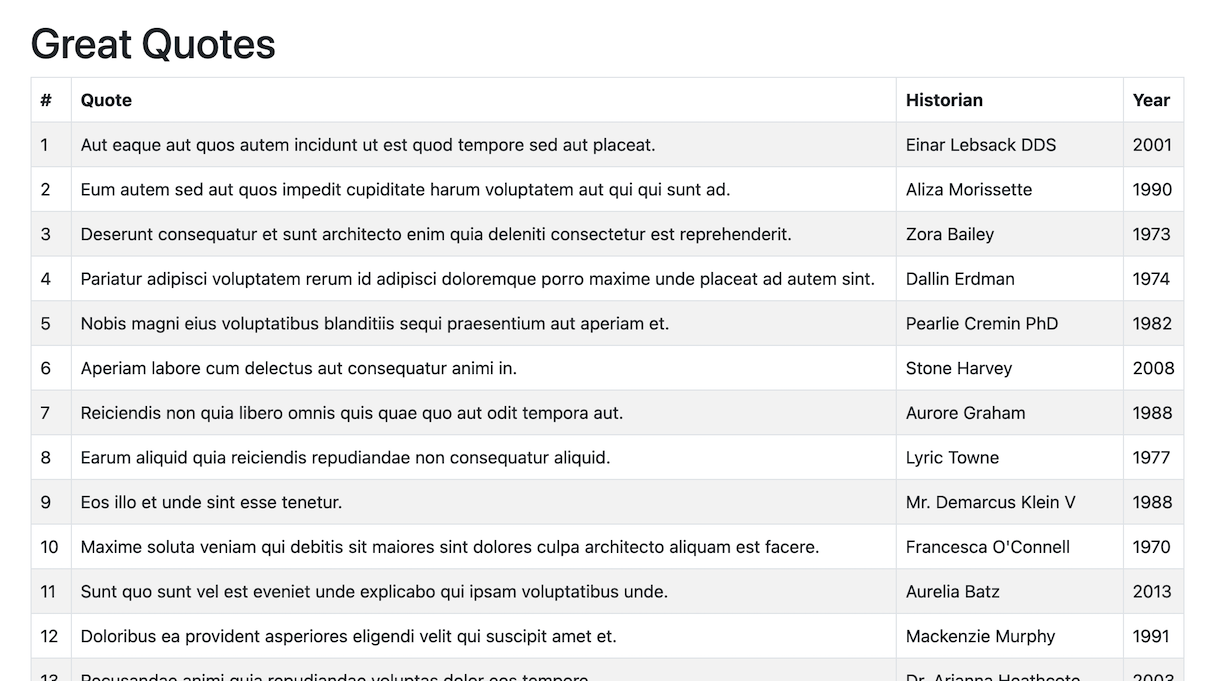
Test the application
Now that the application has been completed, it's time to test it. Reload your index page to see the famous quotes stored in your database.
That's how to set up a Symfony project using Docker
Not only were we able to build containers from images and Dockerfiles, but we were also able to make them communicate with one another, thus allowing us to run our Symfony application and database in separate containers.
By building containers from the same specifications the development team is guaranteed to be not only working with the same code base but working in the same environment.
The entire codebase for this tutorial is available here on GitHub. Feel free to explore further. Happy coding!
Oluyemi is a tech enthusiast with a background in Telecommunication Engineering. With a keen interest to solve day-to-day problems encountered by users, he ventured into programming and has since directed his problem-solving skills at building software for both web and mobile.
A full-stack software engineer with a passion for sharing knowledge, Oluyemi has published a good number of technical articles and content on several blogs on the internet. Being tech-savvy, his hobbies include trying out new programming languages and frameworks.
- Twitter: https://twitter.com/yemiwebby
- GitHub: https://github.com/yemiwebby
- Website: https://yemiwebby.com.ng/

Related Resources
Twilio Docs
From APIs to SDKs to sample apps
API reference documentation, SDKs, helper libraries, quickstarts, and tutorials for your language and platform.
Resource Center
The latest ebooks, industry reports, and webinars
Learn from customer engagement experts to improve your own communication.
Ahoy
Twilio's developer community hub
Best practices, code samples, and inspiration to build communications and digital engagement experiences.