How to Queue Emails in Laravel PHP with Twilio SendGrid

April 26, 2019
Written by
Ankit Jain
Contributor
Opinions expressed by Twilio contributors are their own

Queue Emails in Laravel with Twilio SendGrid.png

Introduction

Laravel is one of the most famous PHP MVC frameworks with a great community. It provides all the features that are required to create your project, whether it is for personal or enterprise level usage. One feature that sets Laravel apart from other frameworks is “Laravel Queue”. For any project that needs to defer time consuming tasks, Laravel Queue offers this support out of the box.

This tutorial will help you to implement the Laravel Queue to send emails. After we’re finished, you will have a running Laravel application that allows you to send emails to registered users using Laravel queue to prevent your task from timing out and increase deliverability of your emails. We will use Sendgrid for sending emails because their service will allow us to check out whether your email is read or opened by the user.

Requirements

  1. PHP development environment with Laravel
  2. Composer globally installed
  3. SendGrid Account
  4. Passion :D

Set Up a New Laravel Project

If you don’t have Laravel installed in your system, install it first from the Laravel Official Documentation. A guide to getting started from Laravel can be found in the Laravel docs. Let’s start with setting up a new Laravel Project named “laravel-queue”. Remember, you can give your project any name you want.

$ laravel new laravel-queue

This will install Laravel v5.8 along with all the dependencies required by it. Composer post-create scripts automatically create the .env file for us and set the APP_KEY environment variable. Add the APP_KEY in the .env file by running this command if it is not configured automatically.

$ php artisan key:generate

Next we need to add the database connection details to our .env file. We will use MySQL database for this project. After you have created your local database, add the DB_USERNAME, DB_PASSWORD and DB_DATABASE values in the .env file.

Create a SendGrid Account

Before going further, let’s set up a Twilio SendGrid account for emailing. Yes, SendGrid is now part of Twilio, powering the future of customer engagement on one platform.

Once we are done with account setup, let’s create a Mail driver for our Laravel application. Here’s a quick setup guide for Using SendGrid as Your SMTP Relay in Laravel PHP 

Create Auth Scaffolding for Login/Registration

Laravel makes implementing authentication very simple. In fact, almost everything is configured for you out of the box. If you’re unfamiliar, you can read more about Laravel Authentication from the documentation.

Run this command to add the Auth scaffolding to our Laravel project.

$ php artisan make:auth

This will generate the Auth scaffolding for the project. Laravel 5.7+ comes with the email verification feature by default, so we will use the default functionality first. Later on we will switch to Laravel queues so we can have an understanding of both implementations.

Use the Email Verification Feature

To use the Email verification feature we need to make sure that our App\User model implements the Illuminate\Contracts\Auth\MustVerifyEmail contract. Open App\User model file and make the following changes:

# App\User
<?php
namespace App;
use Illuminate\Notifications\Notifiable;
use Illuminate\Contracts\Auth\MustVerifyEmail;
use Illuminate\Foundation\Auth\User as Authenticatable;
class User extends Authenticatable implements MustVerifyEmail
{
   use Notifiable;
   .
   .
   .
}

Our user migration table is already configured with the email_verified_at column and is set to nullable by default. It stores the date and time when the email address is verified. Run our database migration by running this command.

$ php artisan migrate

Email verification is an optional feature that comes with Laravel. We just need to enable routes to send verification links and verify emails. This can be done simply by passing the verify option to the Auth:routes() method. Open the web.php file under the routes folder to enable this option.

Auth::routes(['verify' => true]);

Laravel comes with a verified route middleware to allow access only to the verified users. So let's add this route to the home route like this:

Route::get('/home', 'HomeController@index')->name('home')->middleware('verified');

Now that we have enabled the basic email verification feature, let’s implement Laravel Queues.

Implement Laravel Queues

We have completed basic setup for email verification from Laravel. We will now implement Laravel Queue to add a layer of efficiency. Laravel Queue is used widely because it uses a queue to send emails one by one without getting them lost in delivery. We can also prioritize these emails depending on our need.

Before implementing the Laravel Queue, let’s understand how Laravel implements the email verification so that we can successfully include our queue procedure within their flow.

Laravel raises events during the registration process. Whenever a new user is registered, an event is fired which is listened to by the class SendEmailVerificationNotification. We can find this event in the EventServiceProvider.php file under the app/Providers directory. This concludes what we need in order to create a listener that listens on the registration event. From there we can make our own flow of sending emails without changing the default configuration.

Creating Listener Class

In Laravel, Event listeners receive the event instance in their handle() method. Within the handle() method, we may perform any actions necessary to respond to the event. Let’s create a listener class using the Artisan CLI:

$ php artisan make:listener EmailVerificationListener

If it doesn’t exist, a new directory app/Listeners is created with the EmailVerificationListener.php file within it. We will handle the event within the handle() function. Since we don’t need a constructor method, we can remove it. From the handle() method we need to dispatch our mailing job. Our file will look like this:

<?php
namespace App\Listeners;

use Illuminate\Auth\Events\Registered;
use App\Jobs\EmailVerification;

class EmailVerificationListener
{
   /**
    * Handle the event.
    *
    * @param  object  $event
    * @return void
    */
   public function handle(Registered $event)
   {
       EmailVerification::dispatch($event);
   }
}

Now add the EmailVerificationListener to listen for the registration event in the EventServiceProvider file and remove the SendEmailVerificationNotification listener.

...
use App\Listeners\EmailVerificationListener;
class EventServiceProvider extends ServiceProvider
{
   /**
    * The event listener mappings for the application.
    *
    * @var array
    */
   protected $listen = [
       Registered::class => [
           EmailVerificationListener::class,
       ],
   ];
...

Creating Jobs

By default, all of the queueable jobs for our application are stored in the app/Jobs directory. If the app/Jobs directory doesn't exist, it will be created when we run the make:job Artisan command. We can generate the EmailVerification job using the following Artisan CLI:

$ php artisan make:job EmailVerification

Let’s create a verification link through the temporarySignedRoute() method using the URL facade, which is sent to the user’s email. After that, we will queue mail to the user’s email address using the Mail facade which we have under the $event variable. Within this job, we call the EmailVerification mailable class to build our email template and pass the verification link to it. Our EmailVerification job will look like this:

<?php
namespace App\Jobs;
use Illuminate\Bus\Queueable;
use Illuminate\Queue\SerializesModels;
use Illuminate\Queue\InteractsWithQueue;
use Illuminate\Contracts\Queue\ShouldQueue;
use Illuminate\Foundation\Bus\Dispatchable;
use App\Mail\EmailVerification as EmailVerificationMailable;
use Mail;
use Illuminate\Support\Facades\URL;
use Illuminate\Support\Carbon;
class EmailVerification implements ShouldQueue
{
   use Dispatchable, InteractsWithQueue, Queueable, SerializesModels;
   protected $event;
   /**
    * Create a new job instance.
    *
    * @return void
    */
   public function __construct($event)
   {
       $this->event = $event;
   }
    /**
    * Execute the job.
    *
    * @return void
    */
   public function handle()
   {
       $link = URL::temporarySignedRoute(
           'verification.verify', Carbon::now()->addMinutes(60),['id' => $this->event->user->id]
       );
       Mail::to($this->event->user->email)->queue(new EmailVerificationMailable($link));
   }
}

Creating Mailable Class

In Laravel, each type of email sent by your application is represented as a “mailable” class. These classes are stored in the app/Mail directory. Let’s create one for our email verification using the Artisan CLI:

$ php artisan make:mail EmailVerification

As soon as this command is completed, a new directory app/Mail, is generated with the EmailVerification.php file within it.

Mailable Classes in Laravel have a build() method along with a constructor() in which we build the template of the email that we are going to send. Within this template, we pass along any data that should be transferred with the email. In the EmailVerification class, we pass the token in every email, ensuring it will be passed down into an email template.

Now let’s create a template for our email. We will store the template in the email directory under the resources/views folder. If it doesn’t exist, create the email folder.

Next in the resources/views/email folder create a new file emailVerificationMail.blade.php. Copy the code below into your emailVerificationMail.blade.php file.

<!DOCTYPE html PUBLIC "-//W3C//DTD XHTML 1.0 Strict//EN" "http://www.w3.org/TR/xhtml1/DTD/xhtml1-strict.dtd">
<html xmlns="http://www.w3.org/1999/xhtml" xmlns="http://www.w3.org/1999/xhtml">

<head>
  <meta http-equiv="Content-Type" content="text/html; charset=utf-8" />
  <meta name="viewport" content="width=device-width" />
  <style>
    table.secondary:hover td {
      background: #d0d0d0 !important;
      color: #555;
    }

    table.secondary:hover td a {
      color: #555 !important;
    }

    table.secondary td a:visited {
      color: #555 !important;
    }

    table.secondary:active td a {
      color: #555 !important;
    }

    table.success:hover td {
      background: #457a1a !important;
    }

    table.alert:hover td {
      background: #970b0e !important;
    }

    a:hover {
      color: #2795b6 !important;
    }

    a:active {
      color: #2795b6 !important;
    }

    a:visited {
      color: #2ba6cb !important;
    }

    h1 a:active {
      color: #2ba6cb !important;
    }

    h2 a:active {
      color: #2ba6cb !important;
    }

    h3 a:active {
      color: #2ba6cb !important;
    }

    h4 a:active {
      color: #2ba6cb !important;
    }

    h5 a:active {
      color: #2ba6cb !important;
    }

    h6 a:active {
      color: #2ba6cb !important;
    }

    h1 a:visited {
      color: #2ba6cb !important;
    }

    h2 a:visited {
      color: #2ba6cb !important;
    }

    h3 a:visited {
      color: #2ba6cb !important;
    }

    h4 a:visited {
      color: #2ba6cb !important;
    }

    h5 a:visited {
      color: #2ba6cb !important;
    }

    h6 a:visited {
      color: #2ba6cb !important;
    }

    table.button:hover td {
      background: #2795b6 !important;
    }

    table.button:visited td {
      background: #2795b6 !important;
    }

    table.button:active td {
      background: #2795b6 !important;
    }

    table.button:hover td {
      background: #2795b6 !important;
    }

    table.tiny-button:hover td {
      background: #2795b6 !important;
    }

    table.small-button:hover td {
      background: #2795b6 !important;
    }

    table.medium-button:hover td {
      background: #2795b6 !important;
    }

    table.large-button:hover td {
      background: #2795b6 !important;
    }

    table.button:hover td a {
      color: #fff !important;
    }

    table.button:visited td a {
      color: #fff !important;
    }

    table.button:active td a {
      color: #fff !important;
    }

    table.button:hover td a {
      color: #fff !important;
    }

    table.button:active td a {
      color: #fff !important;
    }

    table.button td a:visited {
      color: #fff !important;
    }

    table.tiny-button:hover td a {
      color: #fff !important;
    }

    table.tiny-button:active td a {
      color: #fff !important;
    }

    table.tiny-button td a:visited {
      color: #fff !important;
    }

    table.small-button:hover td a {
      color: #fff !important;
    }

    table.small-button:active td a {
      color: #fff !important;
    }

    table.small-button td a:visited {
      color: #fff !important;
    }

    table.medium-button:hover td a {
      color: #fff !important;
    }

    table.medium-button:active td a {
      color: #fff !important;
    }

    table.medium-button td a:visited {
      color: #fff !important;
    }

    table.large-button:hover td a {
      color: #fff !important;
    }

    table.large-button:active td a {
      color: #fff !important;
    }

    table.large-button td a:visited {
      color: #fff !important;
    }
  </style>
</head>

<body style="width: 100%; max-width:800px; -webkit-text-size-adjust: 100%; -ms-text-size-adjust: 100%; color: #222; font-family: Helvetica,Arial,sans-serif; font-weight: 400; text-align: left; line-height: 19px; font-size: 14px; margin: 0; padding: 0;">
  <style type="text/css">
  </style>

  <table class="body" style="border-spacing: 0; border-collapse: collapse; vertical-align: top; text-align: left; height: 100%; width: 100%; color: #222; font-family: Helvetica,Arial,sans-serif; font-weight: 400; line-height: 19px; font-size: 14px; margin: 0; padding: 0;">
    <tr style="vertical-align: top; text-align: left; padding: 0;" align="left">
      <td class="center" align="center" valign="top" style="word-break: break-word; -webkit-hyphens: auto; -moz-hyphens: auto; hyphens: auto; border-collapse: collapse !important; vertical-align: top; text-align: center; color: #222; font-family: Helvetica,Arial,sans-serif; font-weight: 400; line-height: 19px; font-size: 14px; margin: 0; padding: 0;">
        <table class="container" style="border-spacing: 0; border-collapse: collapse; vertical-align: top; text-align: inherit; width: 100% !important; margin: 0 auto; padding: 0;background-color:#fff;">
          <tr style="vertical-align: top; text-align: left; padding: 0;" align="left">
            <td class="wrapper last" style="word-break: break-word; -webkit-hyphens: auto; -moz-hyphens: auto; hyphens: auto; border-collapse: collapse !important; vertical-align: top; text-align: left; position: relative; color: #222; font-family: Helvetica,Arial,sans-serif; font-weight: 400; line-height: 19px; font-size: 14px; display: block !important; margin: 0; padding: 0;"
              align="left" valign="top">
              <table class="twelve columns" style="border-spacing: 0; border-collapse: collapse; vertical-align: top; text-align: left; width: 100% !important; table-layout: fixed !important; float: none !important; display: block !important; margin: 0 auto; padding: 0;">
                <tr style="vertical-align: top; text-align: left; padding: 0;" align="left">
                  <td class="twelve sub-columns last" align="center" style="word-break: break-word; -webkit-hyphens: auto; -moz-hyphens: auto; hyphens: auto; border-collapse: collapse !important; vertical-align: top; text-align: left; min-width: 0; color: #fff; font-family: Helvetica,Arial,sans-serif; font-weight: 400; line-height: 19px; font-size: 14px; width: 100% !important; margin: 0; padding: 10px;"
                    valign="top">

                    <center><img src="https://i.ibb.co/FJ96vMb/images.png" width="150" height="150"></center>

                  </td>
                  <td class="expander" style="word-break: break-word; -webkit-hyphens: auto; -moz-hyphens: auto; hyphens: auto; border-collapse: collapse !important; vertical-align: top; text-align: left; visibility: hidden; width: 1px !important; color: #222; font-family: Helvetica,Arial,sans-serif; font-weight: 400; line-height: 19px; font-size: 14px; margin: 0; padding: 0;"
                    align="left" valign="top"></td>
                </tr>
              </table>
            </td>
          </tr>
        </table>
        <table class="container" style="border-spacing: 0; border-collapse: collapse; vertical-align: top; text-align: inherit; width: 100% !important; margin: 0 auto; padding: 0;border:1px solid #506374;">
          <tr style="vertical-align: top; text-align: center; padding: 0;" align="center">
            <td style="word-break: break-word; -webkit-hyphens: auto; -moz-hyphens: auto; hyphens: auto; border-collapse: collapse !important; vertical-align: top; text-align: center; color: #222; font-family: Helvetica,Arial,sans-serif; font-weight: 400; line-height: 19px; font-size: 14px; margin: 0; padding: 20px;"
              align="center" valign="top">

              <h1 style="margin:0px 0px 25px 0px;padding:0px;display:block;color:#0abe51;line-height:45px">Thanks for choosing <span class="il">Twilio Blog Tutorial</span></h1>

              <p style="font-size:22px;padding:0 0 20px;margin:0px 0px 20px 0px;color:#555555;line-height:30px">Click this button to proceed</p>

              <div>
                <p style="display:inline-block;margin:auto;font-size:15px;color:#2a73cc;line-height:22px;background-color:#ffffff;font-weight:bold;border:1px solid #2a73cc;border-radius:2px;font-family:'Open Sans',Arial,sans-serif" align="center"><a style="padding:10px 25px;display:block;text-decoration:none;" href="{{ $link }}" style="text-decoration:none;color:#0abe51" target="_blank">Verify</a></p>
              </div>

              <br /><br /> Regards <br /> Team Laravel<br />
              <a href="http://laravel.com">Laravel.com</a>
            </td>
          </tr>
        </table>

        <table class="row" style="border-spacing: 0; border-collapse: collapse; vertical-align: top; text-align: left; width: 100% !important; position: relative; padding: 0;background-color:#506374;">
          <tr style="vertical-align: top; text-align: left; padding: 0;" align="left">
            <td class="wrapper last" style="word-break: break-word; -webkit-hyphens: auto; -moz-hyphens: auto; hyphens: auto; border-collapse: collapse !important; vertical-align: top; text-align: left; position: relative; color: #222; font-family: Helvetica,Arial,sans-serif; font-weight: 400; line-height: 19px; font-size: 12px; margin: 0; padding: 0 0;"
              align="left" valign="top">
              <table class="twelve columns" style="border-spacing: 0; border-collapse: collapse; vertical-align: top; text-align: left; width: 100% !important; table-layout: fixed !important; float: none !important; margin: 0 auto; padding: 0;">
                <tr style="vertical-align: top; text-align: left; padding: 0;" align="left">
                  <td align="left" style="word-break: break-word; -webkit-hyphens: auto; -moz-hyphens: auto; hyphens: auto; border-collapse: collapse !important; vertical-align: top; text-align: left; color: #fff; font-family: Helvetica,Arial,sans-serif; font-weight: 400; line-height: 19px; font-size: 12px; width: 100% !important; margin: 0; padding: 10px;"
                    valign="top">
                    <p style="text-align: left; color: #fff; font-family: Helvetica,Arial,sans-serif; font-weight: 400; line-height: 19px; font-size: 12px; margin: 0; padding: 0;" align="center">

                    </p>
                  </td>
                  <td align="right" style="word-break: break-word; -webkit-hyphens: auto; -moz-hyphens: auto; hyphens: auto; border-collapse: collapse !important; vertical-align: top; text-align: left; color: #fff; font-family: Helvetica,Arial,sans-serif; font-weight: 400; line-height: 19px; font-size: 12px; width: 100% !important; margin: 0; padding: 10px;"
                    valign="top">
                    <p style="text-align: right; color: #fff; font-family: Helvetica,Arial,sans-serif; font-weight: 400; line-height: 19px; font-size: 12px; margin: 0; padding: 0;" align="center">
                      <a style="color: #fff; font-family: Helvetica,Arial,sans-serif; font-weight: 400; line-height: 19px; font-size: 12px; margin: 0; padding: 0;" href="#">Ankit Jain</a>
                    </p>
                  </td>
                </tr>
              </table>
            </td>
          </tr>
        </table>
        <table class="row" style="border-spacing: 0; border-collapse: collapse; vertical-align: top; text-align: left; width: 100% !important; position: relative; padding: 0;background-color:#fff;">
          <tr style="vertical-align: top; text-align: left; padding: 0;" align="left">
            <td class="wrapper last" style="word-break: break-word; -webkit-hyphens: auto; -moz-hyphens: auto; hyphens: auto; border-collapse: collapse !important; vertical-align: top; text-align: left; position: relative; color: #222; font-family: Helvetica,Arial,sans-serif; font-weight: 400; line-height: 19px; font-size: 12px; margin: 0; padding: 0 0;"
              align="left" valign="top">
              <table class="twelve columns" style="border-spacing: 0; border-collapse: collapse; vertical-align: top; text-align: left; width: 100% !important; table-layout: fixed !important; float: none !important; margin: 0 auto; padding: 0;">
                <tr style="vertical-align: top; text-align: left; padding: 0;" align="left">
                  <td align="center" style="word-break: break-word; -webkit-hyphens: auto; -moz-hyphens: auto; hyphens: auto; border-collapse: collapse !important; vertical-align: top; text-align: left; color: #ccc; font-family: Helvetica,Arial,sans-serif; font-weight: 400; line-height: 19px; font-size: 12px; width: 100% !important; margin: 0; padding: 10px;"
                    valign="top">
                    <p style="text-align: center; color: #ccc; font-family: Helvetica,Arial,sans-serif; font-weight: 400; line-height: 19px; font-size: 12px; margin: 0; padding: 0;" align="center">
                      &copy; 2019 Laravel
                      <a style="color: #ccc; font-family: Helvetica,Arial,sans-serif; font-weight: 400; line-height: 19px; font-size: 12px; margin: 0; padding: 0;" href="[[UNSUB_LINK_EN]]">Unsubscribe</a>
                    </p>
                  </td>
                </tr>
              </table>
            </td>
          </tr>
        </table>
      </td>
    </tr>
  </table>
</body>

</html>

We’ll now include the view in the EmailVerification mailable class to build out the template of the email.

<?php
namespace App\Mail;

use Illuminate\Bus\Queueable;
use Illuminate\Mail\Mailable;
use Illuminate\Queue\SerializesModels;
use Illuminate\Contracts\Queue\ShouldQueue;

class EmailVerification extends Mailable
{
   use Queueable, SerializesModels;
   protected $link;
   /**
    * Create a new message instance.
    *
    * @return void
    */
   public function __construct($link)
   {
       $this->link = $link;
   }
    /**
    * Build the message.
    *
    * @return $this
    */
   public function build()
   {
       return $this->view('email.emailVerificationMail')
           ->subject("Verify Email Address")
           ->with([
               'link' => $this->link,
           ]);
   }
}

We are almost done with our Listeners, Jobs, and Mailable classes. Now, we need to setup Queue Drivers so that our mailable class is recognizable by Laravel.

Setup Queue Driver

Now we will set our queue driver to “database”. Add the following settings in the .env file and make sure to change the APP_URL fromhttp://localhost tohttp://localhost:8000 else the queue workers will send the incorrect verification link which results in the Invalid Signature.

QUEUE_CONNECTION=database
APP_URL=http://localhost:8000

After that we need to generate migrations and create tables for the queue. Let’s run the command below to generate the queue database tables:

$ php artisan queue:table
$ php artisan migrate

Cool, let’s test our application and see whether it’s queueing our emails or not.

Testing

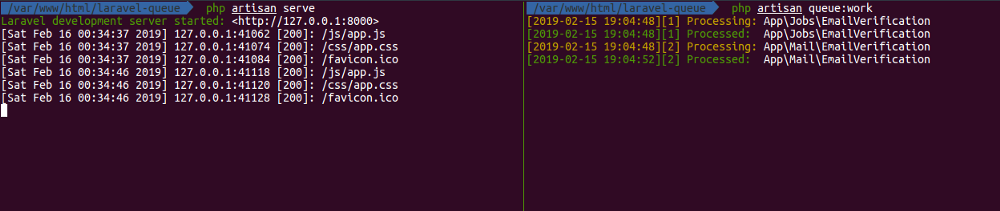
Open two terminals. One for running the Laravel development server and one for running the queue worker. Laravel includes a queue worker that will process new jobs as they are pushed into the queue. Run these commands in each terminal respectively.

# Development Server
$ php artisan serve

# Queue Worker
$ php artisan queue:work

Laravel Development server will run at http://localhost:8000 so let’s open the browser and browse this URL. Go to the registration and register again.

Once we registered successfully, we can see the logs of the queue worker. It will show the processing/processed jobs and emails using the queue.

screenshot of Laravel queue

Let’s check our inbox for the email we have received through the Laravel queue.

Successful verification email

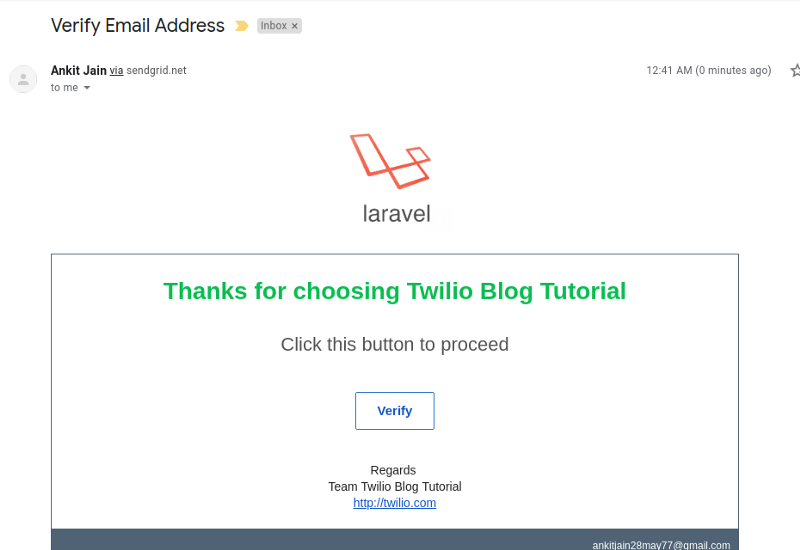
We will receive an email similar to the screenshot above which asks us to verify our email address. Once we click the Verify button, our email address will be verified and we will be redirected to the /home page.

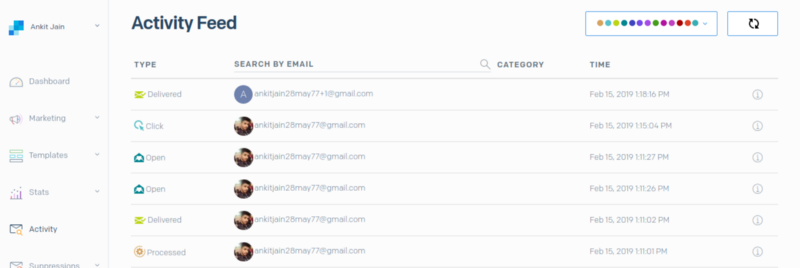
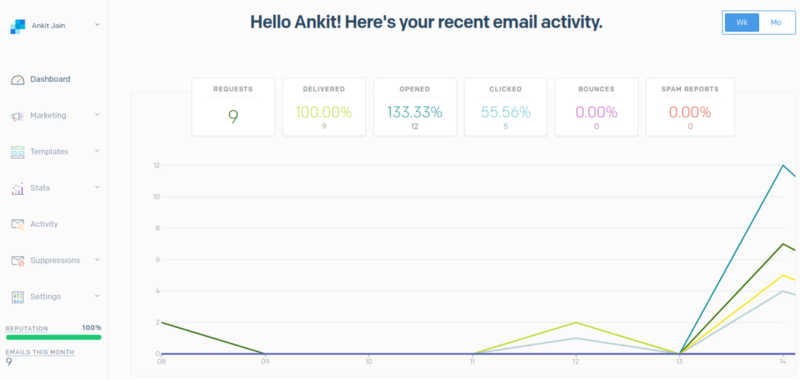
Let’s check the activity in our SendGrid Dashboard.

SendGrid activity feed


SendGrid email queue

Conclusion

In this article, we implemented the Laravel Queue features and learned about listeners, jobs, mailable classes and understanding the default workflow of sending emails in Laravel. The complete code for the tutorial can be found on GitHub repo → laravel-queue-tutorial.

Wait we forget to fix the Request another email feature in Laravel as it is still sent through the default workflow that is without Laravel Queue. I left that part so you can implement that on your own and learn more about this Laravel Queues.

Tips: “Request another email” feature can be implemented through the VerificationController under app/Http/Controllers/Auth directory.

Laravel Queue has a lot of other good features that we should know how to make full use of like Queue Priorities, Specifying Max Job Attempts / Timeout Values, Job Chaining, Rate Limiting and many more. Read them in the official documentation of Laravel Queues.

Feel free to comment and ask me anything. You can reach me at ankitjain28may77@gmail.com and follow me on Twitter @ankitjain28may. You can also read more of my articles on Medium @ankitjain28may.

Thanks for reading!