How to build an Email Newsletter application using ASP.NET Core and SendGrid
Time to read: 13 minutes
June 13, 2022
Written by
Reviewed by

Sending out newsletters is a great way to keep your audience up-to-date on the latest news. There are existing newsletter products like SendGrid Email Marketing, however, in a scenario where the client demands more customization, building a newsletter app yourself using the SendGrid Email API is a great alternative.
The advantage of building your own newsletter application is that you can control the nuts and bolts of the system and still maximize deliverability and measure engagement with SendGrid.
In this tutorial, you will learn how to build a newsletter app using ASP.NET Core Razor Pages and SendGrid.
Solution Overview
Every newsletter application involves two parties: the subscriber of the newsletter, and the author of the newsletter.
The subscriber's journey goes like this: The soon-to-be subscriber fills out a form to subscribe that includes their email address and other details (depending on your business needs). When the subscriber submits the form, the application creates a new contact in your database and the subscriber receives an email with a link to confirm their subscription. The subscriber then clicks on the confirmation link to complete the journey. This flow is called a double opt-in and prevents malicious users from subscribing for other people.
Thereafter the subscriber will receive your newsletter emails.
In the event that the subscriber wants to unsubscribe, the subscriber clicks on the unsubscribe link which will be at the bottom of your newsletter emails. Once clicked, the subscriber gets redirected to your web app and their contact information is removed from your database.
On the other hand, the author has to write a new issue of the newsletter in HTML. Then the author can upload the HTML file which sends the newsletter to your contact list.
Thus, the pages you will be building are:
- a sign-up page for users,
- a confirmation page,
- an unsubscribe page, and
- a newsletter upload page.
Prerequisites
You will need a few things to follow along:
- A Twilio SendGrid Account. Sign up here to send up to 100 emails per day completely free of charge.
- An OS that supports .NET (Windows/macOS/Linux)
- .NET 6.0 SDK (newer and older versions may work too)
- A code editor or IDE (Recommended: Visual Studio Code with the C# plugin, Visual Studio, or JetBrains Rider)
- Some experience with ASP.NET Core and Razor Pages.
- An email address for testing
You can find the source code for the application you will build at this GitHub repository, which you can refer to in case you get stuck.
Configure SendGrid
To use SendGrid, you have to configure two things; the Email Sender and an API Key. The Email Sender confirms that you own the email address or domain you want to send emails from. The API Key lets you authenticate with the SendGrid API and gives you the authorization to send emails.
Configure the Email Sender in SendGrid
To quickly get started, you will use Single Sender Verification for this tutorial. This verifies that you own the email address that the application will send emails from. Single Sender Verification is great for testing purposes, but it is not recommended for production.
Log in to the SendGrid app, navigate to the Settings section and click on Sender Authentication. Click on Verify a Single Sender. You should see a screen that looks like the one below.
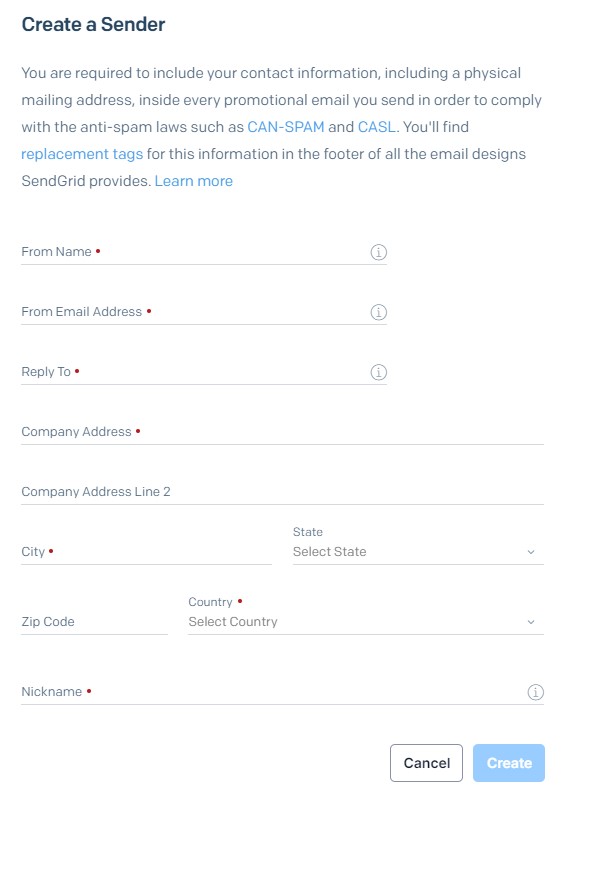
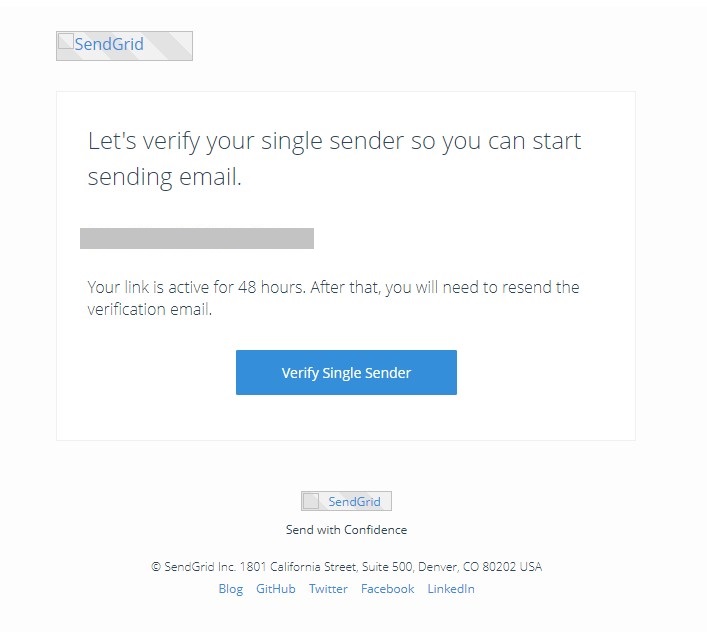
Fill out the form and click Create. Once the fields are filled, A confirmation email is sent to the email address you entered in the From Email address field. Go to your mailbox, find the email and click the Verify Single Sender button (like the one below) to complete the process.
Navigate back to the Sender Authentication > Settings Page. The Single Sender Verification section should show your email address with a verified status.
Generate the API Key
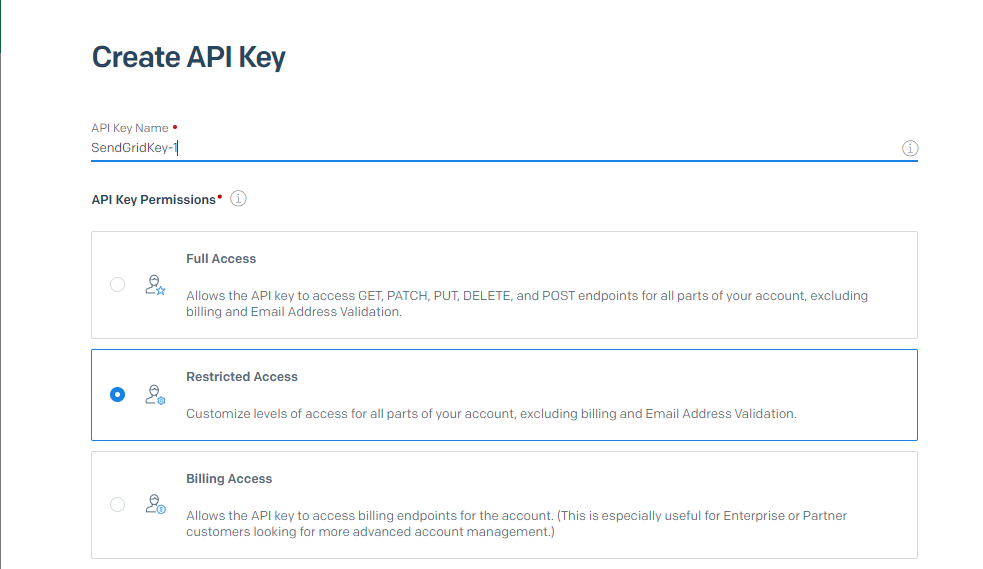
Navigate to the Settings section and click on API Keys. Click on the Create API Key button on the top right of the page to continue.
On the Create API Key page, fill out the API Key name and set API Key Permissions to Restricted Access.
Scroll down to the Mail Send and click to reveal the permissions underneath it. Drag the slider on Mail Send to the left.
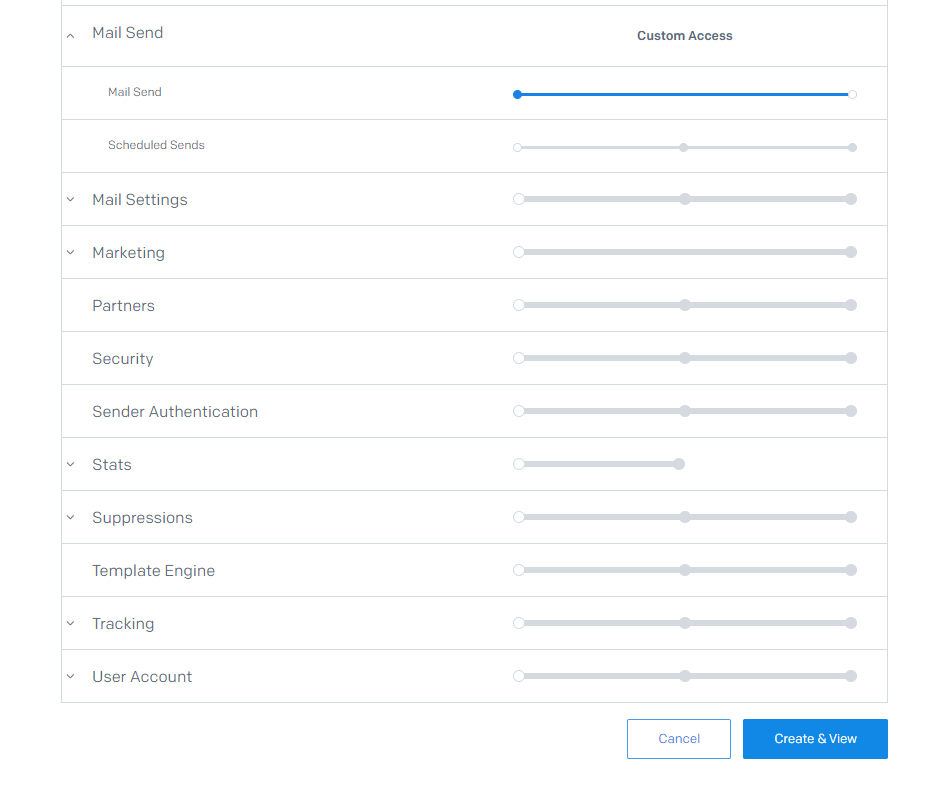
Continue with the Create & View button.
SendGrid will now show you the API Key. Make sure to copy it somewhere safe. The API Key will not be shown again so if you lose it you'll need to generate a new one.
Click the Done button.
With the Sender verified and API Key generated, it is time to begin building the web application.
Build the web app
Open your terminal and create a new folder using the following command:
Then move into the new folder by running this command:
In this new folder, you will be creating an ASP.NET Core Razor Project. Run the following command to create the project:
You can use the command dotnet run to start the app. Then navigate to one of the URLs to view the web app.
Close the app by pressing Ctrl + C.
Update site CSS
Update the wwwroot/css/site.css file with the CSS from this file on GitHub, and update the Pages/Shared/_Layout.cshtml to look like the code below to remove the navigation and footer that came with the template.
Install SendGrid SDK and Setup API Key
Sensitive data, like the SendGrid API Key, in .NET are stored as user secrets for local development, and user secrets are structured as a key value pair. First, initialize user secrets by running the following command in the terminal:
Then use the following command to set a key-value pair of key SendGridApiKey
Replace <YOUR_SENDGRID_API_KEY> with the API Key you copied earlier.
Now, the SendGrid API Key can be accessed through the IConfiguration in .NET.
Next, install the dependencies,
Install the SendGrid and Dependency Injection (DI) NuGet package using the following commands:
The SendGrid package will be used to send out the emails and the DI package will add the SendGrid client to the DI container. To learn more on the capabilities of the SendGrid package, check out the SendGrid C# .NET GitHub repository.
Now, open your project using your prefered code editor.
Then update the Program.cs file to register SendGrid into the dependency injection (DI) container with the SendGridApiKey:
Next, add the following properties to the appsettings.json file:
Replace [SENDER_EMAIL]with the Sender email you configured earlier on SendGrid, and [SENDER_NAME] with your name or your business or your newsletter. The [SENDER_NAME] is the name recipients of your email will see when they receive an email.
Later, you will grab these settings from .NET's configuration and use it to send emails.
Create the Data Model and the Database
In this application, you will use Entity Framework Core (EF Core) – the object–relational mapping (ORM) from Microsoft – to store the contacts in a SQLite database.
Install the EF Core Sqlite Package:
Next, install the EF Core tool and the EF Core Design package to help to run database migrations:
Create a Data folder in your project and add a file Contact.cs to the Data folder with the following code:
This file will hold the Contact model class to describe the user’s contact information which will be used to save the data to the database.
Create another file in the Data folder, named NewsletterDbContext.cs and add the following code:
The NewsletterDbContext will let you work with the contact data from the database through the Contacts property.
Create a ConnectionStrings JSON object in appsettings.json and add the following database connection string:
Next, update the Program.cs file to register the NewsletterDbContext into the dependency injection (DI) container with the connectionstring you just configured:
Finally, run the following commands to generate database migrations and run the migrations:
As a result, the Contacts.db SQLite database file should now have been created.
Implement the Repository Pattern
A common way to architect how applications interact with your database is using the Repository Pattern. Instead of writing database related code directly into your controllers, you create dedicated classes, the Repositories, which have the sole responsibility of managing the data, and then consume those repositories from your controllers.
Create a new file IContactRepository.cs in the Data folder and add the following code:
Next, add another file ContactRepository.cs in the Data folder and add the following code:
The ContactRepository class will be used to manage the contact data for the database and will be exposed via the IContactRepository interface.
Finally, register the ContactRepository into the DI container by adding the following line after where you registered the SendGrid service in Program.cs:
Now the DI container will inject the ContactRepository into your Razor pages when accepting an IContactRepository parameter in your constructor.
Create all Pages and update the appsettings.
As mentioned earlier, this newsletter application will consist of a bunch of pages. Run the following script to quickly generate all the pages:
The script first navigates to the Pages folder, then generates all the necessary pages, and then navigates back to the parent folder.
Each dotnet new page command will generate a Razor Page View, the .cshtml-file, and a PageModel C# file, the .chstml.cs file, which is the code-behind file where you can add your logic.
When the --no-pagemodel argument is used, only the View file will be generated, and the code-behind file will not. This is useful for pages that only need to render a Razor template without any logic in the code behind.
Build and Test the Email SignUp Page
Create a new folder named Models, and in it, create a file SignUpViewModel.cs with the following code:
The SignUpViewModel class has properties for the information you will be asking in the form to sign up for the newsletter, which is the FullName and EmailAddress. By applying the Required and DataType attributes to the model's properties, ASP.NET will be able to validate the form for you later.
Next, add the following code into the Pages/SignUp.cshtml file:
The SignUp page contains a form for the user to input their contact information: their email and full name. Once the form is submitted, the OnPostAsync method of the code behind is triggered.
Update the Pages/SignUp.cshtml.cs file with the following code:
The DI container will inject a couple of parameters into the constructor of the SignUpModel class: an instance of IConfiguration, ISendGridClient, IContactRepository, and HtmlEncoder. These parameters are then stored in private fields so they can be accessed throughout the class.
The code section below binds a class of SignUpViewModel to the page.
The last section contains the OnGet method which returns the page, and the OnPostAsync method which is hit when the user submits the form.
The OnPostAsync method follows this sequence:
- Validate the form posted by the user using
ModelState.IsValid. - Generate a GUID
confirmationIdwhich will be used for the confirmation and unsubscription process. Since only the user will have the confirmation ID as part of their links, it verifies that it is in fact the legitimate user performing the action, not a malicious user. - Construct a link of format: https://<BASE_URL>/Confirm?email=<CONTACT_EMAIL>&confirmation=<CONFIRMATION_ID>, using the
Url.PageLink()method. In the SignUp page theUrl.PageLink()method helps you to generate a URL to the Confirm page. - Thereafter a
SendGridMessageobject is created with the contact details from the form and the SendGrid sender details from the .NET configuration. - Then, the injected
ISendGridClientis used to send the confirmationSendGridMessageto the contact. - If the email was queued successfully, it adds the user to the database using the
_contactRepoand redirects the user to theSignUpSuccesspage.
Update the Pages/SignUpSuccess.cshtml file with the following code:
Start the app by running the dotnet run command.
Open your browser and navigate to the signup page with a url like this: https://localhost:<port>/SignUp
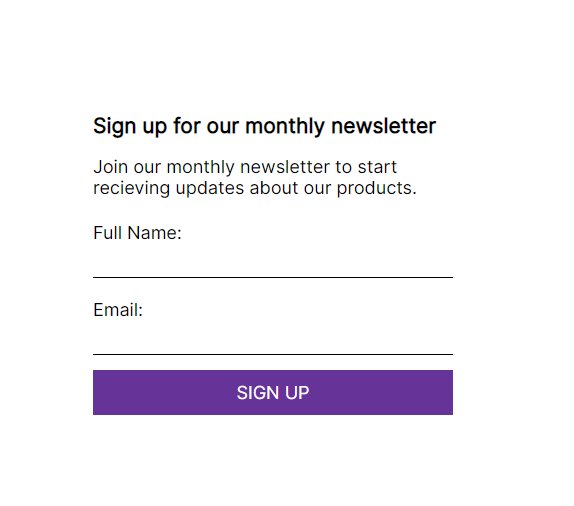
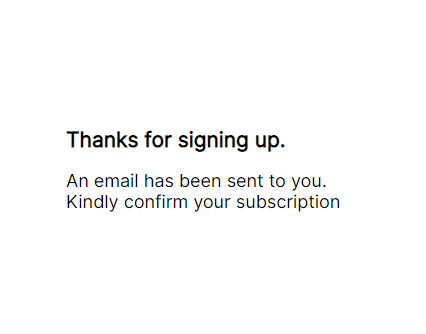
Fill out the form with your name and email address, and submit it. After submitting the form, you should be redirected to the success page that looks like this.
Check your email inbox for an email that looks like the one below.

Next up, you will create the confirmation page.
Build and Test the Confirmation Page
The confirmation page is the page the user is redirected to when they click on the confirmation link in their email inbox to confirm their newsletter subscription.
Update the Confirm.cshtml file in the Pages folder with the following code:
The code displays the ResponseMessage property that is passed to it from the page model.
Next, update the code-behind file Pages/Confirm.cshtml.cs with the following code:
The OnGet method is triggered when the confirmation link is clicked by the user and it retrieves the email address and confirmation ID from the query string.
Then the contact is retrieved from the database using the _contactRepository.GetContactByEmail(emailAddress) method. If the contact is found, the contact is confirmed using _contactRepository.ConfirmContact(emailAddress) and a success message is set to the ResponseMessage property.
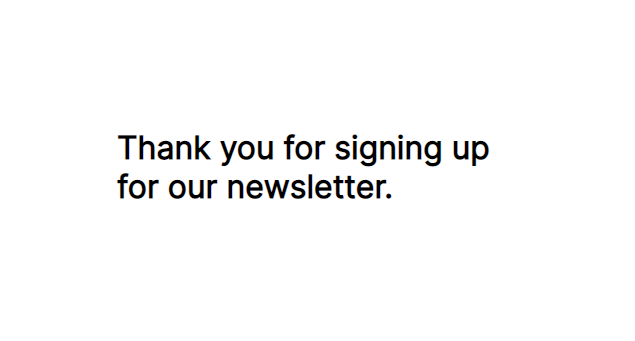
Start the application using the dotnet run command, and find the confirmation email in your inbox. Click on the confirmation link in the email and the Confirm page should be hit which will show a page like the one below.
The next step is to allow users to unsubscribe.
Build the Unsubscribe Page
When the user clicks on the unsubscribe link at the bottom of the newsletter, they are redirected to the Unsubscribe page.
Add the following code to the Razor view file Pages/Unsubscribe.cshtml:
Then update the Pages/Unsubscribe.cshtml.cs file with the code below:
When a user clicks the unsubscribe link, the OnGet method is triggered and the emailAddress and confirmationId parameters will be bound from the query string.
Using the emailAddress, the contact is retrieved from the database using the _contactRepository the confirmationId is compared. If the confirmationId from the query string matches with the confirmation ID from the contact, _contactRepository.DeleteContact method deletes the contact from the database.
Build and Test the Newsletter Upload Page
The final bit of the puzzle is sending the newsletter to the user.
Create a file named UploadNewsletterViewModel.cs in the Models folder. The UploadNewsletterViewModel class will be bound to the form to upload the newsletter.
By using the [DataType(DataType.Upload)] attribute, ASP.NET will be able to validate that a file was submitted using the form, and you'll be able to read the file using the IFormFile object.
Next, update the Pages/Upload.cshtml file with the following code:
The view renders a form for the author to upload a newsletter HTML file.
When the Upload button is clicked the OnPostAsync method of the code behind is triggered.
Update the code-behind file, Pages/Upload.cshtml.cs and with the code below, and bind the NewsletterViewModel property of type UploadNewsletterViewModel.
The PostAsync method begins with validating the user input and proceeds to reading the file uploaded by the newsletter author. Then an unsubscribeUrl is constructed based on the Unsubscribe page, and substitution tags for the email address and confirmation ID.
The contacts are queried in batches of 1,000 using the _contactRepo.GetConfirmedContacts method. Then a SendGridMessage object is created for the contacts that are retrieved. The Personalizations property of the SendGridMessage helps to create several email recipients and also do substitutions for "-email-" and "-confirmation-" using the Substitutions property.
The Personalizations property allows up to 1,000 contacts per message which can help you to deliver emails to your subscribers in bulk.
Once the newsletter is sent out to all subscribers, the author is redirected to the UploadSuccess page.
Create the Pages/UploadSuccess.cshtml and add the following code:
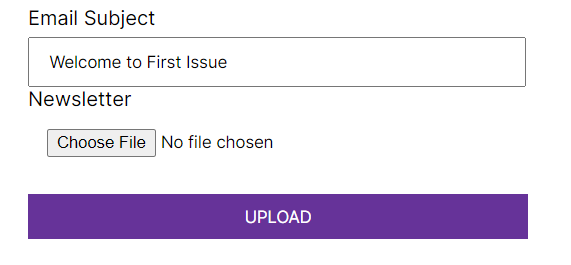
To test run dotnet run and navigate to https://localhost:<port>/Upload.
A sample newsletter of the format below can be downloaded from the GitHub repo.
Fill out the upload form with the sample newsletter and verify that the newsletter was delivered to your email inbox.
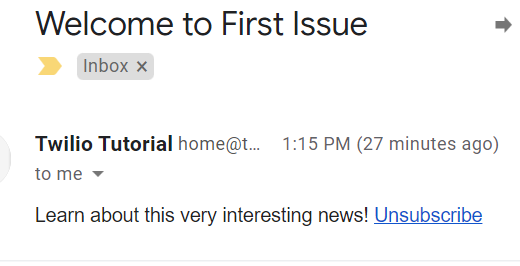
Here is a sample of the newsletter received by a subscriber:
Sending Newsletter Emails with Email Marketing Campaigns
As an alternative to building everything yourself, you can use the Email Marketing Campaigns to accomplish everything you have built so far.
Once logged into the SendGrid Dashboard you can navigate to Signup Forms in the Marketing section. Here you can create forms for users to sign up, and then you could proceed to share a link to the form with your users or embed the form in your website.
For email sending, you can set up automated emails using the Marketing > Automation option or you send emails out manually using the Marketing > Single Sends option. You can design your emails using a visual editor or write the HTML code yourself. This solution also includes the unsubscribe functionality.
The Marketing > Contacts option can be used to build different lists such that when a user subscribes, the user is added to a particular list. The list can be targeted for marketing campaigns or ignored as the business requires.
Future Improvements
The solution you just built is a fantastic start. However, there are many ways you could improve this application:
SQLite is very helpful for local development, but is limited in features and performance. You can switch to a different database that meets your needs while keeping your existing EF Core code.
Currently, anyone can access the Upload page and send a newsletter out to all subscribers. You should add authentication and authorization to the Upload page so only authorized users can send out newsletters!
Your solution can send a newsletter to thousands of subscriber, however, the emails will arrive at slightly different time because of two reasons:
- If you have 20,000 subscribers, you will call the Mail Send API 20 times because you're paginating by 1,000 subscribers at a time. By the time you have queued the emails to the 1,000 subscribers, the first 1,000 subscribers may have received the email already.
- When you call the Mail Send API correctly, the API will return a successful HTTP status code.
However, that means SendGrid has accepted your request and the emails are queued. SendGrid will process them and finally send them to the recipient.
For a small number of recipients, this won't matter, but as your subscriber list grows, you should consider using the SendAt parameter for better bulk email performance and have your newsletter delivered to all your subscribers at the same time.
Quoting the SendGrid docs:
This technique allows for a more efficient way to distribute large email requests and can improve overall mail delivery time performance. This functionality:
- Improves efficiency of processing and distributing large volumes of email.
- Reduces email pre-processing time.
- Enables you to time email arrival to increase open rates.
- Is available for free to all SendGrid customers.
You could add a datetime field to the form on the Upload page so that the author can schedule when the newsletter email goes out while improving performance and consistency.
Conclusion
With ASP.NET Core, Entity Framework, and SendGrid, you created a newsletter application to subscribe to a newsletter and to send newsletter emails to a large audience. In this tutorial you learned how to:
- verify a SendGrid Sender and configure a SendGrid API Key
- build a form for users to sign up to your newsletter and confirm their subscription
- built a system for users to unsubscribe from your newsletter,
- build a page where you can upload a newsletter HTML file,
- and learn how to send a bulk email to a large audience.
Continue learning about .NET, SendGrid, and Twilio, I recommend reading about configuring your .NET apps for SendGrid, or using FluentEmail to send emails.
And read this blog post to learn all the different ways you can bulk email and personalize your emails in C# .NET.
Similoluwa Adegoke is a software engineer and currently works in the banking industry. When Simi is not coding or writing about it, he is watching tv shows. Simi can be reached at adegokesimi[at]gmail.com
Related Resources
Twilio Docs
From APIs to SDKs to sample apps
API reference documentation, SDKs, helper libraries, quickstarts, and tutorials for your language and platform.
Resource Center
The latest ebooks, industry reports, and webinars
Learn from customer engagement experts to improve your own communication.
Ahoy
Twilio's developer community hub
Best practices, code samples, and inspiration to build communications and digital engagement experiences.