How To Build Your Own Hackpack
Time to read:
May 07, 2015
Written by
This post is part of Twilio’s archive and may contain outdated information. We’re always building something new, so be sure to check out our latest posts for the most up-to-date insights.

In a just a couple of weeks, developers from around the world will be joining us in San Francisco for Signal. For some Signal attendees, the speakers will be the highlight. For others, it’s getting their hands on the new video SDK. There’s also a good chance that $bash will steal the show.
Whatever part of Signal you’re most excited about, you can also look forward to receiving some awesome swag. We wanted to give Signal attendees a piece of swag unlike anything they’ve ever seen before. That’s why we partnered with littleBits to create custom built hackable backpacks for everyone joining us at the event:

In this post, we’ll give an inside look at how we used littleBits to build the hardware internals of the hackpack and build an application that scrolls the word “Twilio” across the LED panel.
We’ll leave it in your hands to modify your own backpack to house the hardware, or you can save the time and energy and just join us at Signal to get one of ours. Register with the promo code Swag75 for $75 off your ticket price. We’ll wait here for you while you take care of that:

You’re back! With that out of the way, let’s get to the hacking.
Our Tools
We need more than just a few lines of code to make this pack work. The following hardware supplies and software are necessary to build the internals our hackpack:
- littleBits: As we mentioned in the introduction, our hackpack is built using littleBits. Here are the specific bits we’ll be using:
- power: sends power to the hackpack
- battery+cable: provides the power and a connection
- Arduino: makes the hackpack programmable
- Proto Module: eases the difficulty of connecting to our LED
- magnetic shoes: prevents hardware from falling apart in the backpack
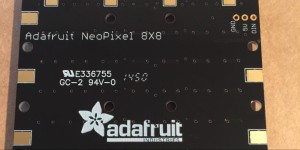
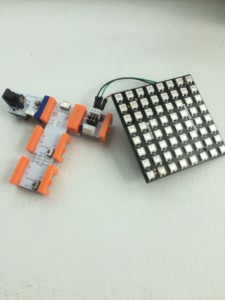
- Adafruit NeoPixel 8×8 LED Panel: displays beautiful lights on the back of our hackpack
- 3 jumper wires to connect our littleBits Proto Module and LED Panel
- 2mm flathead screwdriver
- Arduino IDE: allows us to write code in an Arduino IDE and upload it to our Arduino
- Adafruit NeoPixel Library: makes it easier to interact with our LED panel
- Adafruit NeoMatrix Library: enables easier text writing on the LED
The above list may appear daunting right now. Don’t let that scare you off from this hack though – our hackpack will be built step-by-step throughout this post. Let’s pull our components together and start building our hackpack.
Hello Hardware
With our supplies gathered, the fun can begin. We’ll start off by putting together the hardware for our hackpack. The powerful thing about littleBits is that they allow you to easily build super rad hardware hacks with minimal assembly required. Most pieces just snap in magnetically. For the hackpack there’s a little wiring required but don’t worry, we’ll walk you through it.
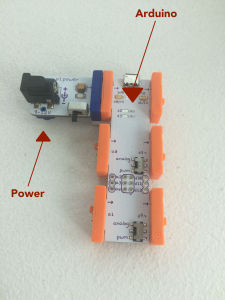
We’ll start simple. Plug the power module into the top input on the Arduino module and put one of the magnetic shoes on the button to make sure it stays secure:

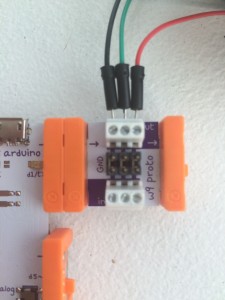
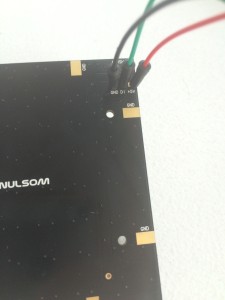
Now connect those wires on the NeoPixel Panel. For the final product you’d want to solder these in place but if you just want to push a jumper wire in each spot on the NeoPixel it will work for testing things out: But without soldering the wires will be finicky so be prepared that you may need to wiggle them a bit when you’re running the app to make sure things are working:
Software People
Thanks to the power of littleBits we’ve quickly built the hardware portion of our hack. It’s time to start slinging some code, and in order to do that we need to configure the device to let us upload scripts from the Arduino IDE.
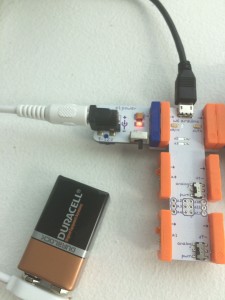
Start off by plugging the Arduino module into your computer via USB. Plug the power into the battery as well because the USB connection does not provide power to the bit. Then flip the power module switch to “on”. A red light will appear that indicates power is on:
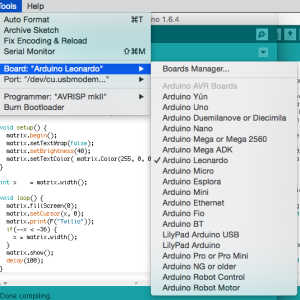
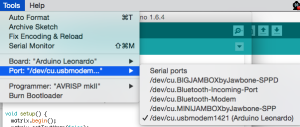
With the hardware powered on, open up the Arduino IDE. We need to tell the Arduino IDE what board we’re using and which port to connect to our board. The littleBits Arduino module is based on Arduino Leonardo. Go to select Tools -> Board and pick Arduino Leonardo:
It’s time to start building our application that scrolls “Twilio” on our NeoPixel panel. We’ll start by installing the Adafruit libraries we mentioned when we assembled our tools. If you’ve already done this you can skip to the next paragraph. Click the links to download the Adafruit_NeoPixel, Adafruit_GFX and Adafruit_NeoMatrix libraries. Unzip each library, remove the “-master” from the name of each folder and move to the Arduino libraries folder. Now restart the Arduino IDE and you should be good to go.
With our libraries installed, we can create a new sketch (File -> New) and import our libraries at the very top of the file.
Next we define the pin that our NeoPixel panel is plugged into:
Now we can initialize our matrix:
The first two arguments are the size of our matrix (8×8). Then we set the pin that our matrix is plugged into. Everything else provides basic configuration for our matrix. Make sure to check out the documentation if you’re interested in more ways you can set up the Adafruit_NeoMatrix library.
The setup function will be called whenever our application starts. Here we want to start our matrix and configure the options for text wrapping, brightness and text color:
Finally, we’ll write the code that sets the text and then scrolls it on the the screen by changing the x position:

See You At Signal!
That’s a peek behind the scenes of how we used littleBits components and a bit of code to create to create the hardware that’s coming in the Signal swag hackpack backpack. In mere minutes we were able to wire together the components with the NeoPixel Panels, write some Arduino code and display our “Twilio” message. Now just think of what you could could build given even more time with the hackpack and a Twilio engineer sitting by your side at Signal.
We’re stoked to see what you can build using this amazing hardware kit, so start your brainstorming! What are you going to build with your hackpack? Or maybe you’ve already created your own hacks using litteBits hardware? Let us know in the comments or holler at us on Twitter (@mattmakai or @rickyrobinett). We’ll publish your hacks and let you help inspire other Signal attendees to build awesome applications with the hardware they receive at the conference.
Related Posts
Related Resources
Twilio Docs
From APIs to SDKs to sample apps
API reference documentation, SDKs, helper libraries, quickstarts, and tutorials for your language and platform.
Resource Center
The latest ebooks, industry reports, and webinars
Learn from customer engagement experts to improve your own communication.
Ahoy
Twilio's developer community hub
Best practices, code samples, and inspiration to build communications and digital engagement experiences.