How to Write Effective Unit Tests in Java
Time to read:
March 07, 2022
Written by
Reviewed by

In the early years of my career, getting started with testing my code felt like trying to break through a brick wall. To hopefully make your experience less painful, here is an attempt at the introduction I was given to this important topic.
In this article, you will learn how to write code which is easily testable and how to test it using a single tool: JUnit 5.
Prerequisites
- Java Development Kit (JDK) version 8 or newer.
- JUnit 5.8.2 (though most versions of JUnit 5 should work).
- An IDE with JUnit integration is recommended, such as Eclipse, Intellij IDEA, Android Studio, NetBeans. This article will make references to IntelliJ IDEA.
- A build tool is recommended, such as Gradle or Maven to manage the JUnit 5 dependency.
Why You Should Care About Testing
Anytime you write application code that is deployed and used, it is being tested. Whether you write tests in code, manually test it via a browser or device, or publish it and let your users test it, is merely a detail. I do not recommend that last option!
Most start by manual testing which means to deploy and use the application like a typical user would. While there is a time for that, checking critical application logic can be done in a systematic, faster, and more reliable way by writing code tests.
What seems like extra work initially, will save you time for two reasons: Firstly, you will catch and identify your errors sooner. Secondly you can run your tests with lightning speed on your local JVM environment.
Building and deploying your application to a server or a device for manual testing can be orders of magnitude slower by comparison.
How To Write Testable Code
Testing your code means verifying that it works as intended. However, getting from there to writing code tests might be challenging. To make matters worse, many tutorials go into great detail about a particular tool without describing the basic testing process.
To avoid any confusion, the first example will demonstrate how to test some code without using any libraries at all; not even JUnit. With that being said, I do encourage you to find a setup that works for you.
NOTE: Some of you may have heard of test driven development (TDD). I will not be applying TDD in these examples, but I will address it and the topic of 100% code coverage, toward the end of this article.
A Basic Process For Testing
For this example, you may either use a JDK via command line, along with a basic text editor to write the code, or use your preferred Java IDE (recommended). I will be using Intellij IDEA Community Edition to write and run the code.
Create a new Java Gradle project in IntelliJ IDEA by selecting the menu options File -> New -> Project. For this example, Gradle is not necessary, but later examples will benefit from having some kind of build tool ready.
The Code To Be Tested
Suppose you are writing a user facing application where the user must create a username. In this situation, it is often necessary to write validation logic which places restrictions on what characters the user may choose for their username.
Create a new Java class called Validator.java inside the src/main/java package and copy and paste the following code:
Regex is short for “Regular Expression” and it can be thought of as a set of instructions used to examine the contents of String objects. Although it can be difficult to read, using a regex pattern is often much faster than writing the tedious validation logic in pure Java.
What Is A Unit Test?
Now that you have something to test, this is a good time to introduce a term which you may have heard: "Unit Test". I agree with a common definition that a "Unit" can be thought of as “the smallest testable part of an application.” Keep in mind that you will find other definitions from other developers.
The validateUserName(...) method can be understood as a unit of code. It is a single method call with a single output. It makes use of some libraries such as String.length(), but it is not your responsibility to test the standard library itself.
Later on, you will see an example of a Java class that contains multiple dependencies, and is responsible for coordinating the events and flow of data between them. There will remain only a single method call on this class for each Unit Test. However, that single method may need to call many other methods within the same class, or other classes, to serve its functionality.
One of the core ideas of Object Oriented Programming is Data Hiding which means that in Java, testing private member (class) methods directly is difficult. There are some workarounds to this problem, but I find it sufficient to regard private member methods which are subsequently called from a public method to be part of the whole unit of code.
The Code Which Does The Testing
Now that you have some context of the sample code, it's time to test it. The process of unit testing code can be summarized in three steps:
- Prepare test inputs to the code (if any are required).
- Call the code (unit) to be tested.
- Verify what it does (behavior) and the result it returns.
This can be done by creating a class which contains a main method.
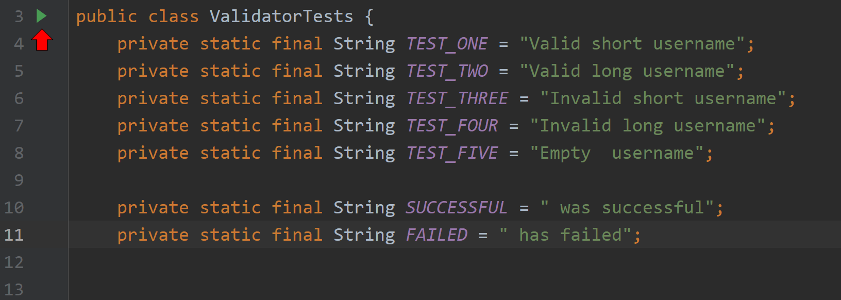
Create a class called ValidatorTests.java within the same subfolder:
NOTE: I have deliberately left out a particular test which would test a common situation which will crash an Java application; any idea what it might be?
Depending on what you are testing, a good start is to test one or two valid and invalid inputs. In this case, the way in which you observe the results of each test, is by printing the result.
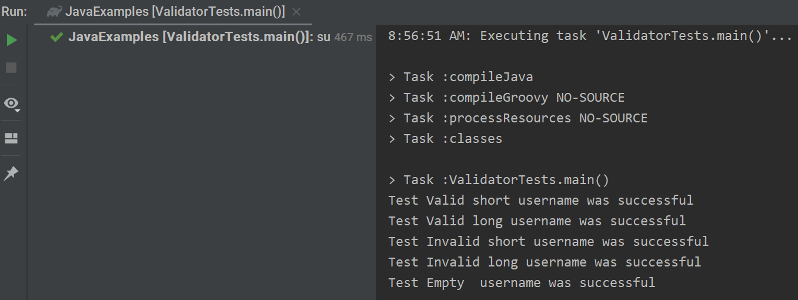
In Intellij IDEA, the quickest way to run your code is to locate the class that contains the main method. Then, click the green arrow beside the class declaration or the main method itself:
After running this code, the console output should look similar to the image below:
Everything seems to be working, but it has occurred to me that Java’s famous Billion Dollar Mistake has not yet been accounted for! Add the highlighted code to the ValidatorTests class:
With the new test added, the console output is now:
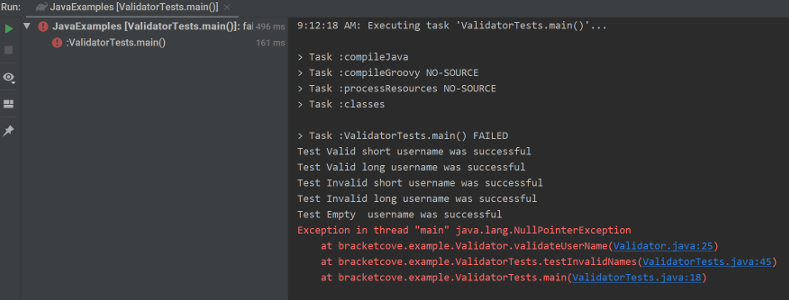
Yikes! This can be fixed by adding a null check to the validateUserName(...) method defined in the Validator.java file:
In this example we only checked the output of the code. In the next section, I will explain how to verify the behavior of the code.
You also saw an example of a core OOP principle in testing: Do not assume that adequate test coverage can be achieved by adding a single test to a unit; though on occasion this may be true. Over time, you will get a sense of what kind of tests will be required in a given unit.
Here are a few tips to think about:
- If Arrays or List indexes are involved, test the smallest and largest allowable indexes to catch
ArrayIndexOutOfBoundsException. - If there is any possibility that a reference type (non-primitive type) may be null, test for it.
- If large numbers and mathematics are involved, consider testing around the maximum size of Java’s primitives number types.
The point is, pure standard library code makes testing seem less stressful than it should be.
The Key To Testable Code: Decision Makers and Doers
This next idea has been given several names by different software engineers. I will restate it using names which were chosen for clarity of understanding.
This section discusses the option of testing with a variety of platform APIs and 3rd party frameworks and libraries. This is a common situation; particularly in projects which require a graphical user interface.
To make a useful generalization, the key to making your code testable is to separate it into two kinds of software entities such as classes or methods.
The first is what I will call a “Doer.” The job of a doer is to talk to some platform or 3rd party library/framework code and hide it from the rest of the application code.
Doers should have basic methods such as setColor(...), showMessage(...), or saveData(...) and may report success or failure if appropriate. They should contain as little logic as possible, for reasons that will become clear in a moment.
The second kind is what I like to call a "Decision Maker." Decision makers are broadly meant to accomplish two tasks:
- Encapsulate (contain) the various kinds of logical instructions which you will come across in most kinds of applications.
- Coordinate the flow of data and events to and between one or more doers (explained soon).
Perhaps more importantly is what they must not do:
- They must try not to contain dependencies to platform APIs or 3rd party libraries/frameworks.
- They must not make (instantiate) the doers that they depend on.
- Optionally, they should not know or depend on concrete class names.
We will observe a practical example of a GUI application. This same principle can apply regardless of whether you are writing Android, Java EE, Java Desktop applications, and most languages and platforms.
Preliminary Classes For A Typical GUI Application
At this point, you will likely want to have a project that is using some kind of build tool like Gradle or Maven. However, it is possible to integrate dependencies like JUnit 5 without them.
If at any point you want clarification about source code or directory structure for the following examples, visit the source code repository here.
Most Java applications will use some kind of Plain Old Java Object to represent core objects and their properties. The following examples represent a generic “task management” application, which will require such an object.
Make a new subdirectory called task in the same project directory where you created Validator and ValidatorTests.
Create a Java class called Task.java within the task directory and copy the following code to the file:
All of the user’s tasks will be contained in a single object, defined in another file named Tasks.java. Apart from acting as a collection of Task.java objects, it has a convenient method to look up a particular task by its taskId.
Create a Java class called Tasks.java within the task directory and copy the following code to the file:
Another common and useful class to create in a GUI application is one which represents user interaction events in a particular screen. You can create such a class using the following pattern:
- Create an enum class to represent each event.
- Create a class which wraps the enum class.
- Give the “wrapper class” a variable to represent the event, along with any data associated with it.
Within the task subdirectory, create a new Java class called ManageTaskEvent.java with the following code:
The Decision Maker
In the task subdirectory, create a new class called ManageTaskDecisionMaker.java. Replace the contents with the following code:
The general point I want to make first is that this article is not about teaching any particular GUI architecture pattern. All of them encourage this separation of decision makers and doers to some degree, and none of them are ideal for every kind of project or feature.
There is no such thing as a perfect software architecture; they just tend to work better or worse depending on project requirements.
Prefer Standard Library Only
It is recommended for decision makers to only contain code made from, or depending on, the Java Standard Library (jstdlib). This is because every dependency potentially adds overhead complexity to the tests.
Take for example, the popular Reactive Extension library, RxJava 2. Some developers love to use this library to glue their entire software architecture together. Supposing the decision maker used RxJava 2, the unit tests must now:
- Become tightly coupled to the RxJava 2 library.
- Work with the RxJava 2 API within the tests.
Though not necessarily a critique of RxJava 2 specifically, the common pitfalls of tight coupling to such a library are:
- The learning curve required to actually test such code.
- A limited amount, or complete lack of integration for testing.
- The complete destruction of test code if you migrate to a different library.
- Code breaking API changes over time.
Conversely, standard library code will tend to change much slower than platform and 3rd party library code. This insulates your decision makers and the test code from breaking changes.
It is unrealistic to expect that every line of code you write, particularly in a GUI application will be standard library only. Therefore, the next two sections will explore how to use many such libraries while avoiding the tight coupling problem.
Dependency Injection
Dependency Injection (DI) is a topic which can be difficult to grasp. However, it is important to understand its basic forms to increase the testability of code.
Our decision maker does not instantiate its own dependencies. This is fundamentally what dependency injection is about: separating configuration from use; to paraphrase Martin Fowler.
Instead of creating its dependencies, these dependencies are passed (injected) to it via a constructor method:
The usefulness of dependency injection becomes evident as you begin to test classes like the decision maker. Later on, you will create Test Doubles for the dependencies, and pass them into the decision maker.
Thanks to dependency injection, all of this can be done without changing any code in the decision maker or the Unit Tests. dependency injection effectively makes it such that the decision maker does not care whether it talks to fake dependencies or real ones.
Instead, if you instantiated the dependencies within the decision maker, you would need to change the decision maker’s source code to reference Test Doubles or the production classes whenever you want to run tests; and vice versa.
Dependency injection is useful, but it turns out that it can be used with another technique to make coupling even looser.
Consider Depending On Abstractions
Abstractions allow you to convey only information which is actually useful; leaving out details which are not.
Interfaces, abstract classes, and inheritance are all forms of abstraction as applied in code. This is not the only function they serve, but a primary one. All of the dependencies for the decision maker are interfaces, instead of concrete classes.
Create a new file named IManageTaskContract.java in the same project directory and paste the following code to create a new interface:
As you can see, it is possible to nest interfaces inside of one another. If you have more than one UI feature, the top level interface works like a namespace.
Java interfaces allow you to define abstract methods, like Task getTask();. A Java method, excluding optional keyword modifiers, consists of two integral parts: a method signature and a method body.
The method signature consists of a return type, the method’s name, and an optional parameter list. The method body consists of the curly brackets, {//…}, along everything between them, that follows the method signature.
It is common to refer to the method signature as behavior of a method, and the method body as the implementation of the method.
The utility of using interfaces is that the decision maker will neither know or care if the actual dependency behind the interface is a Test Double or production code.
Create ITaskStorage.java in the same project directory, and paste the following code into the file:
The second interface represents some kind of Input-Output (IO) device. It could be a database, network adapter (REST, GraphQL, etc.), repository, system service, and so on. Again, the point is that the decision maker does not know what it is actually talking to, only how to talk to it.
Create Continuation.java in the same project directory, and paste the following code into the file:
The third interface contains another useful tool in the Java language: Generic Types. This is another kind of abstraction. The actual types are specified as necessary in the ITaskStorage.java interface, which is then used by the decision maker.
You may be wondering what the purpose of the Continuation interface is. When talking to an IO device of some kind, there is often a chance that it will throw an exception. The Continuation interface is an alternative to using a try-catch block to manage exceptions in a more idiomatic way.
A Note On Using Abstractions
Most developers, when they first learn about abstractions, will tend to use them everywhere.
Here are some tips on when to use abstractions:
- You expect the implementation of some dependency to change over time.
- You have multiple implementations (i.e. test and production) that you expect to use frequently.
- You want to build and test classes such as the decision maker without having to build the dependencies first.
- You do not like to use mocking frameworks (explained later).
There are other ways to get around swapping implementations for test and production code apart from using interfaces. However, most of these workarounds require a framework to mock the dependencies, or a build tool configured to supply different source sets.
I will not be implementing ITaskStorage, ViewModel, or View in this article as that is a platform specific detail. As an exercise, you may wish to implement them yourself in a toy application of your preferred platform.
How To Test Code With JUnit 5
Before writing the tests for the decision maker, you need to be able to use the JUnit 5 library in the test sources.
The JUnit 5 Documentation provides some examples of how to integrate the library into different build tools.
A Glance At The Test Source Set
A new Intellij IDEA Java project should come with a Test source set, which should sit in the same folder as your main source set:
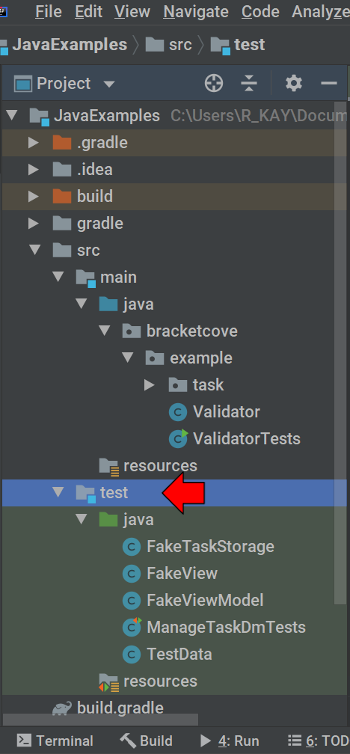
This is the folder which will keep everything that is used in the Unit Tests. While the code within the test source set can reference and use the code within the main source set, the same is not true in reverse. Furthermore, the test sources will not be present in the compiled application code outside of running in a testing environment.
Importing JUnit 5 With Gradle
If you created a Gradle Java project initially, then you will have a build.gradle file which sits in the root directory of your project. It should already have some import statements for JUnit 4. While JUnit 4 is still commonly used, please replace those dependencies with JUnit 5.
Open build.gradle and change the dependencies script to the following:
Afterwards, you will need to synchronize your project dependencies. This can be done in Intellij by selecting the following menu items: Build -> Rebuild Project
Create The Test Data
As previously discussed, a fundamental piece of testing code is to create test inputs for the units to be tested. Since the test inputs in this article will be used across different test cases, it will be handy to have a file that contains all of the test data.
Within the src/test set, locate the java subfolder and create TestData.java:
Create Test Doubles
There exists an esoteric set of names to describe various kinds of approaches to testing a production class or method with code that is used exclusively for testing (often broadly called Test Doubles). The unfortunate truth is that developers do not agree on what each of these terms mean.
Therefore I will call one approach as creating “Fakes” and the other approach as creating “Mocks”. Yes, you will find people who disagree with my usage. Welcome to the joy of software developers arguing about definitions.
A mock can be thought of as a class created by a "Mocking Framework." This means that the developer programmatically gives the class names, methods, and desired responses to the framework within the test sources.
Then at compile time or runtime, the framework will work some magic to provide a Test Double with the same concrete name. Therefore, a Mock does not need to be hidden behind an interface.
I used to use mocking libraries all of the time in my Unit Tests, and I know several senior developers who still do. The reason I no longer use them is because I find they suffer from the same issue that almost every framework does.
It will tend to work very well in many situations, but it will also be a major nuisance in a few special cases. With that being said, I do encourage you to explore them. A good mocking framework can help you write most of your tests a bit faster.
Create The “Fakes”
In this section, you will use what is commonly referred to as either a Fake or Stub. You will create some Java classes which implement the interfaces that are referenced in the decision maker. The benefit of this approach is that you have absolute control over these Test Doubles and no extra frameworks are needed to use them.
The downside is that they often take a bit more time to write as opposed to using a mocking library. Often, but not always.
Again, within the test source set java folder, create FakeView.java and paste the following code into the file:
In this case, you are checking whether or not a given method was called. Details such as how many times the method is called, what it is called with, or what it should return, can all be written into the Fake as needed.
Next, create FakeViewModel.java in the same test subfolder:
You may notice that I have initialized the task reference to be null. In the real application which this code is based on, task is initially loaded from storage. If getTask() is called prematurely, it will cause the test to fail; which is the intended behavior in this case.
Lastly, create FakeTaskStorage.java in the same test subfolder:
As discussed previously, IO devices often throw exceptions. This Fake contains a boolean which can alter in the Unit Tests depending on if you want it to signal success or failure.
How To Write Unit Tests With JUnit 5
You are now ready to write some tests!
In the test source set java folder, create a class called ManageTaskDmTests.java:
For each Unit Test you write, you will write a method in this class. I typically have one test class per Java class to be tested but that is not strictly required.
How To Set Up Your Tests
Before writing any tests, you will make use of the JUnit 5 annotation @BeforeEach. A method marked with this annotation, will be executed prior to each Unit Test. This ensures that the changes made to the decision maker and the Fakes in one test do not affect the outcomes of other tests.
Add the setup() method to ManageTaskDmTests.java below the variable declarations:
Here, you can see another JUnit 5 annotation: @Test. This annotation will be used by compilers and test runners to create an executable test. If you are using a modern IDE, these steps should be handled for you.
This leads me to an important step before running these tests! By default, the tests will be “run” by gradle. While this option can work, many users (myself included) report that it does not without further configuration.
The simplest fix is to run your tests using the Intellij IDEA IDE itself. This setting can be changed by navigating through the following menu options:
- On Windows OS, navigate to File -> Settings -> Build, Execution, Deployment -> Build Tools -> Gradle
- On Mac OS, navigate to Intellij IDEA -> Preferences -> Build, Execution, Deployment -> Build Tools -> Gradle
Once you reach the “Gradle” menu, change the “Run tests using:” dropdown menu to “Intellij IDEA”:
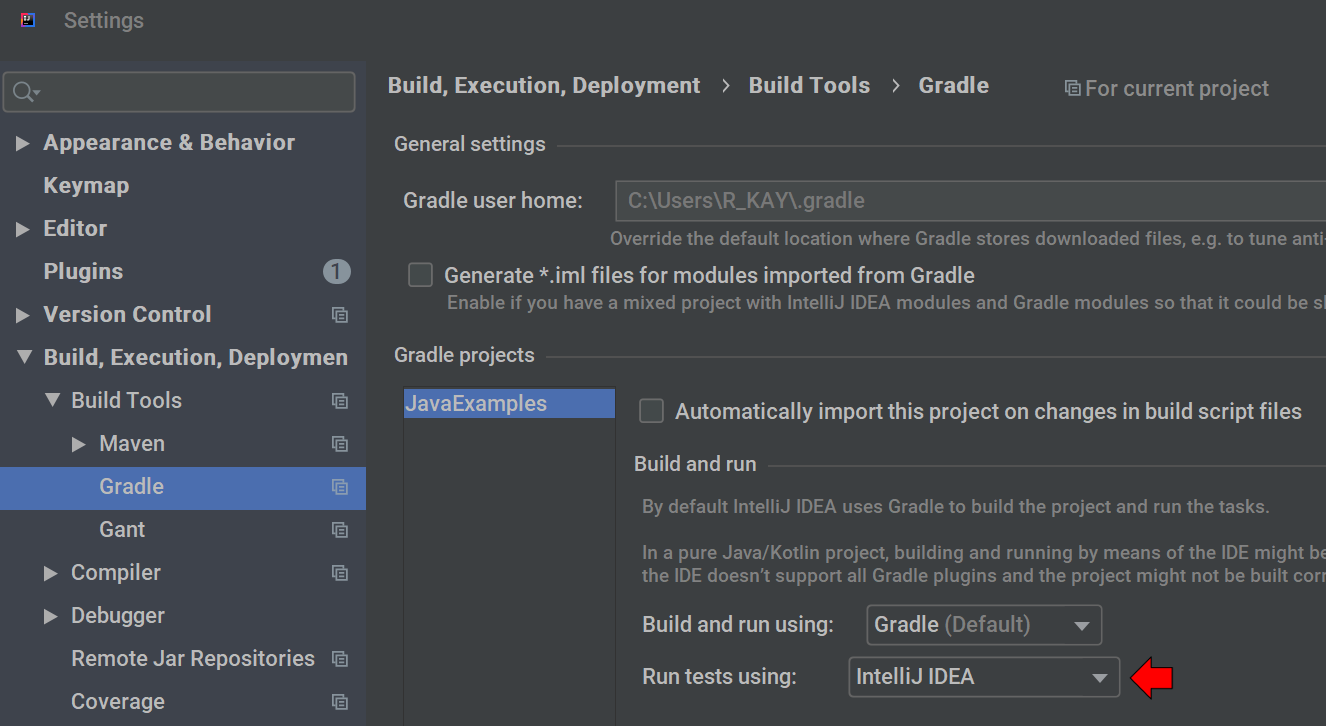
Click on the Apply button at the bottom, then OK.
How To Run A Unit Test
Before running the tests, you may wish to review the full source code of this example.
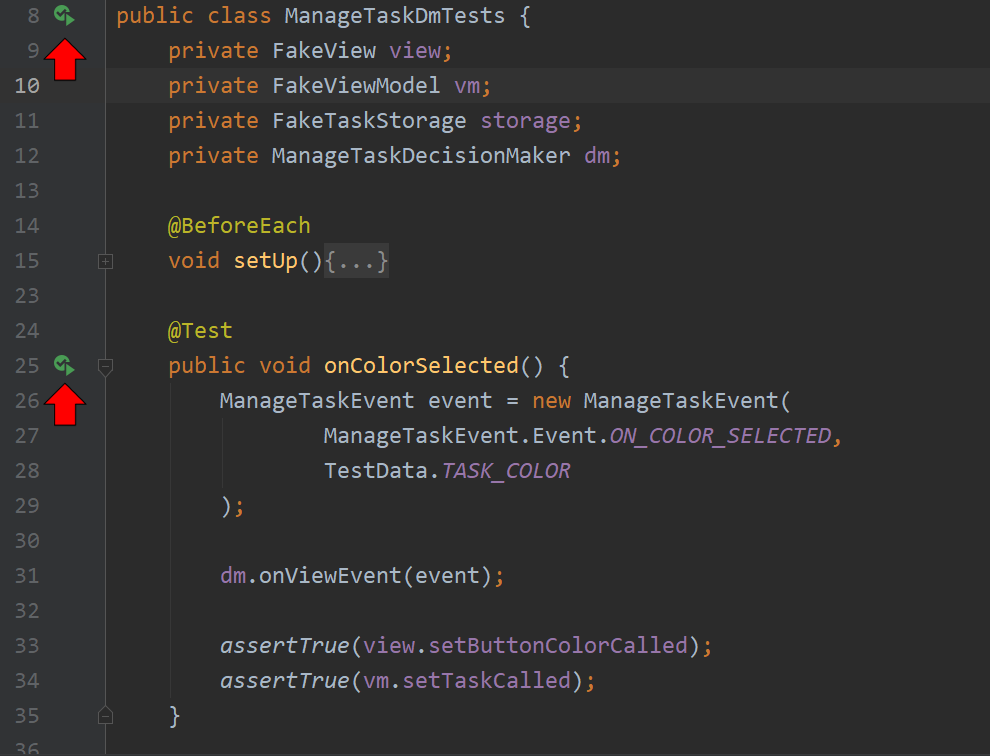
You will now need a run configuration which points to either your test class to run all the tests in one go, or to a specific test within your test class. To do so, click on the green play arrow next to either the class declaration or the test method declaration as seen in the image below:
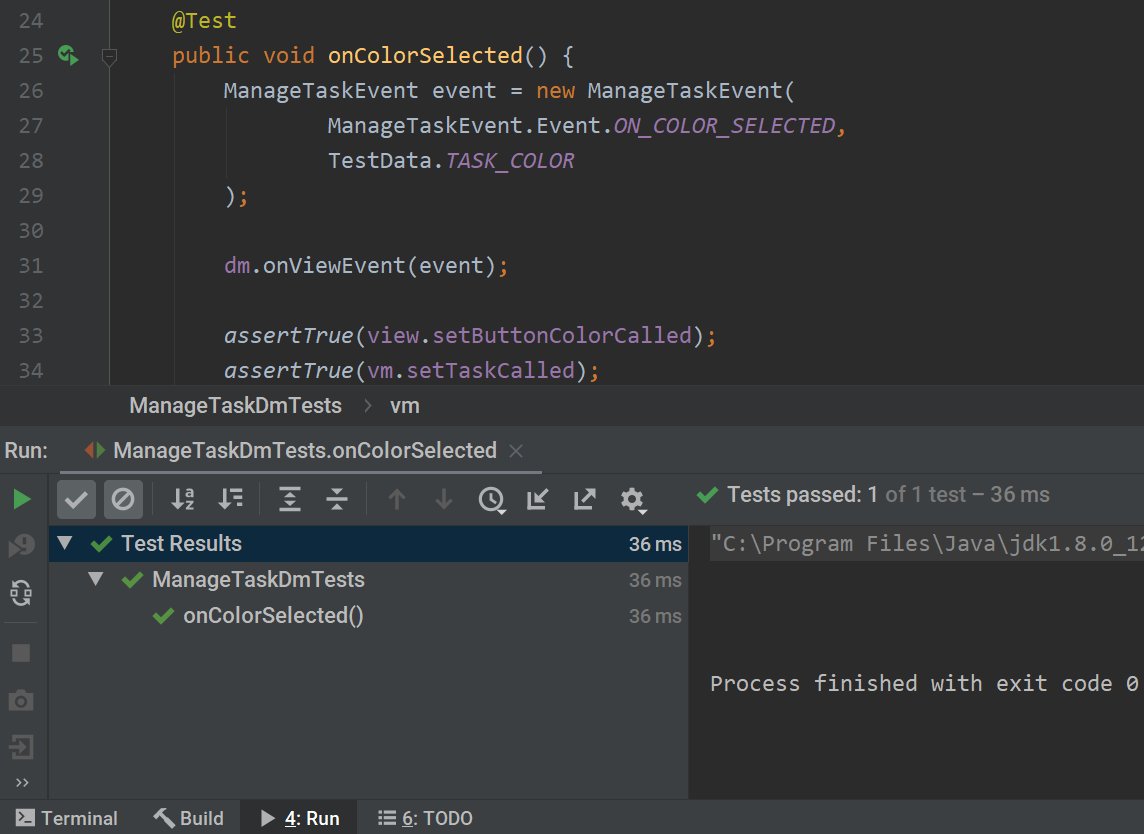
After running the test, the results should display green check marks in the Run tab, as seen in the image below:
To finish this example off, add some more Unit Tests to the same ManageTaskDmTests class below onColorSelected:
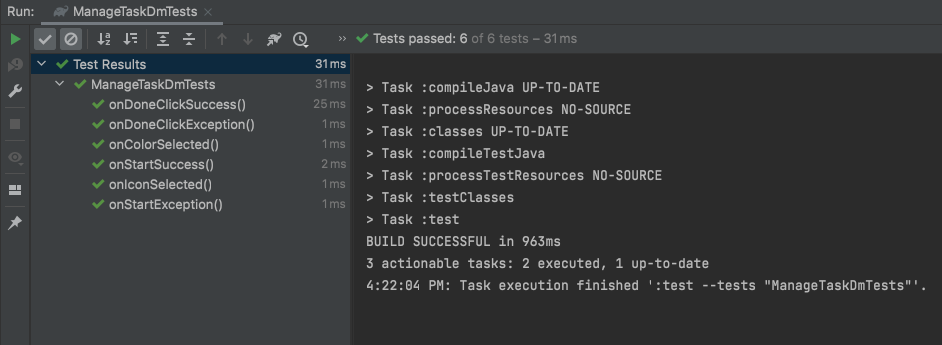
Save the file, build, and run the tests under ManageTaskDmTests class again. You should see check marks under the Test Results:
As you can see, it is important to test exceptions. How you handle them is a project specific detail, and you may wish to create your own exception subclasses for fine grained error handling.
A common pattern I like to use is to have a single entry point into such a class like the decision maker, which is given an object that represents different execution paths. The decision maker uses a method called onViewEvent(...) which is given a ManageTaskEvent object.
I find that this organizes writing the code and tests for such a class quite well. However, not all decision makers will necessarily benefit from having a single entry point.
Controversial Testing Topics
A wise person once said that the duty of a teacher is to point to things and not to fill the student with the teacher’s dogma and opinions. So while I will address a few topics which are frequently argued about regarding testing, I encourage you to try different approaches and see what works for you.
100% Code Coverage
In theory, if you cover every line of executable code with a comprehensive set of well formed tests, then you have logically proved the correctness of your entire project. This is a worthy ideal, but project requirements will dictate whether this goal is useful or silly.
In my experience, the only kinds of projects where I have been able to achieve 100% code coverage, were projects which only needed pure standard library code. For example, I once wrote a compiler front end in pure Kotlin. The entire thing was made via test driven development (TDD) and 100% code coverage was both desired and important.
When it comes to GUI applications, which are tightly coupled to platforms and 3rd party frameworks/libraries, it is a different story altogether. Two common approaches are to either:
- Use mocks in place of platform, framework, and 3rd party library dependencies.
- Deploy the application to an actual device or server and use some kind of automated testing framework to drive the interactions.
The first approach is argued by many to be incomplete and unreliable, as you are making the often incorrect assumption that a mock will behave exactly like the real thing. The second approach, while generally more reliable than the first, typically takes a long time to configure, deploy, and run.
It is often recommended to pull any critical logic into an easily unit testable class. The rest will be handled by deploying the application to a test server or device for manual or automated testing.
Test Driven Development
The most common opinions I hear on TDD tend to be irreconcilable. One camp says that TDD is generally a waste of time. As long as you adequately cover critical application logic with tests, it really does not matter whether the tests are written before or after.
The other camp says that you should not write a single line of production code unless you have already written a failing unit test for it. In theory, the time you save catching your errors simply by testing units, and the correctness provided by incrementally proving each piece of the whole, is absolutely worth it.
I treat TDD like every other principle I have come across in programming - Use it only to the extent that it solves more problems that it creates.
If I am writing code where I have no difficult dependencies to deal with, I will most likely apply TDD. I also would do my best when writing code where the correctness of each step is absolutely critical, such as writing a compiler front end.
However, there are certainly situations where I prefer to write the tests afterwards. The most common situation for me is when I am prototyping new approaches, new architectures, or testing new technologies/platforms/languages. After all, you actually need to know what your expected behavior is before you can test against it.
Both camps previously described have valid points, but I never found myself at either extreme. However, I would encourage you not to just read about them, but to try them and gain some practical insight into the matter.
Conclusion
My goal in this article was to provide you with a way to write tests which is repeatable and independent of a large suite of different testing tools. This was done with the intention of giving you a jumping off point to get started writing tests with minimal configuration required.
I hope that I have also carefully pointed out that there are many different ways to write your tests, and I am not necessarily advocating that you follow this approach. There are also many conflicting definitions and approaches in my study of software testing. Another goal of mine was to either clear up or address these conflicts in a balanced way.
My recommendation to you, is to be open to trying different approaches, and to be prepared to spend a few weeks getting comfortable regularly writing tests. I do think it is worth it.
Ryan M. Kay is a self-taught software engineer and content creator. He specializes in software architecture and writing clean, legible, and modular code. Ryan has prepared a comprehensive introductory Java course which is available for free on YouTube.


Related Resources
Twilio Docs
From APIs to SDKs to sample apps
API reference documentation, SDKs, helper libraries, quickstarts, and tutorials for your language and platform.
Resource Center
The latest ebooks, industry reports, and webinars
Learn from customer engagement experts to improve your own communication.
Ahoy
Twilio's developer community hub
Best practices, code samples, and inspiration to build communications and digital engagement experiences.