Manage your Zoom Meetings on WhatsApp with Python and Twilio

October 20, 2020
Written by
Odunayo Ogundepo
Contributor
Opinions expressed by Twilio contributors are their own

Manage your Zoom Meetings on WhatsApp with Python and Twilio

In this tutorial, we are going to build a WhatsApp bot that allows you to manage your Zoom meetings. Some of the functions include creating or deleting a meeting and listing all upcoming meetings. The bot will be built using Twilio API for WhatsApp, Zoom API and the Flask framework for Python.

Tutorial requirements

You need the following to follow along in this tutorial;

  • A Twilio Account: You need to create a free Twilio account to gain access to the WhatsApp sandbox environment. This will allow you to interact securely with the Twilio number assigned to you on your WhatsApp application. A free twilio account comes with certain features and limitations.
  • A Zoom Account: You need to create a free Zoom account if you do not already have one. With a zoom account, you can create a zoom app which comes with access to their API.
  • Python 3.6 or newer. Python installers for different versions and OS are available for download  here.
  • A smartphone with an active phone number and WhatsApp account.
  • Ngrok: ngrok allows you to securely expose your local server to the public internet. you can find instructions to download and install ngrok here.

Setting up the Development Environment

Now that we have set up the Twilio WhatsApp sandbox environment and we have active Zoom API credentials, we will start creating the application. First, we have to create a directory for this project and create a python virtual environment in that directory.

We will use python’s inbuilt venv module to create the environment and install the following packages.

Enter the following commands in a bash terminal to complete the tasks described above.

If you are following this tutorial on a Windows computer, enter the following commands in the command prompt window to setup your development environment:

$ md meeting-bot
$ cd meeting-bot
$ python -m venv bot-venv
$ source bot-venv/Scripts/activate
(bot-venv) $ pip install twilio flask zoomus python-dotenv

For Unix or Mac OS users, enter the following commands instead:

$ mkdir meeting-bot
$ cd meeting-bot
$ python3 -m venv bot-venv
$ source bot-venv/Scripts/activate
(bot-venv) $ pip install twilio flask zoomus python-dotenv

Configure the Zoom API

In order to gain access to all of Zoom’s collection of resources, we need to create a Zoom app which will grant us access to their APIs. The Zoom App will grant you access to mirror some of its popular features such as creating a meeting, deleting meetings, listing meetings e.t.c. If you don’t have a zoom account you have to sign up for one.

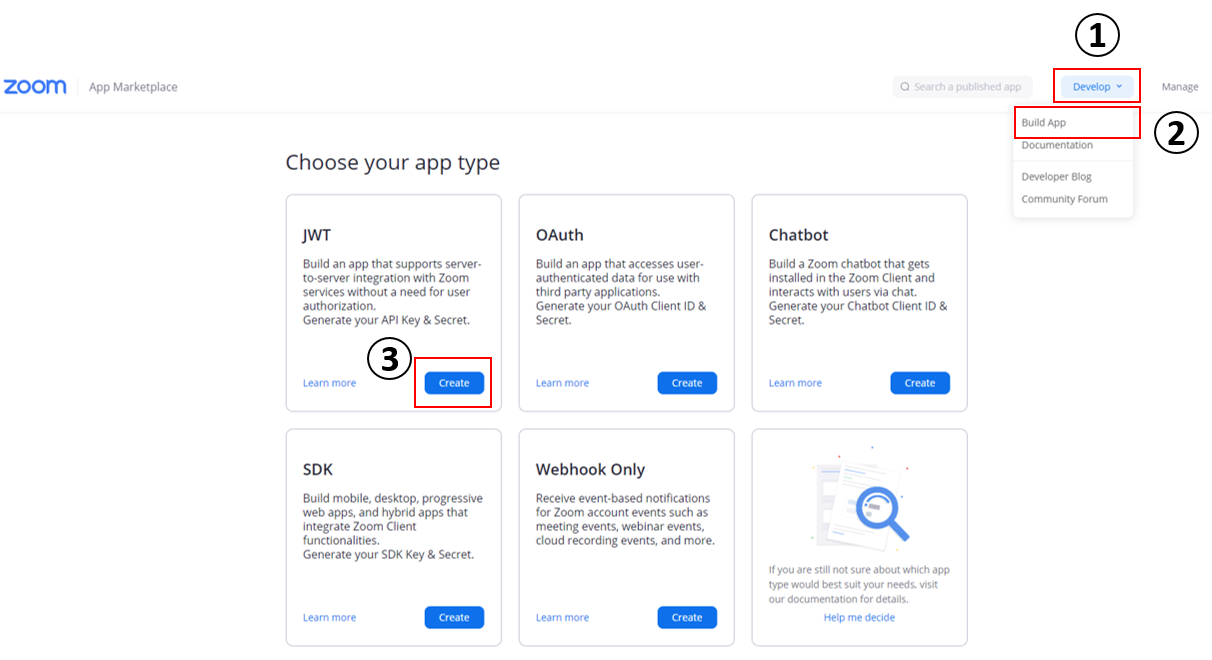
Once you have created an account, you need to navigate to Zoom App Marketplace to create an App. On the navigation bar, click on (1) “Develop” and then on (2) “Build App”. Finally, click on (3) “Create” in the “JWT” box. Give your application a name such as Meeting Bot and click “Create”.

Create a Zoom app

To activate the application and gain access to the API credentials you need to fill in the basic information listed below:

  • “Company name”
  • “Developer Name”
  • “Developer Email Address”

Zoom app settings

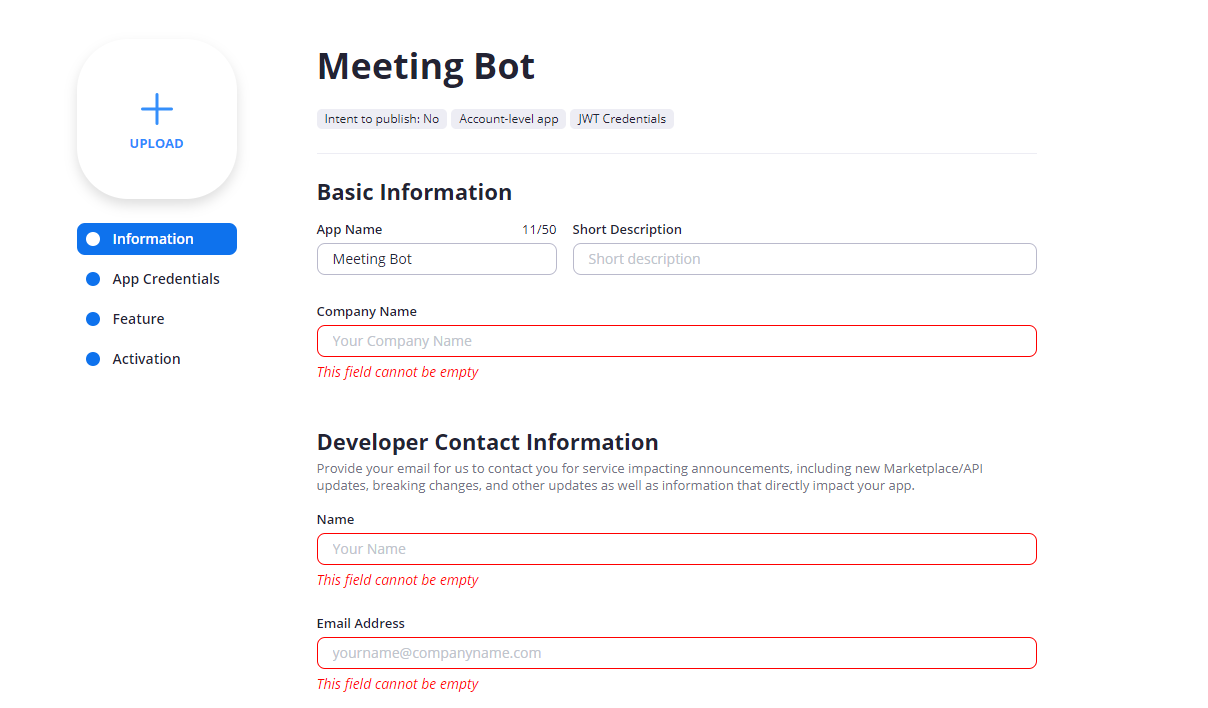
Once that is done, you click “Continue” and then click on “App Credentials” on the sidebar to view the API Credentials (API Key, API Secret & JWT Token).

Now we are going to store our Zoom API key, API secret, and email as environment variables. Create a .env file in the root directory and enter the following variables in it:

API_KEY=<your-API-key>
API_SECRET=<your-API-Secret>
USER_EMAIL=<your-email-address>

Remember to replace the placeholders with the actual values.

In the next section we will test the API.

Testing the API

To test the API credentials that were provided, we are going to retrieve our user information by using the zoom client to call the zoom endpoint with our email address stored in the 'USER_EMAIL'  environmental variable.

We will create a test.py file and add the code block below to import the necessary packages and environmental variables needed to test the API.

import os
from zoomus import ZoomClient
from dotenv import load_dotenv

# Import environmental variables
load_dotenv()

API_KEY = os.getenv('API_KEY')
API_SECRET = os.getenv('API_SECRET')
EMAIL_ADDRESS = os.getenv('USER_EMAIL')

Then we will add the code block that makes the get request to pull our user information from Zoom.

client = ZoomClient(API_KEY, API_SECRET)
response = client.user.get(id=EMAIL_ADDRESS)

if response.status_code == 200:
    print("The API Credentials are valid")
else:
    print("The API Credentials are invalid")

Now, execute the ‘test.py’ file to verify that the API credentials were correctly set up.

Setting up the Twilio WhatsApp Sandbox

One of the dependencies of this project is a free Twilio Account that provides you with a WhatsApp sandbox to create and test your application. The free tier account comes with a trial balance that allows you to exchange messages for a period of time, after which you are billed for what you use. Once your WhatsApp application is production ready, you need to get approval from WhatsApp before it can be deployed on your own phone number.

Click  here to set up your sandbox environment. From the Twilio Console, click on the icon with the 3 dots on the left navigation bar and click on “Programmable Messaging”, then click on “Try it Out”, in the ensuing drop down, select  “Try Whatsapp”. On the screen, you will see a message asking you to send a custom code from your device to the Sandbox number via WhatsApp.

Twilio WhatsApp sandbox

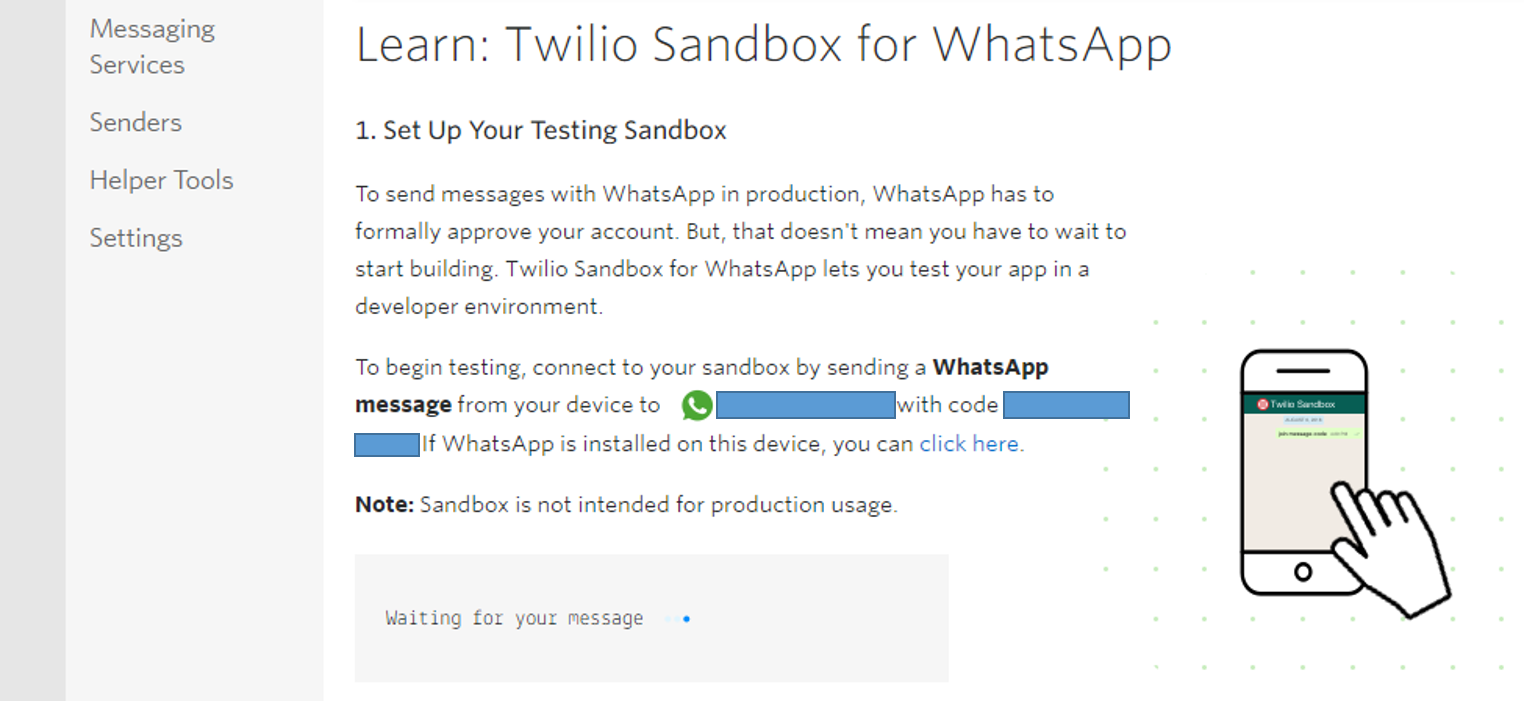
Once that is done, you will get a notification on your twilio console and on your device indicating that your phone number is now linked to your Sandbox.

Connect to the Twilio WhatsApp sandbox

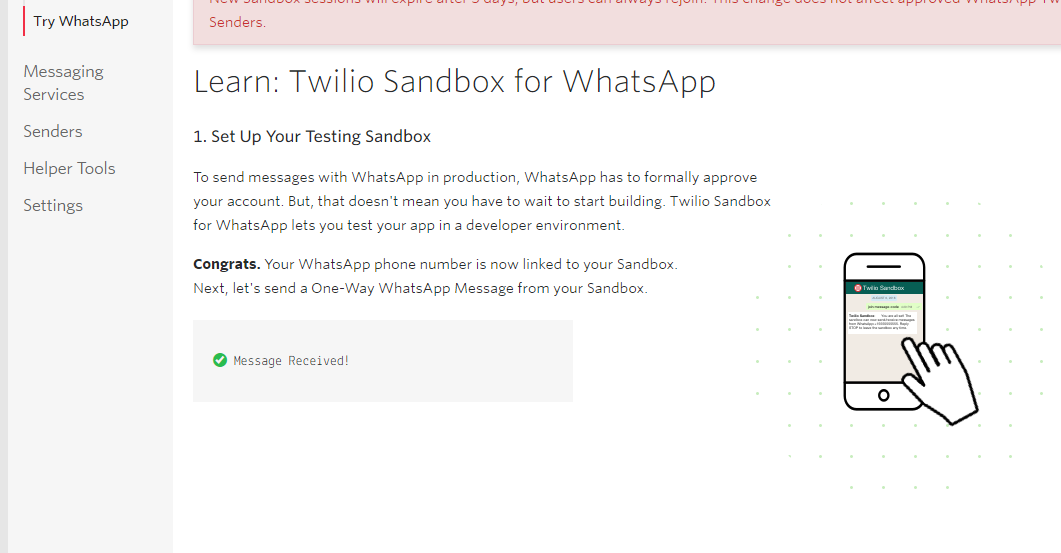
You can link more phone numbers with your sandbox environment by repeating the same steps above.

Creating the Flask Chatbot Service

Now that our development environment is set, we can begin creating the chatbot service. The meeting management bot we are going to create will be a simple one, it will communicate and interact with users by looking out for certain keywords in the users response in some cases and in others the bot will provide the users with options to select from and extract their responses.

The Twilio WhatsApp API allows us to interact with users using webhooks.

Outgoing Messages

Now, I’m going to introduce you to the Twilio Markup Language, also known as TwiML. TwiML is an XML document with special tags defined by Twilio to help you build your SMS and voice applications. To process outgoing responses to the user, Twilio expects a TwiML response from our webhook.

Here’s a simple TwiML message to respond to an incoming message

<?xml version="1.0" encoding="UTF-8"?>
<Response>
    <Message>We received your message, thank you!</Message>
</Response>

Twilio provides a Python package that abstracts the creation of XML responses. Instead of writing an XML code, you can send a response message to the user with the code below:

from twilio.twiml.messaging_response import MessagingResponse

reply = MessagingResponse()
msg = reply.message()
msg.body('We received your message, thank you!')

Incoming Messages

Incoming messages from the user are included in the Body of Twilio POST requests. We will retrieve the messages sent by the user to the chatbot using the request object provided by Flask. We will use the code below to access incoming messages from the user.

from flask import request
in_msg = request.values.get('Body', '').strip().lower()

Flask Sessions

A session object is a dictionary object that allows us to store user information in key value pairs. We are going to use sessions to store the information collected from the user.

Secret keys are needed to secure client-side sessions and you can generate one with the code below from a Python terminal

>>> import secrets
>>> secrets.token_hex(16)
'e146a52985e98545c57d1b6f17bb1066'

Now, copy the code generated and add it to your .env file, assigning it to a variable as shown below

FLASK_SECRET="<generated_code>"

Chatbot

The application that we are building will configure an endpoint that Twilio will communicate with using a webhook. The Flask framework is a simple, lightweight and extensible framework that allows us to easily define webhooks. Now, we are going to create a file called app.py in the top-level directory of our project. This file is going to house most of our application code.

To begin, we will import all the necessary libraries and environment variables into our application by adding the following lines of code to the ‘app.py’ file

from flask import Flask, request, session
from twilio.twiml.messaging_response import MessagingResponse
from dotenv import load_dotenv
from zoomus import ZoomClient
import os
import datetime
import json
import re
import pytz

# import environment variables
load_dotenv()

API_KEY = os.getenv('API_KEY')
API_SECRET = os.getenv('API_SECRET')
EMAIL_ADDRESS = os.getenv('USER_EMAIL')

Next, we will create a regex pattern to validate the meeting time format provided by the user in a later part of the application, and also create the Zoom Client that will be used to manage our meetings.

So, we will add the following code immediately after the last line of code in our file to perform the actions described above

# regex pattern for validating the time
regex_start_time = r"[0-9]{4}-[0-9]{2}-[0-9]{2}\s[0-9]{2}:[0-9]{2}:[0-9]{2}"

# create Zoom client
client = ZoomClient(API_KEY, API_SECRET)

Now it is time to instantiate the Flask application. We will do this by defining a route at the /meeting endpoint which supports POST requests. Add the code below to the app.py file.

app = Flask(__name__)
app.secret_key = os.getenv("FLASK_SECRET")

# define a route for the application that supports POST requests
@app.route('/meeting', methods=['POST'])
def meeting():
    # application code is going to go here 
    pass

If you are using source control, remember to add the .env file to your .gitignore file so you don’t commit your API credentials to a public repository by mistake.

Helper Functions

Next, we will create some helper functions to make our work easier. These functions will be added directly beneath the route function.

We will define functions to:

  • Convert time from one timezone to another
  • List out all the scheduled meetings for a particular user
  • Create meetings
  • Get the details of a meeting
  • Delete meetings
  • Create an initial reply to the user

Convert Timezone

We will create a function to convert time from one timezone to another. The zoomus Python package does not account for different timezones which is why we need to create a function to offset the GMT time difference. Copy the code that follows at the end of app.py:

# Add a function to convert time from one timezone to another
def convert_timezone(time_input, old_timezone, new_timezone):
    time_array = time_input.split(' ')
    day = time_array[0].split('-')
    meeting_time = time_array[1].split(':')

    day = [int(i) for i in day]
    meeting_time = [int(i) for i in meeting_time]

    time_dt = datetime.datetime(
        day[0], day[1], day[2],
        meeting_time[0], meeting_time[1], meeting_time[2])

    old_timezone = pytz.timezone(old_timezone)
    new_timezone = pytz.timezone(new_timezone)

    conv_date = old_timezone.localize(time_dt).astimezone(new_timezone)

    return conv_date

List Meetings

Next we will create a function that returns a list of meetings scheduled for a particular user. The function sends a GET request to the Zoom meetings endpoint with the user's email as a parameter.

# Function to list user meetings
def list_meetings(client, user_id):
    data_dict = json.loads(client.meeting.list(user_id=user_id).content)

    meeting = ""

    if len(data_dict["meetings"]) == 0:
        meeting = meeting + "There are no scheduled meetings"
    else:
        for i, dict in enumerate(data_dict["meetings"]):
            timezone = str(dict["timezone"])
            meeting_time_gmt = str(dict["start_time"]).replace("T", " ").replace("Z", " ")
            meeting_time_exact = convert_timezone(meeting_time_gmt, timezone, 'GMT').ctime()
            meet_info = (
                str(i+1) +
                " Meeting Topic: " + str(dict["topic"]) +
                "\n   Meeting ID:  " + str(dict["id"]) +
                "\n   Meeting Start Time:  " + meeting_time_exact +
                "\n   Meeting Timezone: " + timezone +
                "\n   Meeting Duration: " + str(dict["duration"]) +
                "\n   Meeting URL: " + dict["join_url"] +
                "\n\n"
                )
            meeting += meet_info
        # account for the Twilio character limit
            if len(meeting) > 1500:
                meeting.rstrip(meet_info)
                break
    return meeting

Create Meeting

Next we are going to create a function that schedules a zoom meeting. This function is going to take in arguments such topic, agenda, duration, start time) collected from the user.

The function will return a status code and dictionary containing the created meeting information.

def create_meeting(topic, start_time, duration, user_id, agenda):
    timezone = json.loads(client.user.get(id=EMAIL_ADDRESS).text)['timezone']
    newest_time = convert_timezone(start_time, timezone, 'GMT')

    zoom_meeting = client.meeting.create(
        topic=topic,
        type=2,
        start_time=newest_time,
        duration=duration,
        user_id=user_id,
        agenda=topic,
        timezone=timezone,
        host_id=user_id)

    data_dict = json.loads(zoom_meeting.text)

    return zoom_meeting, data_dict

Get Meeting

The next function checks if a meeting exists using its meeting ID. For this we use the get method of the zoom client meeting component.

# Define a function to check if a meeting exists
def get_meeting(client, meeting_id, host_id):
    meet_info = client.meeting.get(id=meeting_id, host_id=host_id)
    return meet_info

Delete Meeting

This function is going to delete a scheduled meeting.

# Function to delete schedule meetings
def delete_meeting(client, meeting_id, host_id):
    delete_meet = client.meeting.delete(id=meeting_id, host_id=host_id)
    return delete_meet

Initial Response

The last helper function returns a custom TwiML response to the user to kickstart the conversation.

def initial_response():
    message = (
         "Hello!, I am your Zoom Meeting Manager\n\n"
         "Kindly select One of the options below:\n"
         "*1.)* List Scheduled Meetings\n"
         "*2.)* Create a Meeting\n"
         "*3.)* Delete a Meeting\n"
    )
    return message

Conversational Flow

The bot will interact with the user by presenting them with a list of options in some cases and in others, the bot directs questions, provides them with the format to respond in, and validates their responses using regular expressions. The bot will process every response that comes in from the user. The responses will be stored in the Flask user session for further processing.

Now, let’s get into building the conversational flow. First we will configure our chatbot to send a custom greeting to the user using the initial_response() helper function that was defined above. We will add this code in the meeting route function to check if the user has sent “Hello” or “Hi”. We will also add another block to send a default response to the user when they send a message that is not recognized to the bot.

@app.route('/meeting', methods=['POST'])
def meeting():
    # convert incoming message to lowercase and remove trailing whitespace
    in_msg = request.values.get('Body', '').strip().lower()
    resp = MessagingResponse()
    msg = resp.message()

    if in_msg == "hello" or in_msg == "hi":
        reply = initial_response()
        msg.body(reply)
        return str(resp)

    reply = "You have entered an invalid reply \n" + initial_response()
    msg.body(reply)
    session.pop('request', None)
    return str(resp)

At this point, we expect the user to have selected one of the three options. We are going to create conditional blocks to process each of the user’s requests.

If their response is 1, this means that the user wants to list out their scheduled meetings. Since we do not need additional information from the user to perform this action, we would simply use the EMAIL_ADDRESS as an argument to call the list_meetings() function to return all upcoming meetings.

We will add the code snippet that does this after the ‘msg = resp.message()’ assignment inside the ‘meeting()’ function.

    # List meetings
    if in_msg == '1' or 'one' in in_msg:
        reply = list_meetings(client, str(EMAIL_ADDRESS))
        msg.body(reply)
        return str(resp)

If their response is 2, this means that the user wants to schedule a meeting. To create a meeting we need to collect some information from the user such as duration of the meeting, meeting topic, meeting agenda and start time, and include it in the body of the API request. You can view the list of all the other parameters here.

Next, we will ask the user for each of the variables above one by one. We will add the block of code directly below the previous one to respond to the user’s request by asking them to provide the meeting start time.

    # Create Meeting
    if (in_msg == '2' or 'two' in in_msg):
        session['request'] = 'Create'
        reply = (
            "To Schedule a Zoom Meeting, Provide the following information\n"
            "Provide Meeting Start Time 🕐 by following the format below:\n"
            "yyyy-MM-dd HH:mm:ss Example: 2020-09-21 12:00:00")
        msg.body(reply)
        return str(resp)

To complete the part of the application that deals with creating a meeting; we will validate the format of the meeting start time that was provided using the regex pattern regex_start_time that was created earlier.

The latter part of this code snippet takes care of storing the meeting topic in the session variable and asking the user  for the meeting duration. This block is an extension of the previous conditional block.

    elif "request" in session and session["request"] == "Create":
        if "start_time" not in session:
            if re.search(regex_start_time, in_msg):
                session["start_time"] = in_msg
                reply = "Kindly provide the Meeting Topic or Agenda"
                msg.body(reply)
                return str(resp)
        elif "topic" not in session:
            session["topic"] = in_msg
            reply = "Kindly provide the duration of the meeting in minutes e.g 30"
            msg.body(reply)
            return str(resp)

Up next, we will store the provided meeting duration in the session dictionary and proceed to create the meeting using the Zoom Client.

To ensure the meeting was successfully created, we will check that the response code of the API call is ‘201’. If the meeting was created successfully, we will respond to the user with the meeting information contained in the returning JSON variable.

This is also an extension of the previous code block and should be placed directly below it.

        elif "duration" not in session:
            session.pop("request", None)
            api_resp, meeting_info = create_meeting(
                session["topic"],
                session["start_time"],
                in_msg,
                EMAIL_ADDRESS,
                session["topic"],
            )
            session.pop(request, None)
            if api_resp.status_code == 201:
                reply = (
                    "Here You go:\n" +
                    "Meeting ID:  " + str(meeting_info["id"]) +
                    "\nMeeting Join URL:  " + str(meeting_info["join_url"]) +
                    "\nMeeting Topic:  " + str(meeting_info["topic"]) +
                    "\nMeeting Agenda:  " + str(meeting_info["agenda"]) +
                    "\nMeeting Start Time:  " + session["start_time"] +
                    "\nMeeting Password:  " + str(meeting_info["h323_password"]) +
                    "\nMeeting Start URL:  " + str(meeting_info["start_url"]))
                msg.body(reply)
                session.pop("topic", None)
                session.pop("start_time", None)
                return str(resp)
            else:
                reply = "Could not create meeting"
                msg.body(reply)
                return str(resp)

If the user’s initial response is 3, this means that the user wants to delete an already scheduled meeting. To delete a meeting, we only need the meeting id.

Thus, we need to introduce a new conditional block to handle the delete request but first, we will add few lines of code to request the meeting id from the user:

    # Delete Meeting
    if in_msg == "3" or "three" in in_msg:
        session["request"] = "Delete"
        reply = "Kindly provide the meeting ID of the meeting to be deleted"
        msg.body(reply)
        return str(resp)

Next, we will validate the meeting id provided by the user using the ‘get_meeting()’ function. If the meeting id is valid, we will delete the meeting using the ‘delete_meeting()’ function that we created earlier.

We will then check that the delete action was successful using the response code, and then respond to the user with a message showing that the meeting was successfully deleted or not.

    elif "request" in session and session["request"] == "Delete":
        get_resp = get_meeting(
            client, in_msg, EMAIL_ADDRESS)
        if get_resp.status_code == 200:
            response_code = delete_meeting(
                client, in_msg, EMAIL_ADDRESS)
            session.pop("request", None)
            if response_code.status_code == 204:
                reply = "The meeting with id " + \
                    in_msg + " has been deleted"
                msg.body(reply)
                return str(resp)
            else:
                reply = "The meeting with id " + \
                    in_msg + " Could not be deleted"
                msg.body(reply)
                return str(resp)
        else:
            reply = "The meeting with id " + in_msg + " does not exist"
            msg.body(reply)
            return str(resp)

Everything Together

Your app.py file should look like this:

from flask import Flask, request, session
from twilio.twiml.messaging_response import MessagingResponse
from dotenv import load_dotenv
from zoomus import ZoomClient
import os
import datetime
import json
import re
import pytz

# import environment variables
load_dotenv()

API_KEY = os.getenv('API_KEY')
API_SECRET = os.getenv('API_SECRET')
EMAIL_ADDRESS = os.getenv('USER_EMAIL')

# regex pattern for validating the time
regex_start_time = r"[0-9]{4}-[0-9]{2}-[0-9]{2}\s[0-9]{2}:[0-9]{2}:[0-9]{2}"

# create Zoom client
client = ZoomClient(API_KEY, API_SECRET)

app = Flask(__name__)
app.secret_key = os.getenv("FLASK_SECRET")


# define a route for the application that supports POST requests
@app.route('/meeting', methods=['POST'])
def meeting():
    # convert incoming message to lowercase and remove trailing whitespace
    in_msg = request.values.get('Body', '').strip().lower()
    resp = MessagingResponse()
    msg = resp.message()

    # List meetings
    if in_msg == '1' or 'one' in in_msg:
        reply = list_meetings(client, str(EMAIL_ADDRESS))
        msg.body(reply)
        return str(resp)

    # Create Meeting
    if (in_msg == '2' or 'two' in in_msg):
        session['request'] = 'Create'
        reply = (
            "To Schedule a Zoom Meeting, Provide the following information\n"
            "Provide Meeting Start Time 🕐 by following the format below:\n"
            "yyyy-MM-dd HH:mm:ss Example: 2020-09-21 12:00:00")
        msg.body(reply)
        return str(resp)
    elif "request" in session and session["request"] == "Create":
        if "start_time" not in session:
            if re.search(regex_start_time, in_msg):
                session["start_time"] = in_msg
                reply = "Kindly provide the Meeting Topic or Agenda"
                msg.body(reply)
                return str(resp)
        elif "topic" not in session:
            session["topic"] = in_msg
            reply = "Kindly provide the duration of the meeting in minutes e.g 30"
            msg.body(reply)
            return str(resp)
        elif "duration" not in session:
            session.pop("request", None)
            api_resp, meeting_info = create_meeting(
                session["topic"],
                session["start_time"],
                in_msg,
                EMAIL_ADDRESS,
                session["topic"],
            )
            session.pop(request, None)
            if api_resp.status_code == 201:
                reply = (
                    "Here You go:\n" +
                    "Meeting ID:  " + str(meeting_info["id"]) +
                    "\nMeeting Join URL:  " + str(meeting_info["join_url"]) +
                    "\nMeeting Topic:  " + str(meeting_info["topic"]) +
                    "\nMeeting Agenda:  " + str(meeting_info["agenda"]) +
                    "\nMeeting Start Time:  " + session["start_time"] +
                    "\nMeeting Password:  " + str(meeting_info["h323_password"]) +
                    "\nMeeting Start URL:  " + str(meeting_info["start_url"]))
                msg.body(reply)
                session.pop("topic", None)
                session.pop("start_time", None)
                return str(resp)
            else:
                reply = "Could not create meeting"
                msg.body(reply)
                return str(resp)

    # Delete Meeting
    if in_msg == "3" or "three" in in_msg:
        session["request"] = "Delete"
        reply = "Kindly Provide the Meeting ID of the Meeting to be Deleted"
        msg.body(reply)
        return str(resp)
    elif "request" in session and session["request"] == "Delete":
        get_resp = get_meeting(
            client, in_msg, EMAIL_ADDRESS)
        if get_resp.status_code == 200:
            response_code = delete_meeting(
                client, in_msg, EMAIL_ADDRESS)
            session.pop("request", None)
            if response_code.status_code == 204:
                reply = "The meeting with id " + \
                    in_msg + " has been deleted"
                msg.body(reply)
                return str(resp)
            else:
                reply = "The meeting with id " + \
                    in_msg + " Could not be deleted"
                msg.body(reply)
                return str(resp)
        else:
            reply = "The meeting with id " + in_msg + " does not exist"
            msg.body(reply)
            return str(resp)

    if in_msg == "hello" or in_msg == "hi":
        reply = initial_response()
        msg.body(reply)
        return str(resp)

    reply = "You have entered an invalid reply \n" + initial_response()
    msg.body(reply)
    session.pop('request', None)
    return str(resp)


# Add a function to convert time from one timezone to another
def convert_timezone(time_input, old_timezone, new_timezone):
    time_array = time_input.split(' ')
    day = time_array[0].split('-')
    meeting_time = time_array[1].split(':')

    day = [int(i) for i in day]
    meeting_time = [int(i) for i in meeting_time]

    time_dt = datetime.datetime(
        day[0], day[1], day[2],
        meeting_time[0], meeting_time[1], meeting_time[2])

    old_timezone = pytz.timezone(old_timezone)
    new_timezone = pytz.timezone(new_timezone)

    conv_date = old_timezone.localize(time_dt).astimezone(new_timezone)

    return conv_date


# Function to list user meetings
def list_meetings(client, user_id):
    data_dict = json.loads(client.meeting.list(user_id=user_id).content)

    meeting = ""

    if len(data_dict["meetings"]) == 0:
        meeting = meeting + "There are no scheduled meetings"
    else:
        for i, dict in enumerate(data_dict["meetings"]):
            timezone = str(dict["timezone"])
            meeting_time_gmt = str(dict["start_time"]).replace("T", " ").replace("Z", " ")
            meeting_time_exact = convert_timezone(meeting_time_gmt, timezone, 'GMT').ctime()
            meet_info = (
                str(i+1) +
                " Meeting Topic: " + str(dict["topic"]) +
                "\n   Meeting ID:  " + str(dict["id"]) +
                "\n   Meeting Start Time:  " + meeting_time_exact +
                "\n   Meeting Timezone: " + timezone +
                "\n   Meeting Duration: " + str(dict["duration"]) +
                "\n   Meeting URL: " + dict["join_url"] +
                "\n\n"
                )
            meeting += meet_info
            # account for the twilio 1600 character limit
            if len(meeting) > 1500:
                meeting.rstrip(meet_info)
                break
    return meeting


def create_meeting(topic, start_time, duration, user_id, agenda):
    timezone = json.loads(client.user.get(id=EMAIL_ADDRESS).text)['timezone']
    newest_time = convert_timezone(start_time, timezone, 'GMT')

    zoom_meeting = client.meeting.create(
        topic=topic,
        type=2,
        start_time=newest_time,
        duration=duration,
        user_id=user_id,
        agenda=topic,
        timezone=timezone,
        host_id=user_id)

    data_dict = json.loads(zoom_meeting.text)

    return zoom_meeting, data_dict


# Define a function to check if a meeting exists
def get_meeting(client, meeting_id, host_id):
    meet_info = client.meeting.get(id=meeting_id, host_id=host_id)
    return meet_info


# Function to delete schedule meetings
def delete_meeting(client, meeting_id, host_id):
    delete_meet = client.meeting.delete(id=meeting_id, host_id=host_id)
    return delete_meet


def initial_response():
    message = (
         "Hello!, I am your Zoom Meeting Manager\n\n"
         "Kindly select One of the options below:\n"
         "*1.)* List Scheduled Meetings\n"
         "*2.)* Create a Meeting\n"
         "*3.)* Delete a Meeting\n"
    )
    return message

Testing the Chatbot

To test the application, first we will ensure that the virtual environment is activated and then run the command below.

flask run

flask run output

Now that the application is running on port 5000 on our local machine, we are going to run the ngrok command to make our application temporarily available on a public server that Twilio can reach. We will execute the command below on a second terminal window.

ngrok http 5000

ngrok output

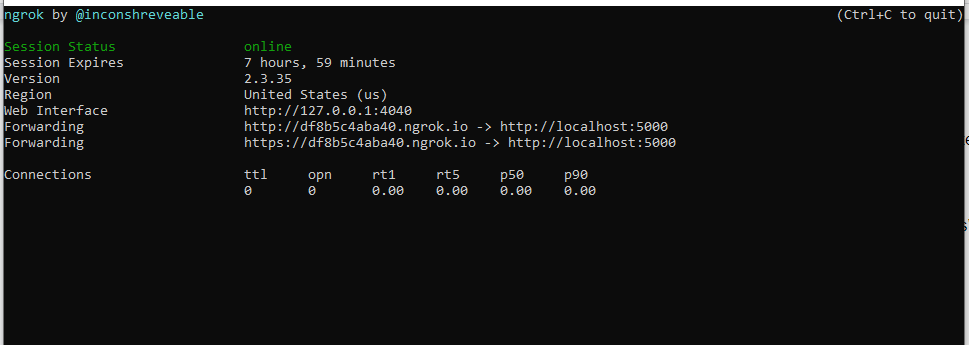
Now copy the secure URL shown in the “Forwarding” lines. Ngrok uses this URL to redirect requests to our application.

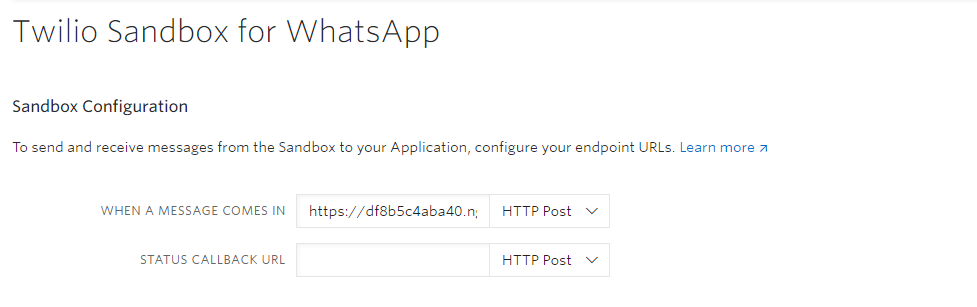
Navigate to the Twilio Console, click on Programmable Messaging > Settings > WhatsApp Sandbox Settings. Paste the URL on the “When a message comes in” field, with /meeting appended at the end. The /meeting path is where we installed the endpoint of our application.

Configure WhatsApp webhook

Now, send “Hello” to the WhatsApp sandbox number to begin the conversation with the bot!

Conclusion

With the recent surge in remote work and virtual workspaces, it has become imperative that we find ways to keep track of the myriad of meetings and calls required to go about our daily tasks. In this tutorial, we have successfully created a bot to effectively manage our Zoom meetings on WhatsApp, one of the popular messaging applications.

The repository for the code can be found here. The application can be extended to do much more than it currently does. An extended list of other capabilities that can be built into this application can be found on the Zoom API reference page.

Happy coding!

My name is Odunayo and I’m passionate about technology and literature. I also enjoy writing to share experiences and knowledge. Feel free to connect on LinkedIn.