How to Use Multiple Authentication Providers in Lumen
Time to read:
December 03, 2021
Written by
Reviewed by
As we all know, authentication is a very important aspect of building an application because you want to ensure that users can only access routes and information that they're allowed to.
Authentication takes many forms and a common one is tokenization which we will be focusing on in this tutorial.
Tokenization replaces a sensitive data element, for example, user information such as user id's, names, and emails, with a non-sensitive substitute, known as a token.
But how will issuing tokens be beneficial to multiple authentications? Well, since every user has a unique token, and they can be stored in separate database tables, the token can be queried across these tables to find a match, and based on which return a true, the route can be limited or opened for the user.
In this tutorial, you will learn how to use multiple authentication providers in Lumen to limit access to routes, depending on whether the logged-in user is an admin or not.
So with that out of the way, let us dive in and create a Lumen application with multiple authentication providers.
Prerequisites
- Basic knowledge of Laravel and Lumen
- Composer installed globally
- Postman for testing of APIs
- A database, such as SQLite, MariaDB, or PostgreSQL
Install and configure Lumen
To create a new Lumen-based project and switch to it, in your terminal run the code below.
Then, in .env, set APP_KEY to a 32 character, random string, which you can generate at https://onlinerandomtools.com/generate-random-string. Unlike Laravel, Lumen doesn't support the functionality to auto-generate the string.
Create the database migrations
If this is your first time hearing about Lumen, it is a micro-framework built by Laravel, which is backend-centered. Given that, we will need to connect our application to a database so it can run migrations and add data.
To connect to the database, in your preferred editor or IDE, open .env, located in the root directory of the project, and change the database-specific variables to connect to your database.
The next step is to create database migrations. These will create the tables and load data into the tables through seeding. To do that, run the commands below.
The commands create two new migration files in the database/migrations folder. Each file's filename starts with the current date and timestamp in the format YYYY_MM_DD_HHMMSS, for example 2021_11_17_120432 and ends with the name given to the make:migration command.
So, allowing for the date and time that you ran the commands, you should see two files named 2021_11_17_120432_create_users_table.php and 2021_11_17_120441_create_admin_table.php.
Update the up function in the migration ending with create_users_table to match the code below.
Next, update the up function in the migration ending with create_admin_table to match the code below.
After you have updated the files, run the migration by running the command below.
Seed the database
So to seed a new user/admin into the tables we just created for them, we will create two database seeders, database/seeders/UsersSeeder.php and database/seeders/AdminsSeeder.php. The seeders will include the information for a new user/admin, which we will be using later in the article, to validate their existence, authenticate them, and limit the access based on their permissions.
To generate them, run the commands below.
After the command has been completed, update the run function in database/seeders/UsersSeeder.php to match the code below.
Then, update the run function in database/seeders/AdminsSeeder.php to match the code below.
Don't forget to include the two use statements below, to the top of both seeders.
Once the Seeders are updated, it's time to seed to the database, by running the commands below.
Now that the database has been seeded, we can then install Laravel Passport into our application to create tokens for authorization.
Install and configure Laravel Passport
To download Laravel Passport, we will not use the conventional documentation for Laravel, as it is buggy, and Laravel Passport is not, currently, fully supported in Lumen. Instead, we will use the dusterio/lumen-passport package. Run the following command in the root of your project directory to install it.
Then, open bootstrap/app.php and update it to match the code below.
Next, create a new directory named config and in that directory, using your preferred text editor or IDE, create a file named auth.php. In that file add the guard configuration below, which supports Laravel Passport.
The above code will be modified, later, to accommodate both user and admin guards for multiple authentication providers.
After that, run the migrations and install the encryption keys for Laravel Passport, by running the commands below.
The second command will result in output similar to the example below to your terminal.
Add the following key/value pairs to the end of .env, and replace the <client id> and <client secret> pair with the Client ID and Client secret values respectively, that were output to the terminal.
Create the controllers
Now Laravel Passport is installed and configured, it's time to add controllers to the application along with the applicable routes.
To create a new controller, copy app/Http/Controllers/ExampleController.php and create a new file UserController.php, and rename the class to UserController. Then, update the body of UserController.php with the code below which:
- Validates the information passed to it in the requestGenerated a Passport token
- Updates the
api_tokenfor that particular user to include the newly generated token
Then, add the use statements in the example below to the top of the class.
Then we create a new model class for `Admin` in app/Models/Admin.php, and add the code below to it; this model ties it to our existing database table.
Then create a new file named app/Http/Controllers/AdminController.php the same way that app/Http/Controllers/UserController.php was created, and paste the code below as the body of the new controller.
Then, add the following use statements to the top of the class.
Finally, in app/Models/User.php, add HasApiTokens to the list of traits that the class uses, and add the following use statement to the top of the class.
Add the Guard configuration
It is important to add authentication guards for both the user and admin routes to point to Passport as the default driver for token authentication. This will come in handy when you want to restrict/allow the user/admin to a particular route.
To do this, go to config/auth.php and modify the existing code to match the example below.
Routes
After we are done with the controllers, we can then create our routes to link to the controller. Open routes/web.php and add the routes after the existing route definition.
Build multiple authentication providers
Next, we need to update the authentication providers to authenticate the user/admin based on the route. To do this, add the following code to the boot method in app/Providers/AuthServiceProvider.php.
In addition, add the following use statements to the top of the class.
This will authenticate routes using a Laravel Passport token, go to the header to the authorization token, and then depending on the requested route, check to confirm if the api_token is valid or not. If the token does not exist in the database and does not match the request database for that route, it returns an HTTP 401 Unauthorized response.
That is it for multiple authentications in the platform, we can now go ahead and test our project to confirm it works just fine.
Test that everything works
Now, it's time to test that the code works. To do that, we will be using Postman, which is an application used for API testing. It is an HTTP client that tests HTTP requests, utilizing a graphical user interface, through which we obtain different types of responses that need to be subsequently validated.
First, start the application by running the following command in the root directory of your project.
Login as a user
Next, test that a user can login. To do that:
- Set the request type to POST
- Set the request URL to http://localhost:8000/auth/login
- Under the Body tab, set the form encoding type to "raw" and set the body content to be JSON, in the drop-down list on the far right hand side
- Paste the JSON below into the body field. It contains the user login details that we seeded the database with earlier
- Send the request by clicking Send
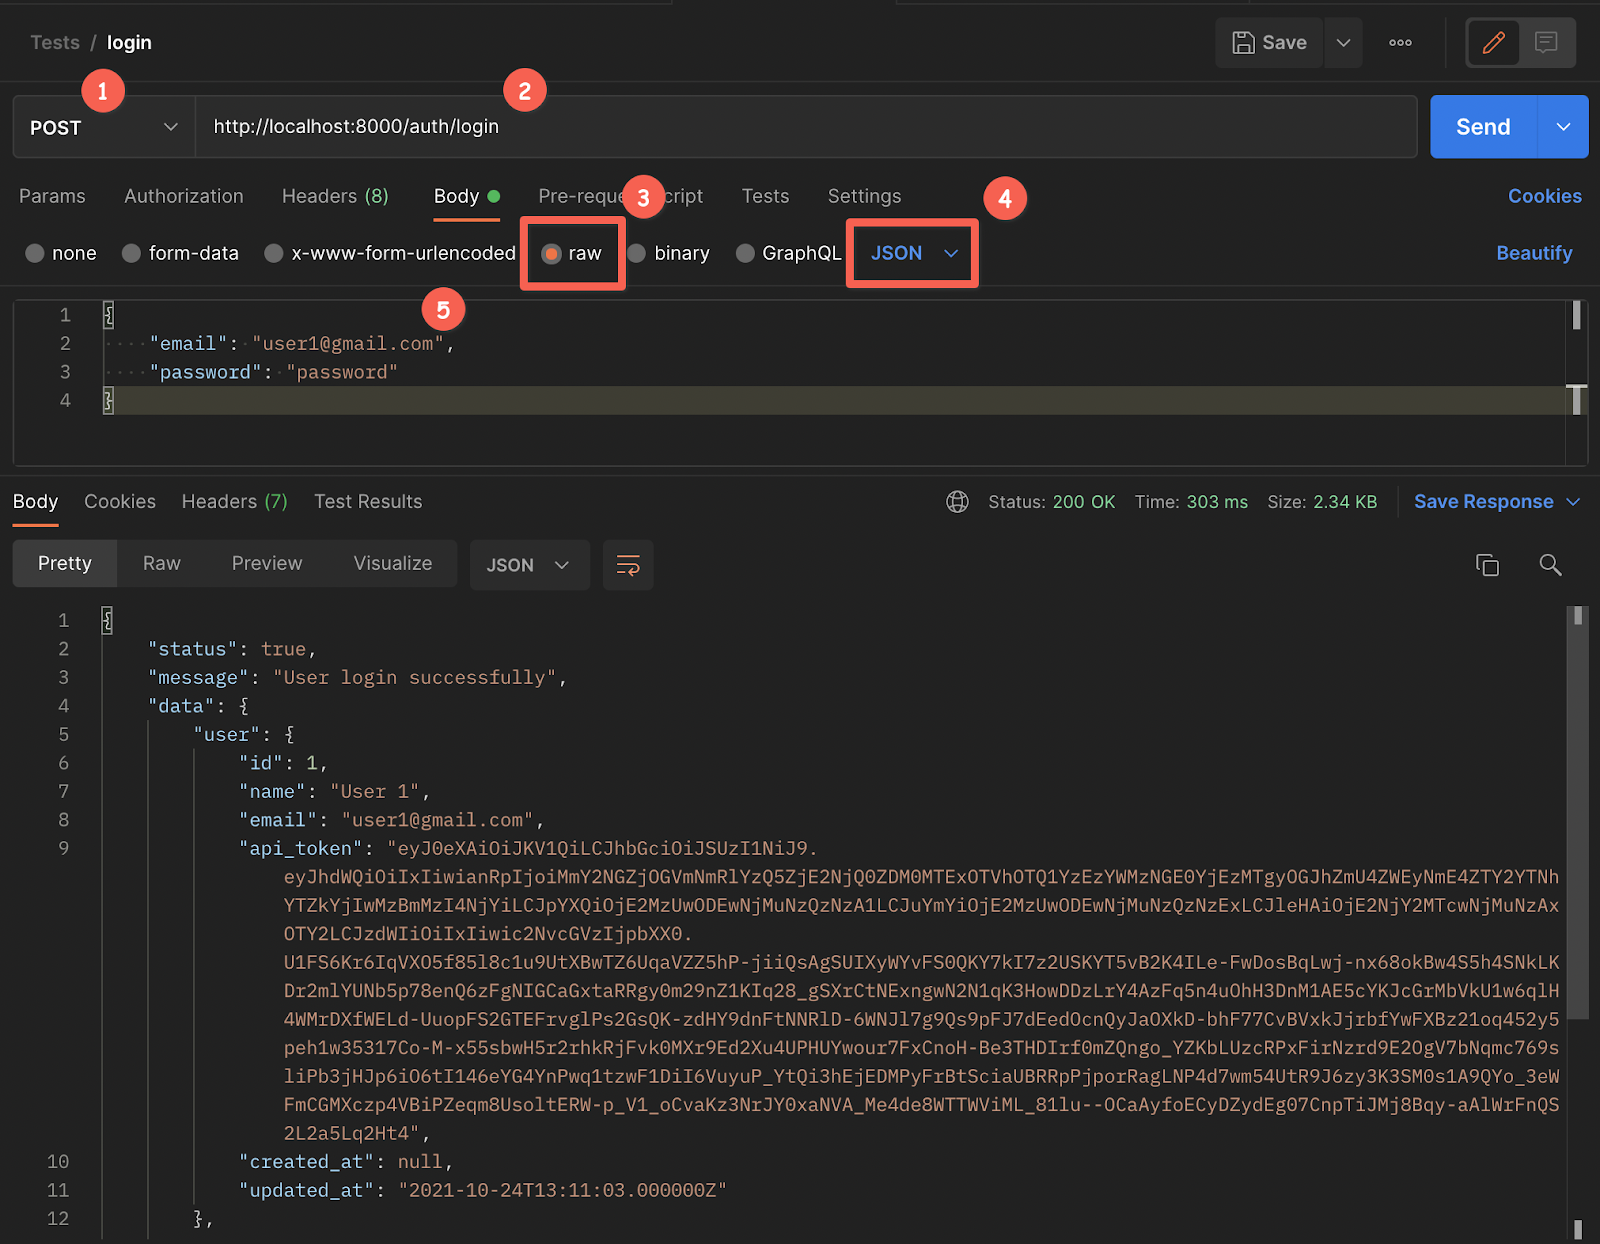
The request will return a response containing the API token which must be passed in a header with requests to user-permitted routes.
Login as an admin
To login as an admin, use the same settings as for logging in as a user, in the previous example, but set the request URL to http://localhost:8000/admin/login.
View all users
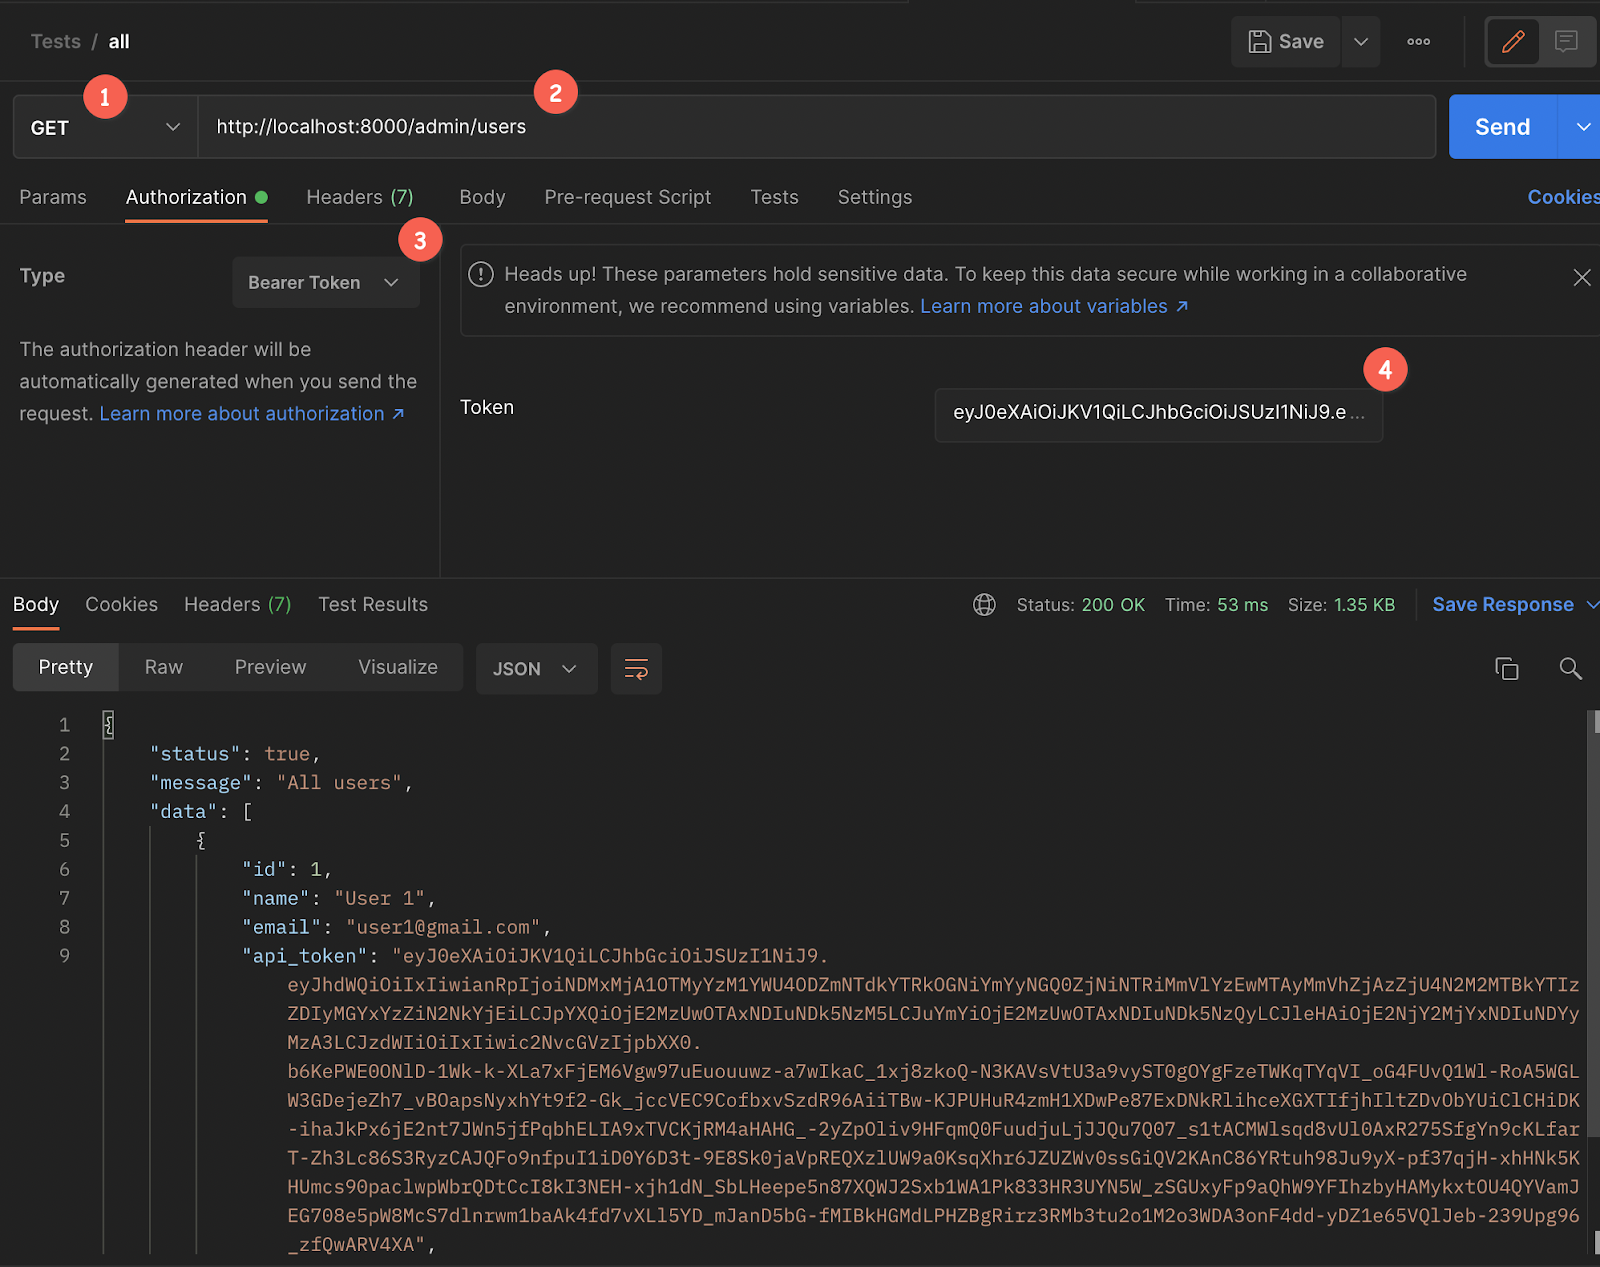
Next, let's test that all users can only be listed by admin users. To do that:
- Set the request type to GET
- Set the request URL to http://localhost:8000/admin/users
- Under the Authorization tab, set the type to "Bearer Token", and use the admin
api_tokenthat was generated and stored in the database for the "Token" field's value.
Then, make the request and you should see all of the users in the database listed in the response panel.
Conclusion
Thank you for working through this tutorial. In it, we covered how to set up a Lumen application, install and configure Passport and then use it to generate tokens that we can use to authenticate users/admin. Then we went ahead to create multiple authentication and permission for different routes and check if the passed tokens are valid.
If you want to view the full codebase for this article, you can go to the public repository I created, and I hope you found it super useful.
Kenneth Ekandem is a full-stack developer from Nigeria currently in the blockchain space, but interested in learning everything computer science has to offer. He'd love to go to space one day and also own his own vlogging channel to teach the next generation of programmers.

Related Resources
Twilio Docs
From APIs to SDKs to sample apps
API reference documentation, SDKs, helper libraries, quickstarts, and tutorials for your language and platform.
Resource Center
The latest ebooks, industry reports, and webinars
Learn from customer engagement experts to improve your own communication.
Ahoy
Twilio's developer community hub
Best practices, code samples, and inspiration to build communications and digital engagement experiences.