Build a Phone Number Verification System with Java Spring Boot and Twilio Verify
Time to read:
October 03, 2022
Written by
Reviewed by
The benefit of having a phone number verification system in today’s business environment cannot be overemphasized as it helps to fight fake account fraud through the delivery of a one time passcode (OTP). This OTP provides a good level of security to a user in a user-friendly approach.
The Twilio Verify API provides an additional level of account security through sign-up protection and throughout the user’s journey. Therefore, businesses everywhere rely on it as a way of authenticating users and proving that a phone number is valid, accessible and still functional.
This tutorial will focus on building a phone number verification system using the Spring Boot framework and the Twilio Verify API to verify a user’s phone number.
You can also visit the Twilio official documentation to learn more about other available Twilio APIs and systems that are supported.
Tutorial requirements
To follow along with this tutorial, you’ll need the following:
- Knowledge of Java framework (Spring Boot).
- Java Development Kit 8(JDK) or newer version installed.
- Apache Maven installed.
- IntelliJ IDE installed.
- Postman for testing our Restful APIs.
You can also clone my GitHub to view the source code used in this tutorial. Let’s get started!
Sign up for Twilio
Twilio is a leading Communications Platform as a Service (cPaas) that provides cloud services used to unite communication and strengthen customer relationships. With Twilio, businesses and developers can improve communication by embedding video, authentication, voice and messaging into their application.
You are going to create a Twilio account by clicking here or sign in if you already have an existing account.

After successfully creating an account, you’ll be prompted to fill in some extra information on the choice of project you intend to build like what we have in the image below.
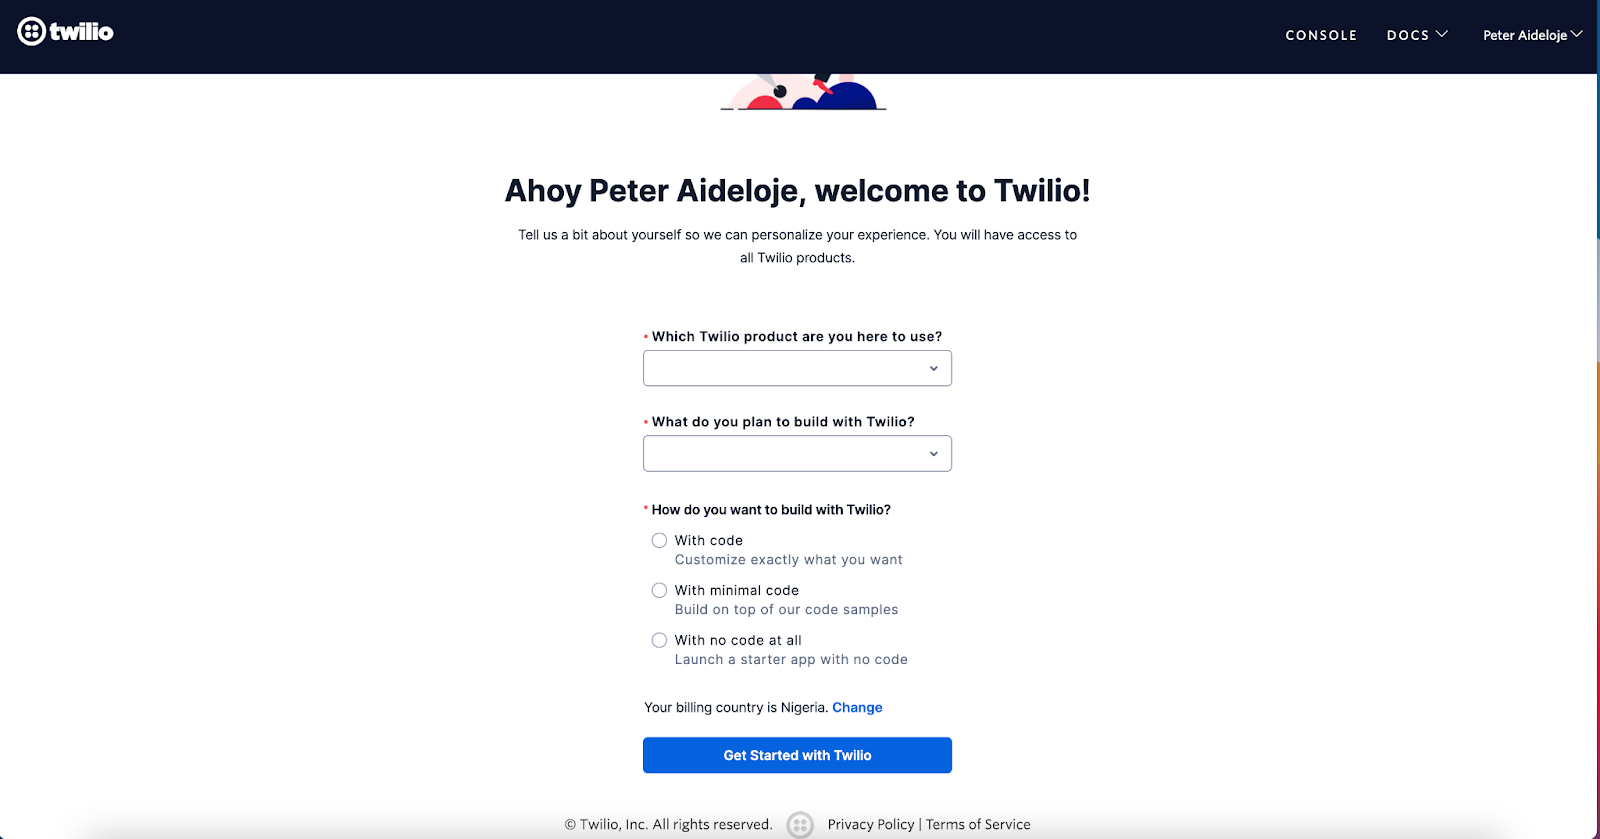
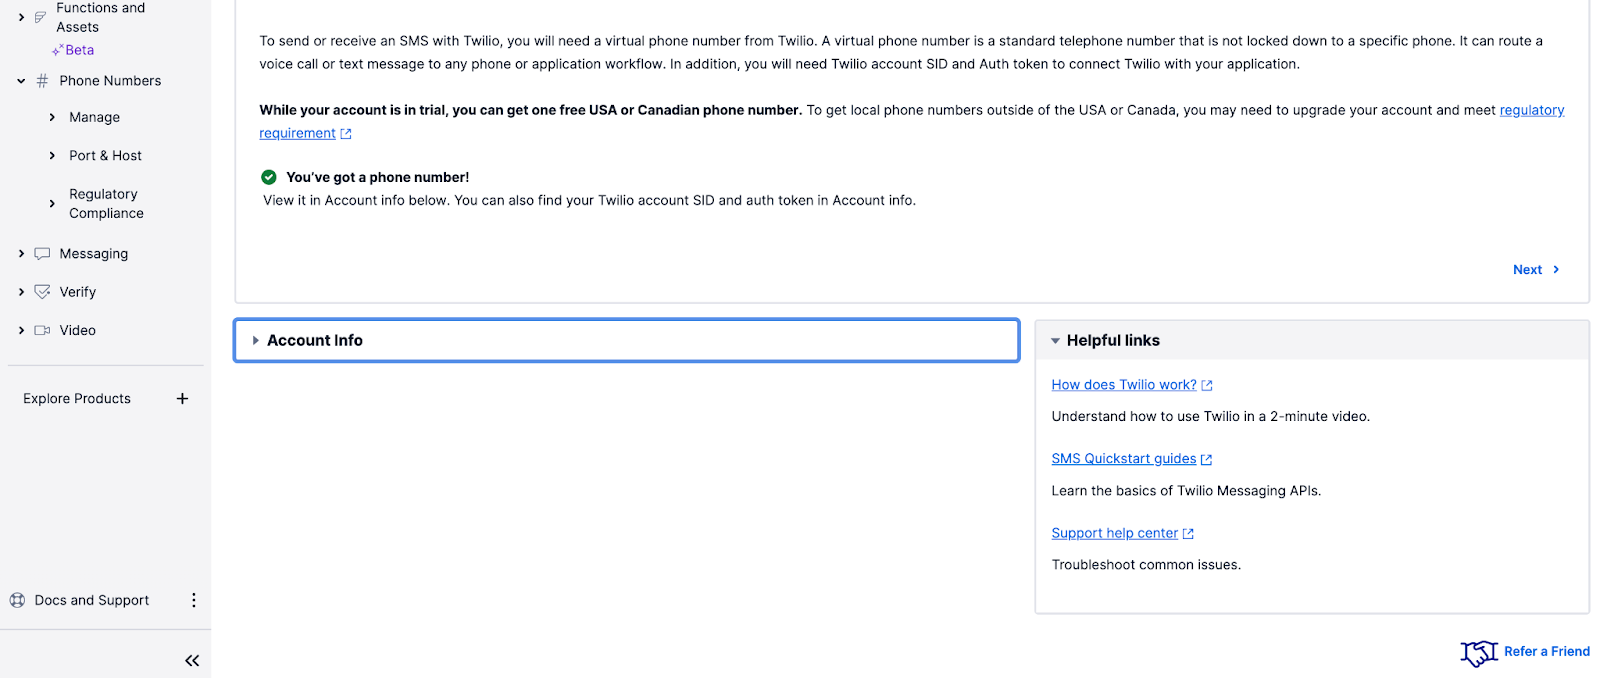
After successfully filling your project information above, you should get the same response below – Welcome to Twilio!

Notice that your Account SID and Auth Token are displayed on this dashboard as well. You are expected to copy these credentials and keep them in a safe place. Click on the Account Info drop down menu to access your credentials.
Next, we are going to create a Twilio Verification Service.
Create your Twilio Verify Service
Create a verification service using the required credentials for sending the OTP by enabling or disabling different delivery channels such as SMS, Voice, or Email.
Navigate to the Verify section on your Twilio account and create a verification service by navigating to the Services section on the left sidebar and by clicking Create new:
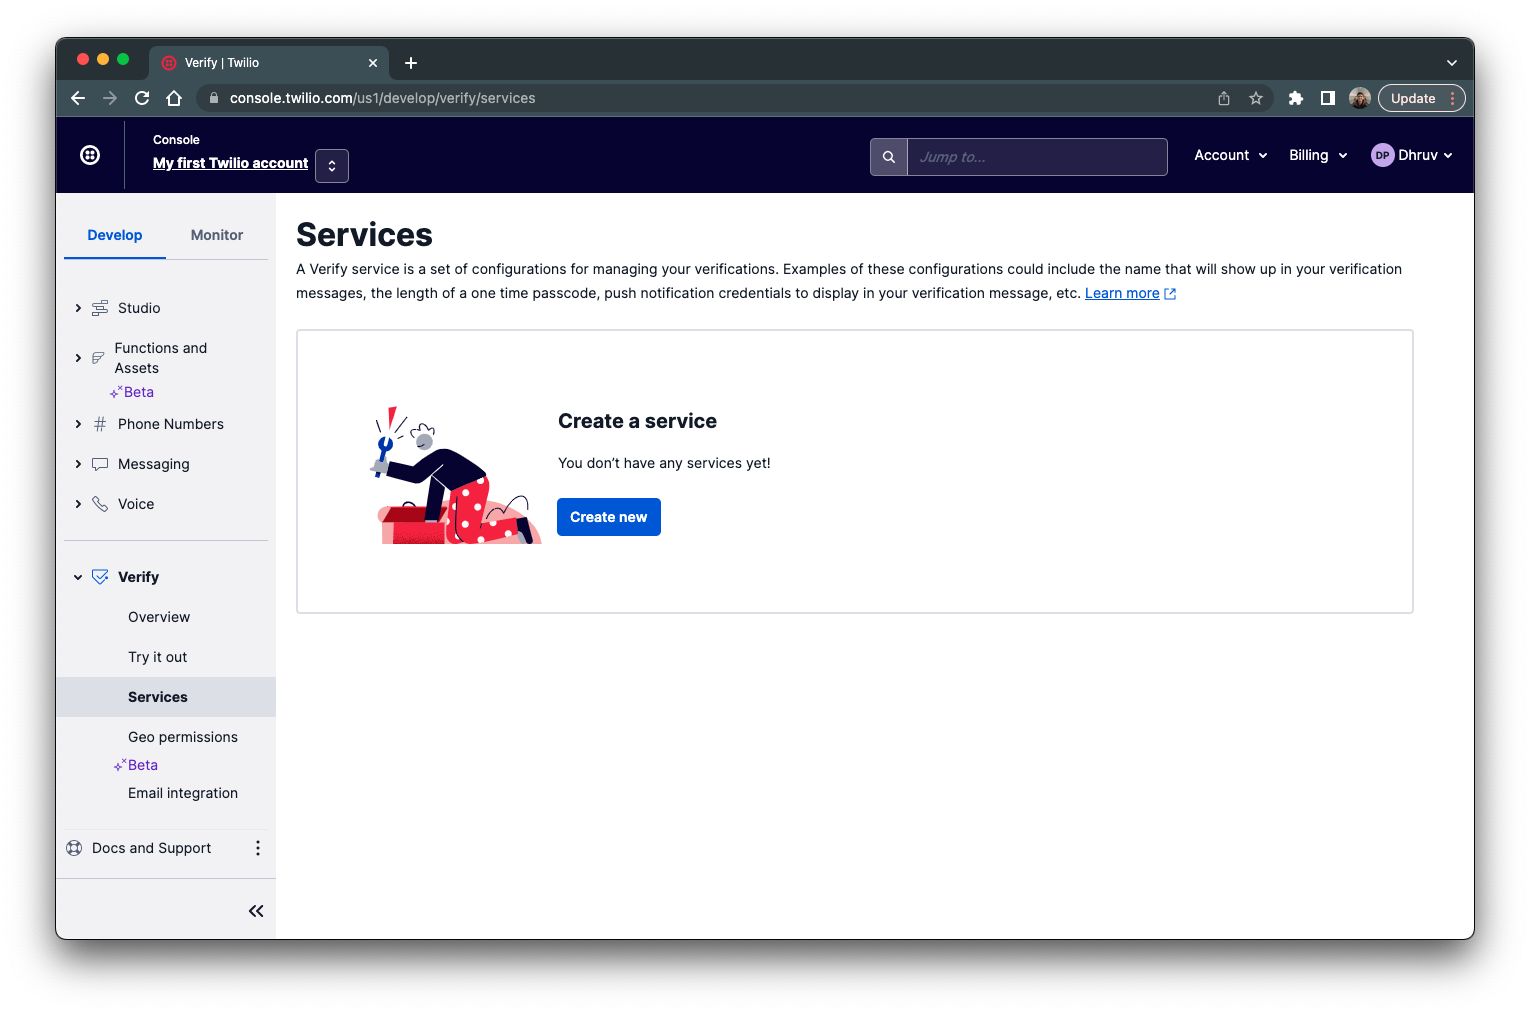
Give your new service a name, enable the SMS channel, and click Create.
You’ll then be redirected to your newly created service where you can see your Service SID. Copy this ID and store it for later.
Set up your development environment
In this section, you are going to create a Spring Boot project using the Spring Initializr method and then later exporting it to your local machine.
Another similar approach you can follow to set up a Spring Boot project, is right from the IntelliJ IDE.
Navigate to the Spring Initializr’s website and enter the properties of the Maven project and the dependencies like we have in the image below:
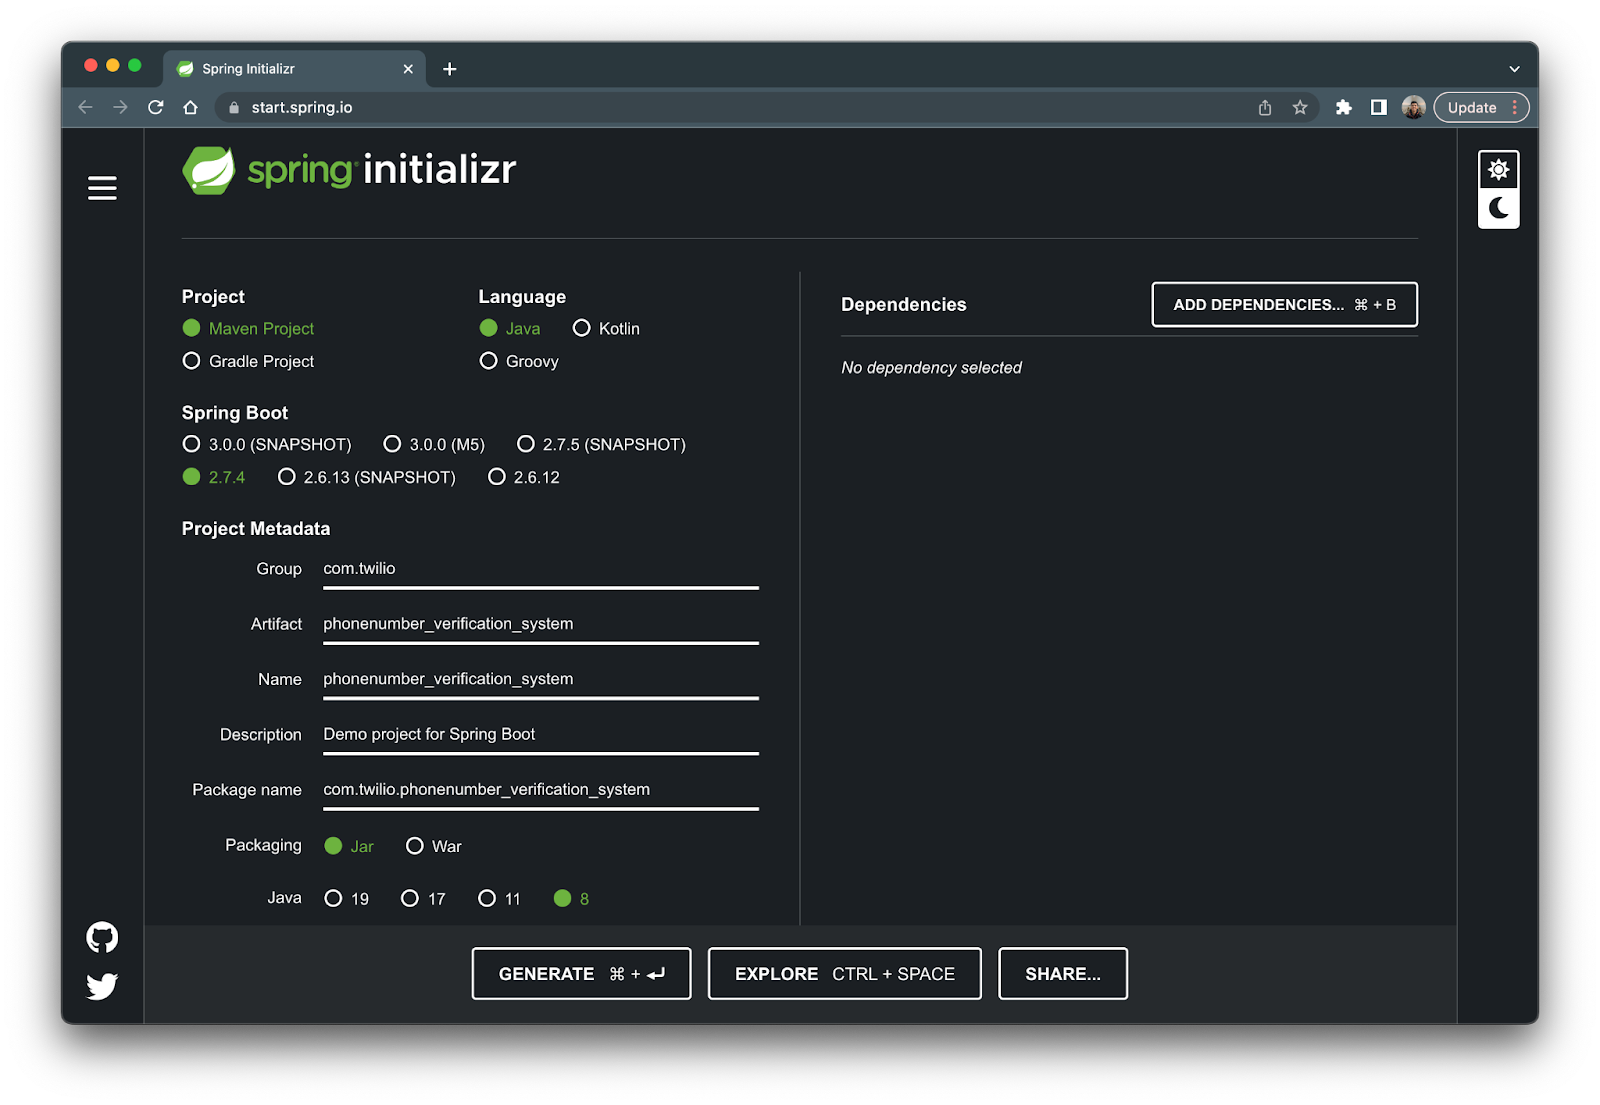
From the above image:
- The Project type is Maven Project
- The Language is Java
- The Spring Boot version is 2.7.4
- The project Name and Artifact is phonenumber_verification_system
- The Packaging is Jar
- The Java version is 8
For the Project Metadata, feel free to add the names of your choosing or use the ones in the image above.
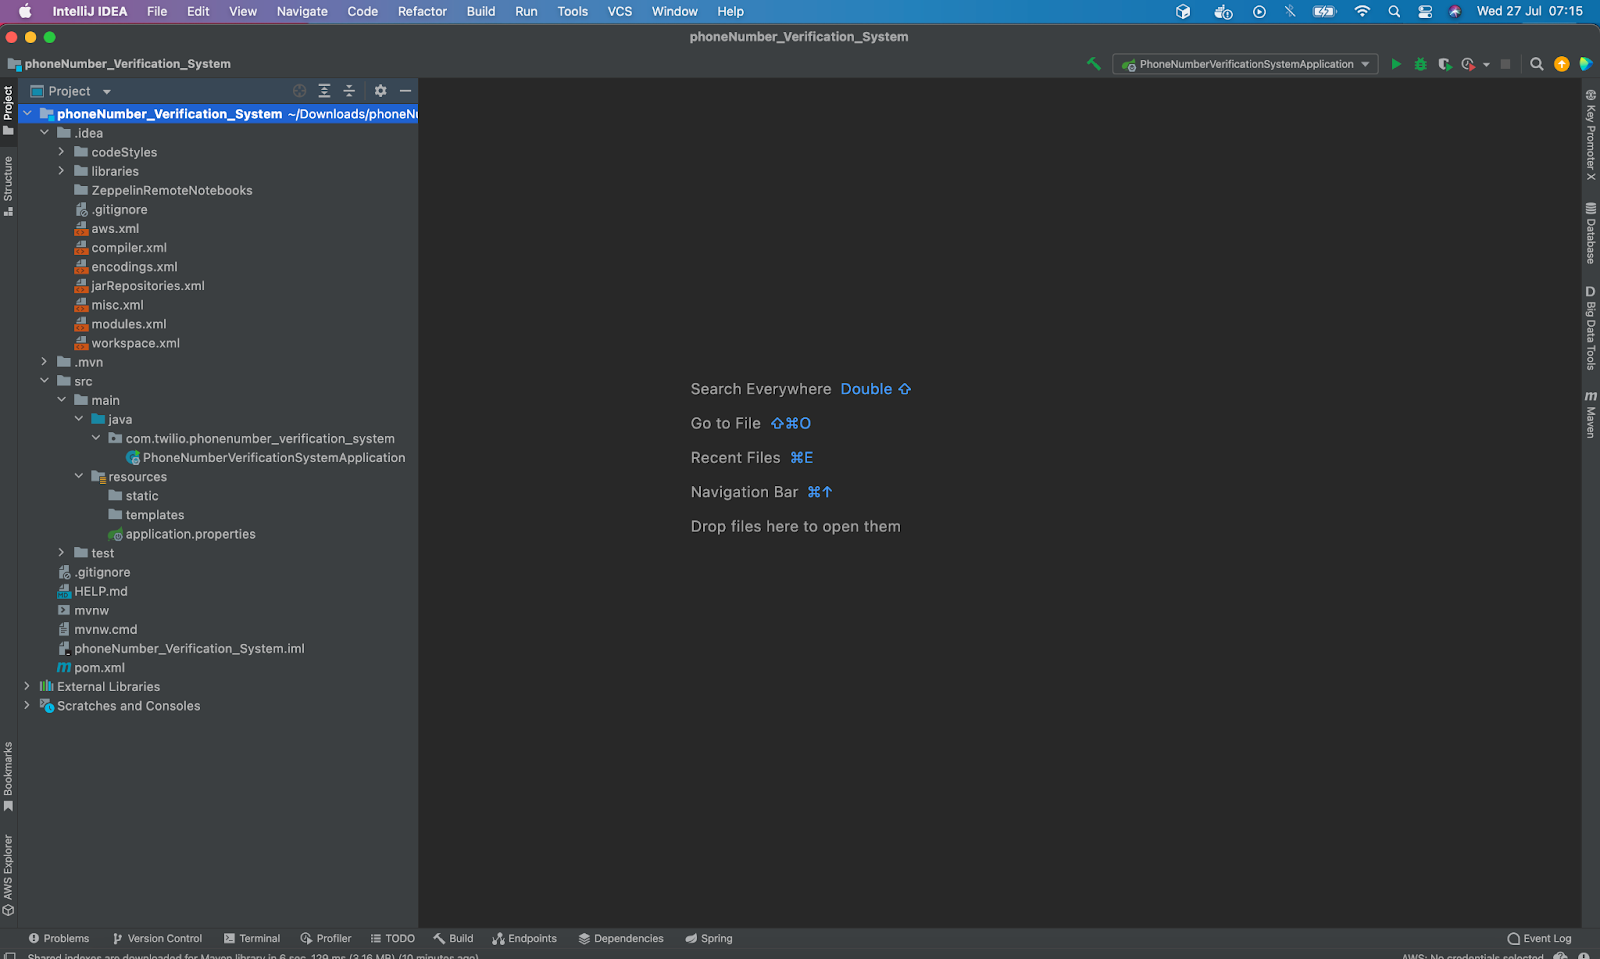
Lastly, click on the Generate button; this will download a zipped file of your Maven project. Unzip this file and open it up in your preferred Intelligent Development Environment (IDE). Once opened, your project structure should look like the image below:
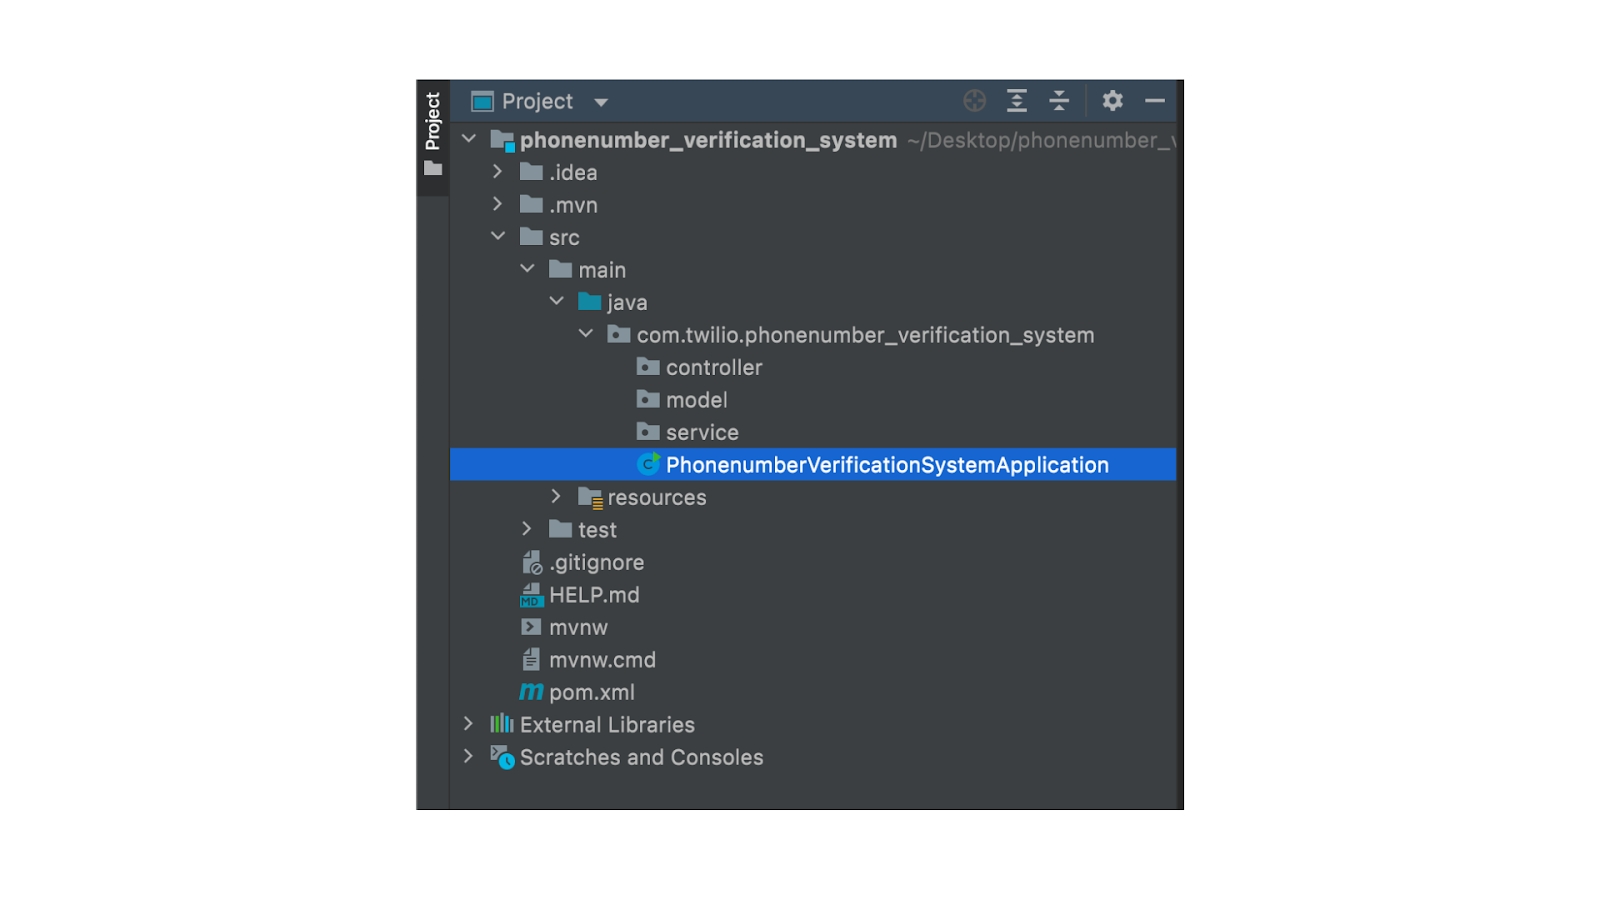
Next, we can now go ahead to create these additional packages: controller, service and model. To do this right click on your main file (PhoneNumberVerificationSystemApplication.java) within main and navigate to New > Package.
Your project directory should look like this:
Include Twilio SDK to Spring Boot Project
In this section, you’ll integrate the Twilio SDK to your Spring Boot project. The Twilio SDK acts as an interface between your Spring Boot application and Twilio; it provides classes and utilities that allows your application to send and receive requests from Twilio. To achieve this, head to Central Maven Repository, search for Twilio SDK dependency that will be added to your project.
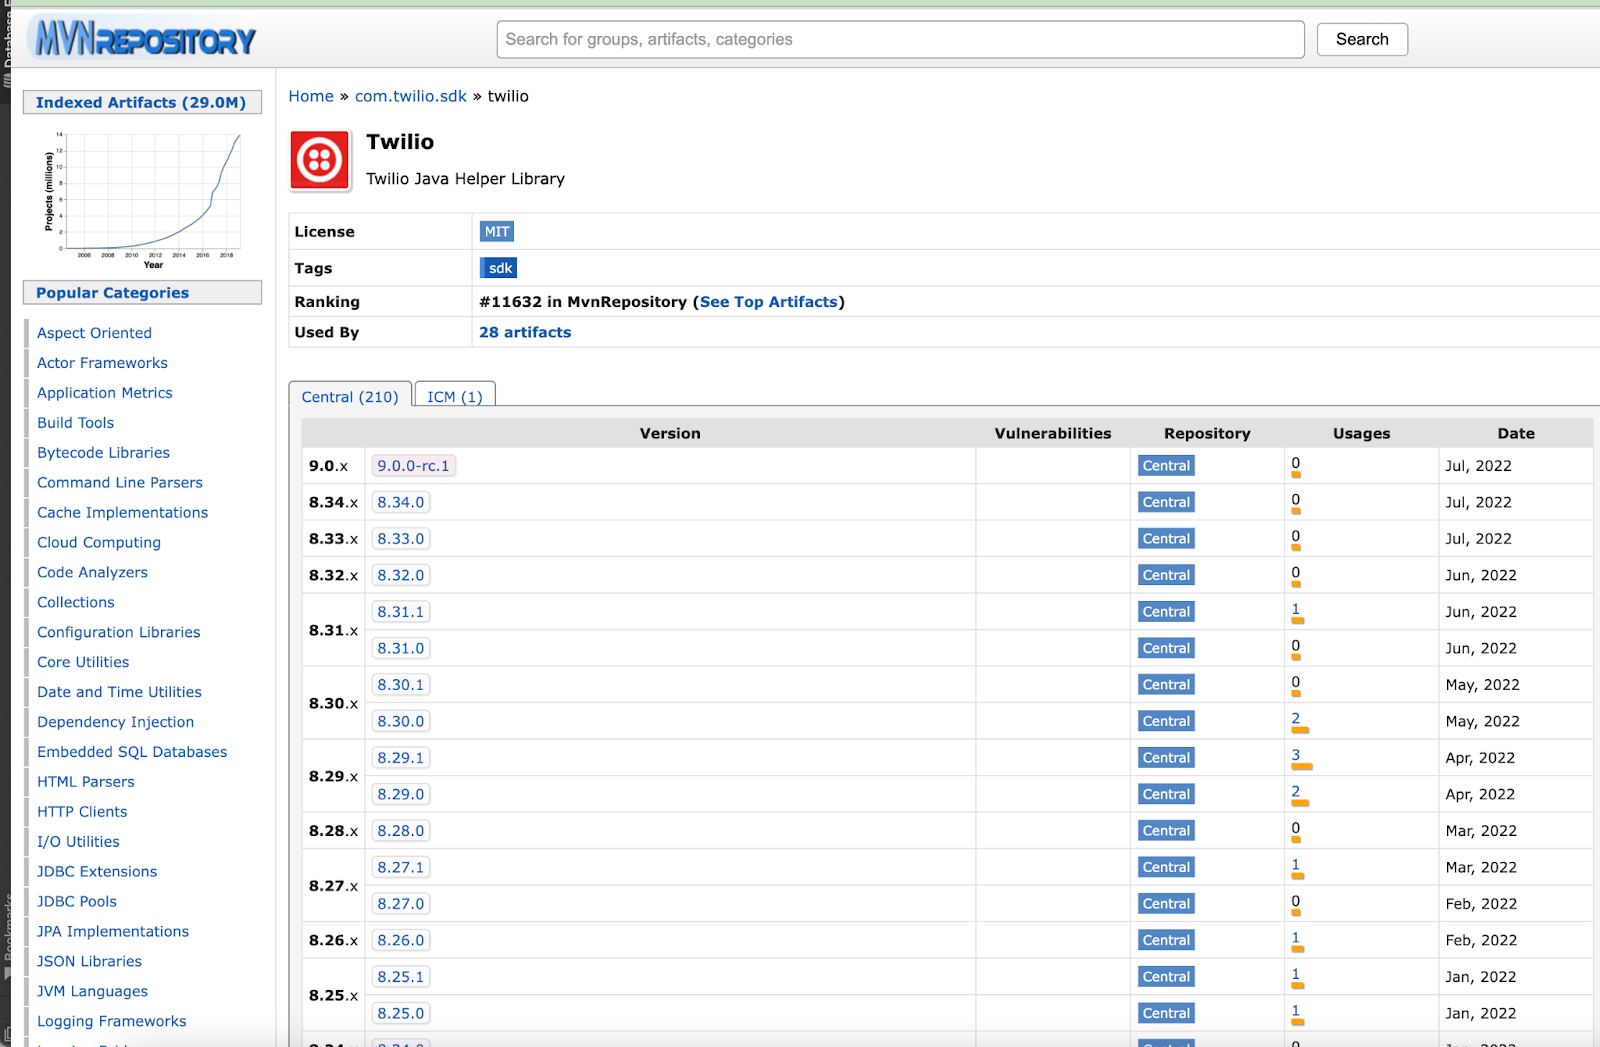
Click on the most recent version and then copy the xml within the Maven textbox. Navigate back to your project and paste it within the dependencies section of the pom.xml file like so:
This project is going to be built with Apache Maven which will be used to download and manage all dependencies.
Set up your environment variables using IntelliJ plugins
To make use of the Twilio Verify API, we need to set up an environment variable that houses the configuration settings rather than hard coding them inside our functions. The environment variable provides a more efficient way to abstract the authentication details like Account SID and Auth Token which are meant to be kept secret from the general public.
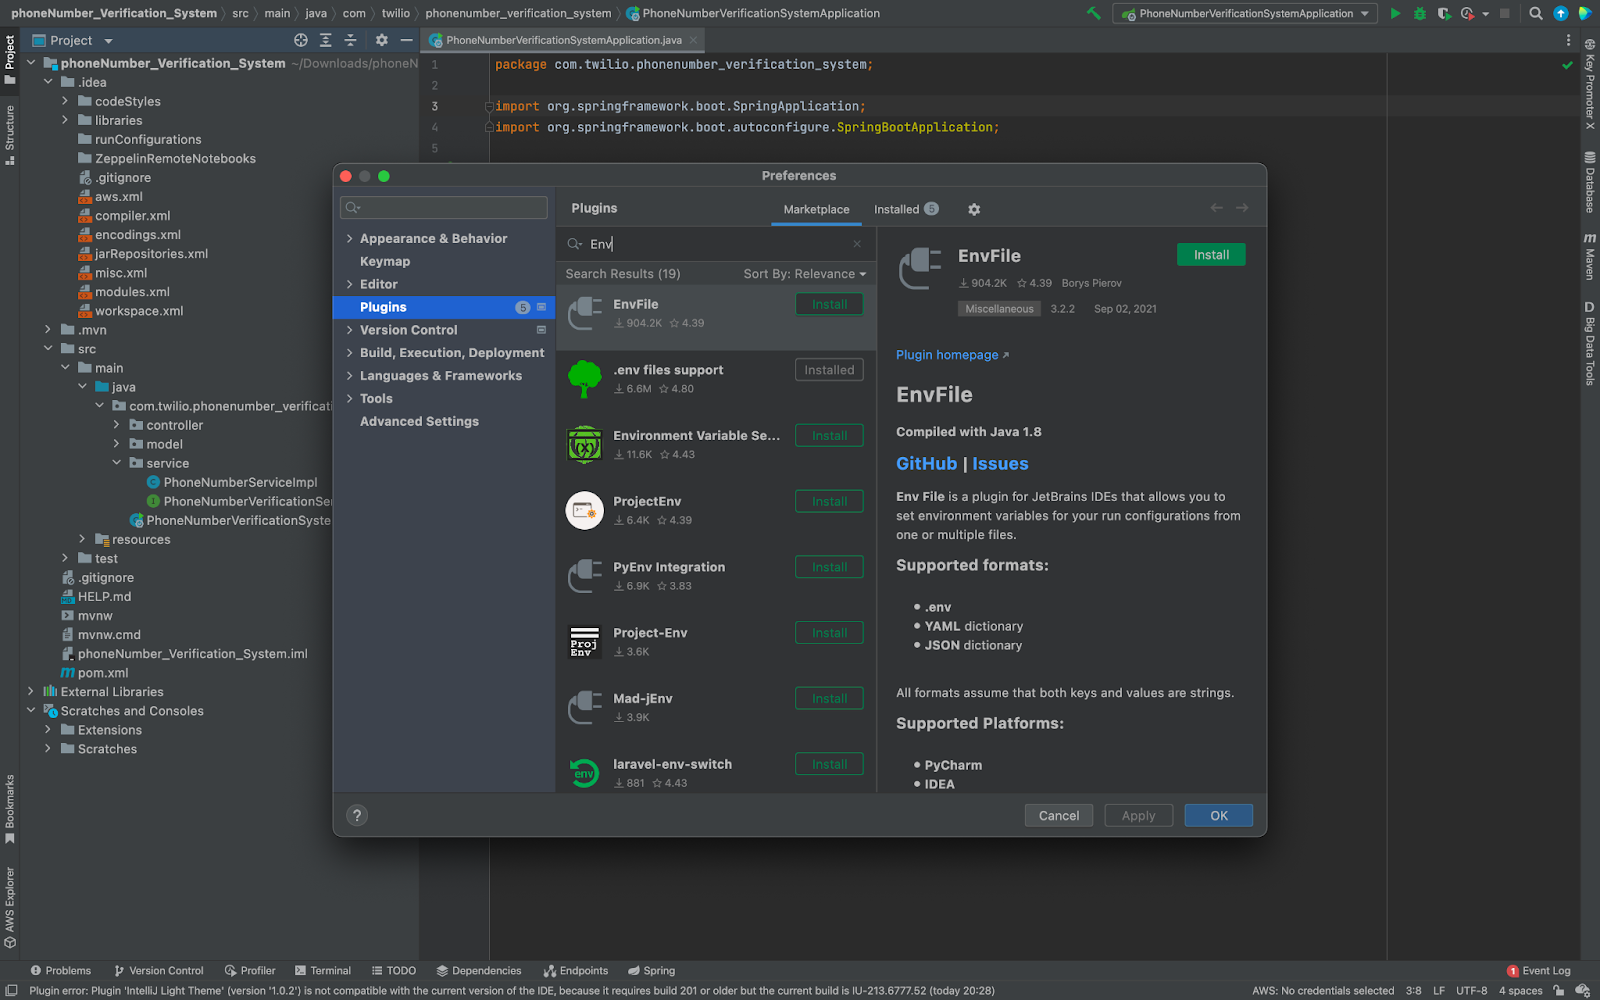
Next, on your IntelliJ IDE, navigate to IntelliJ IDEA->Preferences->Plugins and then search for “EnvFile”.
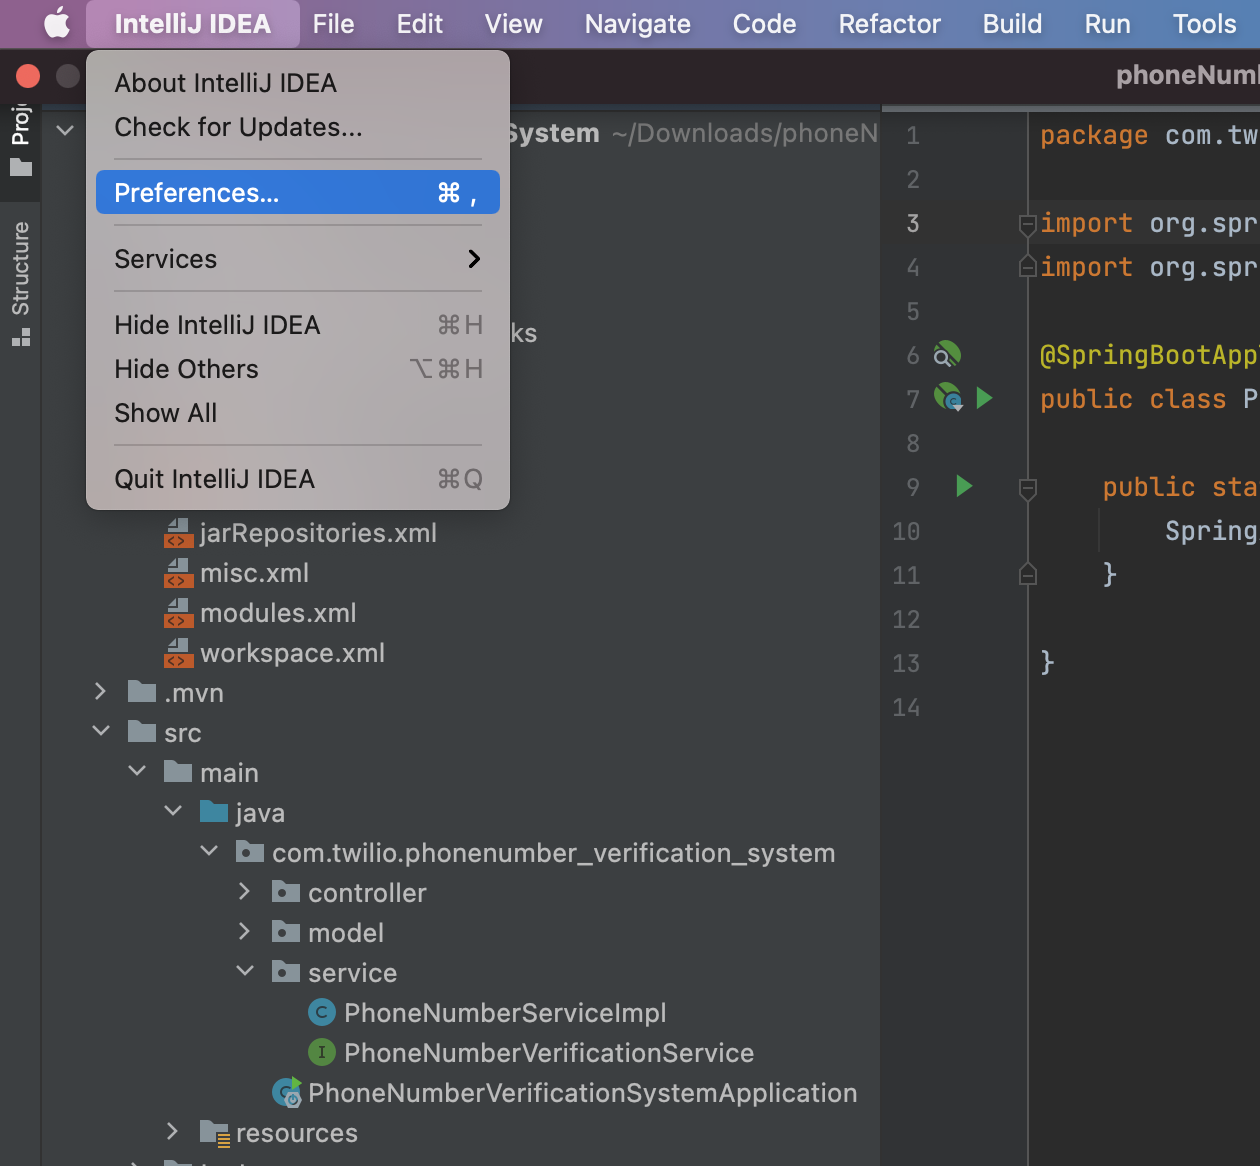
Install the EnvFile from the marketplace by clicking on Apply and OK. Restart your IntelliJ IDE.
After installing EnvFile into your project, create a file named credentials.envfile inside the service package as shown in the image below:
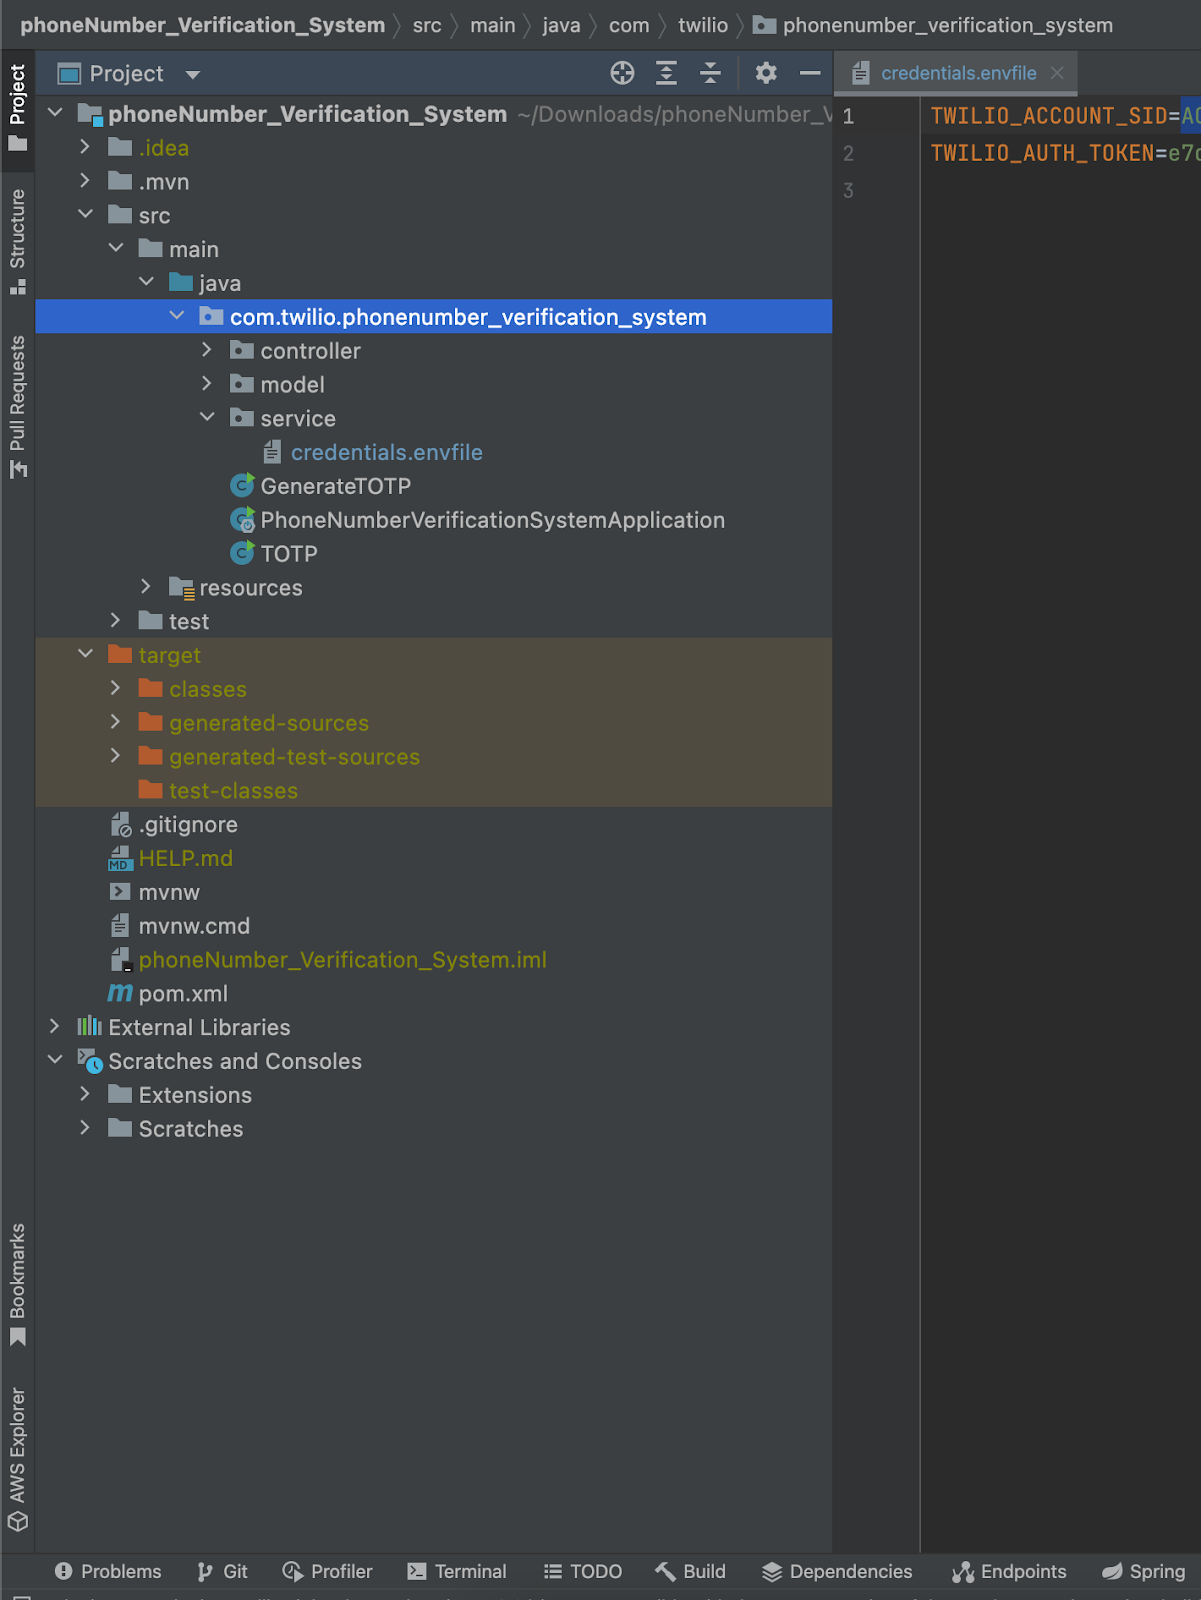
Add the following contents within the credentials.envfile file while replacing the XXXXXXXX with your actual credentials:
To access these credentials in your application, you’ll use the following code:
Next, we are going to write the code to implement our verification service in the next section.
Generate a new OTP
Here, you’ll generate a new OTP in your Spring boot application. To do this, you’ll create a PhoneNumberVerificationController class within your controller folder that houses and exposes all the endpoints.
Within your project directory, right click on the controller folder (which is within src/main/java/com/twilio/phonenumber_verifcation_system/controller) and navigate to New > Java Class and enter PhoneNumberVerificationController for the name.
Open up this file and replace the existing code with the following:
Starting from the top of the file, the @RestController annotation indicates that controller is a Restful API, which saves the stress of using multiple annotations like @RestBody and @Controller annotations. The @RequestMapping indicates the prefix path to be used when testing the API or whenever it’s called. The @Slf4j annotation helps to log responses and is mostly used for debugging purposes.
The @RestController annotation requires a classpath to function properly inside your Spring Boot project, it makes use of the spring-boot-starter-web inside your pom.xml file. To resolve red annotations that you might encounter, all you have to do is import this class path into your project.
Similarly, you’ll also need to import lombok into your class by ensuring you have added project lombok into your pom.xml file as shown in the code snippet below:
Next, we are going to create a @GetMapping method and ResponseEntity within the controller class to create the OTP. This OTP will use the Verifications endpoint of the Twilio Verify API. Within the PhoneNumberVerificationController class paste in the highlighted lines:
Replace the VAXXXXXXXXXX placeholder with your Twilio Verify Service SID you copied earlier and replace the +155XXXXXXX with your recipient number.
Next, we are going to create a second endpoint that is used to verify the OTP code generated.
Check and validate the verification code
After a user receives a One Time Password (OTP) password, there is also a need to ensure deliverability was made to the right person, hence, the need for a second verification code check. To do this, we are going to create a new endpoint for this purpose.
The new endpoint method would be declared as a GetMapping annotation and will use the Verification Check endpoint of the Twilio Verify API. Below the generateOTP endpoint, paste in the following code:
Replace the VAXXXXXXXXXX placeholder with your Twilio Verify Service SID and replace the +155XXXXXXX with your recipient number.
Now that you added the last endpoint for the OTP service, it’s finally time to test it out!
Test the OTP system
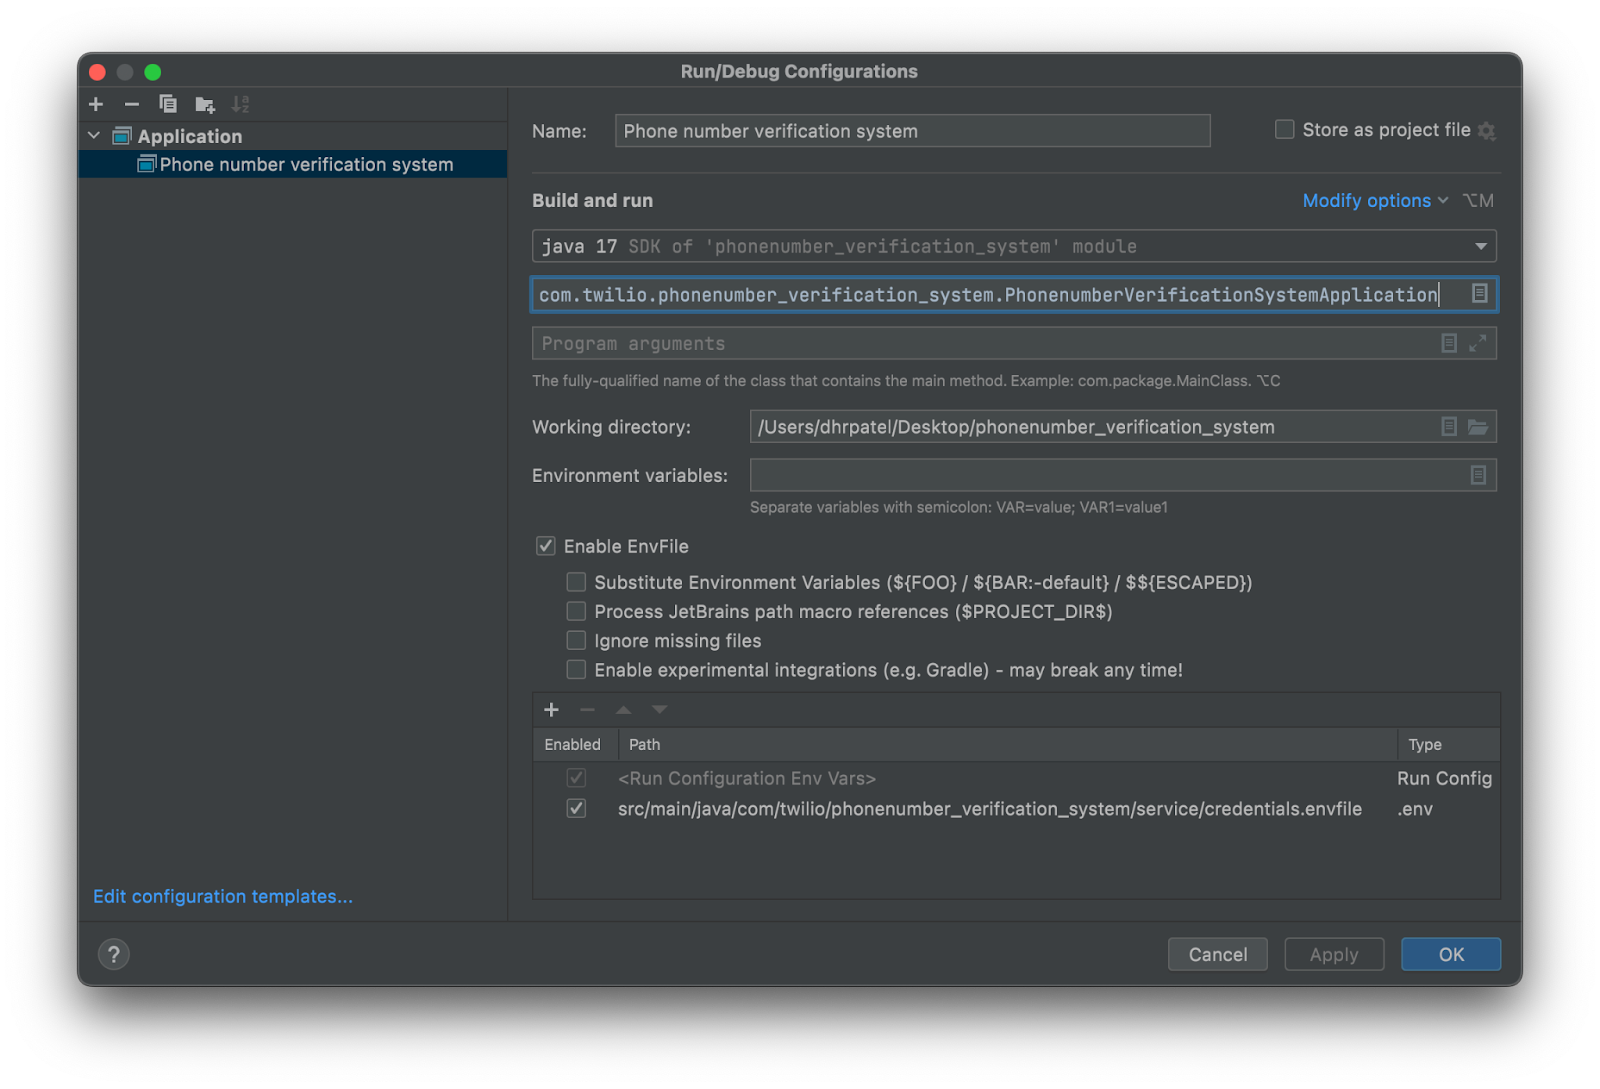
You can now go ahead to run the application from your main class to get the application started. To run your application, click Add Configuration… on the top right corner of the IDE, then click Add new… and then select Application from the dropdown. Rename the configuration to your choosing and within the Main class textbox, click the browse button and select your main class (PhonenumberVerificationSystemApplication).
You’ll also want to connect your environmental variables with your run configuration so they can be used in your application. Select the Enable EnvFile checkbox and click on the plus (+) icon below to add your credentials.envfile. Find your project directory and then the credentials.envfile within it to add it as a path.
Once finished, your run configuration will look something like this:
Click the blue OK button and then click the run button(▶︎) at the top right corner of the IDE to run your application. Your console log will pop up and look like this:
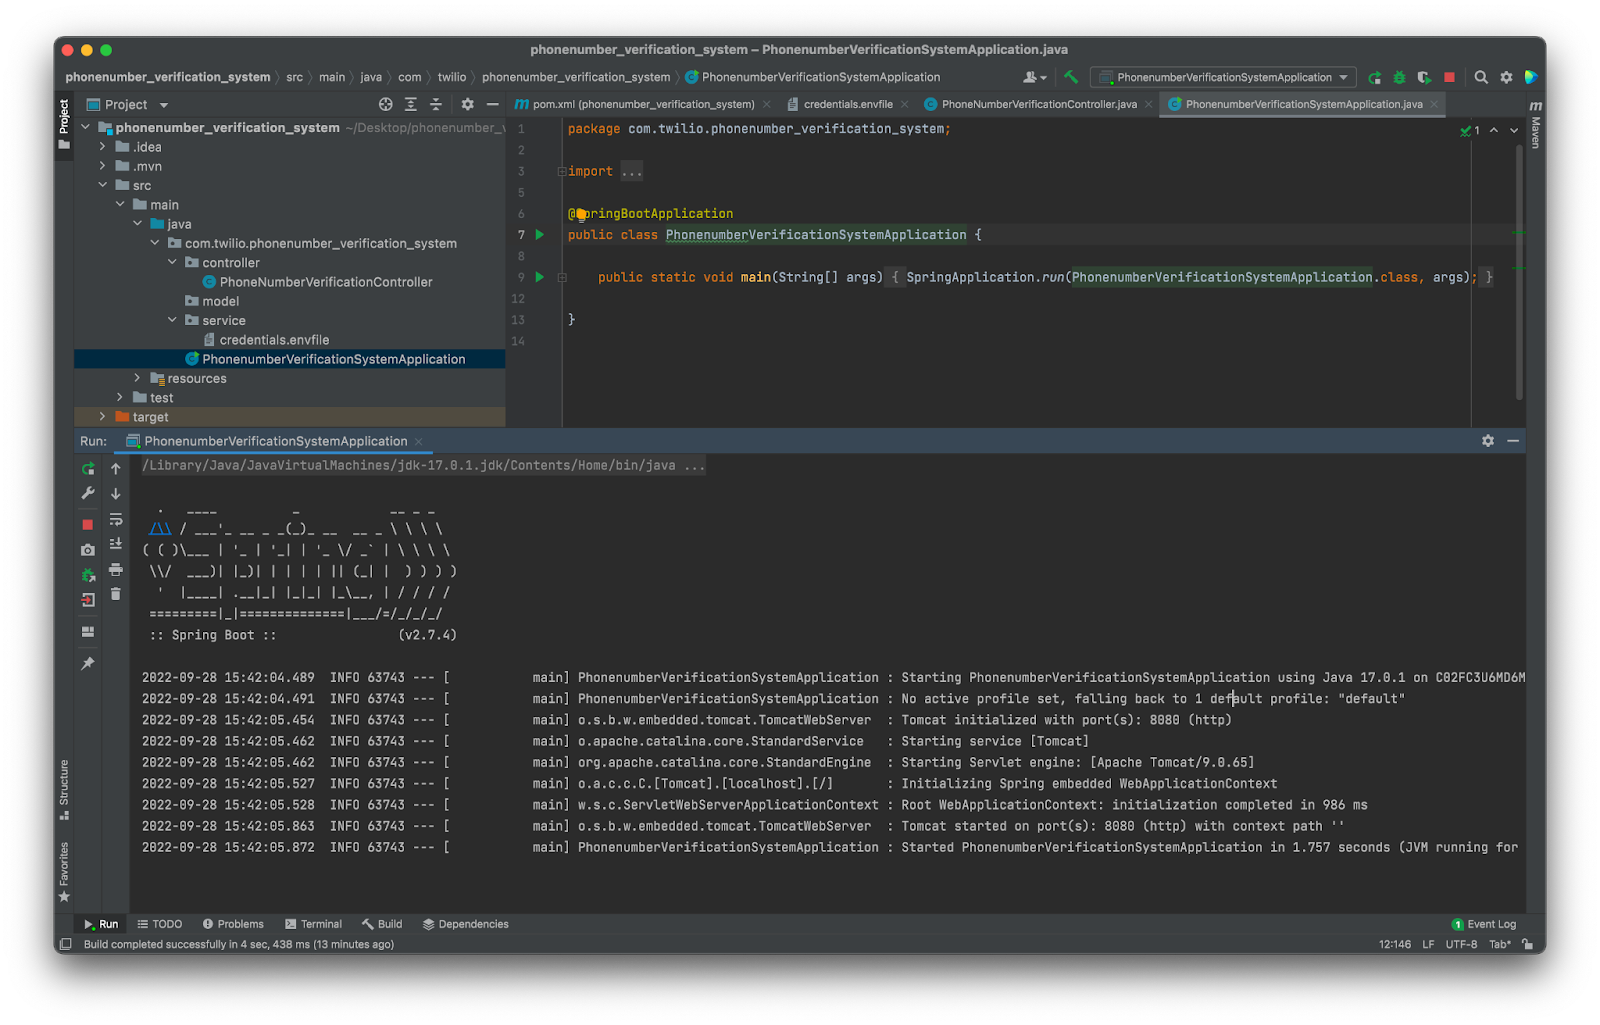
The console log should let you know that the application is being hosted on port 8080 of localhost which is localhost:8080. This is where you’ll send all of your OTP HTTP requests to.
Create requests on Postman
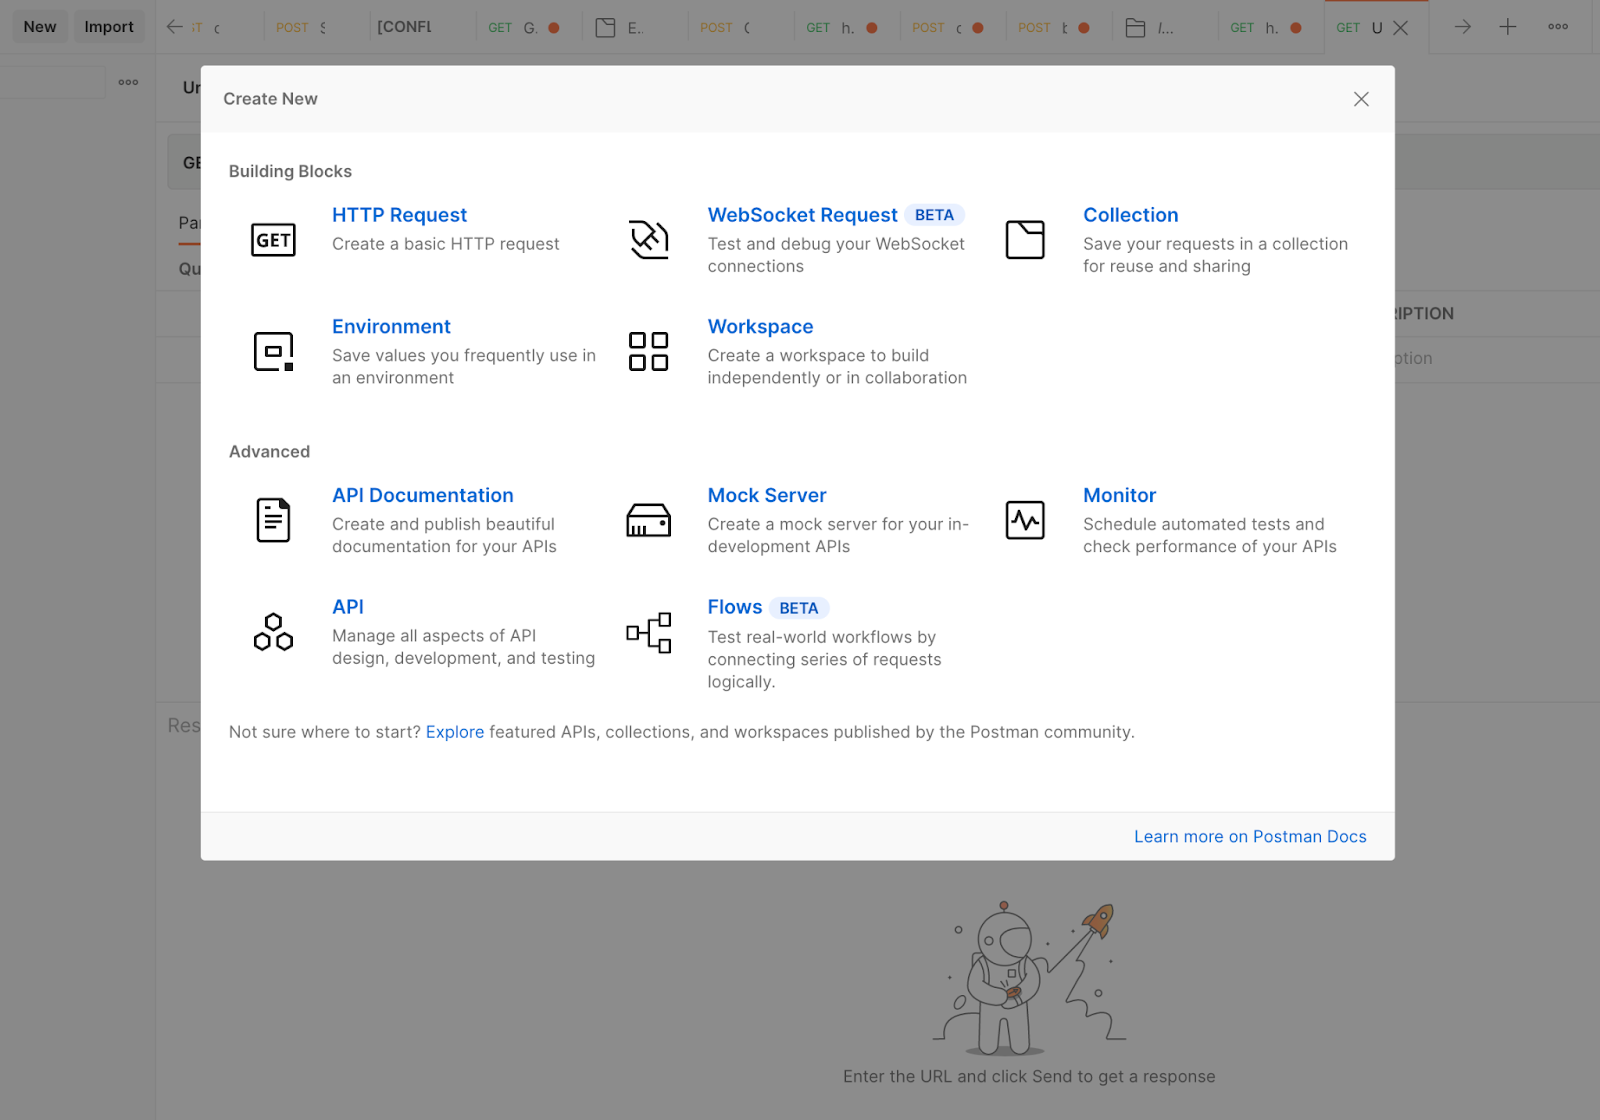
Here, you are going to test our PhoneNumberVerification API service using the Postman tool. To do this, click on the New button on the left side and then click the HTTP Request button to create a request on Postman:
Test the generateOTP response
Create a basic HTTP request and ensure it's a GET method as stipulated in our Spring Boot application. You can go ahead to rename the request as generateOTP and the Postman collection as Twilio_Verify_OTP_API or use your preferred name.
Copy the name on the @RequestMapping path combined with the @GetMapping value of generateOTP from the PhoneNumberVerificationController class to create the URL for this method call: /api/phoneNumber/generateOTP.
This route will then need to be appended to where your application is currently being hosted which should be on localhost:8080 which was displayed on the console log. The URL that should be placed in Postman should look similar to this: localhost:8080/api/phoneNumber/generateOTP.
Place this URL in Postman and click on Send to fire the GET request. You should have a similar response with the image below.
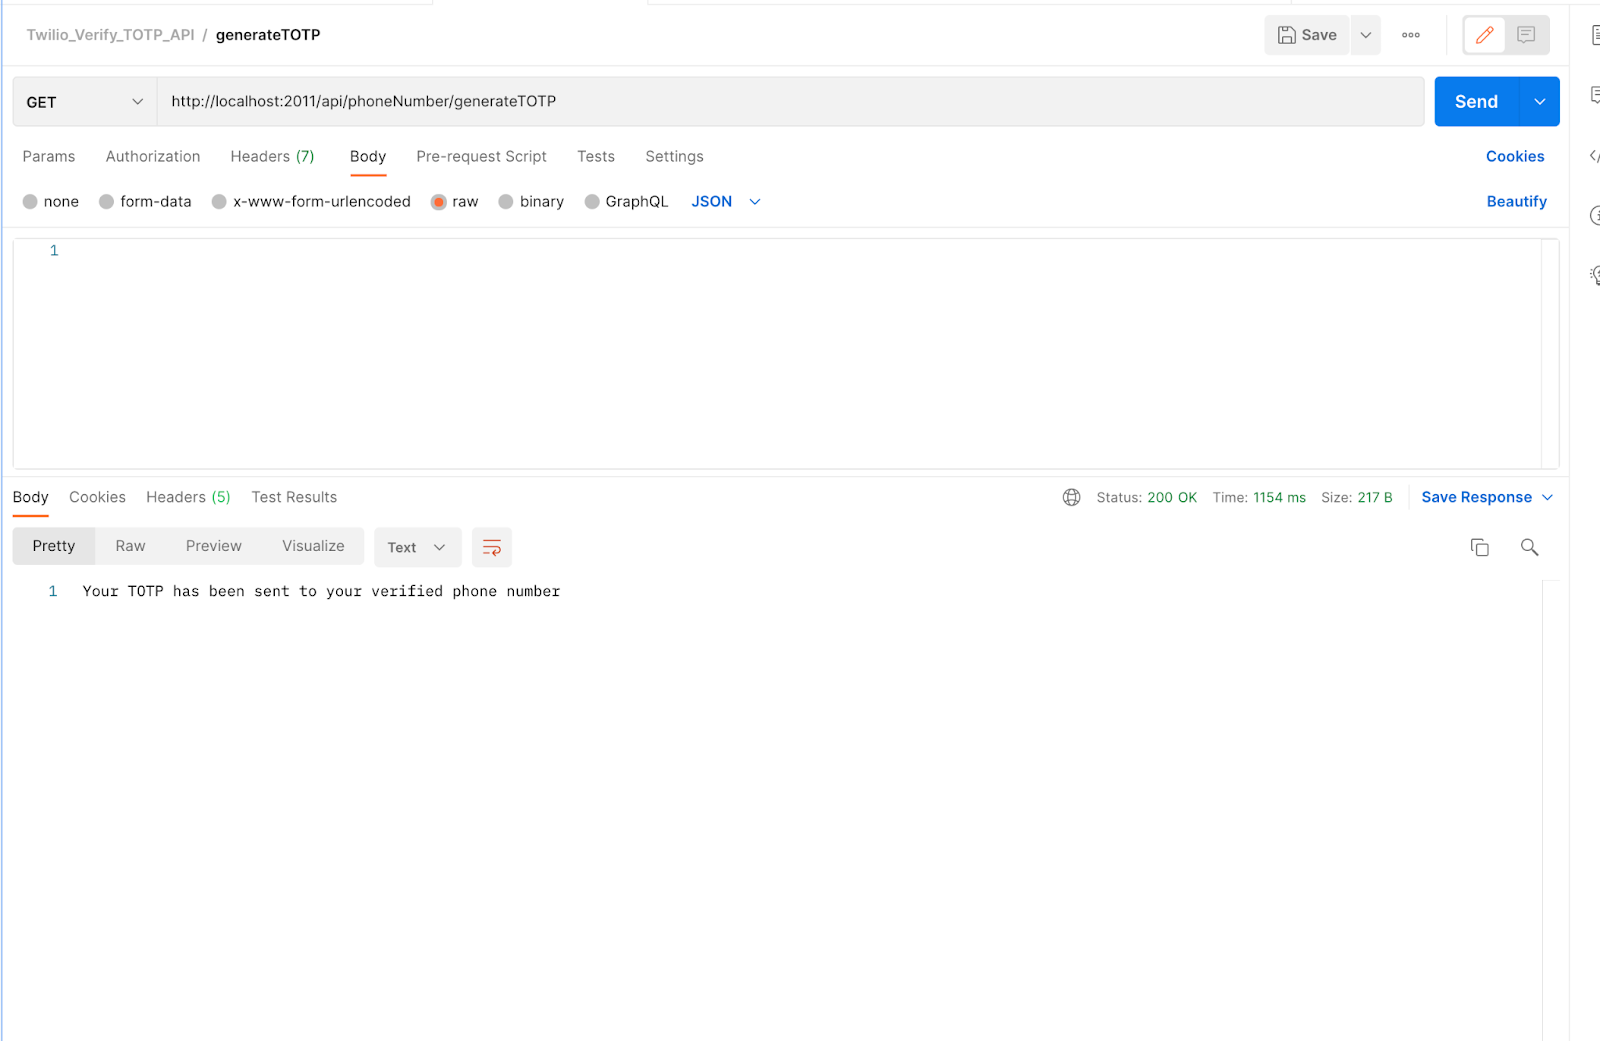
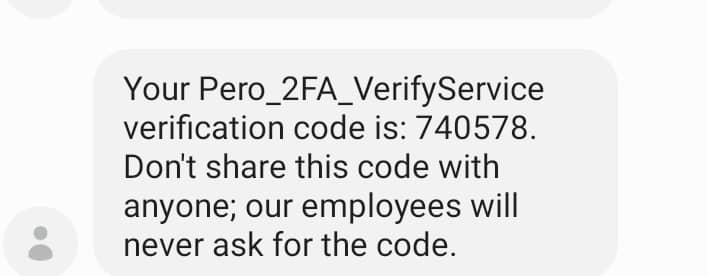
The generateOTP endpoint generates a six digit number to your verified phone number. This SMS OTP contains:
- Issuer name: This is the name of the issuer of the OTP verification service.
- Six digits: This is a six digit OTP code.
- Instruction message: This is an extra warning message that cautions the user to be extra security conscious and not share OTP. You can enable this feature on the Twilio Verification Service settings.
Test the verifyOTP response
Next, we are going to test our verifyOTP endpoint which helps us to confirm that the OTP was delivered to the right users. To do this, we follow a similar step as outlined above and copy the @GetMapping value of the verifyOTP; the URL will look something like this: localhost:8080/api/phoneNumber/verifyOTP
Also, ensure you pass the OTP value generated within the .setCode method and pass the verification service SID to VerificationCheck.creator method to achieve the desired results.
These two processes are responsible for running a background check under the hood to determine if the response would be ‘verification successful’ or ‘verification failed’. This is shown in the code snippet below:
Once you’ve replaced the XXXXXX placeholders within setCode() with the OTP code you’ve received, re-run your application and send the HTTP request to your verifyOTP endpoint.
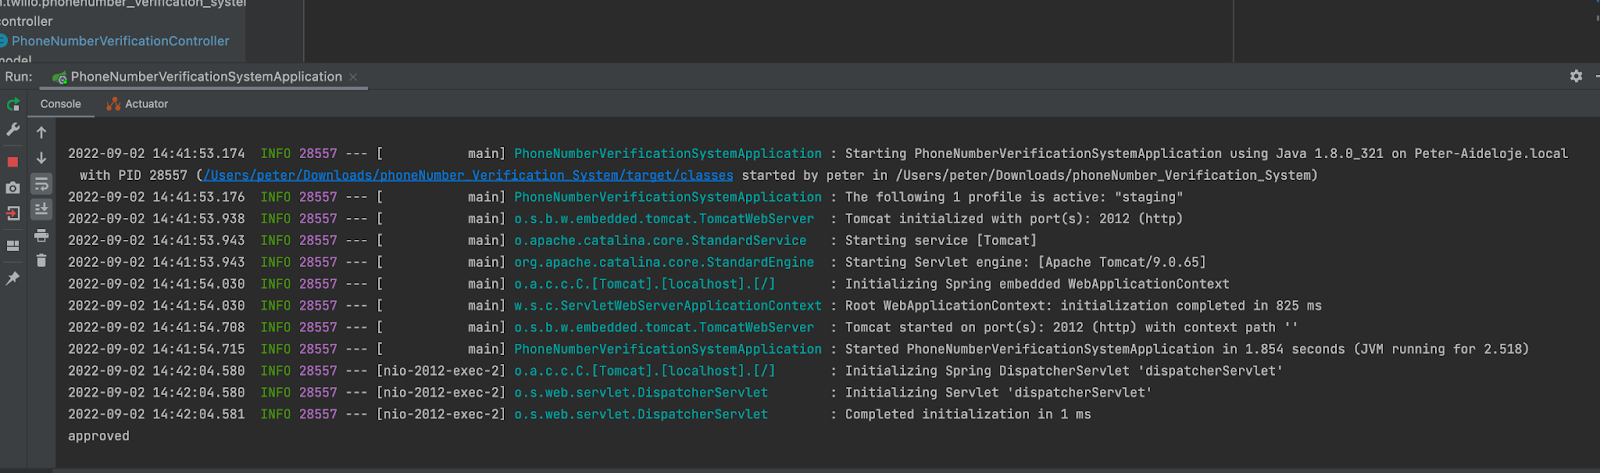
Upon successful completion, we should have a similar response with the image below if the correct OTP was entered.

Notice that the response on your IDE terminal changes from pending to approve after a successful verification is completed. This response should be similar to what we have in the image below:
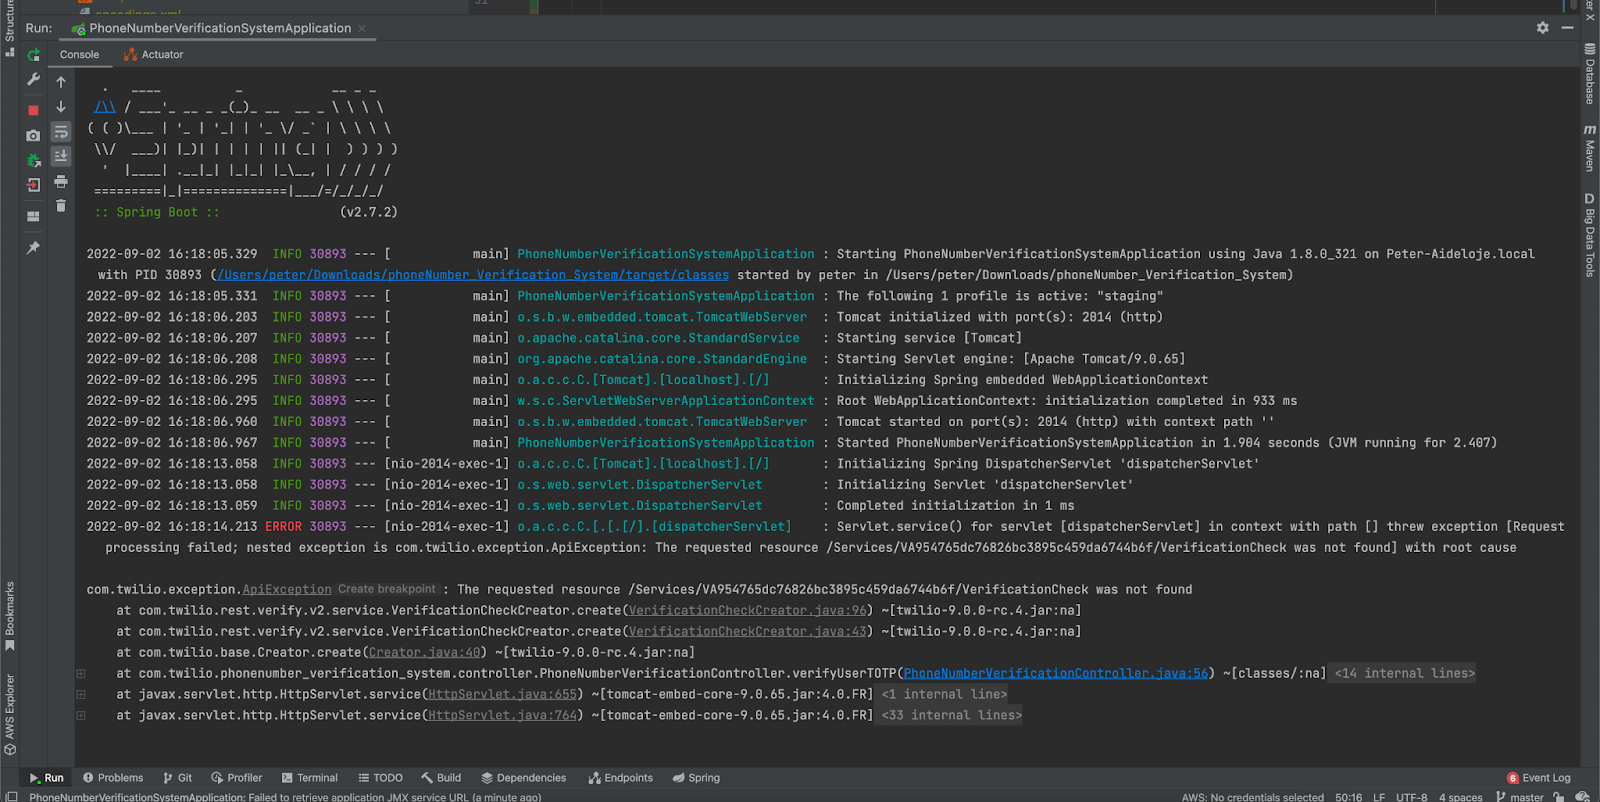
However, an exception would be thrown if the wrong OTP was entered or if the Verification SID has expired after the ten minute duration; this proves that our security check is optimal.
Whenever a “VerificationCheck was not found” error is thrown, it means that the Verification SID has expired and a new service is to be created to generate a new Verification SID.
If you’d like to double check what happened with a given verification code, please use the Twilio Console Verify logs.
This is evident from the error response gotten from IntelliJ IDE terminal shown in the image below:
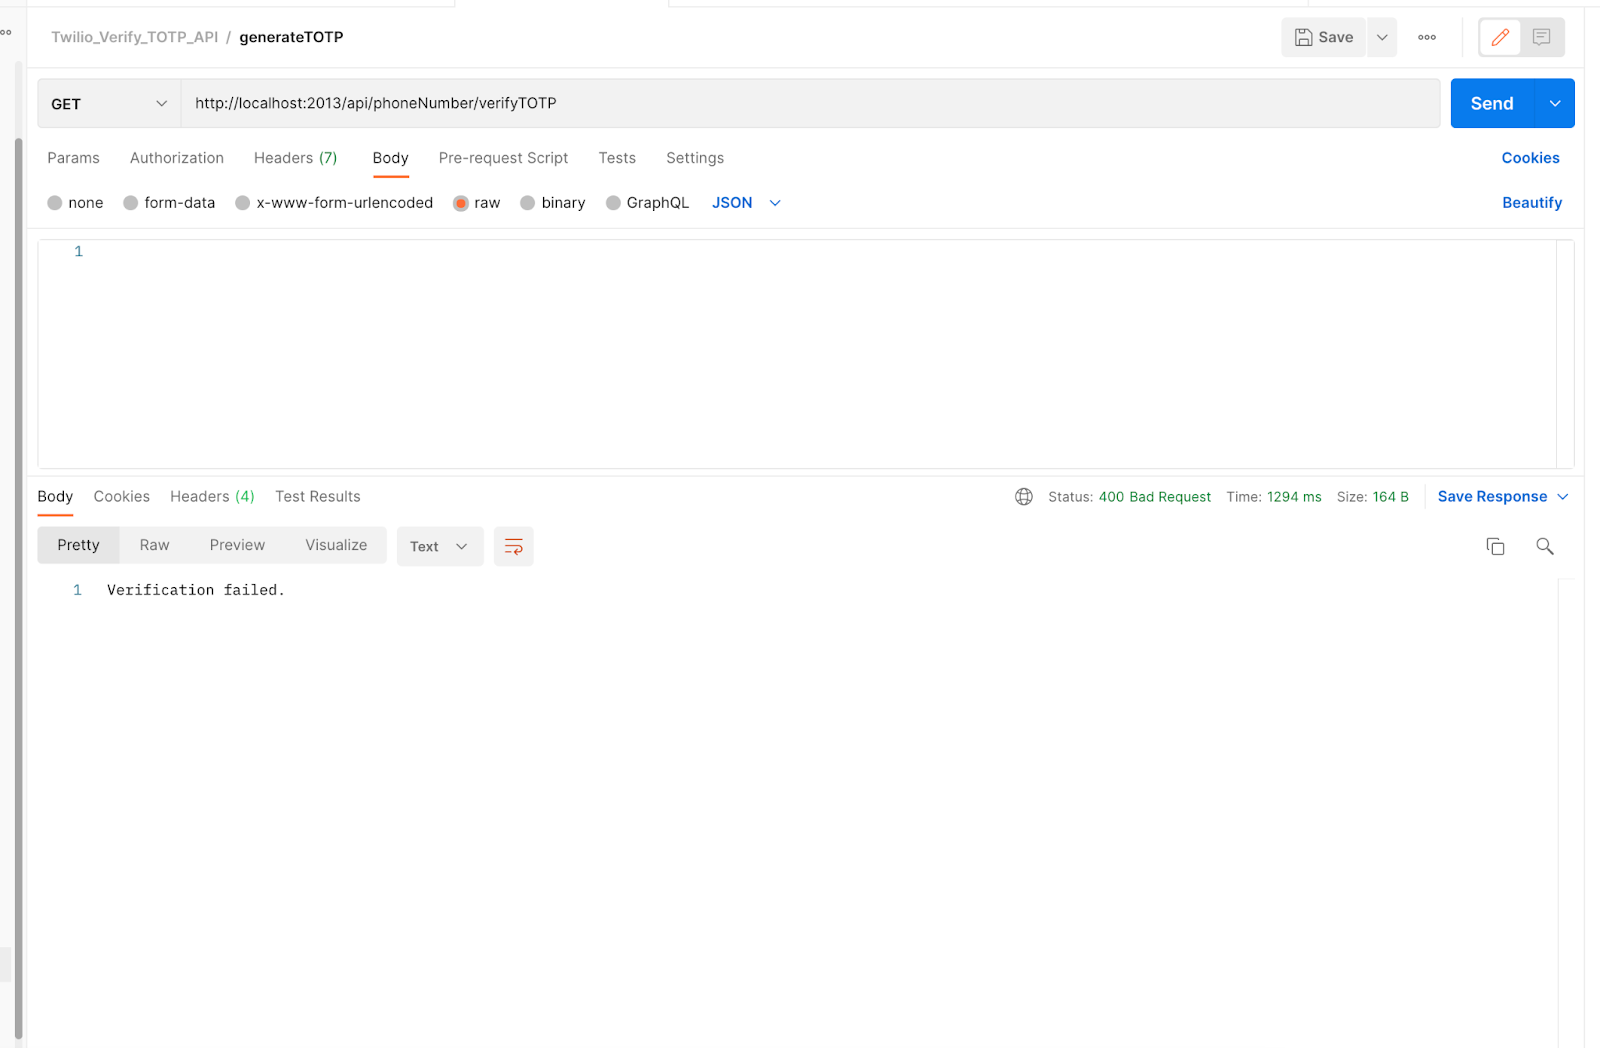
However, this exception was handled and customized using a try-catch in our
verifyOTP endpoint.This is evident in the Postman responses shown below:
What's next for Twilio Verify projects?
In this tutorial, we built a phone number verification system using Spring Boot and the Twilio Verify API. We created a verification service and exposed some endpoints to generate and verify the One-Time Password (OTP). We validated this verification system by testing the verification API on Postman.
You can follow the steps outlined above to explore the Twilio API Documentation to build a unique or similar project that provides security protection against attacks. Assuming there was a password compromise (phishing attack) or brute force attack, two-factor authentication can be the final layer of protection that saves a user’s account from unauthorized access. As you can tell, there is no one size fits all approach to Two-Factor Authentication. You need to consider the friction and risk that your users are willing to accept in order to design the best user experience.
Check out some other articles for verifying phone numbers on the Twilio blog:
- Filter out VoIP numbers before sending an SMS OTP.
- Build a phone verification system in Twilio Studio.
- Verify a user via SMS with Express.
I can’t wait to see what you’re going to build. Happy coding!
Peter Aideloje is a Software Engineer with an interest in backend development using Spring Boot framework. He currently works as an Application Developer in one of the leading FinTech companies in Africa. Kindly reach him via any of his socials below:


Related Resources
Twilio Docs
From APIs to SDKs to sample apps
API reference documentation, SDKs, helper libraries, quickstarts, and tutorials for your language and platform.
Resource Center
The latest ebooks, industry reports, and webinars
Learn from customer engagement experts to improve your own communication.
Ahoy
Twilio's developer community hub
Best practices, code samples, and inspiration to build communications and digital engagement experiences.