How to Make a Phone Call in Spring Boot with Kotlin
Time to read:
April 05, 2024
Written by
Reviewed by
Phone calls remain one of the best ways to reach customers. At the same time, calling each customer one by one takes a lot of time and effort. The solution is to automate this process with programmatic outbound calls that rely on Text-To-Speech voice.
In this tutorial, you will learn how to build an API in Spring Boot and Kotlin that uses Twilio’s Programmable Voice to make an outbound phone call to a given contact.
Prerequisites
These are the prerequisites you need to meet to follow this tutorial:
Java Development Kit (JDK) 17: As stated in the documentation, Spring Boot 3 requires at least Java 17.
Maven ≥ 3.6.3 or Gradle ≥ 8: Choose the Java automation tool you prefer. In this guide, we will use Gradle but show the instructions for both tools. As Gradle is very sensitive to Java versions, you need to install the right version according to your version of Java.
IntelliJ IDEA: The free Community Edition version of the IDE will be enough to go through this article.
A Twilio account and a Twilio number that can make voice calls: If you do not have a Twilio phone number for phone calls, follow the guide on the official documentation and buy one with the Voice capabilities enabled.
A Spring Boot 3 project in Kotlin: The tutorial refers to Spring Boot Web 3, which is the latest version available at the time of writing.
Set up the Spring Boot Phone application
If you do not have a Spring Boot project or prefer to start from scratch, initialize one in Spring Initializr as below:
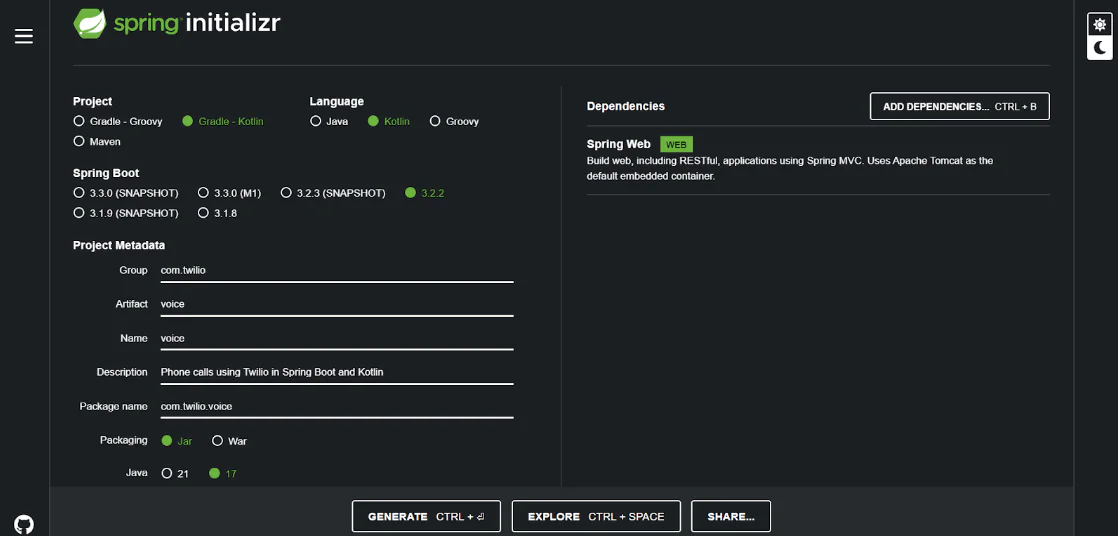
Fill out the form as follows:
Group: com.twilio
Artifact: voice
Name: voice
Description: Phone calls using Twilio in Spring Boot and Kotlin
Package name: com.twilio.voice
Packaging: Jar
Java: 17
Do not forget to select “Gradle - Kotlin” as the automation tool language and “Kotlin” as the programming language. Since you want to initialize a Spring Boot Web project, click the ADD DEPENDENCIES... button on the right and select the “Spring Web” dependency.
When you are done, click GENERATE to download a .zip archive containing your new Spring Boot Kotlin project. Extract the .zip file and open the project directory in IntelliJ IDEA. The IDE will automatically perform the first Gradle build.
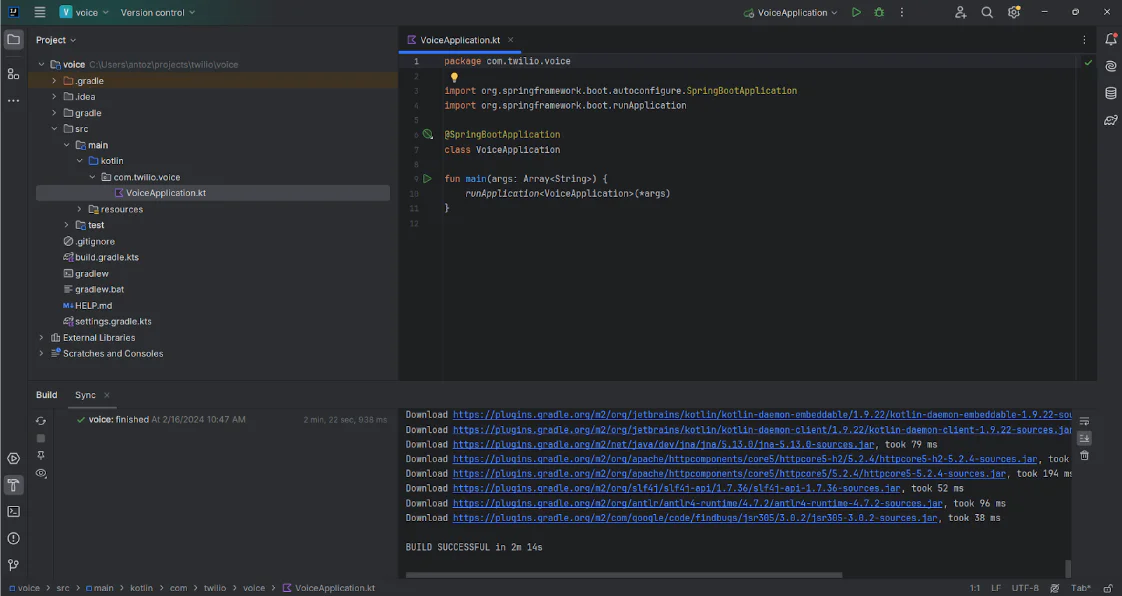
Wait for the message "BUILD SUCCESSFUL" and you are ready to write some Kotlin code!
Build an API to Make an Outbound Call in Spring Boot
Follow the steps below and learn how to build an API in Spring Boot with Kotlin to make an outgoing phone call with Twilio Programmable Voice.
If you are eager to take a look at the full codebase or want to use it as a reference while building the application as you read, you can clone the GitHub repository that supports the guide with this command:
git clone https://github.com/Tonel/twilio-kotlin-phone-call
Now, let’s jump into the step-by-step tutorial section.
Install the Twilio Java Helper Library
First, you need to add the Twilio Java Helper Library to your project's dependencies. This package makes it possible to interact with the Twilio Voice API, providing everything you need to make programmatic outbound phone calls in Spring Boot.
If you are on Gradle, navigate to the build.gradle.kts file in the root folder of your project. Open it and add this line to the dependencies section:
implementation("com.twilio.sdk:twilio:10.0.0")
Otherwise, if you are a Maven user, open the pom.xml file in the root folder of your project and paste the following lines into the dependencies tree:
You just added Twilio Java Helper Library to your project’s dependencies.
NOTE: Always prefer the latest version of the Twilio Helper Library. As of this writing, the latest version is 10.0.0. Take an eye on the Twilio Java Helper Library Maven Repository page to verify if a new version is available.
After updating the project dependencies file, IntelliJ IDEA will show the Gradle/Maven reload button in the upper right corner:

Click that button and wait for Gradle or Maven to install the Twilio Java Helper Library. This will take a few seconds.
You just added Twilio to your project’s dependencies and are all set to configure it in your project.
Integrate Twilio in the Spring Boot Kotlin Project
The next step involves initializing the application.properties file inside the /resources folder as below:
Replace the placeholder strings with account credentials and Twilio phone number. Note that you can retrieve the “Account SID” and the “Auth token” in the API keys & tokens section of the Twilio Console.
NOTE: Any phone numbers used in the code must be in E.164 format. That is the phone number format officially supported by Twilio.
Next, you can use those values to initialize Twilio in Spring Boot.
Right-click on the com.twilio.voice package in IntelliJ. Select New > Kotlin Class/File and add a new class called config.TwilioConfig.kt. The config package will now contain the TwilioConfig.kt file.
Define TwilioConfig.kt as follows:
Since TwilioConfig.kt is decorated with the @Configuration annotation, Spring Boot will automatically load it at start-up time by calling its constructor. That configuration class uses the @Value annotation to read the values added previously to application.properties and assign them to its members.
Right after calling the constructor, Spring Boot will run the twilioInit() method annotated with @PostConstruct. This method initializes Twilio by calling the Twilio.init() function as illustrated in the Twilio official documentation.
NOTE: The @Value members are initialized only after the constructor has been called. This is why you need a method marked with @PostConstruct and you cannot add Twilio.init() directly in the constructor.
Twilio is now working. You are ready to programmatically make outbound phone calls in Spring Boot.
Define a Service to Make the Outbound Call
It is now time to create a VoiceService class that implements the business logic required to make a phone call with Twilio in Kotlin.
In IntelliJ, right-click on the com.twilio.voice package. Select New > Kotlin Class/File and create a new class named service.VoiceService.kt. This will create a service package and add a blank VoiceService.kt file inside it.
The service package of your Spring Boot project should contain all your @Service classes. If you are not familiar with that annotation, a Spring Boot service is a class that should contain part of the business logic of your backend. Thus, the service package is the business logic layer.
Now, add these lines to the VoiceService.kt file:
The makePhoneCall() method accepts as an argument the string representation of the phone number to call. Then, it makes a phone call by calling the Twilio Call class with the following three parameters:
The recipient's phone number.
The sender's phone number.
The URL to a file in TwiML format.
TwiML, short for the Twilio Markup Language, is an extension to XML that is used to provide instructions to Twilio on how certain events need to be handled.
In detail, when the create() method is called, Twilio will make an outbound call from your configured phone number. Under the hood, Twilio sends a request to the URL you specified in the Call.creator() method. If the URL responds with valid TwiML, Twilio will follow these instructions to handle the phone call.
NOTE: Alternatively, you can pass Call.creator() a TwiML Kotlin object containing the desired instruction in a TwiML string instead of a URL.
You can host TwiML snippets directly through Twilio through the TwiML Bin feature. Reach the TwiML Bins section of the Twilio Console. Then, click the Create new TwiML Bin button to create a new bin. This will bring you to a new page where you can configure your bin:
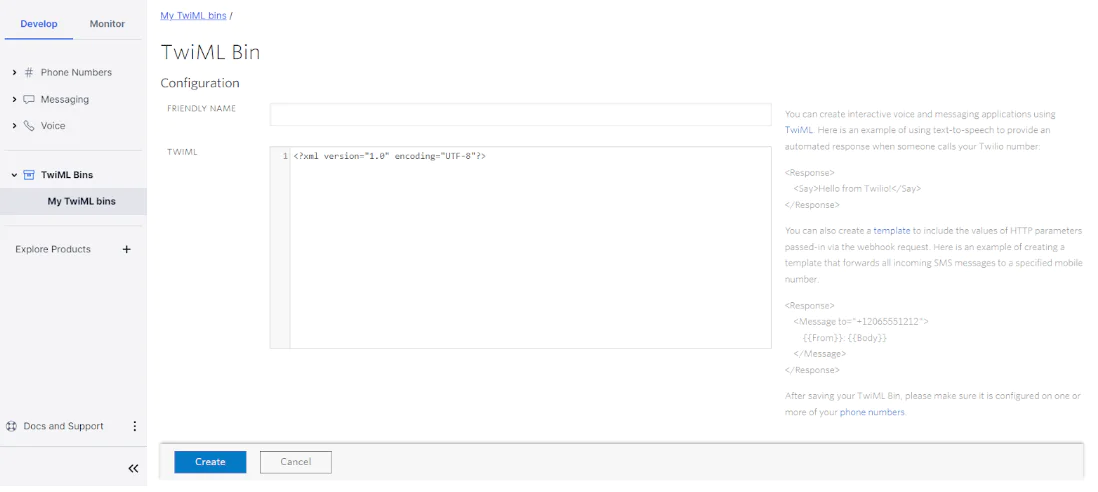
Give the bin a friendly name, such as "Kotlin-Call." Now, suppose you want the Text-To-Speech voice to say “Hey, from Spring Boot and Kotlin!" to the person who answers the call.
You can achieve that by pasting the following TwiML snippet into the “TWIML” field:
Click the Create button at the bottom. The page will refresh and you will have access to the SID and URL values associated with your new TwiML bin:
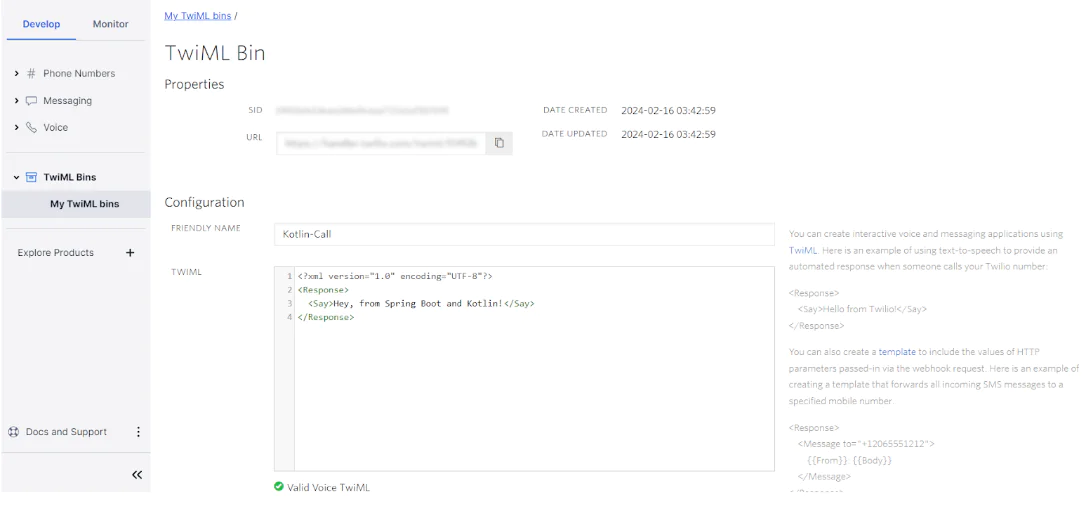
Copy the URL and use it to replace the string <URL_TO_YOUR_TWIML_BIN> in the code.
Create an API Endpoint
Now, let’s create an API endpoint that calls the makePhoneCall() defined earlier and programmatically makes an outbound phone call.
Right-click on com.twilio.voice, select New > Package, and add a controller package to your project. This package represents the Spring Boot controller layer, the folder with the @RestController classes that contain all the API endpoints exposed by your backend.
In the controller package, add a VoiceController.kt file containing the following lines:
Here, you just defined a /api/v1/voice/make-phone-call POST endpoint to make an outbound phone call to a given phone number.
In particular, the API uses the recipient’s phone number read from a PhoneCallBody instance received as a body parameter to call the makePhoneCall() method from VoiceService.
It only remains to define the PhoneCallBody class in a PhoneCallBody.kt file inside the data package as follows:
This Kotlin data class maps the JSON body to pass to the /api/v1/voice/make-phone-call endpoint. Specifically, it accepts a phone number in E.164 format as a string. This is exactly what the makePhoneCall() service method needs to make the phone call.
Test the Outbound Call API
Make sure application.properties contains the right credentials and Twilio phone number. Also, verify that the URI object in makePhoneCall() inside VoiceService.kt points to your TwiML bin.
Run the Spring Boot Kotlin application in IntelliJ and launch the terminal.
On Linux or macOS, test the API with:
curl -i -X POST -H "Content-Type: application/json" -d '{ "to": "+1555000111" }' http://localhost:8080/api/v1/voice/make-phone-call
Or if you are a Windows user, run the following command:
Invoke-WebRequest -Uri http://localhost:8080/api/v1/voice/make-phone-call -Method POST -Body '{ "to": "+1555000111" }' -ContentType 'application/json'
Before launching either of those commands, replace <YOUR_PHONE_NUMBER> with your phone number in E.164 format.
NOTE: If you are making calls from a trial account, the to phone number in the body must be verified with Twilio. You can verify your phone number by adding it to your Verified Caller IDs in the Twilio Console.
Those commands will call the /api/v1/voice/make-phone-call POST API and trigger an outbound phone call to your number. Take the call and you will hear “Hey, from Spring Boot and Kotlin!”.
For another test, feel free to update your TwiML bin in the Console to hear a different message.
Congrats! You just learned how to implement an API to make an outbound phone in Spring Boot and Kotlin!
What's next for using the Twilio Voice API with Kotlin?
In this step-by-step tutorial, you saw how to use the Twilio Java Helper Library to build an API in Spring Boot and Kotlin to make an outbound phone call to a given recipient. As seen here, that required only a handful of lines of code. This is possible because of the Twilio Voice API, which allows you to make and receive voice calls in your application with no effort.
The next step is to make the system more complex. For example, you could retrieve the list of contacts with a query from a database, instead of manually passing one phone number at a time. Or, you could make your outbound calls more sophisticated by recording them, gathering user input, and more.
Check out these other articles such as sending bulk SMS with Kotlin or building serverless functions with Kotlin.
Antonello Zanini is a CEO, technical writer, and software engineer but prefers to call himself a Technology Bishop. Spreading knowledge through writing is his mission. He can be reached on LinkedIn or at antonello [at] writech.run.
Related Posts
-
 How To Build An AI Phone Agent With Twilio Conversation Relay in Node.jsDhruv Patel Dylan Frankcom
 -
Build Real-Time Speech to Speech with Twilio Media Streams and NVIDIA PersonaPlexChristopher Connolly
-
Build and Test a Patient Appointment Scheduling Agent with Twilio and BluejayDeepti Naidu Rohan Vasishth
Related Resources
Twilio Docs
From APIs to SDKs to sample apps
API reference documentation, SDKs, helper libraries, quickstarts, and tutorials for your language and platform.
Resource Center
The latest ebooks, industry reports, and webinars
Learn from customer engagement experts to improve your own communication.
Ahoy
Twilio's developer community hub
Best practices, code samples, and inspiration to build communications and digital engagement experiences.