Building a Django Twilio Programmable Chat Application
Time to read: 12 minutes
March 27, 2018
Written by

As a developer, I’ve always wanted to include chat capabilities in the applications I’ve created. Coding applications is fun but I’ve been stumped by the idea of creating the complex infrastructure needed to support real-time chat. Fortunately, I found that Twilio makes it easy to include chat capabilities in just about any application.
In this tutorial, we’ll be creating a chat application using Python and the Django framework along with Twilio to implement the chat functionality.
We’ll need to accomplish the following goals to get the application functioning properly:
- Setting up Python and Django and creating the base environment for the app.
- Adding code to the app by including HTML, CSS, and JavaScript.
- Generating API keys from Twilio to integrate chat functionality
Setting up the Django Environment
Let’s get started by setting up our development environment. This tutorial requires at least Python 3.4 and assumes you’ll be using a Linux or MacOS environment. Python and Django will run on Windows systems but some of the steps to configure the development environment will vary. You don’t need to be an expert with Python or Django to follow along but having a basic understanding of programming and web frameworks is helpful.
Open a terminal and check the version of Python installed on your system with the following command:
We’ll also be using pip to install Python packages. If your system doesn’t already have pip installed (you can check by running which pip), follow the instructions on this link to get pip set up.
With that information, we can create a virtual environment for the project. A virtual environment will let us develop our application in a sandbox, localizing any packages we install so we don’t mess with any of the system packages.
We’ll be using Python’s virtualenvwrapper to manage the virtual environment. You can run this command to see if the virtualenvwrapper tools are already installed:
If the command returns a version number, you’re all set. If not, follow the instructions on this link to get virtualenvwrapper configured on your system.
Now run the following commands:
The first command creates a virtual environment named “Django” that uses python3 as the default python interpreter. The second command activates the environment.
Now that the virtual environment is created, we can install the packages we need for the project: Django, Twilio, Honcho, and Faker. Of course, Django will be the framework that we use to build the app; the Twilio python library will give us some capabilities to work with the Twilio API; Honcho will help us manage the Django environment; and Faker will help with creating fake usernames for the chat app.
Install the packages with the following command:
Now make a directory to hold the code for your project. In your home directory or other workspace, create a directory and cd into it. Inside that directory, use the django-admin command to create your chat project:
If we check the contents of our project directory now, we’ll find a directory named twiliochat and a python script named manage.py. The twiliochat directory will hold the configuration for the application and you’ll use manage.py for Django specific actions like running the server. Go ahead and run the following commands to get a feel for the manage.py script:
The default configuration for Django includes some database functionality. We won’t be using the database but running the migrate command will minimize warning messages without having to make changes to the code.
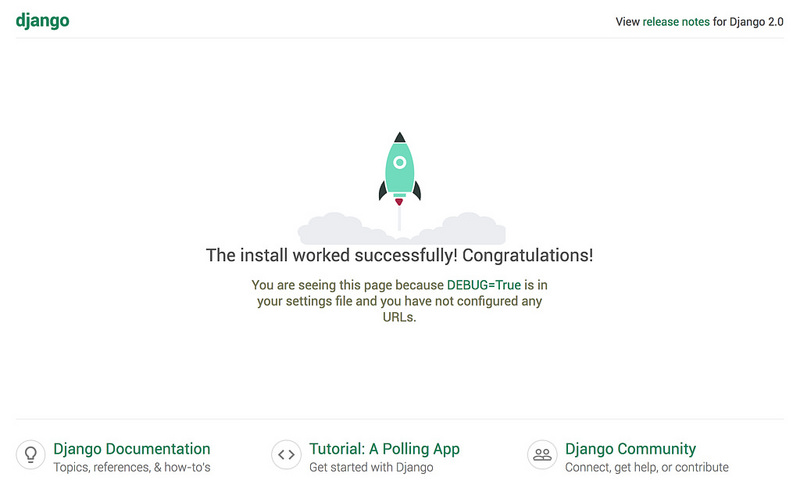
As you might expect, the runserver command starts the built-in server for your project. You can see the project in action by opening a browser with the URL http://127.0.0.1:8000. You should see the Django success page similar to the one below.
Back in terminal press CTRL-C to stop the server.
Great! Now we know our environment and Django are configured correctly and we can get started on the chat app.
Adding Your Chat App to Django
We need to make some code changes to let Django know that we’re adding an app to our project.
Run the startapp command to create an application in the project. In Django, a project can contain several different applications that provide different functionality. In this case, we’ll be adding the base application for our chat app. We also need to create some additional directories to support the chat app’s code:
Now we need to add the chat app to the project settings. Edit twiliochat/settings.py and add ‘chatapp’ under INSTALLED_APPS. The code should look like this:
At the bottom of the file, add the following two lines:
Make sure you have two underscores around the file in the STATICFILES_DIRS line.
Save the file and use manage.py to check your changes:
Running the check command after each change can be helpful when debugging your code. If we make multiple changes and then try to debug, it might not be immediately obvious where the error is located. If any errors are reported, edit settings.py again and make the needed changes. Typical errors include missing a comma or parentheses somewhere in the newly added code.
Once settings.py is updated, we need to add code so that Django knows where to find the chat app. Edit twiliochat/urls.py and make two changes.
Update the line from django.urls import path by adding , include at the end. Add the following line to the urlpatterns list: path(r'', include(‘chatapp.urls')),.
The updated code should look like:
Save the changes and check for any errors. What do you see?

An error!? Oh no! What went wrong? Actually, nothing has gone wrong.
The “ImportError” message is a good one. This means that Django is looking for code inside our chat app but not finding it. If you are seeing a different error, go back over the previous steps and debug as needed.
Now we need to flesh out the chat app with some Python, HTML, CSS, and JavaScript.
Adding HTML, CSS, and JavaScript Code to the Chat App
To get past the error, you’ll need to add some code to your application.
Let’s start with adding the code that tells Django where to find the HTML that will display the application. This is called the “view”. Django creates a views.py file for us when the app is created. Add the following function to chatapp/views.py:
Now we need to add code that tells Django the path to the view; this is done in the chatapp/urls.py file. Create chatapp/urls.py and add the following code:
Now let’s add the HTML, CSS, and JavaScript.
Fortunately, we can use some code from another project to get a jumpstart on the template. We’ll be borrowing code from the [Twilio SDK Starter Application for Python](https://github.com/TwilioDevEd/sdk-starter-python). We’ll be downloading code from the repo’s static/chat directory (https://github.com/TwilioDevEd/sdk-starter-python/tree/master/static/chat).
Use the following commands to put the HTML file into the chatapp/templates directory; and the CSS and JavaScript files into the chatapp/static directory:
Make sure the files were downloaded to the correct place by using ls to list the contents of the chatapp directory.
If the files didn’t download to the correct location or you get a “No such file or directory” error, check your wget commands and make sure the paths to the chatapp directories are correct. Also make sure the directories exist. You may have missed the mkdir step during the environment set up.
Once we’re sure the files are in the right place, we can run the server again with honcho run ./manage.py runserver and browse to http://127.0.0.1:8000. What do you see?
What a boring page! Django found the template and displayed it but there’s no style. Apparently, the CSS wasn’t loaded. Let’s fix that now.
To include the CSS, you’ll need to edit the HTML and add template tags. Django’s template tags allow us to include dynamic functionality in our presentation code. In this case, we’ll use template tags to tell Django how to find our static files.
Again, you can use CTRL-C to stop the server process before moving on.
Edit chatapp/templates/twilio/index.html. At the very first line in the file (above the line that says ), add {% load static %}. This will tell Django to include any HTML references to your static files.
Paths to CSS and JavaScript need to be updated with static template tags as well.
To update the paths in chatapp/templates/twilio/index.html, replace href="index.css" with href="{% static 'twilio/index.css' %}". Also replace src="index.js" with src="{% static 'twilio/index.js' %}".
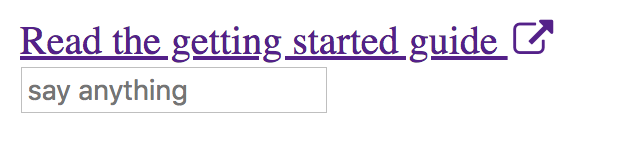
Because Django’s check feature only debugs python code, you’ll have to fire up the server again to see your changes. What do you see?
Wow! Pretty cool interface, right? This is definitely an improvement over the unstyled page from before. But do you notice anything about the application? The top of the page just says “Logging in…” and if you enter some text in the “say anything” field, nothing happens.
It’s finally time to add some Twilio functionality to our chat application. Awesome! We’ve made it this far but there’s still a little ways to go to get our app working. Move on to the next step where we’ll integrate Twilio API keys into our app.
Integrating Twilio API Keys
Because the SIDs and API keys are unique to your account and allow access to services that have limits and costs associated with them, you want to protect them like passwords. It also makes sense to keep them out of your code. To help with that, you’ll store the API keys in a file that won’t be saved along with your code and then configure your Django environment to read the keys from environment variables. By reading the keys from environment variables instead of hardcoding them into our project, we can keep the keys private in the event the code is stored in a repository or otherwise made public.
Back in your terminal, create a file named .env in the root directory of your project. As we collect the keys, we’ll be adding them to this file. Add entries in .env for each key we’ll be collecting like this:
To get your API keys, you’ll need a Twilio developer account. If you don’t already have one, head over to https://www.twilio.com/try-twilio and sign up for a free account.
Log into the Twilio site and start a new project. To do this, click your login name on the top left hand side of the page and then click “Create New Project”.
On the project creation page, select “Products”, then scroll down and select “Programmable Chat”. Then click “Continue”. Now give your project a name, perhaps something like “My Chat App”.
On the next page we’re asked if we want to add any team members. If you’re working with someone, you can add them at this point or you can click “Skip this step” to move on.
Now that our Twilio project is set up, we need to get the following values for your chat app to work: your Twilio Account SID, a Chat Service SID, a Sync Service SID, and Runtime API keys. When combined, these values will authenticate your application to Twilio and allow it to connect to services.
On the project page, look for the Account SID. This will be located under “Project Info”. Add this to .env after TWILIO_ACCT_SID.
Now click the “Programmable Chat” button or browse to https://www.twilio.com/console/chat/dashboard.
On the Programmable Chat Dashboard, click the red plus sign to create a new chat service. Give your chat app service a name, perhaps use “My Chat App” again. Under the Base Configuration, find the “Chat Service SID” and add it to .env after TWILIO_CHAT_SID.
Now browse to the Sync Services page. Find the “Default Service” entry get the SID. Add it to .env after TWILIO_SYNC_SID.
Now browse to the Runtime API Keys page. Click the “Create New API Key” button. Give this API key a name like “My Chat App” one last time to be consistent. Make sure the key type is set to “Standard” and click “Create API Key”.
Make a note of the SID and most importantly the secret. The secret is shown only once and can’t be recovered if lost. If you ever lose the secret, don’t worry, you can create a new one. Add these values to .env after TWILIO_API_SID and TWILIO_API_SECRET.
Now that we have the Account SID, the Chat Service SID, the Sync Service SID, _and_ the API SID and secret, we can integrate them into our chat app to get things working!
Our .env file should look something like this:
Now we need to add code that tells Django to read the keys from environment variables. Edit twiliochat/settings.py and add the following lines to the very end of the file:
After making these changes, run honcho run ./manage.py check to check for errors.
Now that you have your API keys injected into the application, you’re almost there. The next step is to request a token from Twilio using the API keys. Once your app has a token it will be able to interact with the Twilio backend to send and receive messages.
Add the following code to the beginning of the chatapp/views.py:
This brings in the libraries your app needs to generate fake usernames and interact with the Twilio API.
Continue to edit your views.py file, adding the following at the end of the file:
This code creates a fake username and then creates a Twilio token. After the token is created, Sync and Chat grants are added to the token so the chat app can exercise those capabilities in the Twilio API.
Just one more thing to add and you’ll be chatting! Your app needs a path to trigger the token creation.
Edit chatapp/urls.py and add re_path(r'^token', views.token, name='token'), just after the one path that’s already defined. The updated file should look like this:
Run honcho run ./manage.py check again to make sure no new errors were introduced while you added all this new code. If any errors pop up, go back over the code and fix anything that’s out of order.
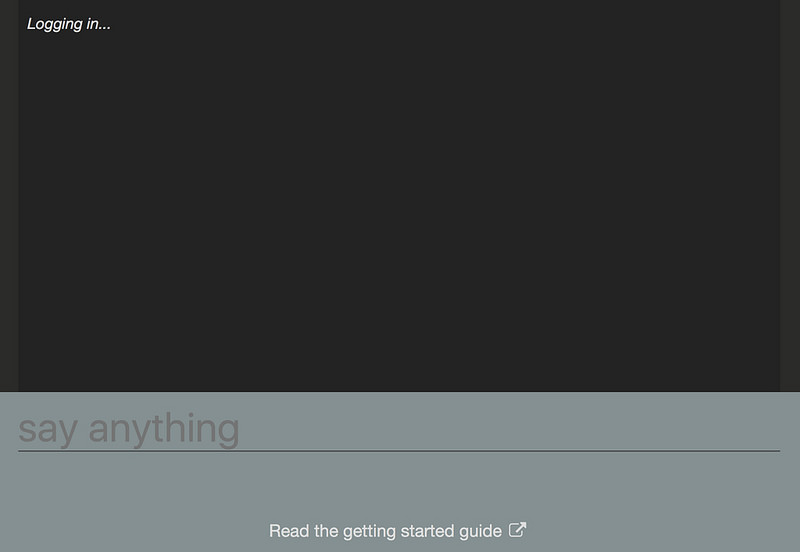
At this point, you should be all good to run honcho run ./manage.py runserver and browse to http://127.0.0.1:8000. What do you see?
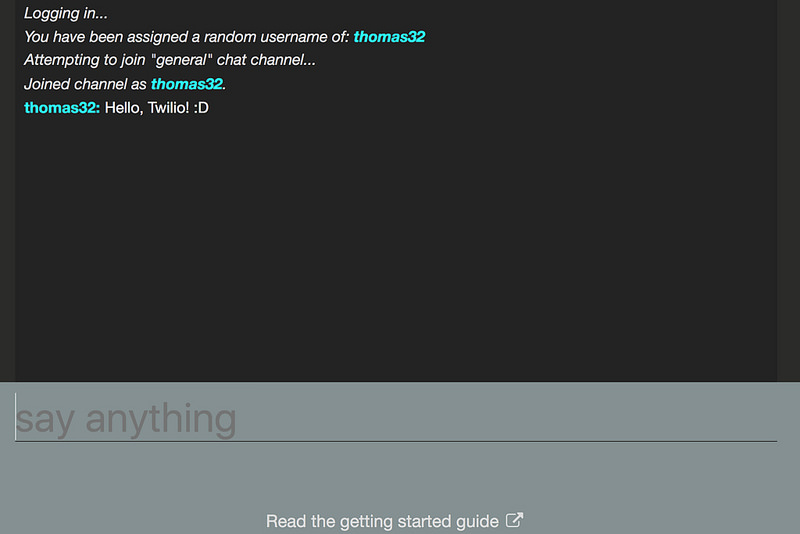
Success! The chat app should be fully functional. After the “Logging in…” statement, you should see a username get assigned and that username joined to the “general” channel. Try entering some text.
To see how the chat app really works, open the app in another browser window. You should see a new username get assigned and join the general channel. Enter some text as the new user and see if it appears on the first browser window. Pretty neat, right? You just made a working chat app using Django and Twilio’s API.
Wrapping Up and Next Steps
That was quite an adventure! We covered a lot from start to finish. First, we had to set up the development environment to run Django. Then we had to create a Django application along with the Python, HTML, CSS, and JavaScript needed to see the app in a browser. Lastly, we got the app working by generating Twilio API keys and injecting them into the application’s environment. Congratulations!
But it’s no fun chatting all alone. To share your chat app, you can use Ngrok (https://ngrok.com/) to create a URL that allows remote users to connect to your locally running application. You could also get your app off your local system altogether and deploy it to a hosting service like Heroku, AWS, or Google Cloud.
And what about those random usernames? Instead of using Faker, you could use Django’s authentication and user management features so users can log in and chat with their real username!
Whatever you do, keep working on ways to build on your chat app. If you have questions or comments along the way, leave them in the comment section below.

Related Resources
Twilio Docs
From APIs to SDKs to sample apps
API reference documentation, SDKs, helper libraries, quickstarts, and tutorials for your language and platform.
Resource Center
The latest ebooks, industry reports, and webinars
Learn from customer engagement experts to improve your own communication.
Ahoy
Twilio's developer community hub
Best practices, code samples, and inspiration to build communications and digital engagement experiences.