Rainy with a chance of Azure Cloud
Time to read:
September 30, 2019
Written by

We all have good days and bad days. On a good day, we may be filled with positive thoughts and on a bad day, we may forget that anything was ever positive!

In this post, we will use Twilio to text your positive thoughts and affirmations to an Azure Function and save them in Azure Table Storage. We will then create a timer-based function that will send a random happy thought from the table storage via SMS to your friends.
This post assumes some basic knowledge of C# and RESTful APIs.
To get started, we will need:
- This GitHub project cloned
- A Twilio account and an SMS enabled Twilio number
- An Azure Account (sign up for free here)
- The latest .NET Core 2.2 SDK (download here)
- Azure Functions Core Tools version 2.6.666 or later
- Azure CLI version 2.0 or later
- Postman for testing our functions locally
- An IDE or code editor with C# support
If you would like to see a full integration of Twilio APIs in a .NET Core application then checkout this free 5-part video series I created. It's separate from this blog post tutorial but will give you a full run down of many APIs at once.
Create an Azure resource group and required resources
Once logged into your Azure portal, we will create a Resource Group, Functions App Service and Azure Function.
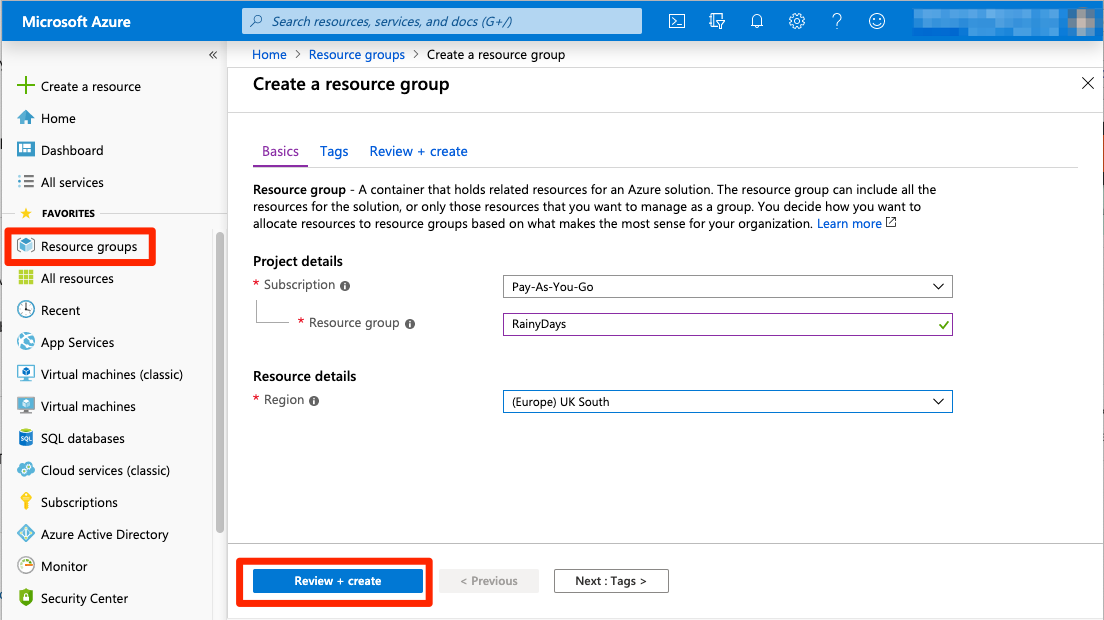
To create the Resource Group, go to "Resource groups" and then click the "plus" button to add a new resource. You will be taken to the "Create a new resource group" page where you can enter a name for your resource group, such as "RainyDays", choose a suitable region and then click "Review + create". Your resource will take a few moments to deploy.
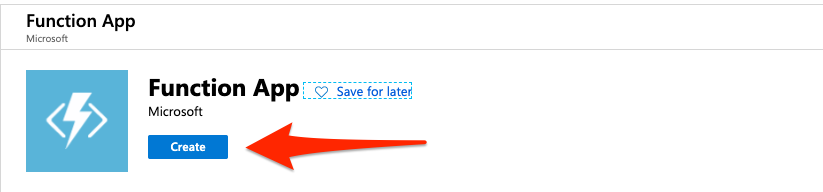
Once deployed, we can create a new "Function App" resource. Click the "Create a resource" button on the top left of the side menu. In the search bar, search for and select "Function App", then click "Create".
A "Create Function App” dialogue will come up and you will need to give the app a unique name. Add it to the Resource Group that we just created. Then set the "Hosting Plan" to "Consumption Plan", choose an appropriate location, set "Runtime stack" to ".NET Core". There are a few other tabs on this wizard; "Hosting" and "Monitoring" being the more important ones. You can leave everything as the default. Finally, click the "Review and create" button at the bottom of the form.
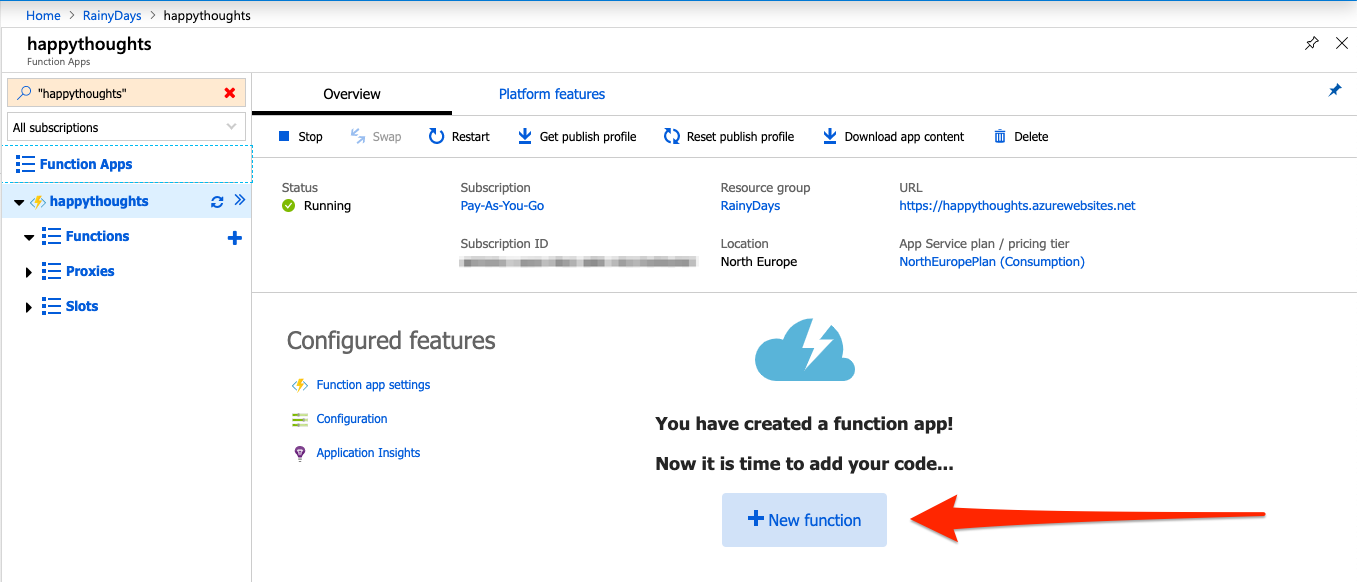
After a few moments, you should have a new Function App Service, which you can then navigate to. In the centre of the screen will be a button called "+ New function". Click on this.
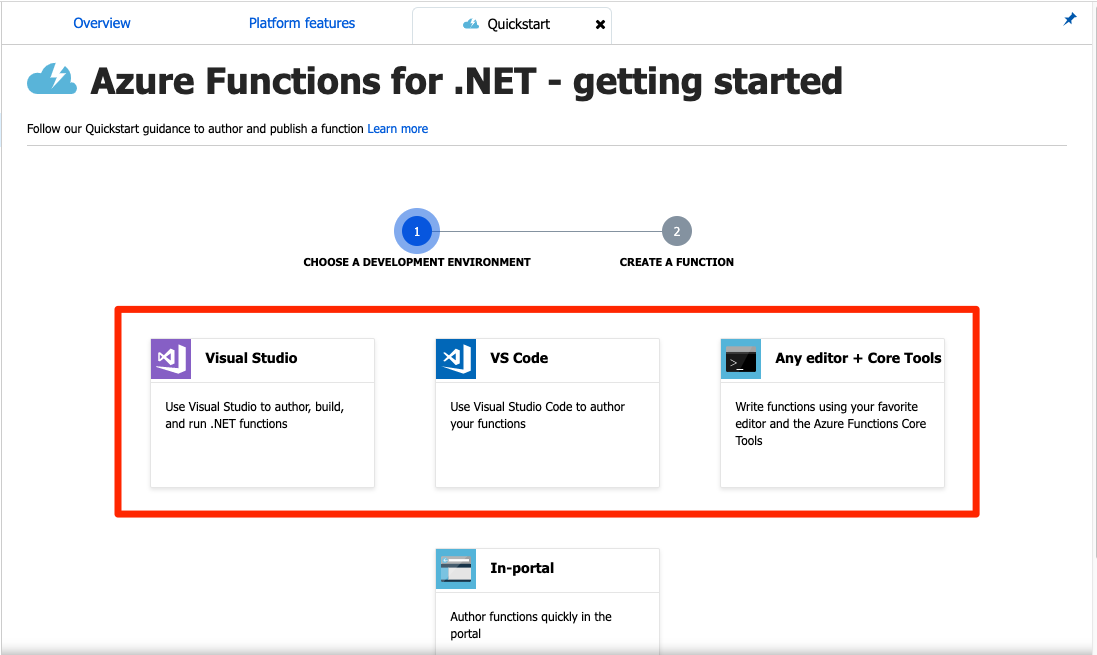
The next screen will give several options, choose the IDE that you are using and if it's not there just choose the "Any editor + Core Tools" option.
You should then be shown a very helpful "cheat sheet" with all the commands that you need to work with your project locally, using the CLI. Especially useful is the "Deploy your code to Azure" command, so you may want to make a note of that for later.
Now that we have the Azure side of everything set up, it's time to look at the code.
The Function App
Open up the solution that we cloned at the beginning of this post in your editor of choice. We will work on the master branch, the completed code is on the complete branch if you would rather see the finished solution.
We will focus on the code in src/Functions for this post.
Within this directory, we have two additional directories, Models and TableServices.
The Models directory contains TableConfiguration.cs and its interface for setting up the table storage dependency injection. It also has QuoteEntity.cs and Message.cs.
Table Storage structure and the "QuoteEntity" model
Table storage is a way to store NoSQL data in a structured way, with a schemaless design and a key/attribute store. For more information on how the data is structured, check out the docs here.
The model, QuoteEntity provided in the source code already, inherits from TableEntity. The overloaded constructor, public QuoteEntity(string phoneNumber, string quote), creates an object with all the properties needed to store it in a table store.
Writing to an Azure table store
To avoid duplicating code, we will use TableDbContext to talk to the Azure Table Store. This code is in the "TableServices" directory and already provided. We will use dependency injection, recently added to Azure Functions natively, to inject the context into the constructor of both our functions. This DbContext has already been registered to the IoT container in the Startup.cs file as seen below:
TableDbContext will handle all interactions with the table storage. It implements the ITableDbContext and has two private methods, CreateStorageAccountFromConnectionString, which ensures the table is created and GetRandom, which generates a random integer based upon the number of rows in a given collection.
Both the ILoggerFactory and the ITableConfiguration dependencies are injected into the class.
Let's implement the CreateTableAsync method first. We will use the private method CreateStorageAccountFromConnectionString() to validate the connection string and return a CloudStorageAccount object. We can then use this object to create a CloudTableClient object called tableClient which we can then use to create a table object, assuming that one doesn't exist already, and assign that to the CloudTable object called _table.
Next, let's implement the method that will write data to the table, InsertOrMergeEntityAsync.
First, we must check if the table already exists, and if not, call the CreateTableAsync method that we previously created. Next, we check if the incoming TableEntity argument entity is null and throw an error if it is.
If entity is not null, then we move immediately into a "try/catch" statement. Add the following code to the try{}:
In the above code, we attempt to use the TableOperation.InsertOrMerge(TableEntity entity) method provided in
Microsoft.Azure.Cosmos.Table library to create a table operation. We then execute the operation using _table.ExecuteAsync(TableOperation insertOrMergeOperation) method from the same library.
If all goes well, we are returned the created entity. If not we log any errors in the "catch".
The Inbound Function
Our first function, InboundFunction, is found in the "Functions" directory. It is an HTTP triggered function that we will invoke using a POST request from Twilio. The TableDbContext is injected into the constructor, so it is immediately available for us to use.
First, we will need to read the body of the request and write it to a string, so add the following line to the Run method:
We will need to extract the "From" number and the "Body" from the incoming request and map it to a Message model object. Message has a constructor available that will take the incoming request body as a string and map it for us.
Now we can create a new QuoteEntity, using the overloaded constructor and the From and Body properties of the Message object. This can then be passed to the InsertOrMergeEntityAsync method on our DB context, _tableContext which will create and save our new quote:
I would recommend adding some logging to the above code. If you would like to see how that's done, then check out the complete branch of the repo.
Writing to an Azure table store
We can now write data to our table store, but we also need to read it back out. Let's return to the TableDbContext and implement the remaining methods.
We want to be able to pick a random quote from our store and send it to all our friends. To do this we will need to bring back all the quotes as an array, create a random number based upon the length of our array, and then use that number to select a quote via its index.
But first, we need to check if the table exists!
Once we are sure that we have a table created, we can then, within a "try/catch" statement, create a new table query TableQuery<TableEntity>, execute that query, and then create an array from the result.
As a precaution, if the array is empty, we return a default quote.
If it is populated, we then use the private GetRandom method to return a random number based upon the length of the array.
This random number will then be used to select a quote via its index, casting the result to a QuoteEntity and returning that value. If something goes wrong, we log it in the "catch".
In addition to a random quote, we will also want a list of all the numbers that have texted a quote in. We can then use this list to send the random quote to all our friends, assuming your friends are sending in their happy thoughts to your app, too!
First, we again check if our table is created.
If it is, we can create our query from within a "try/catch" statement. We then create an empty list of type string, ready to populate with phone numbers.
Next, we will need to create a TableQuery object and execute this. Only this time, instead of creating an array, we will group by phone number, to ensure we only get each number once.
We can then iterate over our collection, adding the phone numbers to our newly created list:
The Outbound Function
Our second function, OutboundFunction, canalso found in the "Functions" directory. It is a function that is time-triggered based upon a schedule described by a cron expression. The TableDbContext is injected into the constructor and is available for us to use as a private attribute throughout the class.
We also fetch the Twilio phone number from settings, which we will set up soon, and assign it to the private attribute _phoneNumber, within the constructor.
Our Function cron expression is set to 0 0 10 * * *, which means it will fire at 10 am every day. If you would like it to fire differently, then this handy cheat sheet for cron expressions can help you.
We will be using Twilio to send our SMS messages. We will need to initialise the Twilio client within the Run method. The Twilio Account SID and Auth token will also be taken from settings.
We can now use our _tableContext to first fetch the list of phone numbers and then the random quote we wish to send.
The final piece of this code, is to iterate over our number collection and send the quote to each user phone number.
Setting the configuration
When developing locally, Azure functions rely on having all configuration within the local.settings.json file. You won't have this in your copy that you cloned from GitHub, as the .gitignore that comes with a function app excludes it. This is to ensure sensitive data isn't accidentally pushed to repositories. As a workaround, there should be a local.settings.demo.json file in the GitHub copy, so just rename that to be local.settings.json.
It is in this local.settings.json file where we will need to add all of the connection strings and secrets.
You can find the Table Storage connection string in the Azure portal.
Navigate to the Resource Group that we made earlier and click into the "storage account" which is used for our Table Storage. On the left-hand menu, click into "Access keys" and copy the "Connection string" listed against "key1".
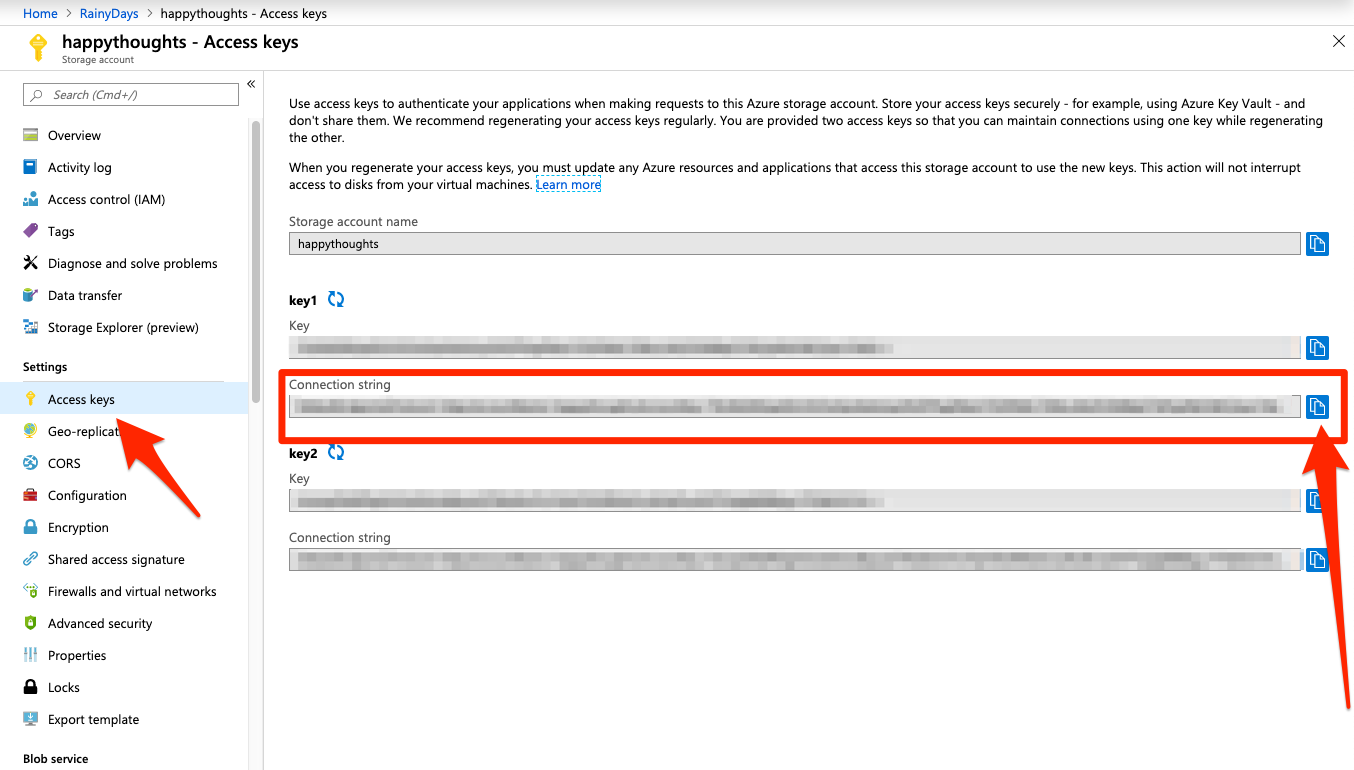
This connection string will be the value applied to the following three keys in local.settings.json; "StorageConnectionSettings", "AzureWebJobsStorage" and "TableStorage-ConnectionString".
Your Twilio Account SID and Auth token can be found on the Twilio console. Grab your Twilio number and set it as a value against the setting "PhoneNumber".
We are now ready to test our functions!
Getting up and running
Start your functions from your IDE or from within the CLI with the following command from the following location "~/DailyAffirmations/src/Functions":
Your function will start and you will receive the following message in the console telling you about the HTTP trigger endpoints.
We will want to wire the Twilio number to this endpoint using ngrok.
Setting up ngrok
ngrok creates a public facing URL that tunnels to our project running locally so we can test our endpoint without deploying to a server. Follow the instructions on the ngrok site to download and install it.
Once installed, run the following on your command line to start ngrok:
If your function isn't running on port 7071, then just update the above command with your port number.
You will then see an output similar to below.
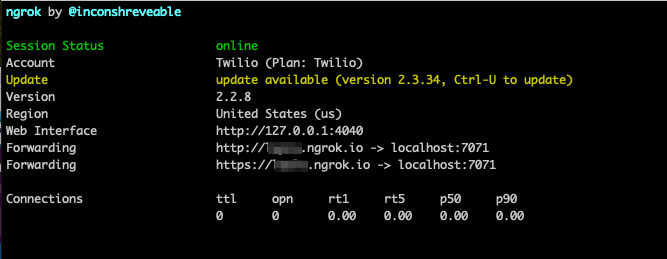
Copy the public-facing URL which should be along the lines of https://12345.ngrok.io.
To enable Twilio to make the initial request that fires off our string of events, we need to set up the webhook.
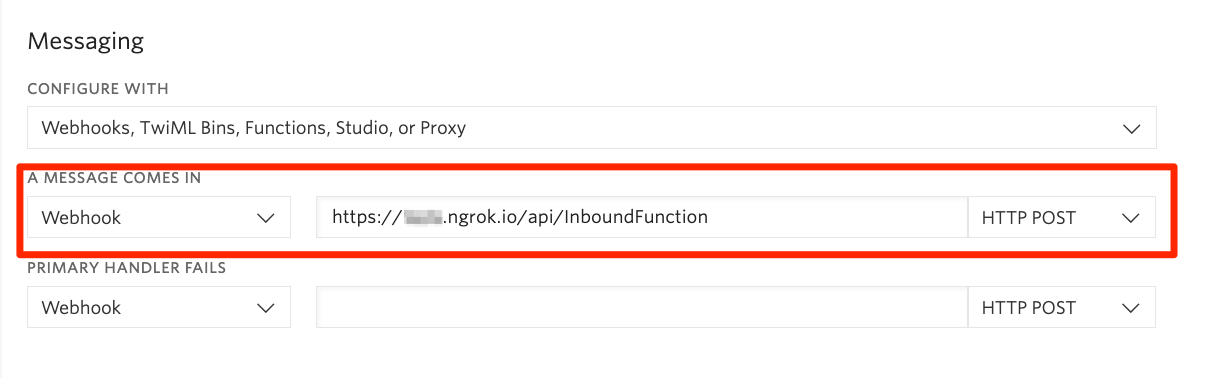
Go to the Twilio console and find the number that you added for this project. Next, add the API endpoint https://<NGROK_NUMBER>.ngrok.io/api/Inbound Function from ngrok and paste into the A MESSAGE COMES IN section, then save.
Now you can send an SMS with your inspiring thought as the message and it will be written to the table store.
Testing the timer trigger
We don't want to wait for our trigger to fire in order to test it… that only happens once a day! It's much more convenient to test it with an HTTP POST request.
For the purpose of testing, we’ll use Postman to create a new POST request to the following URL "http://localhost:7071/admin/functions/OutboundFunction", with "Content-Type" set to "application/json" and the body set to an empty JSON object {}.
Once you send this post you will receive an SMS with a happy thought!

Publishing to Azure
An easy way to publish your app is by using the Azure CLI. First, make sure you are logged into your Azure account with the command az login, which will open a browser and enable you to log in to Azure.
Then, from within "src/Functions" run the command we made a note of at the beginning:
Don't forget to add your app settings and update your Twilio endpoint to your Function app's URL.
What next?
We've seen how we can quickly receive an incoming SMS message and send out an email. A great update to the above code would be to add further logging and error handling. You could also add a third function that enables you to add your friend's numbers without them having to text a quote in.
Let me know what other cool ideas you have for Twilio SMS and Azure Functions. I can't wait to see what you build!
- Email: lporter@twilio.com
- Twitter: @LaylaCodesIt
- GitHub: layla-p


Related Resources
Twilio Docs
From APIs to SDKs to sample apps
API reference documentation, SDKs, helper libraries, quickstarts, and tutorials for your language and platform.
Resource Center
The latest ebooks, industry reports, and webinars
Learn from customer engagement experts to improve your own communication.
Ahoy
Twilio's developer community hub
Best practices, code samples, and inspiration to build communications and digital engagement experiences.