Receive an SMS and email it using Twilio SendGrid, C# and .NET Core
Time to read: 5 minutes
March 27, 2019
Written by

An apt business use for both Twilio SMS and Twilio SendGrid would be for customer enquiries on a website. Using C# and .NET Core 2.2 we will build an app that receives an SMS, takes the from number and the message body and send out an email using Twilio SendGrid.
To get started with this project you will need the following:
- A Twilio account (sign up for a free Twilio account here)
- A Twilio SMS-enabled number
- The .NET Core 2.2 SDK and runtime
- A Twilio SendGrid account (sign up for free here)
- A SendGrid API Key
- Visual Studio Code or similar code editor or IDE
If you would like to see a full integration of Twilio APIs in a .NET Core application then checkout this free 5-part video series I created. It's separate from this blog post tutorial but will give you a full run down of many APIs at once.
Creating the project
We are going to use the WebApi template project that comes with the .NET Core SDK, as a starting point.
From the command line, navigate to the location you wish to create the new application. Use the following command to create the solution and its containing folder, which we will call TextToEmail
The template comes with a demo controller called ValuesController.
Next, open the application in your preferred IDE.
I, personally, like to change the launchSettings.json file, found in the Properties folder of the solution. Changing the use of ports 5000 and 5001 and removing the sslPort assignation when running locally, as it seems to limit problems with self-signing certificates and the like.
To test your project, first change into the new directory using:
And then run the application using the following command:
You will see the following response in the browser when you navigate to localhost:<PORT_NUMBER>/api/values:
We will use a couple of NuGet packages in our solution so let's add those to the TextToEmail.csproj file.
Open the TextToEmail.csproj file and update it with the following lines:
Back in the command line, stop the project with CTRL + C, then run dotnet restore to ensure that these packages are downloaded and ready for use later.
The Twilio SMS webhook
We will need to create an API endpoint to act as a webhook for Twilio to use when a message comes in.
In the Controllers folder create a new file called TextController.cs and add the following code.
The above code will respond to an incoming SMS with a message containing the number the SMS came from and the body of that message. To try this our we'll need to use ngrok.
Setting up ngrok
ngrok creates a public facing URL that tunnels to our project running locally so we can test our endpoint without deploying to a server. Follow the instructions on the ngrok site to download and install it.
Once installed, run the following on your command line to start ngrok, replacing <PORT_NUMBER> with the port your application is listening on.
> ngrok http <PORT_NUMBER> -host-header="localhost:<PORT_NUMBER>"
You will then see an output similar to below.
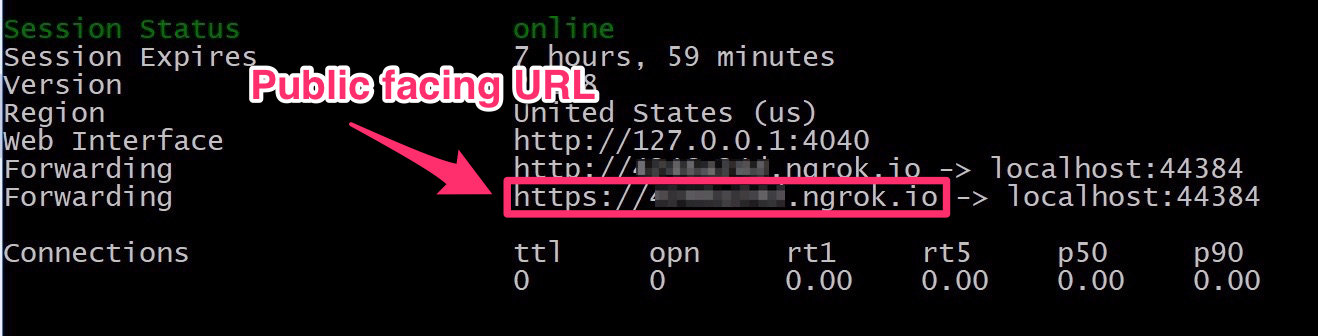
Copy the public facing URL which should be along the lines of https://12345.ngrok.io.
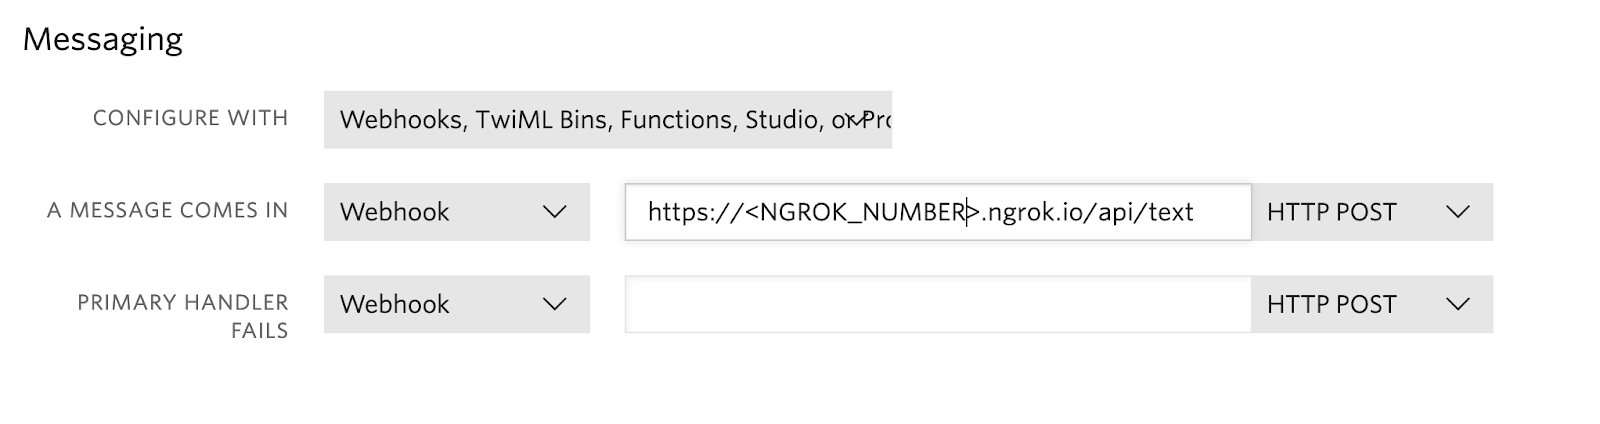
To enable Twilio to make the initial request that fires off our string of events, we need to set up the webhook.
Go to the Twilio console and find the number that you added for this project. Next, add the API endpoint https://<NGROK_NUMBER>.ngrok.io/api/text from ngrok and paste into the A MESSAGE COMES IN section, then save.
If you now run your project and send an SMS to your number you will receive the message containing the from and body information we set up in response.
Setting up the Email service
Now we have the contents of our SMS captured, we can create a service that handles the email side of our application.
Best practice, in my opinion, would be to create an interface for our service and utilise .NET Core's built-in dependency injection. For simplicity, we will create a simple class.
Let's create a new file called Emailer.cs in the root of your solution and add the following code to it:
In the above code, I have created a private readonly variable called _sendGridApiKey which we map our SendGrid API key to in the constructor below. For more information check out this blog post on how to set up an environment variable on your specific operating system.
Let's also create a class to manage all the properties we need to send our email. Add the following private class just below the constructor in our Emailer class. Be sure to update the code with your own email address and name.
We could also create a new file for this Email class and make it public. However, we will only be using it in the Emailer class, so we may as well leave it there for simplicity.
Next, let's add a private method called SendEmail just after the constructor in the Emailer class and add the following code to it:
This code initiates the SendGrid client using our API key, then it creates the email message, finally sending the email and returning a Response called response.
As this is a private method we will need to add a public method called Send just before the SendEmail method and add the following code to it:
This method will take our incoming from number and message body and create a new Email object. This email object then gets passed to the SendEmail method and awaits the response.
If the HttpStatusCode is Accepted we know that our email was sent successfully and we can return a relevant message. If it was anything else, we can return a message telling our user that we didn't receive their SMS properly and that they should try again later.
All that's left to do now, is to call our Emailer method from the TextController. Returning to the TextController.cs file, update the Post method with the following code:
Time to test it out
Run your solution again and then send an SMS message your Twilio number once more.
You will receive the "Thank you for your message, someone will be in touch soon!" in response and an email to the email account you specified.
Sometimes, your email provider might block an email for some reason. But you can see if your email was successfully received by SendGrid, even if it wasn't delivered, by checking out the activity section of your account.

Summary
We've seen how we can quickly receive an incoming SMS message and send out an email. A great update to the above code would be to add in some logging to the Emailer class so we can better debug when things go wrong.
Let me know what other cool ideas you have for Twilio SMS and Twilio SendGrid. I can't wait to see what you build!
- Email: lporter@twilio.com
- Twitter: @LaylaCodesIt
- GitHub: layla-p

Related Resources
Twilio Docs
From APIs to SDKs to sample apps
API reference documentation, SDKs, helper libraries, quickstarts, and tutorials for your language and platform.
Resource Center
The latest ebooks, industry reports, and webinars
Learn from customer engagement experts to improve your own communication.
Ahoy
Twilio's developer community hub
Best practices, code samples, and inspiration to build communications and digital engagement experiences.