Receive Faxes with Twilio, Python, and Flask
Time to read:
December 17, 2019
Written by
This post is part of Twilio’s archive and may contain outdated information. We’re always building something new, so be sure to check out our latest posts for the most up-to-date insights.

Wouldn’t you know it. As soon as we have sent our first fax, someone now wants to respond! Follow along as we quickly setup the means to receive faxes delivered as a PDF attachment via email.
Project Dependencies
We'll be using a Twilio Programmable Fax number, Python 3, Flask, and the Twilio Python Helper library as our core requirements.
Twilio
It’ll be difficult to receive faxes if we don't have a Twilio Fax-Enabled number, so if you do not already have one, head on over and sign up for a free account.
Once you have registered, buy a phone number in the console. Be sure to select the Fax capability!

Search for a number that meets your region criteria then press buy.
Python
To keep our libraries separate from the system libraries, we follow Python best practices and create a virtualenv and activate it:
Our project has several Python dependencies. Installation is as simple as:
Ngrok
Already excited for the prospect of running our code, we jump ahead of ourselves a bit and download and install ngrok by following their instructions. Ngrok will help us expose our web service to the internet, which will be required for Twilio to inform us that we have received a fax!
Flask Skeleton
Begin by creating a file called app.py. At the top, we'll list out all of the import statements we'll be using:
Flask Configuration
Next up, we create and configure our Flask application::
The SECRET_KEY variable is used by Flask to create secure user sessions. In a production deployment, it is a good idea to set the environment variable of the same name to a random string of characters, but during development you can leave that variable undefined and a new random key will be generated each time you run the application. The Twilio account SID and Token are imported from environment variables, which you will set later when running the application.
As we intend to email ourselves the incoming fax, we must configure our mail server settings! The MAIL_SERVER variable should be the fully qualified domain name (FQDN) of our SMTP server to which we submit our emails. The MAIL_PORT should be the port number on which that server is listening. Should our SMTP server support any type of secure communications, we may set the MAIL_USE_TLS or MAIL_USE_SSL variables to True. Next, we have our server’s login credentials which can be set with MAIL_USERNAME and MAIL_PASSWORD.
Finally if we wanted to send the fax to or from a different account, we could set the MAIL_TO and MAIL_FROM variables, otherwise the username will be used for both. If your email account login is not a full email address, then you will need to set these variables.
Fax Received Routes
We will be configuring our Twilio Fax number to send an HTTP POST request to a webhook informing us of this incoming message. There are two stages to this reception process:
- Twilio informs us via the HTTP POST request that a fax is being sent to our number. We may either accept or reject it.
- Assuming we accept it, Twilio sends us the details about the Fax in a follow-up POST request.
For the first request, Twilio expects a response in their TwiML format, which is based on the XML standard. We may either accept the fax with a <Receive> tag, or reject it with <Reject> tag, both enclosed in a top-level <Response> tag. In this initial POST request, Twilio includes To and From variables as form data, so we can use that information as the basis for our acceptance criteria if we so desired. The <Receive> tag must include an action with a link to our second route so that Twilio knows where to send the fax details to.
Considering we’ve told Twilio that we’re more than happy to accept the incoming fax, we now setup the route that receives it:
We begin by fetching the PDF file that Twilio has stored on their server. Next, we create an email message and add to it our PDF file as an attachment. We then submit this message via our configured mail server. Finally, we remove the Fax from Twilio using their Fax Resource.
Webhook Security
Currently we are accepting POST requests from anyone. We will blindly attempt to download a file and email it to a recipient. This is a gaping security hole and one that could be fixed by validating that the requests that are sent to our webhooks are in fact originating from Twilio servers.
Twilio includes a cryptographic signature in all requests that it sends. For an indepth look at how the signature is created, consider reading Securing Your Twilio Webhooks in Python. This signature must be validated to ensure that the origin is legitimate. Because both of our routes need this verification, we may factor this logic out into a decorator that will then be applied to both routes. Make sure the following code appears before the two routes in app.py:
If the request fails the signature check, it will abort with a 401 error code which means Unauthorized. Now that we have our validating decorator, we can apply it to both routes as such:
And:
Running the Application
In our existing terminal window with our activated virtualenv, it is time to run the flask application. Define all of the environment variables we referenced in the configuration section by dropping them in the appropriate places here, then start the application:
If you are following this tutorial on Windows, then use set instead of export to define your environment variables.
If you intend to use Gmail as your email provider, you will first need to generate an App Password. Once you have an app password to be used by this application, the following settings will allow you to send emails through that account:
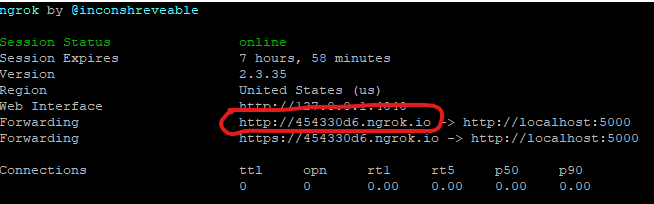
Assuming all went well, you will see the flask server doing its thing on port 5000:
Now because it's only listening on the localhost and because you're most likely behind a firewall or NAT of some type, it is time to launch the ngrok utility that we downloaded earlier.
In another terminal window, navigate to where you downloaded and extracted ngrok, then run:
This exposes an http tunnel to the internet, meaning that traffic that hits the URL created by ngrok is forwarded to port 5000 on your local machine, which just so happens to be where your flask server is listening!
Take note of the Forwarding URL that ngrok displays!
Twilio Configuration
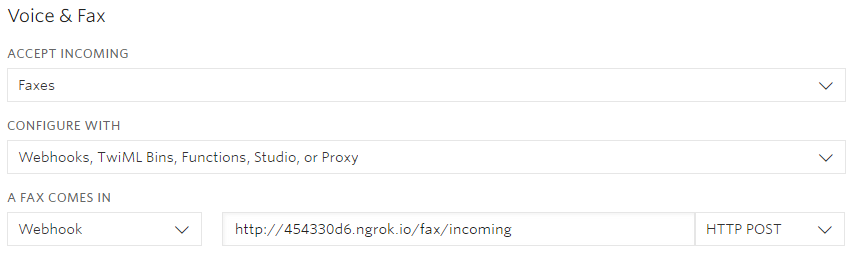
We must now configure our fax number within Twilio to send requests to our webhooks when a fax is received. Do this from the Twilio Console, by navigating to your number configuration. Change the “Accept Incoming” option to “Faxes”, and the “Configure With” option to “Webhooks, TwiML Bins, Functions, Studio, or Proxy”. Finally, in the “A Fax Comes In” section, select a “Webhook” as the primary handler with the Ngrok URL above with /fax/incoming added as a suffix.
Once you have saved the configuration, you are now able to receive faxes!
Disclaimers and Best Practices
Neither Flask's run command nor our usage of ngrok should be considered production ready. In lieu of the flask server, for a production deployment consider using a combination of uWSGI and Nginx.
Configure your firewall rules to expose your Nginx server on ports 80 and 443, and setup a domain name and a free SSL certificate from Let’s Encrypt for an easy to remember and secure URL.
Finally, you may want to setup systemd service unit files to make sure that all of the components (uWSGI, nginx) are enabled at boot and are always running.
Conclusion
Hopefully you've seen a portion of the power that Twilio, their Python Helper Library, and tools like Flask can provide.
All code can be found in github.
Thanks for your time, and I look forward to seeing what you build with Twilio!
Scott Sturdivant

Related Resources
Twilio Docs
From APIs to SDKs to sample apps
API reference documentation, SDKs, helper libraries, quickstarts, and tutorials for your language and platform.
Resource Center
The latest ebooks, industry reports, and webinars
Learn from customer engagement experts to improve your own communication.
Ahoy
Twilio's developer community hub
Best practices, code samples, and inspiration to build communications and digital engagement experiences.