Receiving and Responding to Text Messages with Server Side Swift, Vapor and Twilio
Time to read: 3 minutes
May 29, 2018
Written by

You’re building a Vapor app and want to be able to respond to SMS messages? Let’s walk through how to add Twilio SMS to the barebones Vapor “Hello World” app.
Swift Package Manager
For this project we’re going to use Swift Package Manager to set everything up and install dependencies. Make sure you have Swift 4.0 or greater installed before moving on. You can check your Swift version by running the following in your terminal:
Vapor has a convenient command line tool which can be used to generate templates for projects. Installing this will also take care of other necessary dependencies.
You can install it using Homebrew with the following command:
Now initiate a new Swift project with the following terminal command in the directory where you want your code to live:
This will generate a directory structure for your Swift project. By default it will name your project after the directory you ran the previous command in. My project was named Hello, so you may need to replace that in any of the commands or code further in this post that refer to your Swift project.
Next let’s get our dependencies set up. Open the file Package.swift and add the Vapor package to the code Swift Package Manager generated. My Package.swift looks like this:
Getting started with Vapor
We’re now ready to move on to writing some Swift code. From the base directory of your project, open the file Sources/Hello/main.swift and add the following code to it:
This is the bare bones “Hello World” Vapor application. It has one route that takes a GET request and responds with a simple string. With your Package.swift configured and your Vapor code written, run the following commands in the terminal to build and run the project:
This will install Vapor and all of its dependencies and will run your web application. Once it is running, visit http://localhost:8080/ to see a basic “Hello World” webpage.
Setting up your Twilio account
Before being able to respond to messages, you’ll need a Twilio phone number. You can buy a phone number here (you can get one for free).
Your Vapor app will need to be visible from the Internet in order for Twilio to send requests to it. We will use ngrok for this, which you’ll need to install if you don’t have it. In your terminal run the following command:
If you’ve just installed ngrok and that previous command didn’t work, you might have to run it like ./ngrok http 8080 from the directory that the ngrok executable is in.
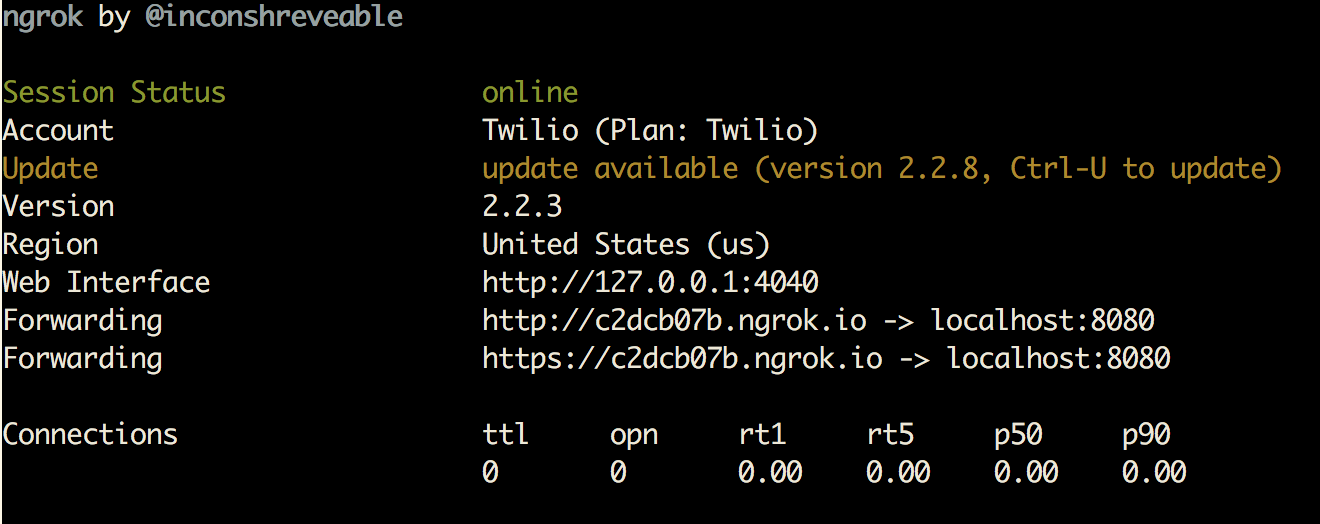
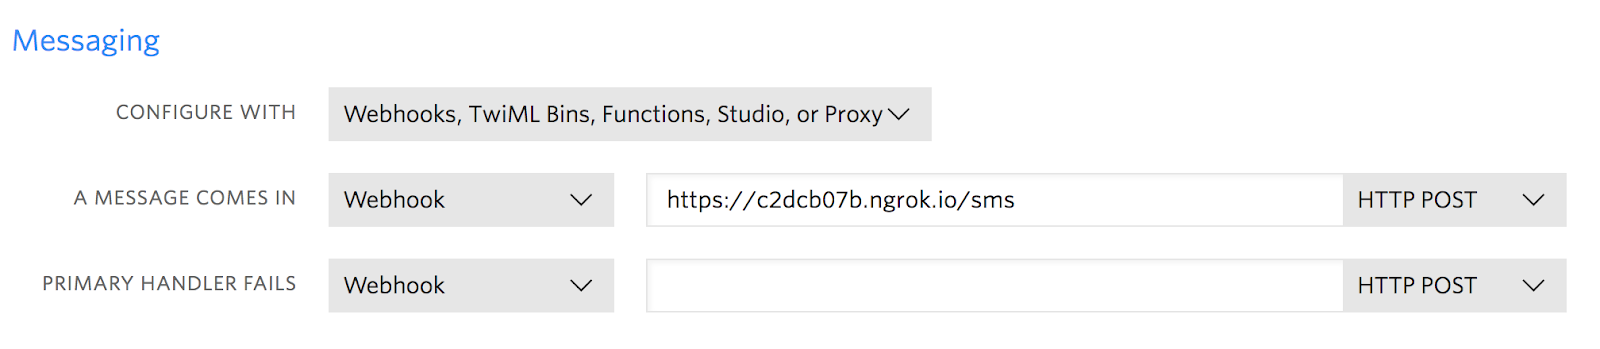
This provides us with a publicly accessible URL to the Vapor application. Configure your phone number as seen in this image by adding your ngrok URL with /sms appended to it to the “Messaging” section:
You are now ready to receive a text message to your new Twilio number.
Adding SMS to your Vapor app
Now that you have a Twilio number you want to allow users to send a text message to it and get a response. The next step is to handle the POST request Twilio will send when your number receives a text.
We only need one route on this app: /sms to handle incoming text messages. Let’s add another route. Replace all of the code in main.swift with the following:
In the new sms route we’re creating a string for the TwiML, and then putting it in an HTTPResponse object with a content type of XML. The Body tag in the XML string contains the text of the message we are responding with.
Build and run your server code again and try sending a message to your Twilio number!
What just happened?
With Vapor running on port 8080, sitting behind a public ngrok URL, Twilio can see your application. Upon receiving a text message:
- Twilio will send a POST request to
/sms. - The function associated with the
smsroute will be called. - This function responds to Twilio’s request with TwiML telling Twilio to send a message back in response.
If you want to do more with Swift and Twilio, you can check out these other posts:
- Sending text messages with Swift
- Making phone calls in Swift
- Handling phone calls with server side Swift
If you have any questions or other cool ideas, feel free to reach out and let me know:
- Email: Sagnew@twilio.com
- Twitter: @Sagnewshreds
- Github: Sagnew
- Twitch (streaming live code): Sagnewshreds


Related Resources
Twilio Docs
From APIs to SDKs to sample apps
API reference documentation, SDKs, helper libraries, quickstarts, and tutorials for your language and platform.
Resource Center
The latest ebooks, industry reports, and webinars
Learn from customer engagement experts to improve your own communication.
Ahoy
Twilio's developer community hub
Best practices, code samples, and inspiration to build communications and digital engagement experiences.