Send Recurring Emails using C# .NET and Hangfire with SendGrid
Time to read: 7 minutes
July 05, 2022
Written by
Reviewed by

Sometimes you need to send out emails at a certain interval - monthly, weekly, daily, or even more frequent. To run jobs on a time interval, you can use operating system tools like cron jobs on Linux or the task scheduler on Windows. Alternatively, you can create your own long running application that schedules the jobs for you. However, developing a robust job scheduler is not an easy task. Luckily, there are some great libraries that take care of this for you like Hangfire.
In this tutorial you will learn how to send recurring emails using Hangfire and the SendGrid Email API.
Prerequisites
You will need a few things to follow along:
- A Twilio SendGrid Account. Sign up here to send up to 100 emails per day completely free of charge.
- An OS that supports .NET (Windows/macOS/Linux)
- .NET 6.0 SDK (newer and older versions may work too)
- A code editor or IDE (Recommended: Visual Studio Code with the C# plugin, Visual Studio, or JetBrains Rider)
- Some experience with ASP.NET Core
- An email address for testing
Configure SendGrid
To use SendGrid, you have to configure two things; the Email Sender and an API Key. The Email Sender verifies that you own the email address or domain you want to send emails from. The API Key lets you authenticate with the SendGrid API and gives you the authorization to send emails.
Configure the Email Sender in SendGrid
To quickly get started, you will use Single Sender Verification for this tutorial. This verifies that you own the email address that the application will send emails from. Single Sender Verification is great for testing purposes, but it is not recommended for production.
Log in to the SendGrid app, navigate to the Settings section and click on Sender Authentication. Click on Verify a Single Sender. You should see a screen that looks like the one below.
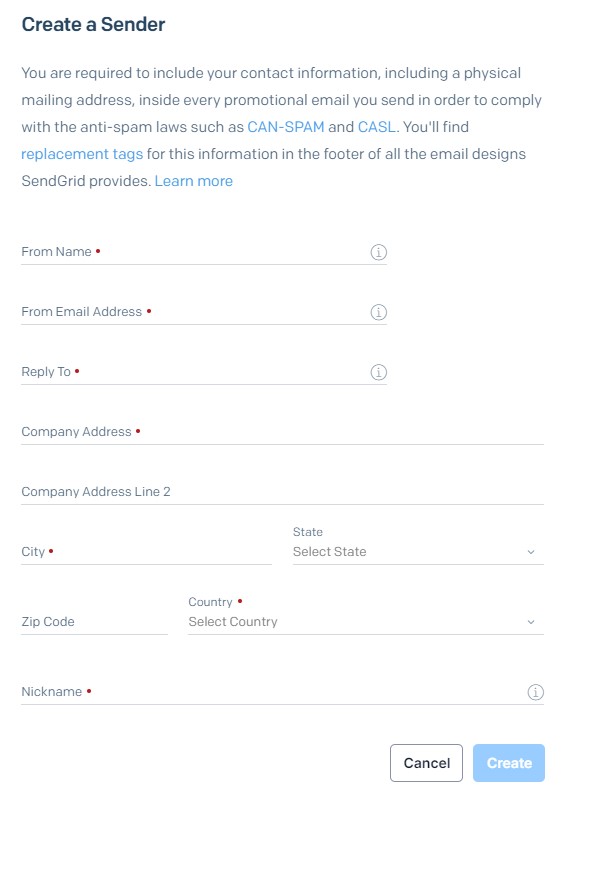
Fill out the form and click Create. Once the fields are filled, A confirmation email is sent to the email address you entered in the From Email address field. Go to your mailbox, find the email and click the Verify Single Sender button (like the one below) to complete the process.

Navigate back to the Sender Authentication > Settings Page. The Single Sender Verification section should show your email address with a verified status.
Generate the API Key
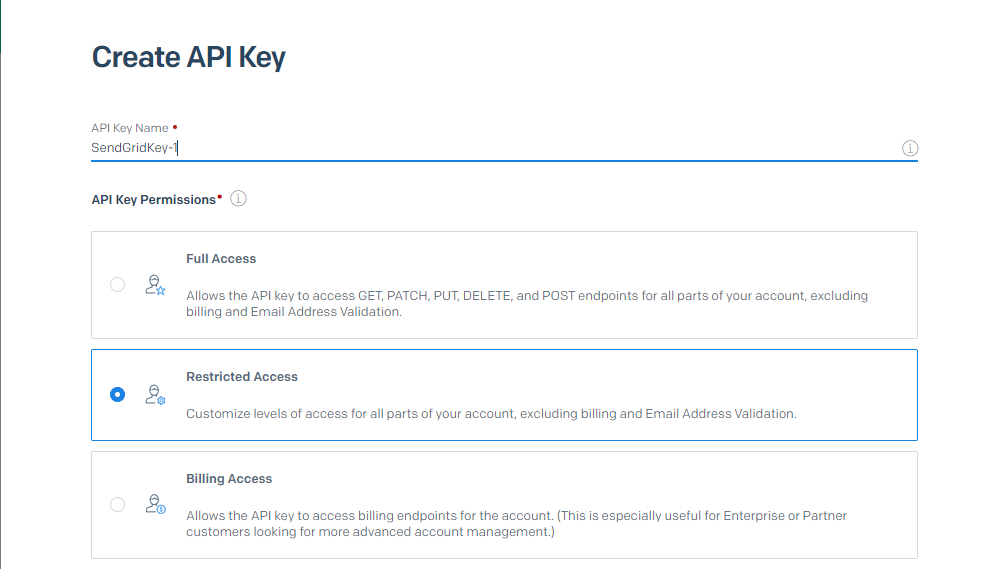
Navigate to the Settings section and click on API Keys. Click on the Create API Key button on the top right of the page to continue.
On the Create API Key page, fill out the API Key name and set API Key Permissions to Restricted Access.
Scroll down to the Mail Send and click to reveal the permissions underneath it. Drag the slider on Mail Send to the left.
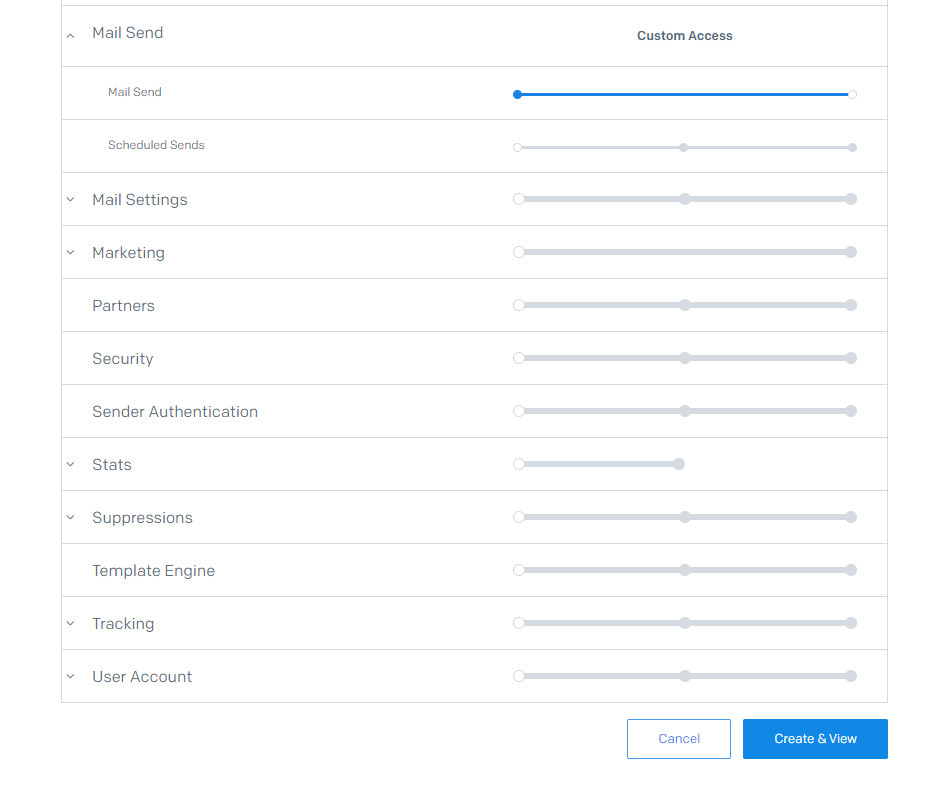
Continue with the Create & View button.
SendGrid will now show you the API Key. Make sure to copy it somewhere safe. The API Key will not be shown again so if you lose it you'll need to generate a new one.
Click the Done button.
With the Sender verified and API Key generated, it is time to build your .NET application.
Create your .NET Application.
Run the following command to create an empty ASP.NET Core app.
Then open the RecurringEmailService folder in your code editor.
Integrate Hangfire into the .NET application
What is Hangfire
Hangfire is a framework for managing background jobs in .NET. The Hangfire framework does the setup, creation, and managing (e.g. retries) of these background jobs. There are several types of background jobs that can be specified using the Hangfire framework which include a fire-and-forget, a delayed job, batch job, recurring job, etc.
You will use a recurring job in this tutorial. You can check out the official docs for differences between these background jobs and how to set them up.
A critical part of the Hangfire framework is persisting the background job information between app restarts. This is done by hooking the Hangfire framework to persistent storage like SQL Server, Redis, SQLite, etc. depending on your business needs. This way, restarting your app does not affect already set up jobs.
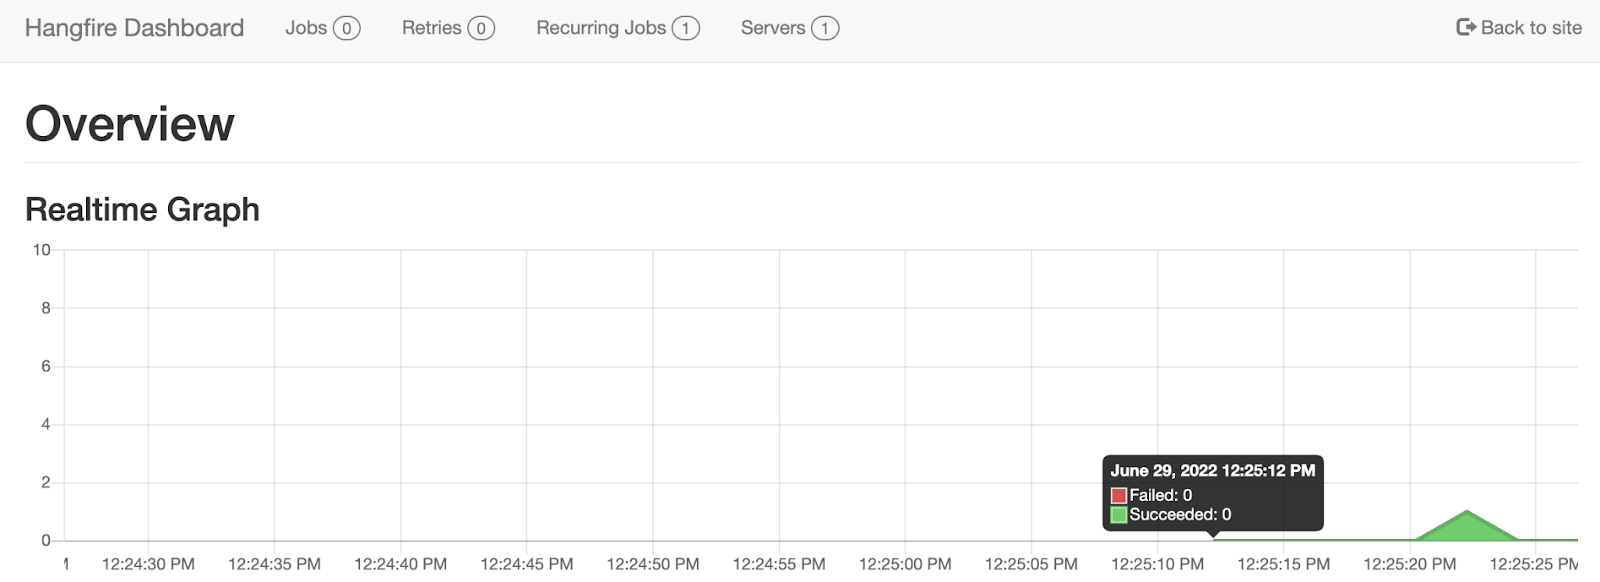
With Hangfire, you have access to a dashboard which gives you analytics on the background jobs. You can also see the different kinds of background jobs that are scheduled, recurring, failed, and succeeded. You can see how many times Hangfire retries a job, and you can also manually retry a job using the UI. In this dashboard you can also see on which servers Hangfire is running, which in your case will be only one, but you can host Hangfire on multiple servers to increase the amount of compute power that can be used to run the jobs.
Install Hangfire packages
To begin using Hangfire, you have to add these packages to your project; Hangfire.Core and Hangfire.AspNetCore for adding the core capabilities and hosting integration, and Hangfire.InMemory which allows Hangfire to store background jobs in memory.
Run the following commands to add the packages to your project:
Then, Update Program.cs file with the code below
Line 5-8 configures the in-memory storage for Hangfire using the default configuration.
Line 10 sets up the Hangfire server.
Line 14 maps the Hangfire dashboard to the root / path.
Next, schedule a simple job in Hangfire.
Schedule a Job with Hangfire.
To test out the Hangfire implementation, you will write a job to be triggered every 15 seconds.
Update the Program.cs file according to the code below:
The RecurringJob.AddOrUpdate method creates a recurring background job and accepts two parameters; the job which is a lambda, and the interval to trigger the job. In this case, the interval is specified using a cron expression /15 * * * * * which means to run every 15 seconds. A cron expression is a string of six or seven fields that are separated by whitespace and specifies the details of a schedule, e.g. 0 0 12 * * ? will fire at 12:00 PM everyday. Hangfire uses their own open-source Cronos library for generating and parsing cron expressions.You can learn more about the cron format that Cronos uses in their readme.
You can pass any lambda into the different job scheduling methods, however, by specifying EmailJob as the generic type in the RecurringJob.AddOrUpdate method, Hangfire will request the services from the Dependency Injection (DI) container, instantiate an EmailJob object injecting the services into the constructor parameters. Then Hangfire will invoke the lambda passing in the EmailJob object.
The advantage of using a class to run your job is that you can better organize your code and Hangfire will inject those services from the DI container into your constructor parameters.
The EmailJob class has a method, SendEmail, which will send an email in the future, but for now simply logs information. When Hangfire invokes the passed in lambda, it will call the SendEmail() method.
The last part of the code is on line 17 and 21 which changes from app.Run() to await app.StartAsync() and await app.WaitForShutdownAsync(), this way you have access to the configured services and can run a piece of code between the host starting and when a shutdown is triggered.
Run the dotnet run command to start the app.
Information like the one below should be shown.
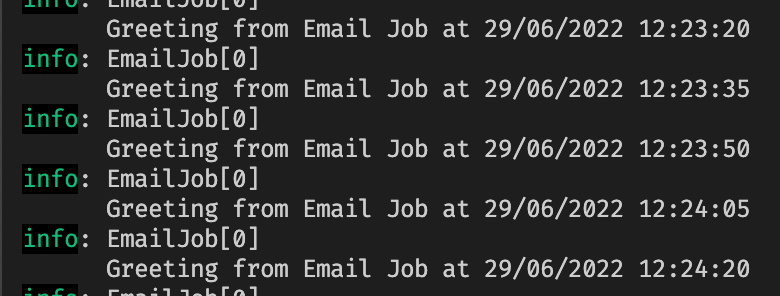
Now, navigate to the url shown in the console e.g. http://localhost:5282 to view the Hangfire dashboard.
Stop the app using Ctrl+C.
Next, set up an emailing job using SendGrid.
Integrate SendGrid to send emails
Install SendGrid packages and configure the SendGrid API Key
Install the SendGrid and Dependency Injection NuGet package using the following commands:
The SendGrid package will be used to send out the emails and the DI package will add the SendGrid client to the DI container. To learn more on the capabilities of the SendGrid package, check out the SendGrid C# .NET GitHub repository.
Next, you will add the SendGrid API key as a user secret.
You can store secrets and keys as user secrets during local development. User secrets are key-value pairs and in this case the user secret name will be SendGridApiKey and the value will be the API key you created in the Generate Api Key section.
Run the following command to initialize user secrets in your app.
Then, run the following command to configure your SendGrid API key.
Replace [YOUR_SENDGRID_API_KEY] with the API Key you copied earlier.
In the next section, you will update the EmailJob so that it will send an email.
Send an email in your Hangfire job
Add the following code to the Program.cs.
This adds the SendGrid dependencies to the DI container and configures the SendGrid library with your api key. On line 10, the user-secrets that is set earlier is accessed using the key SendGridApiKey.
Next, update the EmailJob class with the code below to use the SendGrid service to send an email.
Update the placeholders:
- replace [SENDER_EMAIL] with the Sender email address you verified on SendGrid.
- replace [SENDER_NAME] with your name.
- replace [RECIPIENT_EMAIL] with the desired destination email address.
- replace [RECIPIENT_NAME] with the name of the recipient.
The EmailJob constructor has been updated to accept another parameter, ISendGridClient sendGridClient which will be injected by the DI container.
The SendEmail method on line 39 sends email to the desired recipient using the SendGrid.SendGridMessage class to configure the email to be sent. Then the sendGridClient.SendEmailAsync method is used to send the email. If the response is successful, a success message is logged. If not, an exception is thrown which will let Hangfire know that the job failed.
Hangfire will automatically retry running the job up to 10 times, but you can change the retry behavior if desired. You can also use the Hangfire dashboard to find your job and tell Hangfire to retry it.
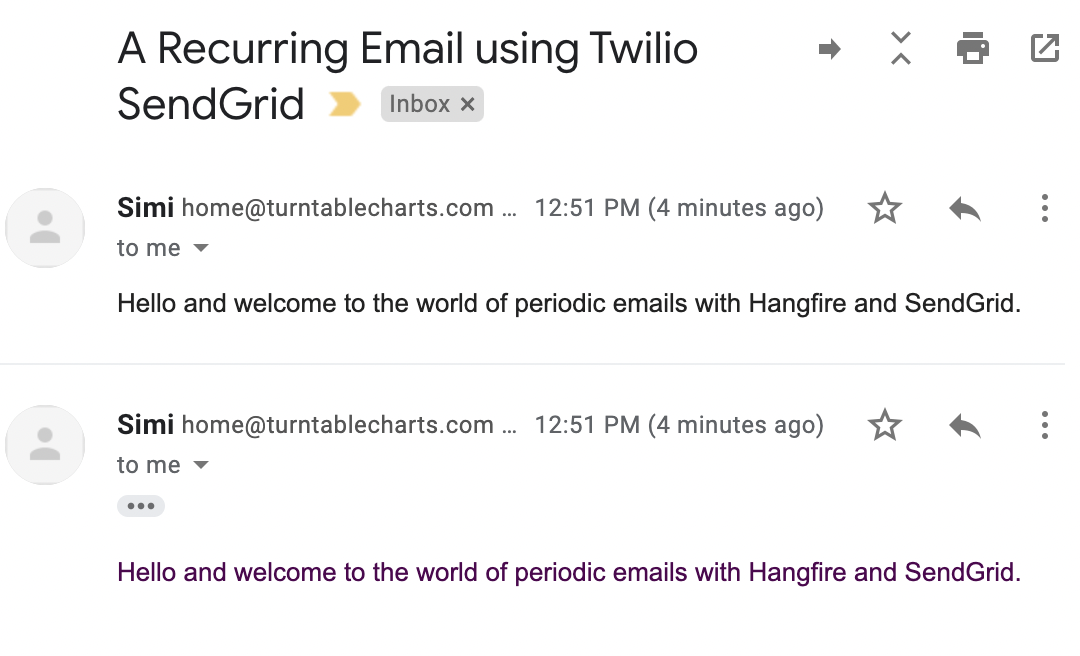
Run the application with the command dotnet run.
The result in the recipient email should look like this.
Conclusion
In this tutorial, you learned how to use Hangfire to run background jobs that send emails at certain time intervals.
Using what you learned here, you could develop other background jobs like sending quotes to your subscribers every day, using the SMS Messaging API to send yourself cute cat pictures every morning, etc. If you want to send SMS instead of emails, check out how to send an SMS Message with C# in 30 Seconds.
Additional Resources
Check out the following resources to learn more about the tools used in this tutorial.
Hangfire website and documentation - your used an sqlite and worker services in this tutorial to setup a recurring background job, but in the documentation you could learn more about setting it up for web application, using other storage systems and also the different kinds of background processes that could be specified,
SendGrid Email SDK in C# - you can check out the source code for the SendGrid Email SDK, the different capabilities present and also how it differs from making calls over HTTP as seen in the SendGrid API reference docs.
Source Code for this tutorial on GitHub - use the source code if you encounter any issues while following along the tutorial.
Related Resources
Twilio Docs
From APIs to SDKs to sample apps
API reference documentation, SDKs, helper libraries, quickstarts, and tutorials for your language and platform.
Resource Center
The latest ebooks, industry reports, and webinars
Learn from customer engagement experts to improve your own communication.
Ahoy
Twilio's developer community hub
Best practices, code samples, and inspiration to build communications and digital engagement experiences.