Running a Mailing List with Airtable, Twilio SendGrid and Python
Time to read:
June 15, 2020
Written by

Mailing lists are the heart of many communities. They help community members be organized and up-to-date with all the communications and updates happening inside the community. Airtable is an all-round software which acts both as a spreadsheet and a database. In this post we’ll use Airtable to collect email addresses of members in the mailing list. We’ll use Airtable’s API to fetch the data and send emails to members using SendGrid’s powerful email API, all done with Python. So, lets get on to it!
Tutorial Requirements
- Python 3.6 or newer. If your operating system does not provide a Python interpreter, you can go to python.org to download an installer
- A free Airtable account. Signup here.
- A free Twilio SendGrid account. Signup here.
Setting Up a Python Virtual Environment
Before we kick off, let’s create a Python virtual environment to start clean. We’ll be making a folder and a virtualenv inside the folder. We’ll then install the following packages to use with this project:
- sendgrid Python SDK
- markdown2 for converting the content body in Markdown to HTML
- airtable-python-wrapper for using Airtable’s API in Python
- python-dotenv for loading environment variables from a
.envfile
If you are using Linux or MacOS, enter the following commands:
On Windows Systems the commands are:
For further specifics, the versions of the packages that I have tested for this project are:
We’ll create a .env file (note the leading dot) where we will store the environment variables that will serve as configuration for our project:
For now you can set the FROM_ADDRESS variable to the address you will want emails to be sent from. We’ll set the remaining variables later.
Airtable Setup
Airtable gives you the power of a super-flexible database to connect your information—and design the perfect workflow—all in one place. In this sections we’ll do the following:
- Create a New Base and Table
- Use the Form view of Airtable
- Get the Airtable API Key and Base ID
Creating a new Base and Table
So what is a base? As per Airtable’s docs, a Base is “a database that contains all of the information you need for a specific project, and is made up of one or more tables.”
Once we login to Airtable we will be advised to create a Workspace. A workspace is a collection of bases. You can learn more about workspaces, bases and tables here.
You’ll already have a workspace with a few new bases to get you started like the image. We’ll create a new base for starting our project.
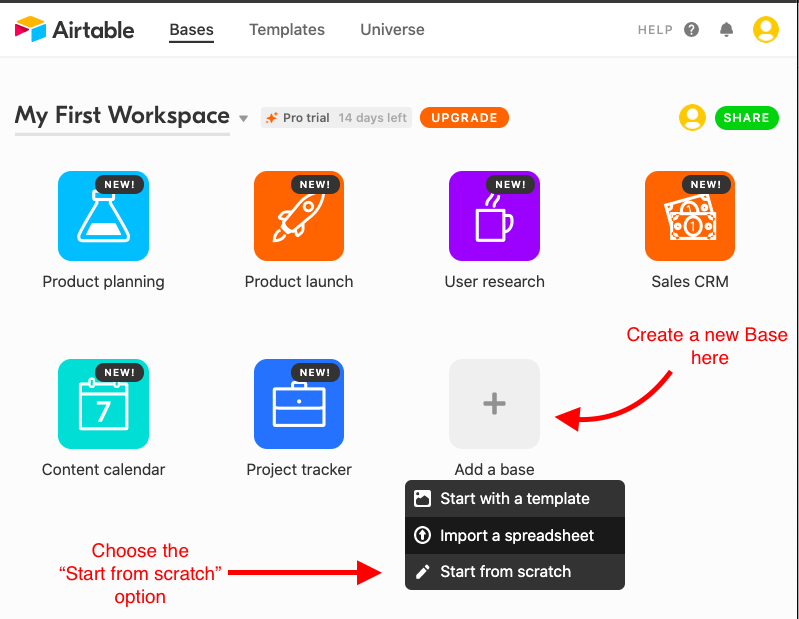
Name the base as your wish. I’ll be using the name “Mailing List”. Once you create the base and name it, you can click your new base and you’ll see a blank spreadsheet as in the image below.
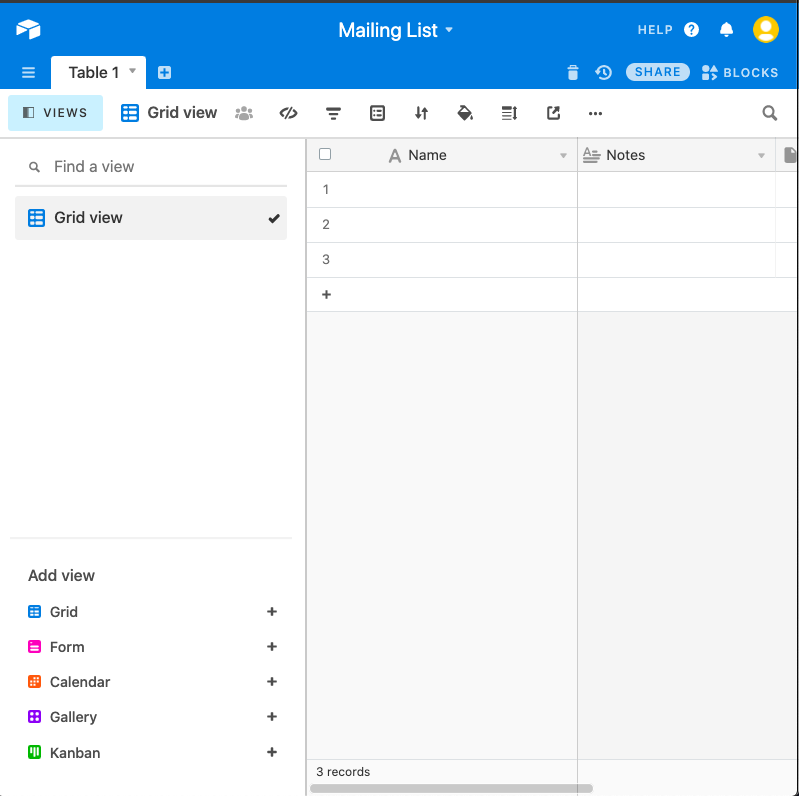
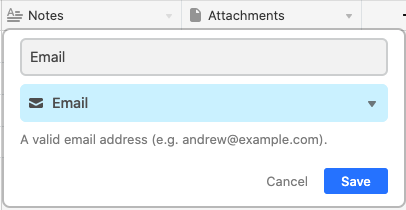
Now we need to rename the table and fields for our use case. First we’ll rename the “Notes” field to “Email” field and set its type also to “Email’. We can do that by clicking the dropdown button in the field name.
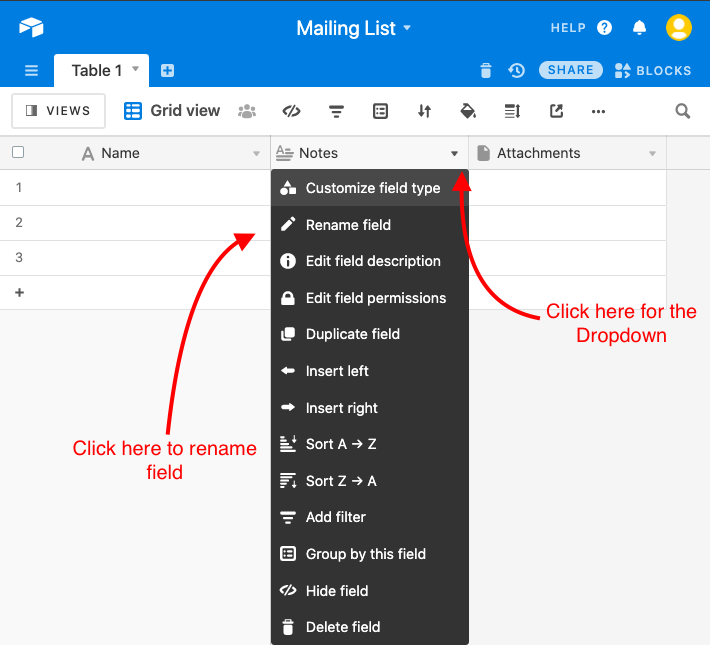
You can change the field name and select the field type from the dropdown. Select the “Email” type from the dropdown.
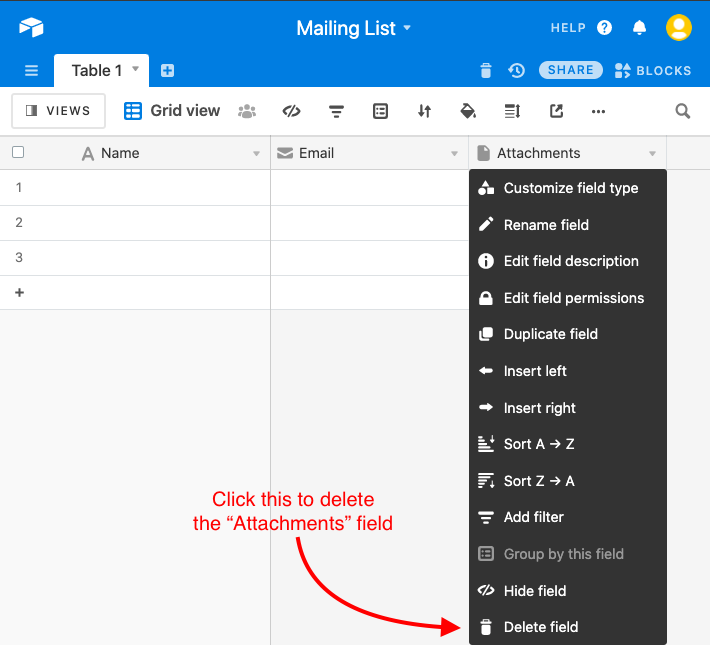
Next we’ll delete the Attachments field, which we don’t need. Click on the dropdown button on the field header and select the “Delete Field” option.
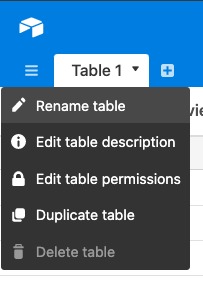
The table in our base is called “Table 1”. Let’s rename it to “List”. Click the dropdown button next to the table name to access the rename option.
Since we will need this name in our Python script later, let’s set the name of this table in the “AIRTABLE_TABLE_NAME” variable of our .env file:
Creating a Form for Collecting Emails
After we have done all this, we just need the data. To add email reciepents we can manually enter the data person by person in the spreadsheet, or we can make an Airtable form. Yes, Airtable has this wonderful feature to turn a table into different things, such as a form, a kanban board, a gallery view, etc. This feature is called Views and as the name says it, it formats the data in different ways. We’ll be using the form view for collecting data. If you don’t see the “Views” sidebar on the left, click the “Views” button to display it.
You can select the “Form” option under “Add view”, and you’ll be taken to a form builder page where you can customize the form and share it.
Feel free to edit the form to your liking. Once you are done, you can share it by clicking the “Share Form” button on the top. You’ll get a URL for the form that you can give to your friends, and each time the form is submitted a new row will be added to the table.
You may have noticed that the table was created with three empty rows. You can delete these rows if you like, but I recommend that you leave at least one and set a test email address that you can use later. Make sure there are no empty rows left in the table.
Getting Airtable API Key and Base ID
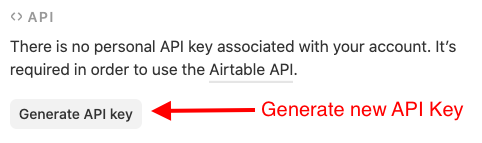
In this section we are going to retrieve the Airtable API Key and the Base ID, both of which we need in our Python script as we’ll see later. To get your API key, open your Airtable Account Settings page and scroll down to the “API” section. Click “Generate API Key” button to create an API key for your account.
Once you have the API key, you can copy it to your clipboard and paste it in the AIRTABLE_API_KEY variable of your .env file.
Now we need to get the “Base ID” of our Airtable base, which we can find in the Airtable’s API page. This is a page that shows all your bases, along with API documentation to access them programmatically.
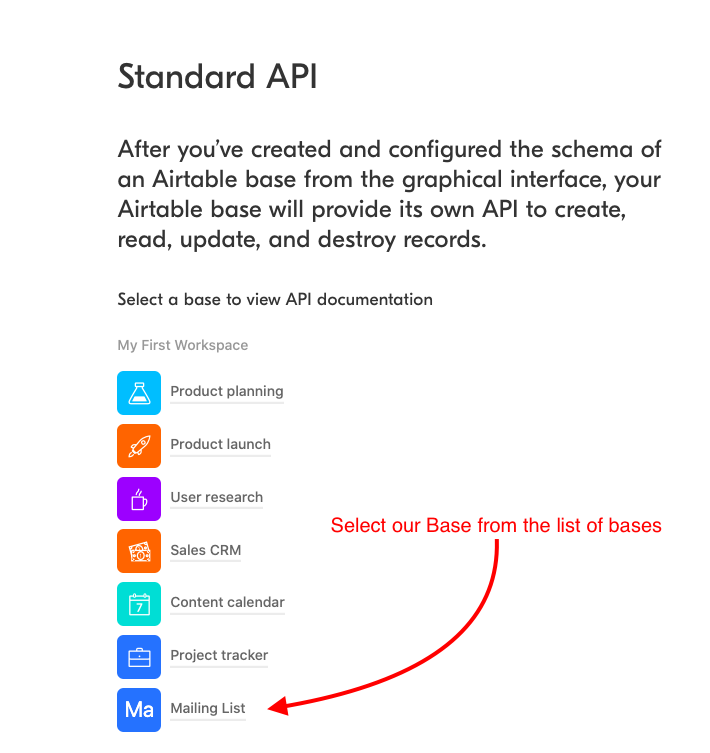
Select the “Mailing List” base to open its documentation page. In the “Introduction” section of the generated documentation you will see the ID of your base.
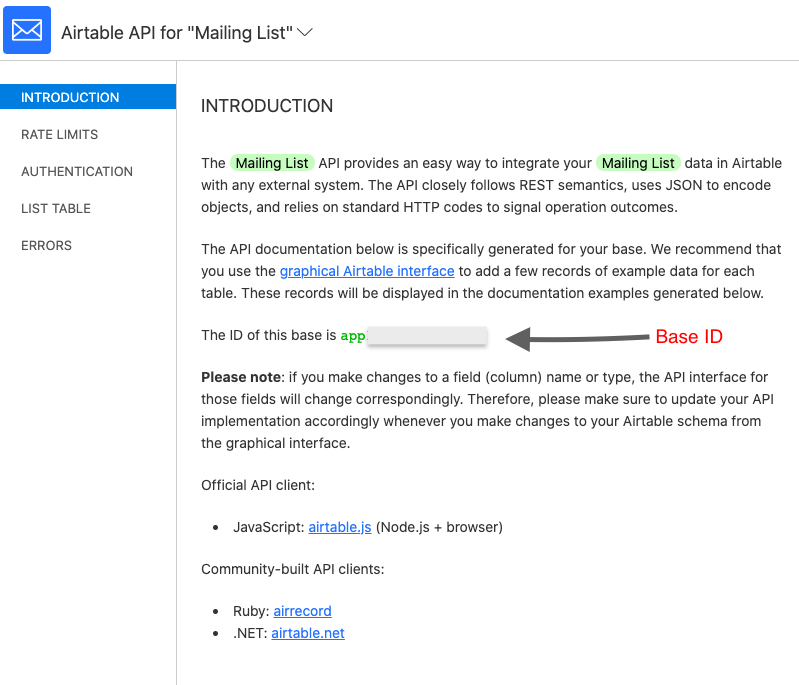
Copy the Base ID and Save it in the .env file as the value of the AIRTABLE_BASE_ID variable.
Getting the Credentials from Twilio SendGrid
In this section we will generate a Twilio SendGrid API key that we will use to send emails to our recipients.
Creating a Twilio SendGrid Account
Follow these steps to set up your SendGrid account if you don’t have one already.
- Create a Twilio SendGrid account from this page.
- Enter a Username, Password and an Email Address.
- Create and Verify your account.
Creating and Getting the API Key
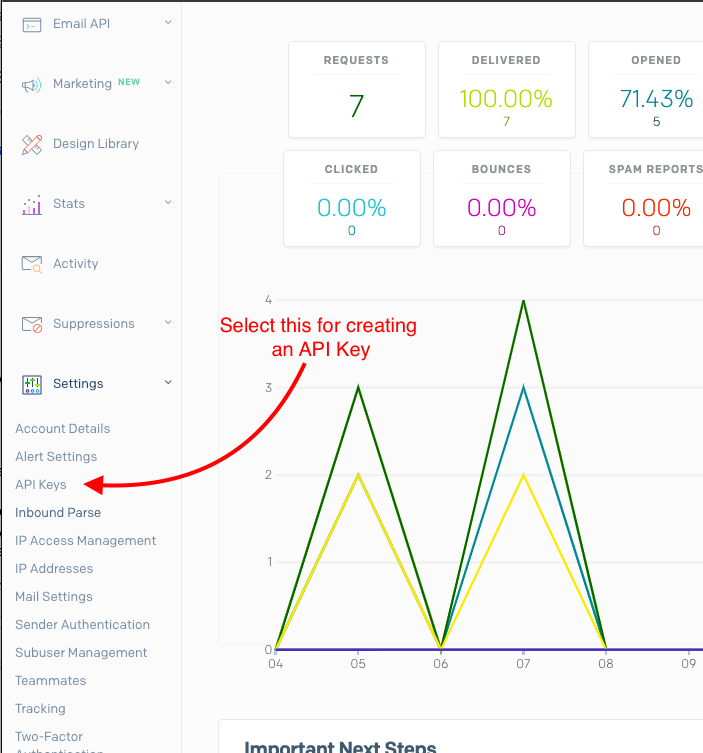
Once you have created and verified your account, navigate to your Dashboard. In the side navigation bar you’ll see a “Settings” drop down and select the “API Keys” button.
Create a new API Key from the “Create API Key” button.
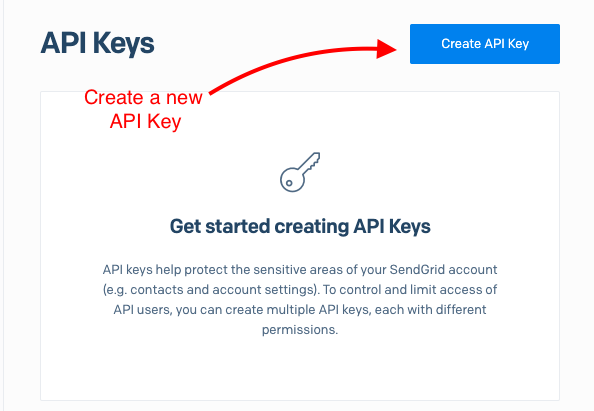
Once you’ve given the API Key a name, select the “Restricted Access” radio button and move the slider to the “Mail Send” scope.
Once you have done this, you’ll get an API Key that you can save in the .env file as the SENDGRID_API_KEY variable. Note that if you lose your key you will need to create a new one, as SendGrid only shows you the key during creation.
Writing the Script
We are going to write a script which will do the following:
- Getting the Emails from Airtable,
- Getting the Content from a markdown (
.md) file, - Sending Emails using the Twilio SendGrid API.
We’ll be using environment variables from the .env file to load all of the credentials and configuration.
Getting Recipient Emails from Airtable API with Python
To begin our Python script we will be getting the recipient emails via the Airtable API.
Before we start, make sure your .env file the following variables set:
AIRTABLE_BASE_IDset with the Base IDAIRTABLE_API_KEYset with your Airtable API KeyAIRTABLE_TABLE_NAMEset with your Airtable Table Name
We’ll now create a new file called mailer.py, which will eventually contain the whole application. For now, we’ll define a get_emails() function that retrieves the emails from Airtable.
The function arguments in get_emails() are the base id and the table name, and they will be passed by the main function. The AIRTABLE_API_KEY environment variable is automatically used by the Airtable client. The value stored in the airtable_emails local variable will have the following structure:
We iterate over the contents of the airtable_emails list and generate the emails variable, which will be a simple list with the email addresses, such as ['abc@xyz', 'efg@xyz’]. Here is how we can call this function in the console:
Getting the Content for the Email
SendGrid makes it possible to send HTML content in emails, but writing HTML for an email is a tedious experience. We are going to use Markdown instead. Markdown has a very easy syntax and a very short learning curve.
For rendering Markdown we will use the markdown2 Python package. It takes in a Markdown file and renders it to HTML. Our Markdown files will have content with a front matter section, like Jekyll.
As an example content file with front matter, write the following contents in a content.md file:
The content between the --- and --- is considered front matter and our script only checks for a subject in this section.
Add the following import and function to render a Markdown file in mailer.py:
The render_markdown() function reads a Markdown file and returns the rendered HTML content, along with the metadata or front matter.
Here’s a demo from the Python shell:
Sending the Emails with Twilio SendGrid
Now we need to send the emails using the Twilio SendGrid’s helper library for Python. The logic here is to get all the email addresses by calling the get_emails() function shown earlier and iterate over the addresses and send each one an email.
The code looks like this:
The arguments in the function are the basic things we need for an email. These include the from address, subject of the email, content of the email, and the list of emails we’ve got from Airtable.
The main thing we’re doing in the above snippet is that we’re iterating over the list of emails with Python’s enumerate function, for which you can read more about it here. The enumerate function allows us to loop over the emails and have an automatic counter. This counter can be used for logging.
The email content is composed of the content we receive in the content argument plus an unsubscribe link. The SendGrid client automatically authenticates using the SENDGRID_API_KEY environment variable, so make sure your ’env file has this variable set. Because we want to make sure the application does not crash, we’re using a try-except statement around the sending of the email.
Writing a CLI for Reading the File
We need to read the markdown file for the content and it’s easy to add the content by just giving the filename when executing the script. We’ll use the argparse module to parse our command line arguments.
The argparse module has a handy tool for working with files, notice the type=argparse.FileType("r"). We are specifying that the “content” argument is a file and therefore argparse needs to load the file and create a file object. Later in the script we can access the file object as args.content.
Writing the __main__ script
Python has this feature called “top level execution”. A module’s __name__ is set equal to '__main__' when read from standard input, a script, or from an interactive prompt. This makes it easier to work with scripts where we can specify an entrypoint for execution.
Our __main__ will be responsible for loading the environment variables, the emails and the content, and then to send the emails.
You can read more about __main__ and top-level execution in Python here.
Here we’re loading all the environment variables from the .env file with the python-dotenv package. Then we get the content and subject for our emails and we call the get_emails to get the emails from Airtable and the send_emails function to send our emails. We are reading the subject from the markdown file with the statement subject = md_content.metadata.get("subject"). We have a small if case to check if the subject isn’t found in the markdown file then the script will exit without sending the emails.
Making it all work together
Below you can see the complete source code for our script.
You can see that we have defined all the functions we discussed earlier.
Once again make sure you have your .env file populated with the following variables:
SENDGRID_API_KEYfor your Twilio SendGrid API Key,AIRTABLE_API_KEYfor your Airtable API Key,AIRTABLE_BASE_IDfor the Base ID of your Airtable base,AIRTABLE_TABLE_NAMEfor the table name in Airtable,FROM_ADDRESSfor the address the emails are going to be sent from.
We can run the script as follows:
The content.md file can be replaced with any markdown file that has a subject variable in the front matter.
Best Practices
You might’ve noticed an unsubscribe variable with HTML content in the send_email() function. Keep in mind that many countries have legal requirements to allow users to unsubscribe from mass mailings. We could add an automatic unsubscribe process but that is a tad tedious for our small-scale mailing list. We will simply pay attention to replies to our mailings and manually remove them from our table in Airtable.
Here are also some best practices by SendGrid for a smoother email flow.
Conclusion
In this post we’ve gone through some basic concepts of Airtable and how to use its API with Python. We’ve also learned how to send emails with Twilio SendGrid’s API. Finally, we’ve learned how to build a small CLI application and how to render markdown files which contain front matter.
I hope you learned something new from this post that was a valuable addition to your toolkit. You can find the source code in GitHub. You can find me on Twitter @athulcajay.
Now go and build something cool with Emails and Python!

Related Resources
Twilio Docs
From APIs to SDKs to sample apps
API reference documentation, SDKs, helper libraries, quickstarts, and tutorials for your language and platform.
Resource Center
The latest ebooks, industry reports, and webinars
Learn from customer engagement experts to improve your own communication.
Ahoy
Twilio's developer community hub
Best practices, code samples, and inspiration to build communications and digital engagement experiences.