Secure Your Web Application With Laravel Socialite
Time to read: 6 minutes
February 20, 2023
Written by
Reviewed by

Authentication is a very interesting subject as it concerns web apps, because of the numerous options available and is also critical because of the bad actors and the harm they can do.
Choosing the best authentication strategy depends on what you need and your budget. But one of the most cost-effective ways to authenticate users is to delegate it to third-party services. One way to achieve this delegation is through OAuth and the several platforms that support it.
What is OAuth?
An open standard for access delegation, commonly used as a way for internet users to grant websites or applications access to their information on other websites but without giving them the passwords
As a web app developer, this implies a simpler way to authenticate a user against your application.
There are a few ways of implementing OAuth in Laravel applications, but the easiest way to implement it is through Laravel Socialite. Laravel Socialite is an easy way to authenticate users using OAuth providers.
In this guide, we’ll walk you through how to integrate OAuth into your Laravel application using Laravel Socialite. The idea is to provide a button that the user can click which will kickstart the authentication process on the home page. After authentication, the user's details will be collected on the "/callback-url" page. Below is the list of things we’ll be covering in this article.
- Introduction to Socialite
- Use of Socialite
- Importance of OAuth in an application
- Install Laravel Socialite
- Set up Laravel Socialite
- Authentication
- Configure multiple authentication options
Prerequisites
- Prior knowledge of PHP
- PHP 8.1 or above
- Your preferred text editor or IDE. I recommend using Visual Studio Code.
- Composer installed globally
- A free GitHub account
- A free Google account
Use of Socialite
Laravel Socialite provides an interface for implementing OAuth in Laravel applications which is both easy and convenient. It comes with compelling features such as:
- Retrieving user details: After the user has been authenticated, Socialite provides a way to retrieve the user's details automatically. The details received will depend on the scope specified during authentication.
- Retrieving user details from a token: Once the authentication is complete, the application will receive a token and/or secret (depending on the OAauth flow type used) to subsequently retrieve the user's details.
- Stateless authentication: Stateless authentication allows an application to issue tokens to users with appropriate details. If you are running a stateless API and need to disable session verification, this is a very interesting feature to look out for.
The importance of OAuth in an application
OAuth eliminates the need to add authentication functionality directly into your application, instead using existing authentication infrastructure from existing institutions (like Google, Github, Facebook, etc).
The great thing about OAuth is that it brings great things to the table for all parties involved. For the user, it provides control over their information and who they want to share it with. For the developer, it provides simplicity; as you can integrate a provider supporting OAuth into your application.
Install Laravel Socialite
Before we get into the installation of Socialite, let's first set up a new Laravel project using Composer.
Create a new Laravel project, using the command below.
When the installation is complete, move into the folder and start the application with the following commands.
Your app should now be running at http://localhost:8000.
Next, add Socialite to the application by running the command below in a new terminal window or tab.
Set up Laravel Socialite
Before you can use Laravel Socialite in your application you need to configure it. However, the configuration for Socialite depends on what you want to achieve. In our case, we want to integrate GitHub OAuth Authentication. To achieve this we will need a client ID and client secret.
Step 1: Update the services configuration
First, open the project in your preferred IDE or text editor and add the following details to the end of the array returned in config/services.php:
Then, add the configuration below to the end of .env.
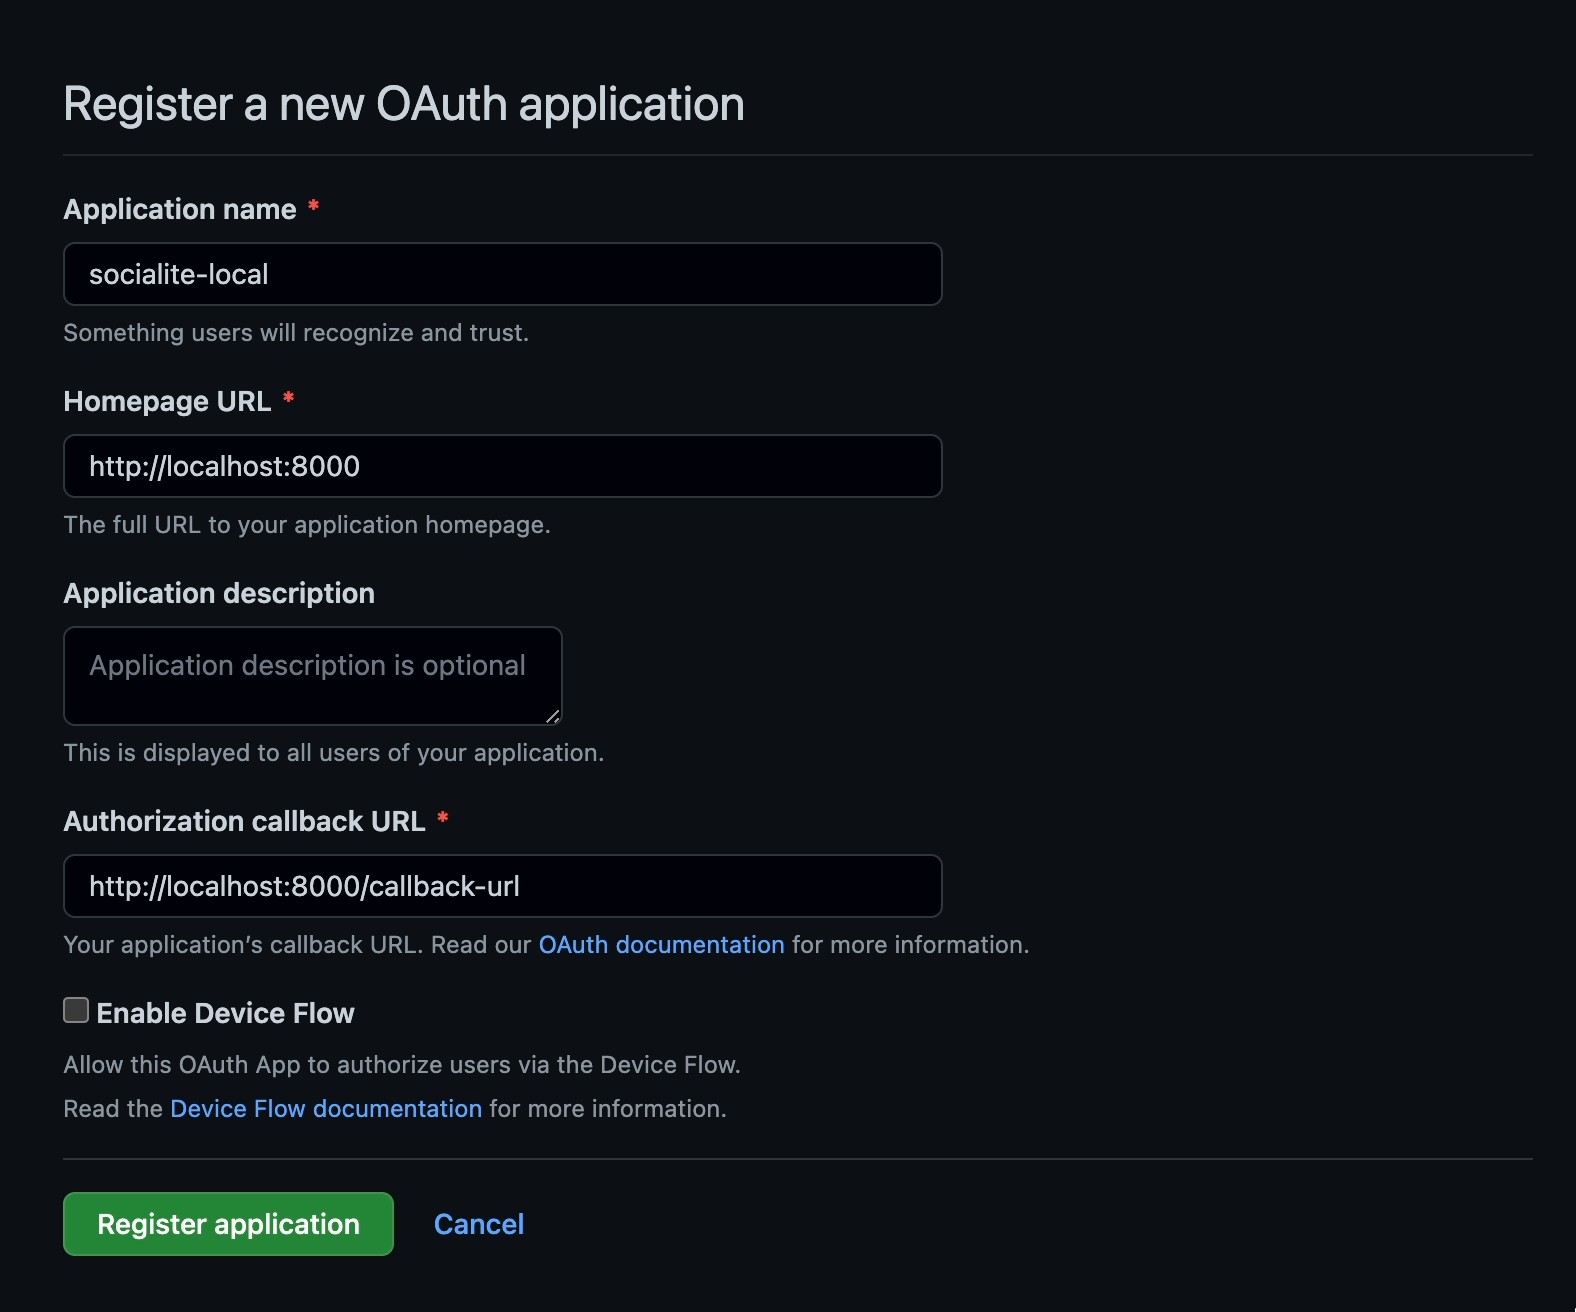
The GitHub client ID and client secret are retrieved when you create a GitHub OAuth application, so let’s create one. Visit the GitHub OAuth Application page to get started. Then, fill in the form as in the screenshot above, and click Register application.
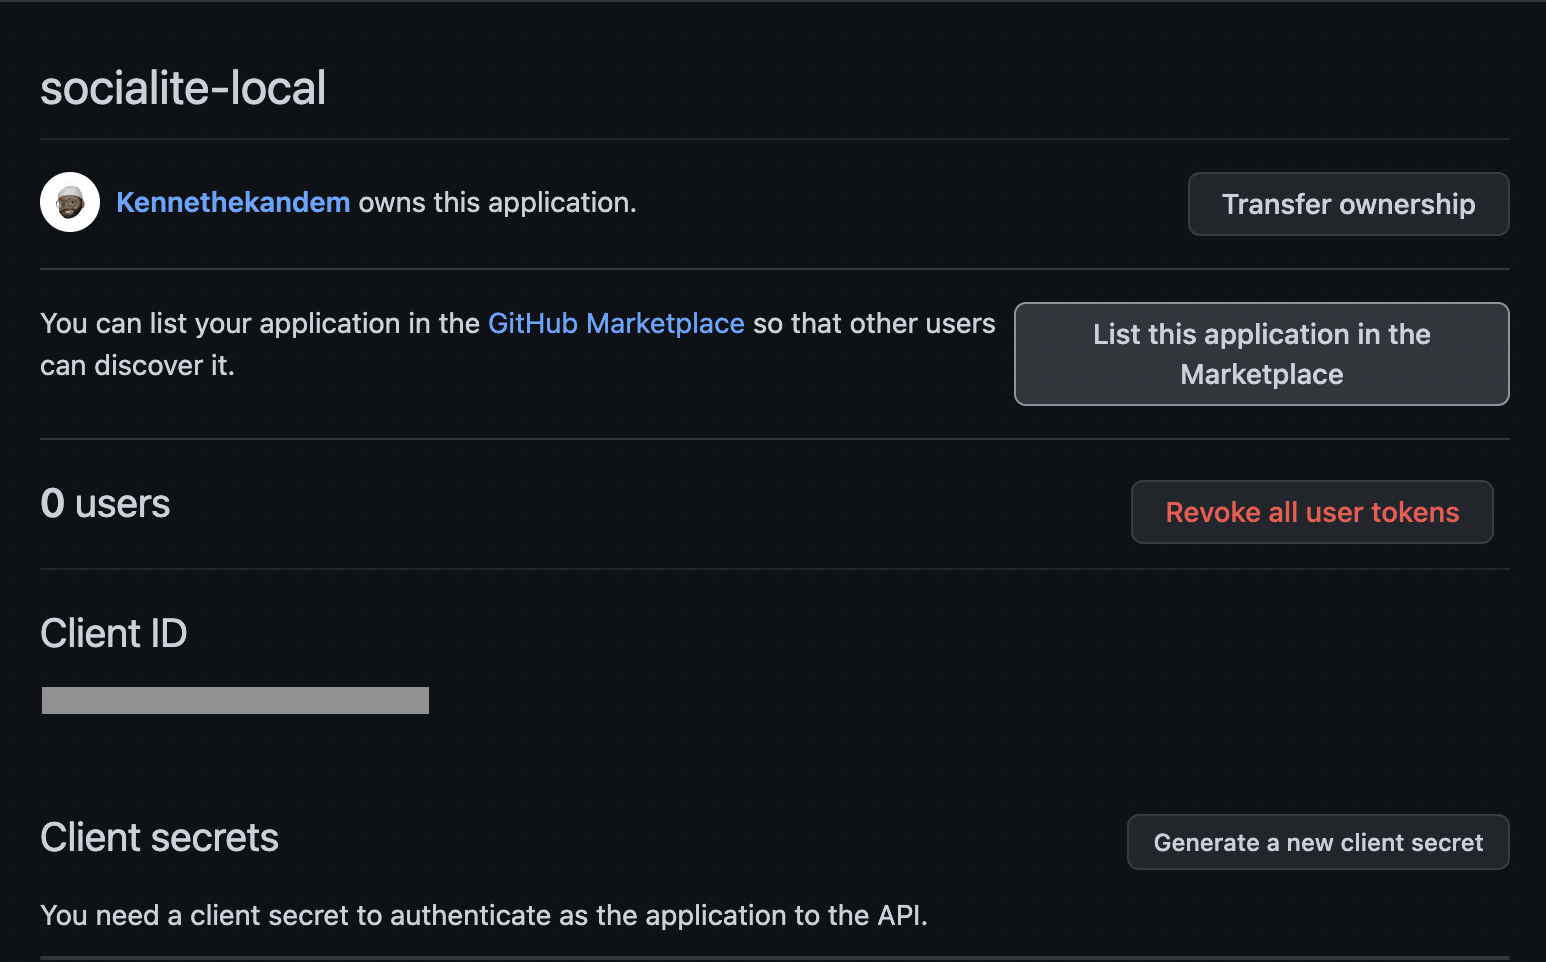
Once the application has been submitted, you will be redirected to a page like the one above. Copy the Client ID and paste it .env in place of the placeholder for GITHUB_CLIENT_ID.
Then, click Generate a new client secret to generate a new client secret and paste it in .env in place of the placeholder for GITHUB_CLIENT_SECRET.
This is all you need to do for GitHub.
Step 3: Set up authentication
Next, update the routes/web.php with to match the code below:
As you might have noticed, it adds two new routes: “/redirect” and “/callback-url”. The “/redirect” route is what is responsible for triggering the OAuth flow. The “/callback-url” is where the user will be redirected to after authentication.
Now, proceed to update the home page which will double as the authentication page. We’ll be using Tailwind CSS for the design. Replace the content of the resources/views/welcome.blade.php file to match the following code:
You should see a page like the one below if you visit http://localhost:8000.

Click the Login with GitHub button which should take you to a page like the one below.
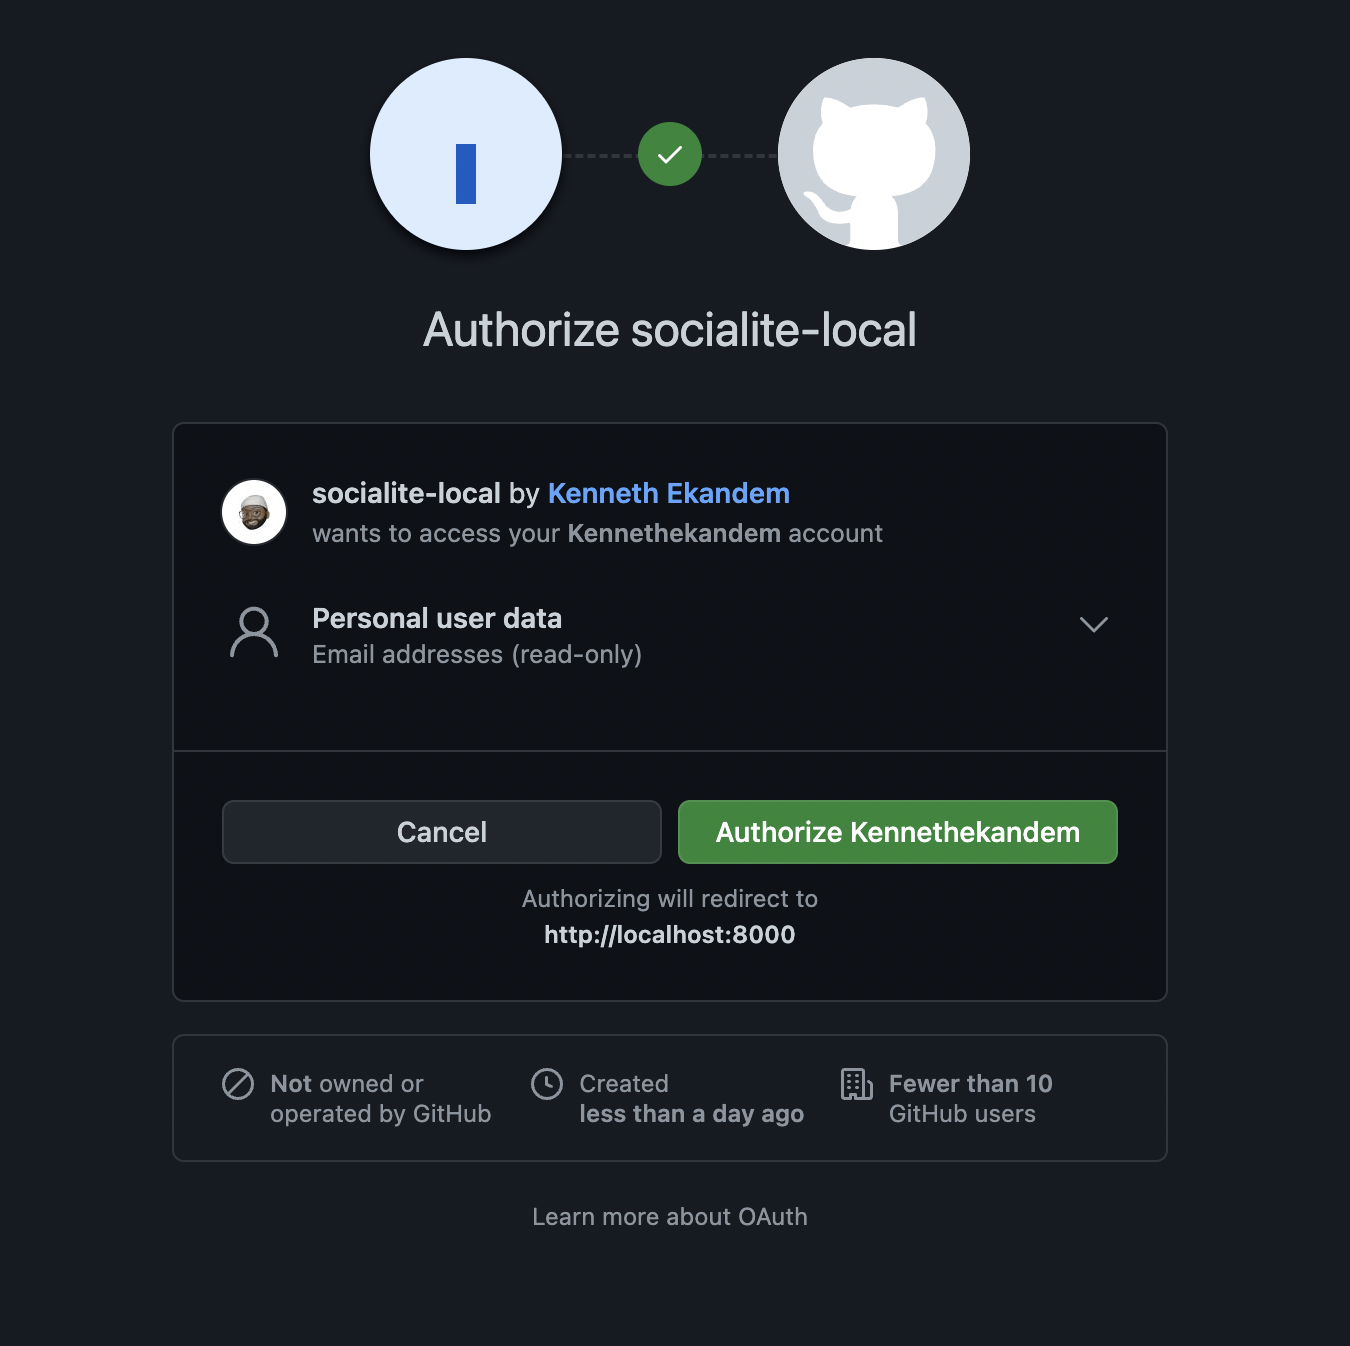
Click the Authorize button, where you will be redirected to the “/callback-url” page and see a response similar to the example below.
Implement multiple authentication options
When it comes to OAuth, you are not just limited to one authentication option. You can add more authentication services that support OAuth. To demonstrate that, you will add Google as your next authentication client.
Again, you’ll need both a Client ID and Client Secret. To retrieve those, you’ll need to do a few things.
Step 1: Update .env
First, add the following to the bottom of .env, so that you can store the Client ID and Secret that you're about to create.
Step 2: Create a new application
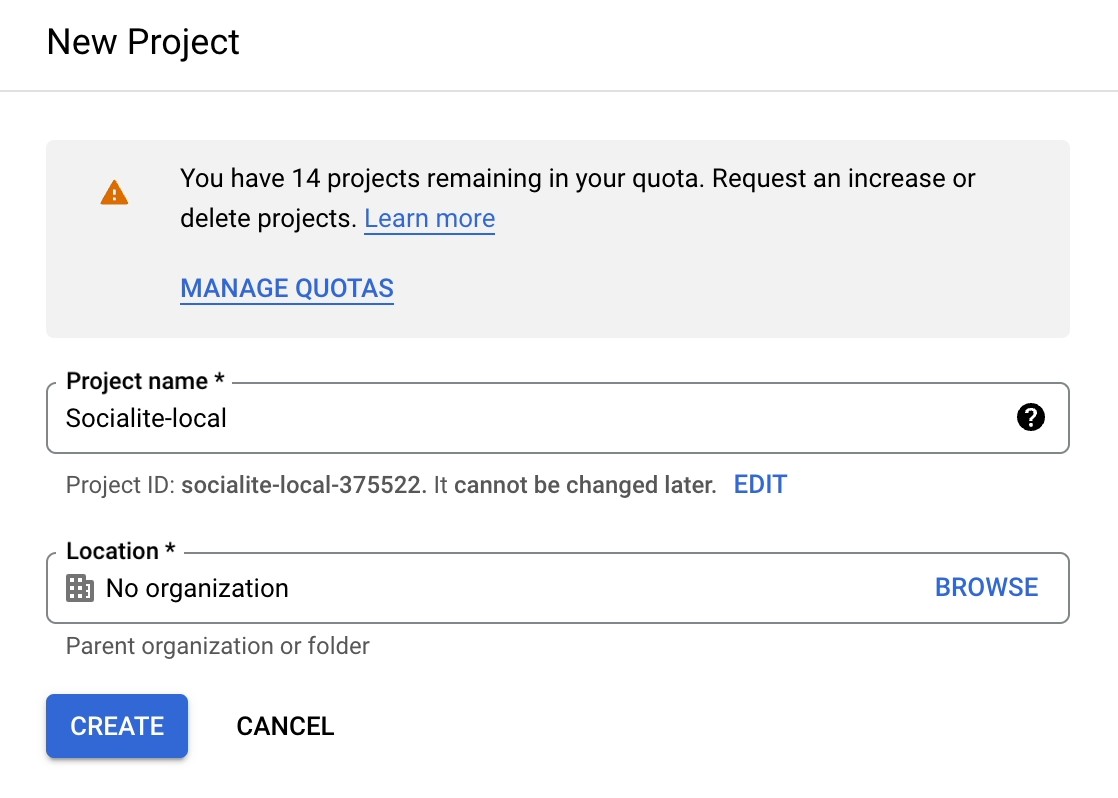
Navigate to the Google Cloud Console and fill out the form presented there, as can be seen below. You can leave the Location field set to "No organization". When you're done, click CREATE to create the project.
Step 3: Generate OAuth credentials
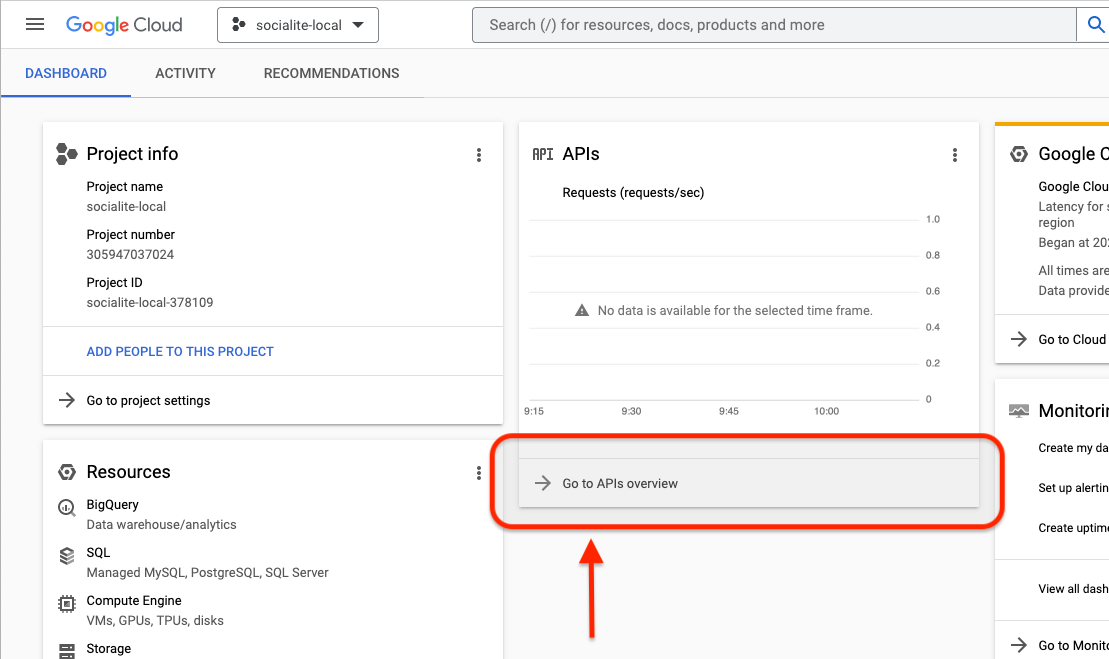
After the creation of the project, you will be redirected to the application page. But just in case you aren’t, you can find it by opening the project Dashboard and clicking Go to APIs overview under APIs.
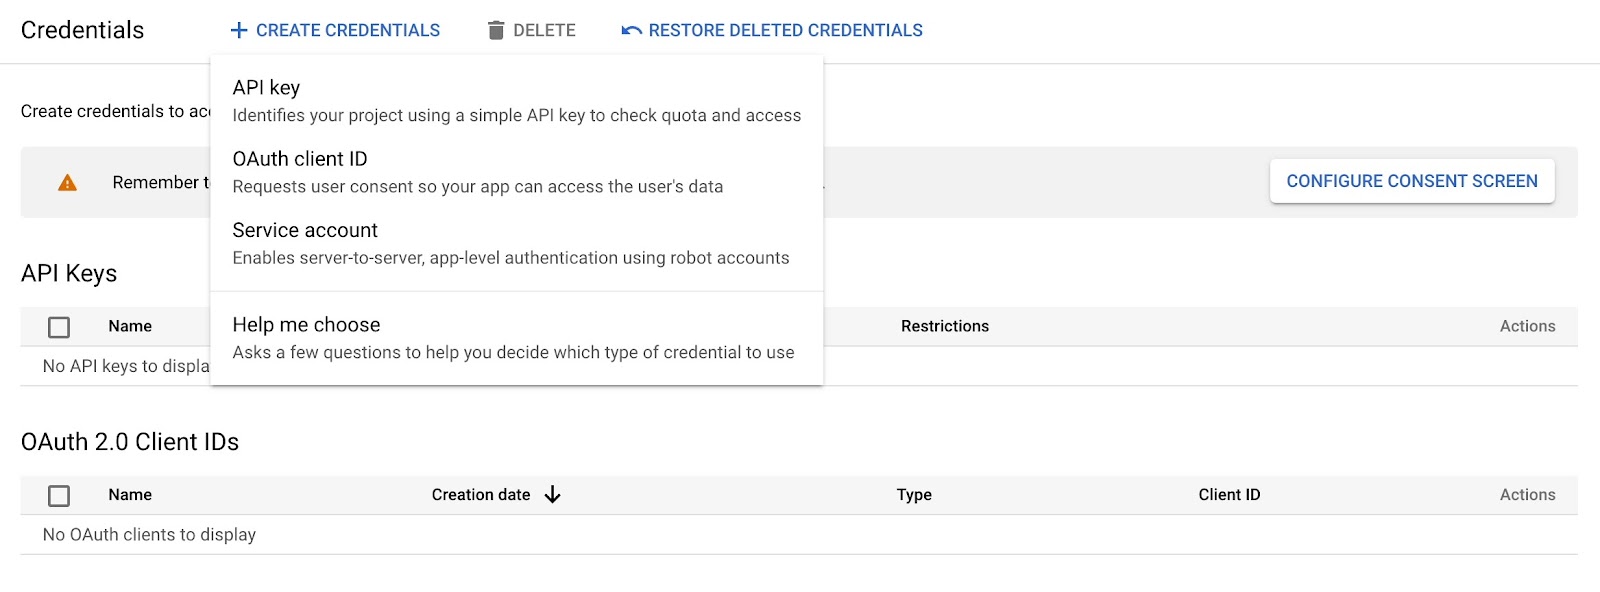
From there, click Credentials in the lefthand side navigation panel.

To generate the Client ID and Client Secret, click on the CREATE CREDENTIALS button on the top left and choose OAuth client ID on the pop-up as seen below.
Once you click that, you will be taken to a page prompting you to click the CONFIGURE CONSENT SCREEN button. Click it, and you will be taken to the consent configuration page as seen below.
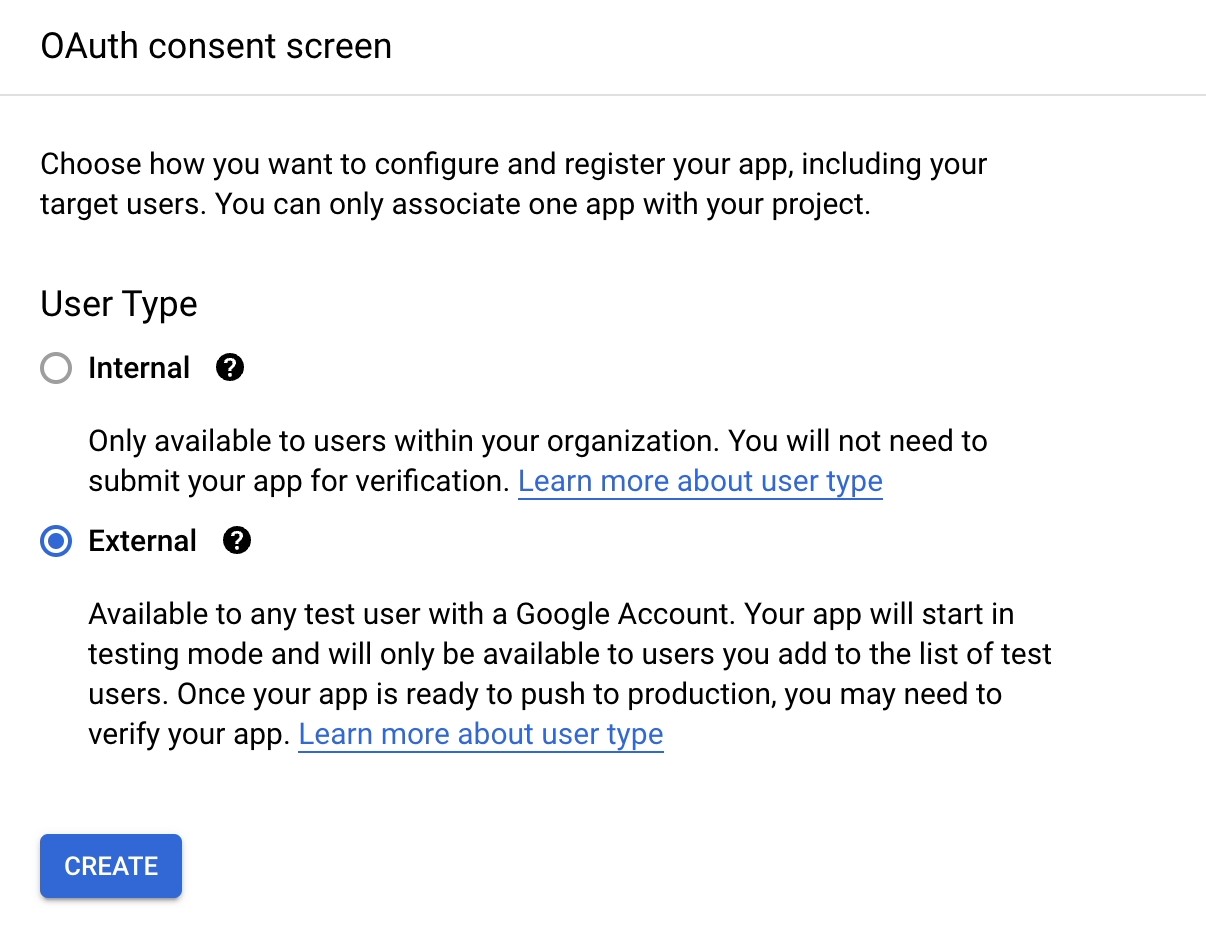
On the OAuth consent screen, choose External for the User Type, and then click CREATE. This should redirect you to yet another page where you be required to create an application.
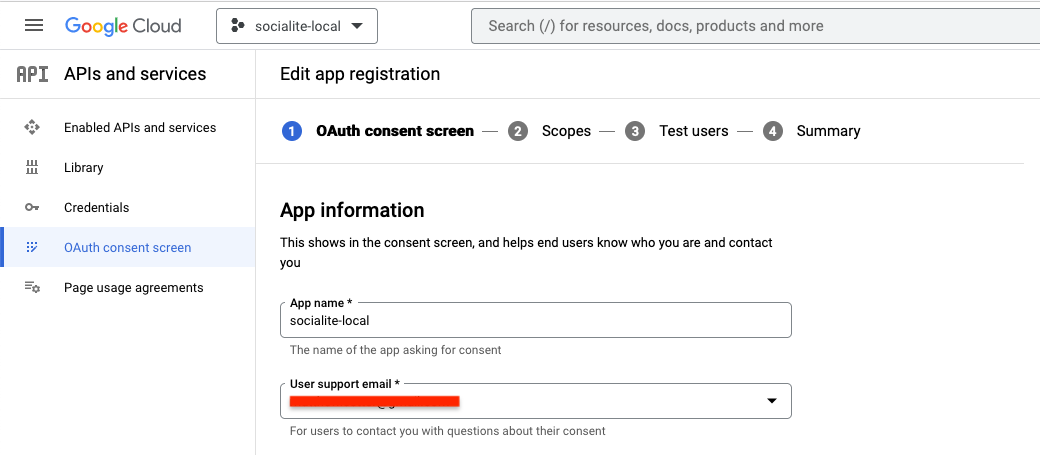
In the App information section, fill out the App name and User support email fields. In the Developer contact information section fill out the Email addresses field. Then, click SAVE AND CONTINUE.
On the next tab, you will be required to select the scope your application is interested in. Click ADD AND REMOVE SCOPES to choose the scope. Choose auth/userinfo.email and auth/userinfo.profile as seen below.
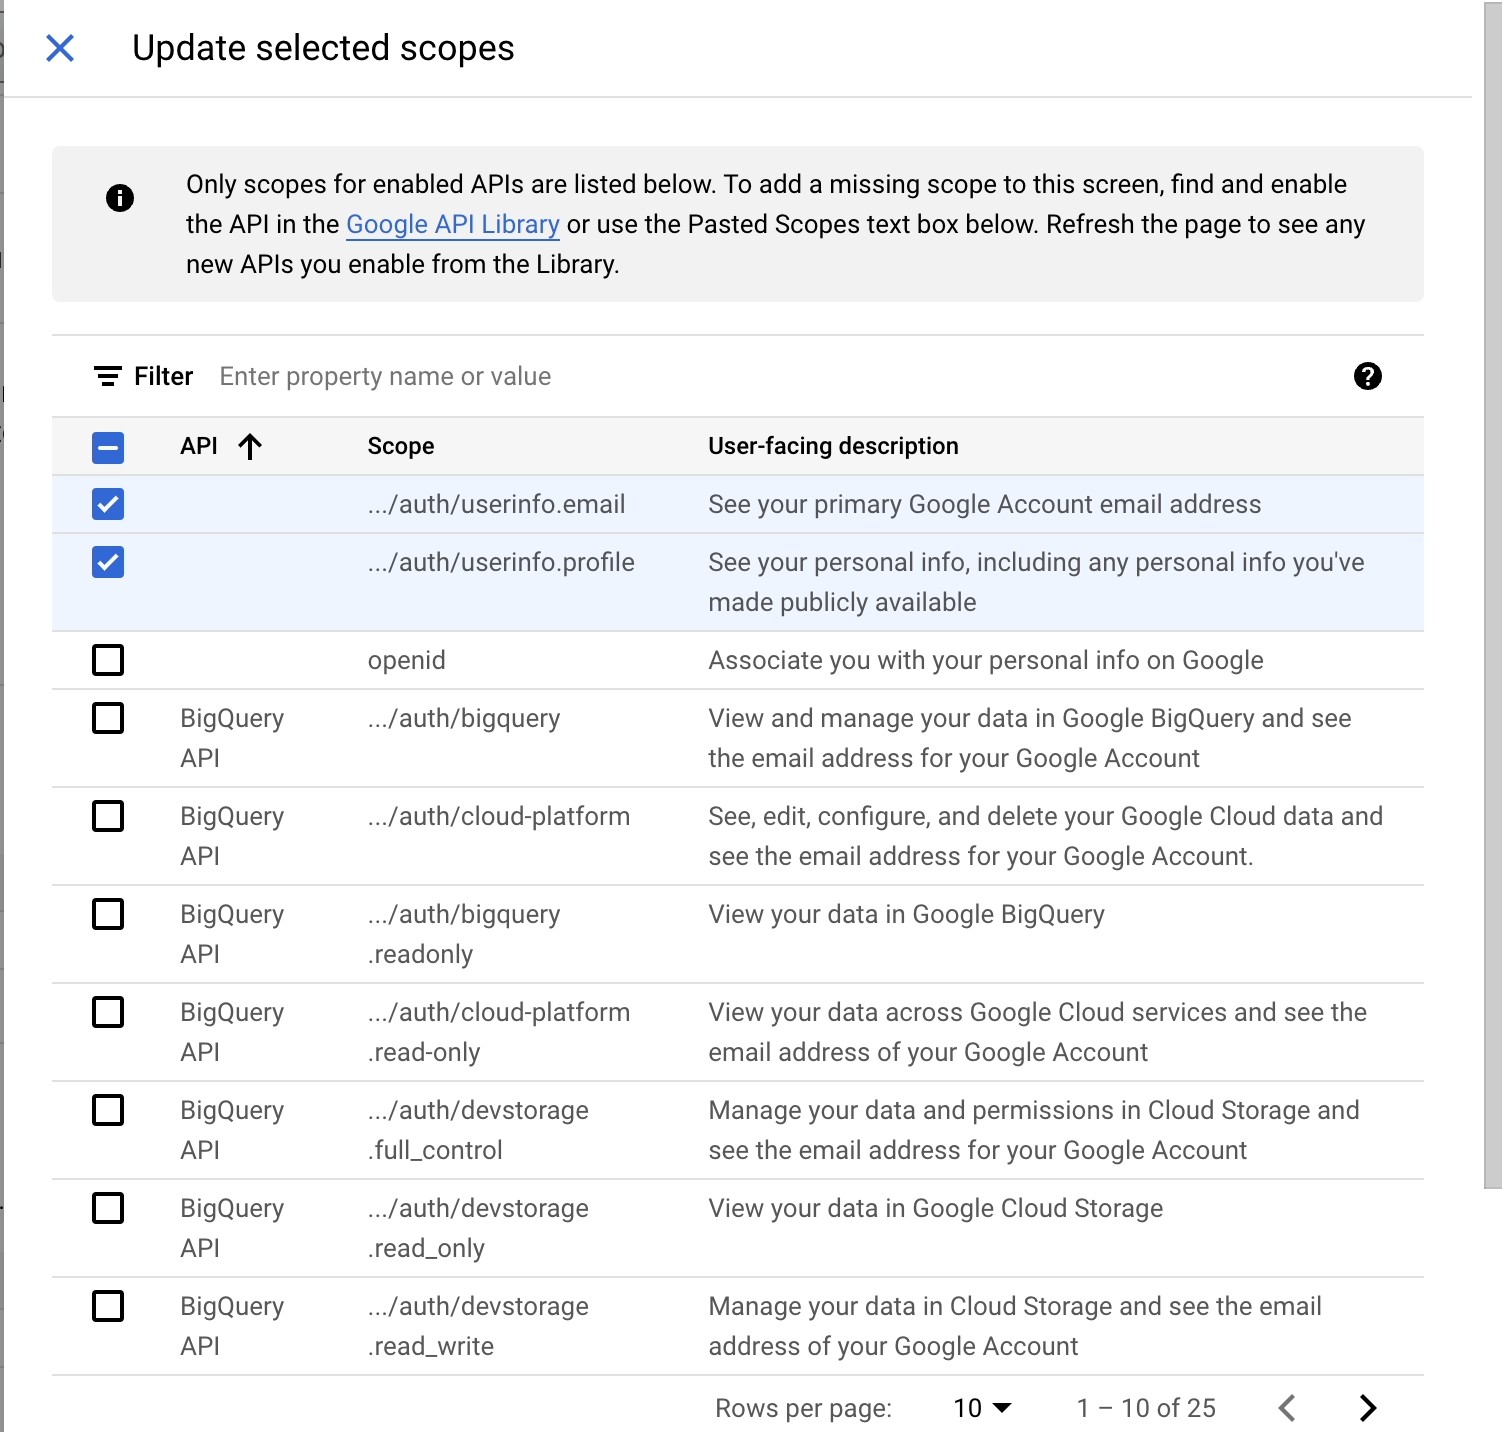
After doing that, click Update, and then click SAVE AND CONTINUE.
You will now be required to add a test user since this is just for testing purposes. Click on the ADD USERS button and add the email addresses you wish to use to test your application with and click ADD. Then, click SAVE AND CONTINUE and BACK TO DASHBOARD.
Now, click Credentials in the lefthand side navigation menu, then click Create Credentials, and choose OAuth client ID again. This time you will be taken to a page to create the OAuth client ID. Fill out the form with details as seen below.
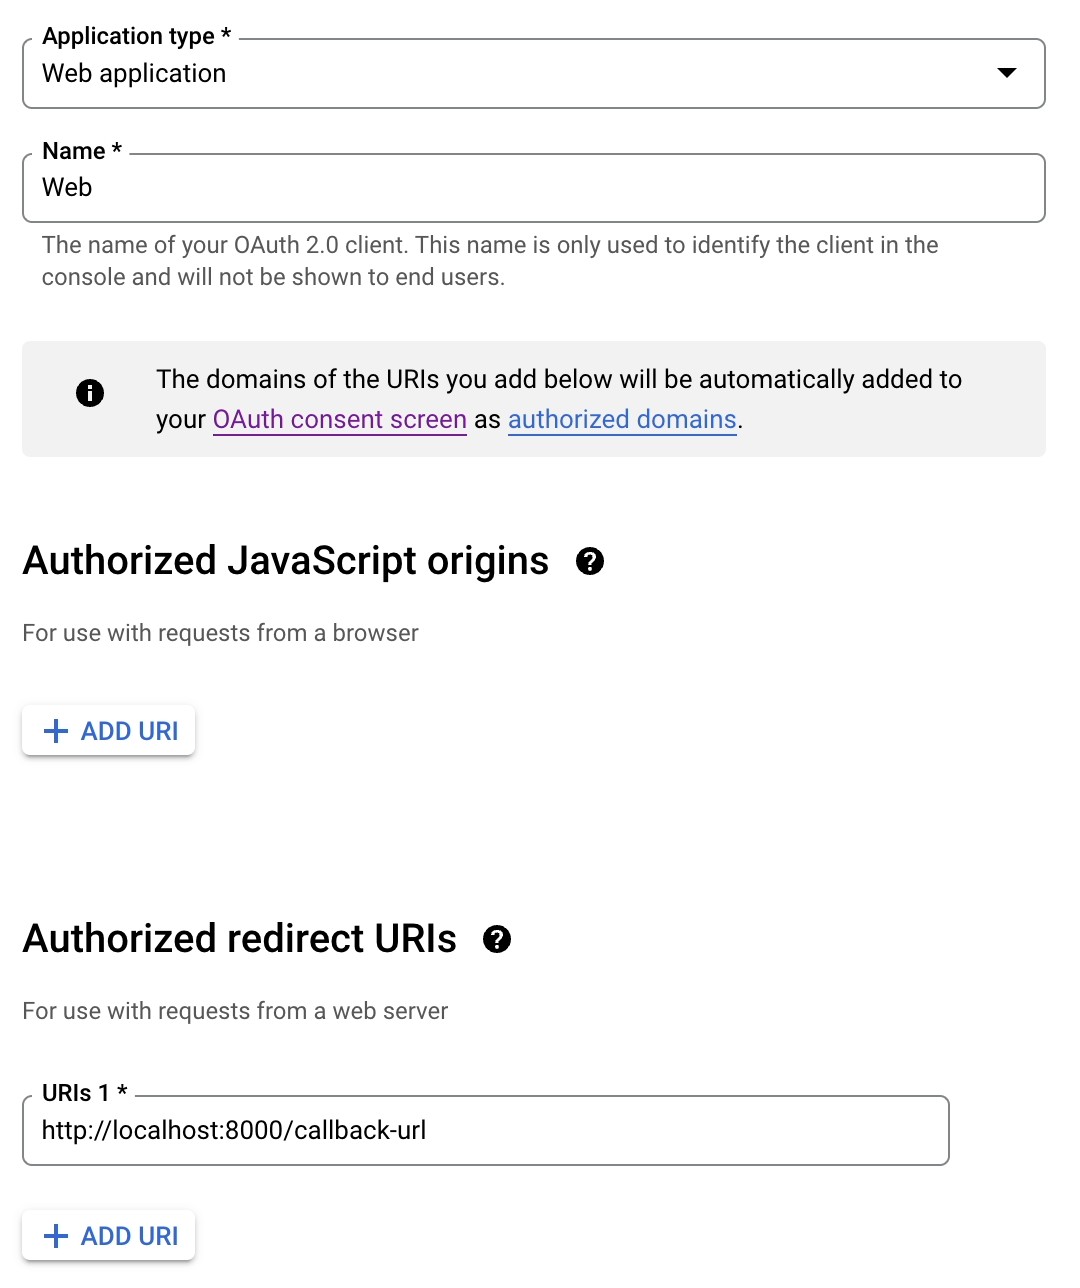
Now, click CREATE. When the page is done loading, a modal containing the Client ID and the Client Secret will appear. Copy and paste them into .env in place of GOOGLE_CLIENT_ID and GOOGLE_CLIENT_SECRET respectively.
Then, add the following code to config/services.php, to the bottom of the array returned from the file.
Now, update the <body> tag of the resources/views/welcome.blade.php with the following code.
We’ve updated the button and added value and name to delineate between the buttons. Finally, update the “/redirect” route in routes/web.php to match the following.
Here, we are calling appropriate driver for the job. You can test it out to get a feel of it.
Conclusions
Adding OAuth to your application simplifies authentication and leaves you to worry about the main application logic. Apart from the obvious ease of integration that OAuth brings to the table, it also scales pretty well. I hope you use OAuth in your next project and help prevent your users from having to cram another password. Thanks for reading.
Kenneth Ekandem is a full-stack developer from Nigeria currently in the blockchain space, but interested in learning everything computer science has to offer. He'd love to go to space one day and own his own vlogging channel to teach the next generation of programmers.
Related Resources
Twilio Docs
From APIs to SDKs to sample apps
API reference documentation, SDKs, helper libraries, quickstarts, and tutorials for your language and platform.
Resource Center
The latest ebooks, industry reports, and webinars
Learn from customer engagement experts to improve your own communication.
Ahoy
Twilio's developer community hub
Best practices, code samples, and inspiration to build communications and digital engagement experiences.