How to Send Application Invites with Laravel and GraphQL
Time to read:
March 02, 2023
Written by
Reviewed by
Building an invitation system in today's highly interconnected world can be a game-changer for your application. These kinds of systems are instrumental when building a new social network, for instance, a new marketplace, or a productivity tool. Allowing users to invite their friends and colleagues can significantly accelerate user acquisition and adoption.
But building an invitation system from scratch can be a daunting task. That's where Laravel and GraphQL come in. Laravel is a popular PHP framework that offers robust features and a streamlined development experience. GraphQL, on the other hand, is a modern API technology that enables you to query and manipulate data in a flexible and efficient way.
In this blog post, you'll learn how to build an invitation system into your app using Laravel and GraphQL. You'll learn about what GraphQL is, and how Lighthouse is such an effective implementation of the technology. You'll also learn how to use the Insomnia client to test your GraphQL requests. So, let's dive in!
Prerequisites
To follow this tutorial, you will need the following:
- Working knowledge of PHP, Laravel (we'll be working with version 9), and GraphQL would be ideal
- PHP 8.3 or above
- Composer globally installed
- MySQL
- Insomnia
- A Twilio account (free or paid). If you are new to Twilio, click here to create a free account
- The Twilio CLI
- Lighthouse
- Laravel Sanctum
- A MySQL client, such as TablePlus, phpMyAdmin, DataGrip, or MySQL Workbench
Before getting started
We'll need to talk about Lighthouse, the important library that you'll be using to start up a GraphQL server, in just a moment. But first, what is GraphQL? GraphQL is a query language and runtime for APIs. With a single request, GraphQL can retrieve specific data and receive only the data that is needed. This is unlike REST APIs, traditionally used in Laravel applications, and are used to make multiple requests to different endpoints to get all the data that is needed.
One strong point of GraphQL is that it provides a strongly-typed schema that defines the data that can be queried, which makes it easy to know what to expect with requests and returns.
Lighthouse provides a set of tools and conventions that make it easy to create a GraphQL schema, resolve queries, and execute mutations. You can create a new GraphQL schema by defining types, queries, and mutations. Lighthouse further simplifies working with GraphQL by creating a set of resolvers that map queries and mutations to the underlying data sources, such as databases and APIs.
Set up the application
Let's call our new project, Twilvite. Navigate to the folder where you store your projects and run the following scripts in your terminal. They will generate a new Laravel project and change into the newly generated directory:
Next, you'll need to install your authentication layer using Laravel Sanctum and then publish the files, by running the following commands.
Then, install Lighthouse and publish its files by running the following commands in the terminal:
If you don't see a lighthouse.php file in the config folder, run the command below:
In config/lighthouse.php, you will be able to let Laravel know that Sanctum will be used to authenticate your API. To do that, you'll need to change the middleware configuration to match the configuration below.
Then, in the "Authentication Guard" section, you need to set sanctum as the guard.
Finally, install Twilio's PHP Helper Library by running the following command. This library simplifies interacting with Twilio's APIs.
Configure the database
Next, create a database called twilvite. You'll use the database to hold data related to authentication and user invites. First, in .env, the database configuration should look something like the following. Update it to match your database settings.
Finally, we will run all our pending database migrations for Sanctum and our Laravel app by executing the following commands:
Retrieve your Twilio settings
Our .env file needs three further environment variables to interact with Twilio's APIs. Add the following to the file.
Then, retrieve these values by navigating to the Twilio Console and locating the ACCOUNT SID and AUTH TOKEN inside of the Project Info section, as seen below.
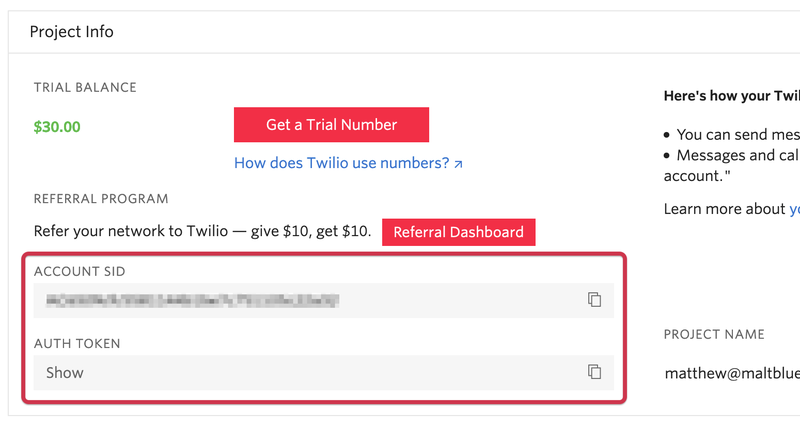
Copy and paste the values in place of the placeholders for TWILIO_ACCOUNT_SID and TWILIO_AUTH_TOKEN respectively, in .env. Next, copy your Twilio phone number and paste it in place of the placeholder for TWILIO_PHONE_NUMBER.
Create migrations, models, and seeders
In this tutorial, you'll only be creating two migrations, one to create the user_invitations table and one to add a phone column to the users table, so that we can send invitations by SMS.
To do that, in a separate terminal tab or window, run:
You should see your new model file in app/Models. The -m flag tells Laravel to also create a migration file related to the model in database/migrations. Go to database/migrations and the last file should be the one you just created. Update it to match the code below.
The phone column will hold the number of the recipient of the invitation. The inviter_id is the user ID of the person that sent the invitation. The status column states if the invitation is active or not as it is time-based, and the invite-key column is a hash that contains the information in the invite_data column.
To add the phone column to the users table, run this migration:
The new migration file's name will end with _add_phone_column_to_users_table.php. Update the migration to match the following code:
Finally, to get around manually registering accounts to send invitations, you will seed user data instead. To do that, open database/seeders/DatabaseSeeder.php and update the file to match the following code.
Once all these files are in place, populate the database by running the following command:
Create classes to handle Twilio API calls and invitations
The best thing about MVC frameworks like Laravel is that you can easily modularize your code through OOP concepts. For example, now, you'll create two traits that will handle Twilio API calls and invitations. The beautiful thing about traits is that they can be reused in multiple independent classes.
The first thing you'll need to do is go to the app folder and create a Traits subfolder. In your new app/Traits directory, manually create a file called Twilio.php and then copy and paste the following code into it:
The constructor receives the values of the environment variables you set earlier and uses them to authenticate calls to Twilio's APIs. The trait's sole function, sendSMS(), takes a $to argument which is the phone number the invitation is being sent to, and a $key argument which is going to be used to build the invite URL.
With that done, create a new file in the Traits folder called AuthKey.php, and then paste the code below into the new trait.
This file will have three functions that generate the key based on the data provided, check if the key passes scrutiny by matching it with the data in the invite_data column, and check if the key is expired or not.
In the code above, you will see a function called hash_hmac(). This is an in-built function in PHP that accepts an algorithm as its first parameter and generates a keyed hash based on the value provided in the second parameter and the key provided in the third parameter. The hash_equals() function will be used to compare the hashed string passed from the URL and the one in the database.
Build the GraphQL server
The schema
In your graphql folder, you will see a file called schema.graphql. It will already be filled out so make sure you delete everything you see there, and replace it with the code below.
The schema defines the types of data available in the system and how they can be queried. The schema is a contract between the client and the server that specifies the available fields, their types, and any arguments they accept. The schema also defines relationships between types, allowing for nested queries and mutations.
In the code below, you will see some familiar terms such as String and Boolean. These are types. If you see a type that looks like String!, this means that the field that the type is attached to must be included in the data. You'll also see some other types like User, which are defined in the same file. These are nested types.
Directives such as @auth and @all add some functionality to the GraphQL schema. These are the directives in the file and their meanings:
- @auth: Returns the currently authenticated user
- @all: Fetches all Eloquent models and returns data as a collection
- @field: Assigns a resolver function to a field
- @guard: Authenticates request through a guard
Let's talk about some of these types. LoginPayload, for instance, expects two fields: access_token of type String, and user of type User. The LoginPayload type is attached to the login mutation and is basically the response that is expected after the mutation operation is completed.
The other response type is SendEmailInvitationResponse, which has fields phone of type String!, and message of type String. This response occurs after the sendInvitation mutation operation is completed.
Create a custom resolver
In our final step of building a GraphQL server with Laravel, you'll be creating custom resolvers for the mutation operations: login, sendInvitation, and acceptInvitation. Each will have their own input fields and each input field will have their own types.
The login operation, for instance, has an email input field with type String!, which means that it needs to be a string and is required, and a password input field with the same type. The resolver that will be handling this request will be the login() function in our CustomerResolver class.
In the app folder, create a subfolder called GraphQL, and in there create a file called CustomResolvers.php. Each custom resolver in Lighthouse has four arguments:
$rootValue, array $args, GraphQLContext $context, and ResolveInfo $resolveInfo.
For this tutorial, you'll only worry about the first three:
$rootValueis the result that was returned from the parent fieldarray $argsare the arguments that were passed into the fieldGraphQLContext $contextis arbitrary data shared between all fields of a single query Here, you use it to get the authenticated user
Here is what the entire resolver file should look like:
In the login() function, you'll only use the $rootValue and array $args arguments. If you are familiar with how logging in works in Laravel, this should look familiar to you. However, you may see something you have not seen before, such as the line FormattedError::setInternalErrorMessage('Invalid credentials.');.
This line just changes the message param in the errors object. Throwing an exception changes the debugMessage param. With Sanctum, you create a plain text token called 'auth_user', and return it with the access_token param. If you remember, this is one of the expected fields in the LoginPayload type.
In the sendInvite() function, you will start to use the AuthKey functions. If an invitation has expired, you will allow another one to be sent by the user without having to delete the last invitation.
The date of the last related invite is sent to the timeChecksOut() function where it returns true if it's less than or equal to a week. If that's the case, it will fail the if statement and go to the return block, where the message reads 'Invitation still active'. If no invitation is active, it will create a new model and save it in the user_invitations table and send an SMS with the target's phone number.
Finally, in the accept() function, the app is looking for the key in the database that matches the one from the URL, and checking if the status of that invitation is still true (when an invitation is accepted, the status becomes false).
Once the key passes scrutiny, it checks if there's a user that already exists with that phone number, and sets the email_verified_at column to the current datetime. The email_verified_at column is used to confirm that the user was invited and can use the app. A LoginPayload is returned. If there's no user with the phone number, a new one is created and a LoginPayload is returned.
Test the app with the Insomnia client
Because there is no frontend UI, you will use Insomnia, a GraphQL testing client, to make sure everything is going well.
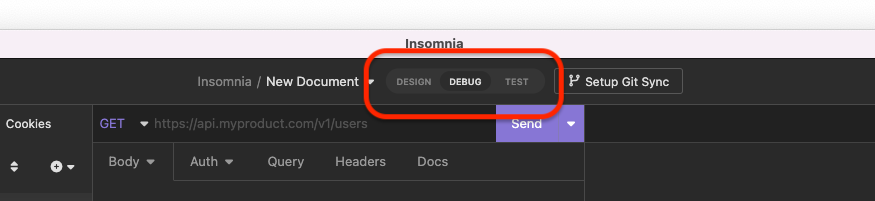
Start Insomnia where you will see that in the middle of the top of the UI there are three tabs: Design, Debug, and Test. Ensure that Debug is selected.
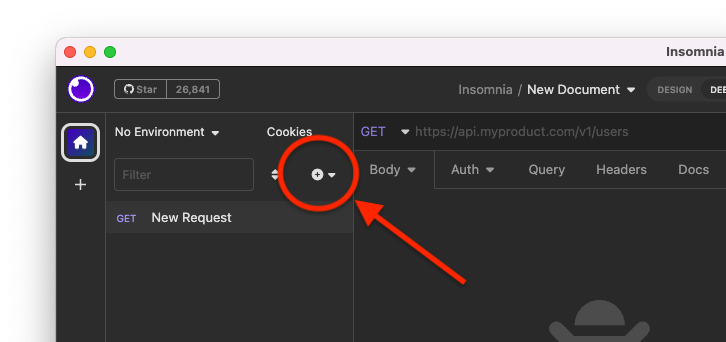
In the left pane, you will see a round button with a + in the middle and a downward facing arrow beside it. Click it and create a new GraphQL Request. Right-click on it and rename it to Login.
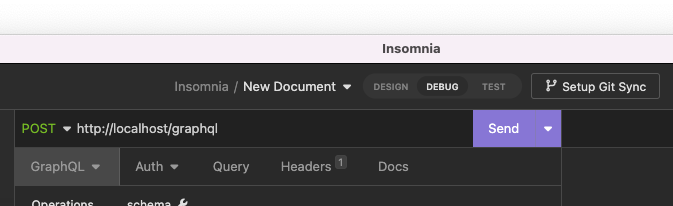
In the URL bar, put your app URL + '/graphql' (on most machines, this should be http://localhost/graphql). Create two more GraphQL Requests. Name one Accept Invitation and name the other one Send Invitation. Follow the previous steps to rename both.
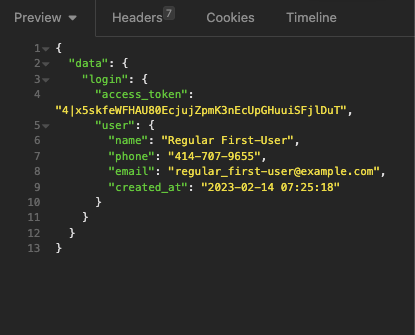
In the Login request, set the GraphQL request body to look like this, and click Send:
If you look at the right pane, if everything went smoothly, you should see a data object that looks something like this:
Now, copy the access token and change to the Send Invitation request. Set the URL field to your app URL + '/graphql'. Then, click on the arrow in the tab next to GraphQL. In the dropdown that appears, choose Bearer Token. Then, paste the token into the TOKEN field. After that, click the first tab (GraphQL) and set the request's body to the following:
Replace the phone number placeholder +15555555555 with a verified phone number from your Twilio dashboard. Otherwise it won't be sent. Now, click Send. You should see an object that contains the phone number that the SMS was sent to, and a message saying "Invitation has been sent".
If you check you phone, you should see a message on your phone with the link. Do not click it as the URL is not exposed to the web.
To test the acceptInvitation mutation, first, in Insomnia, open the Accept Invitation Request and set the URL field to your app URL + '/graphql'. Then, using your database tool
open a connection to your database.
Then, go to the user_invitations table and look for the most recent record, which should be the last one. Copy the string under the invite_key column, and paste it in place of the placeholder for the key field.
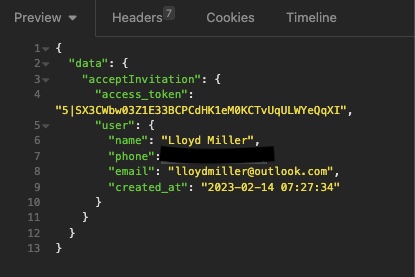
Then, paste the query into the Accept Invitation's body and click Send. You should get a data object that looks like this:
You can go even further by making a register mutation operation as a proof-of-concept that anyone signing up to your app will not be able to use it, since email_verified_at will be null.
Conclusion
In conclusion, sending invitations this way can greatly improve your user onboarding and engagement. With the help of Laravel's built-in functionality, Lighthouse's GraphQL API, and Twilio's powerful SMS service, you can easily create and send customized invitations to your users via SMS.
By following the steps outlined in this post, you can easily integrate these technologies into your Laravel application and streamline your invitation process.
Lloyd Miller is an experienced web developer specializing in Laravel and React. He enjoys creating customer-facing products, especially in the e-commerce space. You can learn more about him on LinkedIn.


Related Resources
Twilio Docs
From APIs to SDKs to sample apps
API reference documentation, SDKs, helper libraries, quickstarts, and tutorials for your language and platform.
Resource Center
The latest ebooks, industry reports, and webinars
Learn from customer engagement experts to improve your own communication.
Ahoy
Twilio's developer community hub
Best practices, code samples, and inspiration to build communications and digital engagement experiences.