Sending Scheduled WhatsApp Messages with Python and the Programmable Messaging API
Time to read:
May 02, 2023
Written by
Reviewed by

Twilio is all about facilitating communication — and doing so quickly and easily. Twilio's Programmable Messaging service has been available for some time, but until last year, developers had to implement their own scheduling solution in order to schedule a message to be sent at a later time.
Thankfully, this is no longer an issue! Message Scheduling allows you to send scheduled SMS, MMS, and WhatsApp messages with a single API call, eliminating the need for custom schedulers.
This tutorial will teach you how to send WhatsApp notifications on a schedule using Python.
Prerequisites
To follow this tutorial, you will need the following prerequisites:
- Python installed on your machine.
- A Twilio account set up. If you don't have one, you can create a free account here.
- A smartphone with WhatsApp installed to evaluate the project.
Buy a Twilio phone number
First, if you have not already done so, buy a Twilio phone number to send SMS (or a WhatsApp notification).
To purchase a Twilio number, log in to the Twilio Console, select Phone Numbers, and then click the "Buy a number" button. Note that if you have a free account, this transaction will be made with your trial credit.
Select your country on the "Buy a Number" page and select SMS in the "Capabilities" field. In the "Number" field, you can input your area code to request a number that is local to your region.
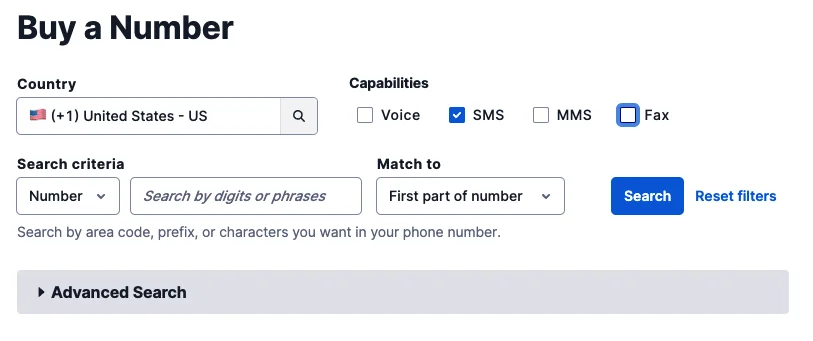
Click on the "Search" button to view the available phone numbers, then select "Buy" next to the desired number. Click the "Close" button once you've confirmed your purchase.
Set up a message service
Currently, scheduled texts can only be sent from a Messaging Service. The next step is to set up a Messaging Service and add your Twilio phone number.
Still in the Console, find the "Messaging" product and click on its "Services" button on the left. Then click on the "Create Messaging Service" button.
On the first page of the setup process, give the service a friendly name like "Appointments" and choose "Notify my users" from the "Select what you want to use Messaging for" dropdown.
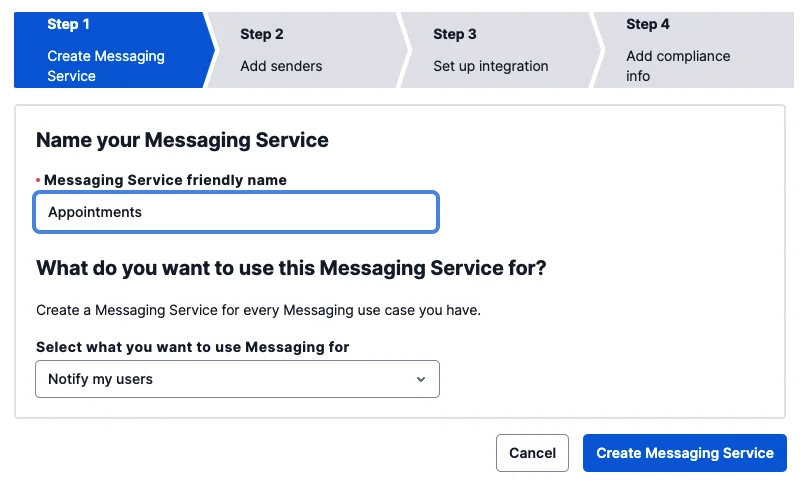
To move on to the next step, click the "Create Messaging Service" button.
In this part of the setup, you have to add the sender's phone number(s) to the Sender Pool that the service uses. Click the "Add Senders" button to add the Twilio phone number you got in the last part.
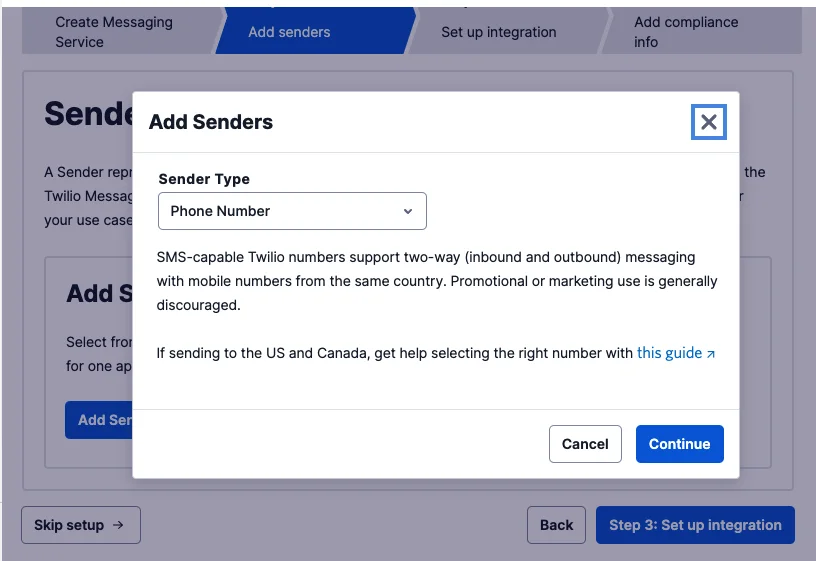
Click "Continue" after choosing "Phone Number" from the "Sender Type" dropdown menu.
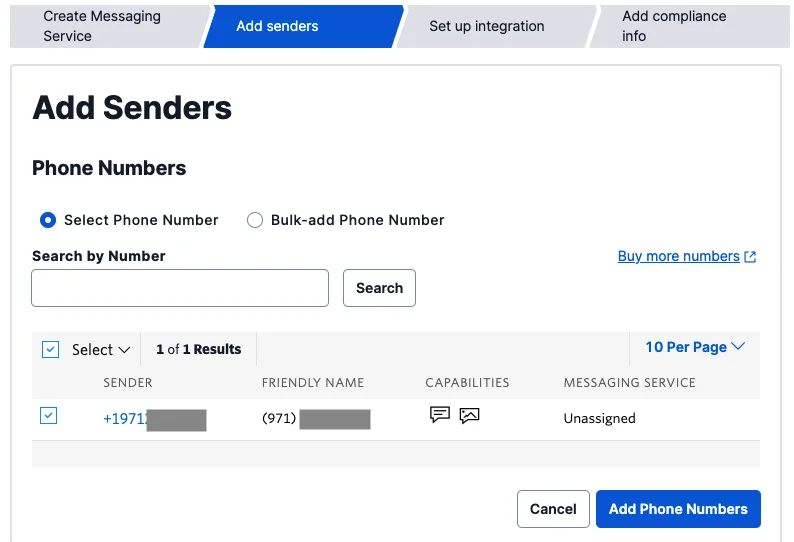
Add a checkmark next to the phone number you want to use as the sender, and then click "Add phone numbers."
To move on to the next step, click the "Step 3: Set up integration" button. On this page, you don't have to change any of the settings. Just click "Step 4: Add compliance info."
Click the "Complete Messaging Service Setup" button to finish setting up your Messaging Service. Now, you will be given the chance to send a test letter.
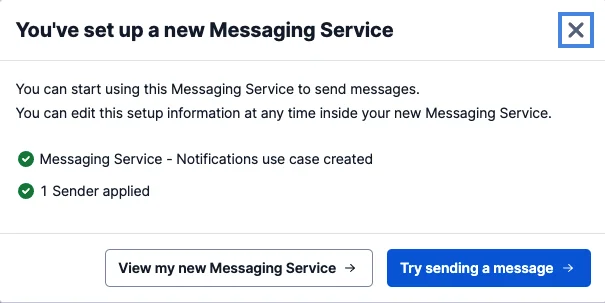
Click on "Try sending a message" to see if your messaging service can send texts.
Choose your personal phone number from the "To phone number" drop-down menu. This number should be registered and verified with your Twilio account. Select the Messaging Service you just made in the "From Messaging Service SID" field. Type some text to send yourself in the "Body Text" box.
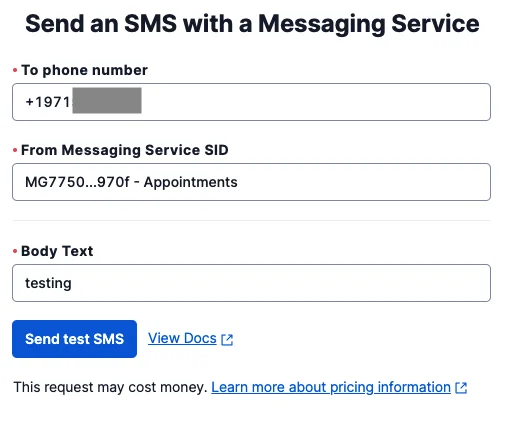
Click "Send test SMS" and make sure you get the text message on your phone.
Set up a Python project
In this part, you will set up a completely new Python project. To keep things in order, open a terminal or command prompt, find a good spot, and start a new directory where the project you're about to make will live:
Run the following commands to create a virtual environment, activate it, and then upgrade the pip package installer within that virtual environment:
This is a common sequence of commands used to set up a project-specific environment and ensure you have an updated package installer.
You're now ready to install the Twilio Python helper library:
For Twilio to send an SMS, the Python client needs to be able to connect with your Twilio account. Also, the SID for the Messaging Service you just made will be needed.
Setting environment variables is the easiest way to describe these configuration values. Create a new .env file and include the following credentials:
You will need to fill in all of the above values with the right information for your account. The first two are your "Account SID" and "Auth Token" for Twilio. You can find them in the "Account Info" section of the screen on the main page of the Twilio Console:

The SID that is given to the Messaging Service is stored in the TWILIO_MESSAGING_SERVICE_SID value. The Twilio Console has a page called "Message Services" where you can find it. The first letters of this name are "MG."
Send a scheduled WhatsApp message with Python
You are now ready to start coding the Python script.
Before you write the logic, make sure to do two things:
- Install
python-decoupleto be able to deal with environment variables. Run the following command on the terminal:pip install python-decouple - Add your phone number to the
MY_PHONE_NUMBERenv var in the .env file as follows:
Make sure to use the international E.164 format when adding your phone number here.
Open a new file named scheduled_whatsapp.py in your text editor or IDE and enter this code in it:
Here is a breakdown of that code snippet:
- Importing necessary modules and packages:
datetimeandtimedeltaare imported from thedatetimemodule. These are used to work with dates and time durations.Clientis imported from thetwilio.restmodule. It is the Twilio client used to interact with the Twilio API.configis imported from thedecouplemodule. It is used to retrieve configuration variables from an environment file.
- Retrieving Twilio API credentials and phone number:
- The
TWILIO_ACCOUNT_SID,TWILIO_AUTH_TOKEN, andMY_PHONE_NUMBERvalues are retrieved using theconfigfunction from thedecouplemodule. These values should be stored in an environment file (e.g., .env file) to keep them secure.
- The
- Creating a Twilio client:
- The
account_sidandauth_tokenvariables are set using the values retrieved from the environment file. - The
Clientclass is instantiated with the Account SID and Auth Token, creating a client object for interacting with the Twilio API. - The
phone_numbervariable is set using the value retrieved from the environment file. This represents the phone number to which the WhatsApp message will be sent.
- The
- Defining the
send_scheduled_whatsappfunction:- This function sends a scheduled WhatsApp message using Twilio.
- The
send_whenvariable is set to the current time minus 2 hours plus 16 minutes. This determines the scheduled time for the message in the GMT timezone. I’ve subtracted 2 hours because I’m in the GMT+2 timezone, the timezone in which Twilio will send the message. You can adjust this according to your own timezone to set the scheduled time to be in the GMT timezone. Note that messages have to be scheduled at least 15 minutes in advance but not more than 7 days in advance. - The
messaging_service_sidvariable is set using the value retrieved from the environment file. This represents the messaging service SID for the Twilio project. - The
messagevariable is set by calling thecreatemethod on theclient.messagesobject. It creates a new message with the specified parameters: message body, recipient phone number, messaging service SID, scheduled send time, and schedule type. Note: Thesend_atparameter takes an ISO 8601 for the time format, which is converted with the following method:strftime('%Y-%m-%dT%H:%M:%SZ'). - The
printstatements display the message SID, as well as the message body and recipient phone number.
- Calling the
send_scheduled_whatsappfunction:- This line of code invokes the
send_scheduled_whatsappfunction, initiating the process of sending the scheduled WhatsApp message.
- This line of code invokes the
Ready to try this out?
Make sure you’ve set the MY_PHONE_NUMBER environment variable to your own phone number, and then run the Python script in the root directory of the project as follows:
You should see a code (the identifier of your message) printed to the terminal that starts with the letters SM and a follow-up print statement. If you see these print statements, then you know that the message was successfully scheduled.
Now you have to wait 16 minutes to receive this WhatsApp message on your phone! In the meantime, you can view the message in the Programmable Messaging Logs section of the Twilio Console, under which the message will show with its status set to “Scheduled” until the time of delivery.
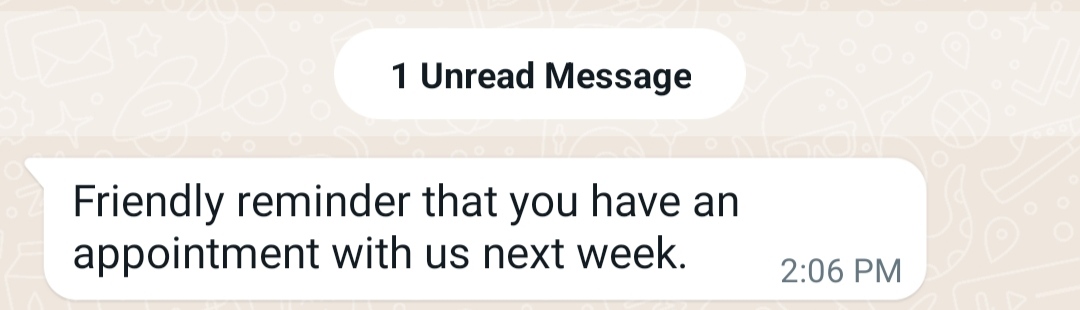
After 15 minutes, if your WhatsApp message has been sent, the state will change to "Delivered." The “whatsapp” followed by your Twilio phone number will also show up under the “TO” column.
And if you open your WhatsApp, you should see the scheduled message like the following:
What’s next?
Congratulations on learning how to use Python to send scheduled WhatsApp notifications. There are a number of places you can look to learn more about setting up SMS and WhatsApp messages:
- How to schedule a message (API documentation)
- How to cancel a scheduled message (API documentation)
- Message Scheduling Public Beta announcement
- Message Scheduling FAQs and Beta Limitations
Or if you want to take a look at how to send scheduled messages through a Node.js client, check out this Node.js tutorial.
Ezz is an AWS Certified Machine Learning Specialist and a Data Platform Engineer. He helps tech companies take developer experience to the next level through his technical blog posts. Check out his website for more.
Related Resources
Twilio Docs
From APIs to SDKs to sample apps
API reference documentation, SDKs, helper libraries, quickstarts, and tutorials for your language and platform.
Resource Center
The latest ebooks, industry reports, and webinars
Learn from customer engagement experts to improve your own communication.
Ahoy
Twilio's developer community hub
Best practices, code samples, and inspiration to build communications and digital engagement experiences.